There’s something undeniably exciting about transforming an underutilized basement into a fully functional, stylish space — and a basement kitchenette is the detail that takes it from “finished basement” to genuinely livable. Whether you’re creating an in-law suite, a guest retreat, a teen hangout, or a home bar area, the right kitchenette makes the space feel complete, intentional, and surprisingly luxurious. The good news? You don’t need a massive footprint or a massive budget to pull it off beautifully. Here are 25 basement kitchenette ideas worth saving — and every single one is packed with real, actionable inspiration.
Why Basement Kitchenettes Work So Well
A basement kitchenette hits a design sweet spot that full kitchens often miss: it’s compact by necessity, which forces smart, intentional choices. Every cabinet, every inch of counter, every fixture has to earn its place — and that constraint actually produces some of the most cohesive, visually striking interiors in home design right now.
The basement setting itself offers unique advantages. Lower light levels make moody, dramatic palettes shine where they’d feel heavy upstairs. The separation from the main living area gives designers — and homeowners — permission to experiment with bolder materials like matte black fixtures, concrete counters, or rich wood tones that might feel “too much” in a main kitchen.
Culturally, the basement kitchenette is having a genuine moment. Pinterest searches for “basement bar kitchenette” and “basement suite ideas” have surged alongside growing interest in multigenerational living, accessory dwelling units (ADUs), and home entertainment spaces. People want their basement to function, not just exist.
The best basement kitchenettes share a few traits: thoughtful lighting to compensate for limited windows, vertical storage to maximize a small footprint, and a cohesive material palette that ties the kitchenette visually to the surrounding lounge or living area.
1. Sleek Dark Moody Basement Kitchenette with Matte Black Fixtures
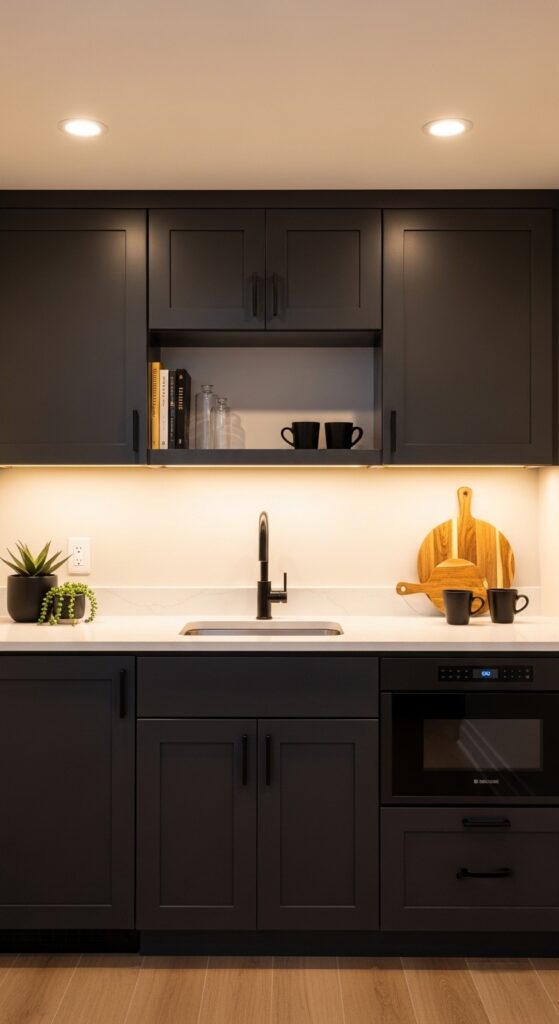
Vibe sentence: This is the kitchenette that makes guests stop and ask if you hired a designer.
What makes it work: Deep charcoal cabinetry reads as intentionally moody rather than dark because the white quartz countertop provides clean contrast. Matte black hardware unifies every element — faucet, pulls, open shelf brackets — into a deliberate, collected aesthetic rather than an afterthought.
How to achieve it: Choose flat-front Shaker or slab cabinet doors in a deep charcoal like Benjamin Moore’s “Wrought Iron” or Sherwin-Williams “Caviar.” Pair with a simple white quartz counter and install under-cabinet LED strip lighting to keep the space from reading as cave-like.
💡 Matte black spray-paint for existing cabinet hardware costs under $12 and instantly modernizes dated brass or chrome pulls.
2. White Shaker Cabinets with Butcher Block Counter
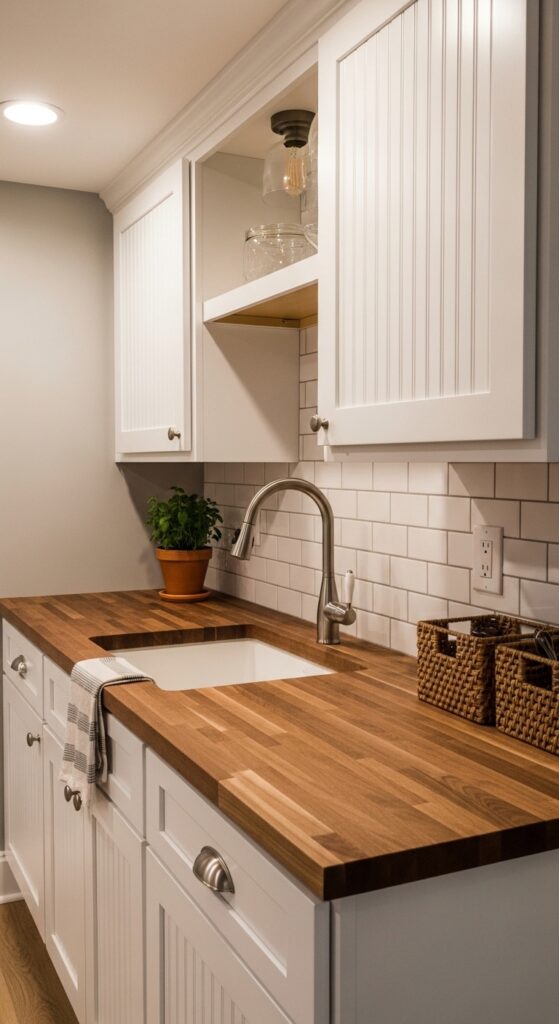
Vibe sentence: Warm, unpretentious, and the kind of kitchenette that makes even a quick snack feel like a small pleasure.
What makes it work: White Shaker cabinets are a timeless foundation precisely because they don’t compete — they let the butcher block’s natural warmth become the focal material. The wood grain introduces organic texture that softens an otherwise simple color palette beautifully.
How to achieve it: Source a pre-cut walnut or maple butcher block countertop from IKEA or Home Depot (starting around $150) and seal it with food-safe mineral oil. Pair with classic 3×6 white subway tile in a stacked bond or traditional brick pattern for a backsplash that feels intentional without being trendy.
3. Open Floating Shelves with Industrial Pipe Brackets
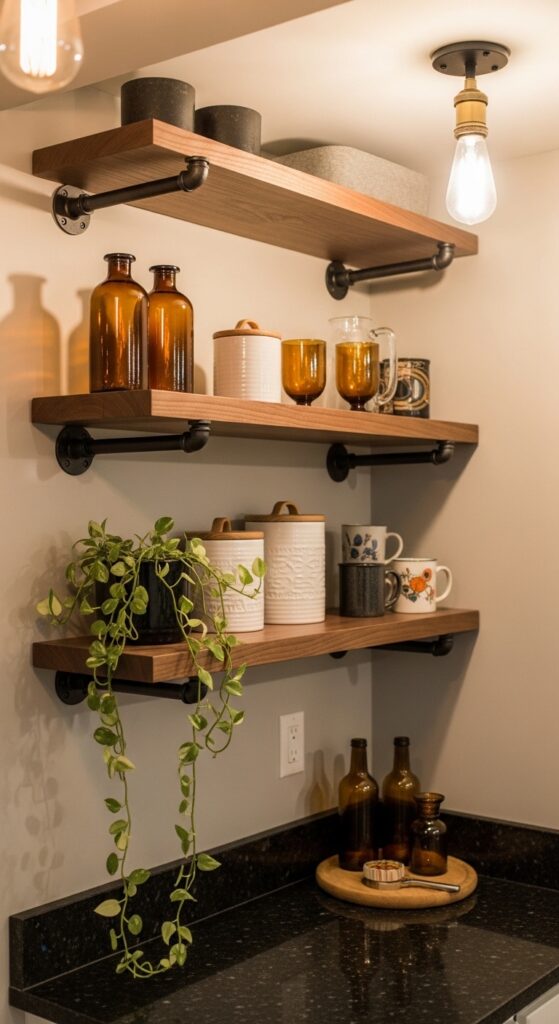
Vibe sentence: Open shelving in a basement kitchenette is equal parts practical storage and curated display — and the industrial hardware makes it look like it belongs in a boutique hotel lounge.
What makes it work: The visual weight of black iron pipe brackets grounds the shelves without bulky upper cabinets that would make a basement feel more closed-in. Styling the shelves with a mix of functional items (mugs, canisters) and decorative ones (trailing plants, amber glass) creates a lived-in, layered look.
How to achieve it: Install 1.5-inch iron pipe flanges and nipples from a hardware store to create custom brackets. Mount 1.5-inch thick walnut or oak boards (pre-cut at most lumber yards) for shelves. Keep items grouped in odd numbers and vary heights to avoid a flat, uniform display.
💡 IKEA’s LAUTERS or BERGSHULT floating shelves with aftermarket black brackets mimic this look for under $60 total.
4. Mini Bar Kitchenette with Wine Fridge and Glass Front Cabinets
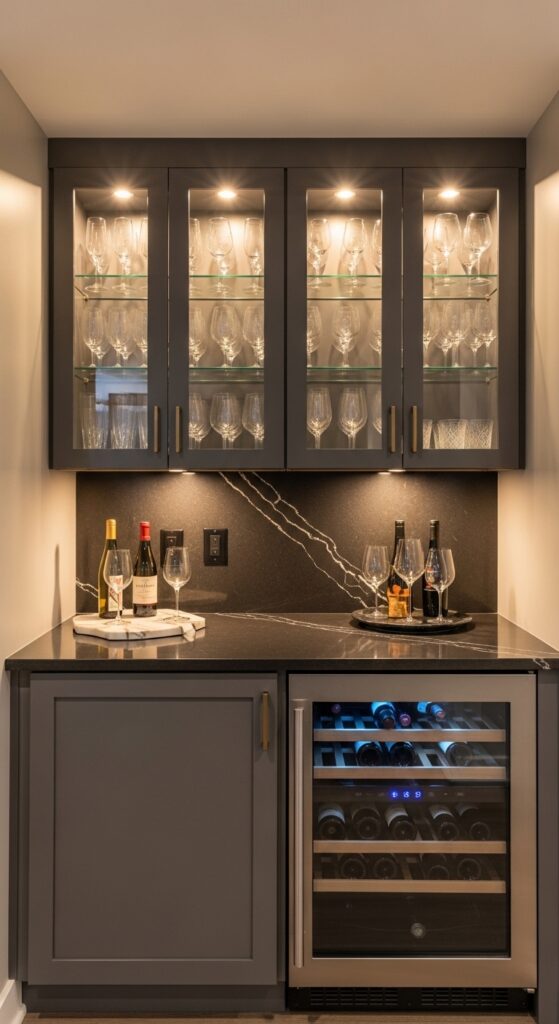
Vibe sentence: This is the basement kitchenette that transforms entertaining from casual to genuinely impressive.
What makes it work: Glass-front cabinets lit from within turn stored glassware into decor — guests see a warm, glowing display rather than closed cabinet doors. The wine fridge integrated flush with the cabinetry creates a built-in look that feels high-end even in a budget-conscious build.
How to achieve it: Retrofit existing cabinet doors by cutting a panel opening and inserting glass inserts (available at glass shops for $20–$50 per panel). Add battery-operated or hardwired LED puck lights inside. A freestanding 24-bottle wine fridge from brands like Frigidaire or Kalamera runs $150–$300 and slides under a standard counter.
5. Sage Green Cabinets with Unlacquered Brass Hardware
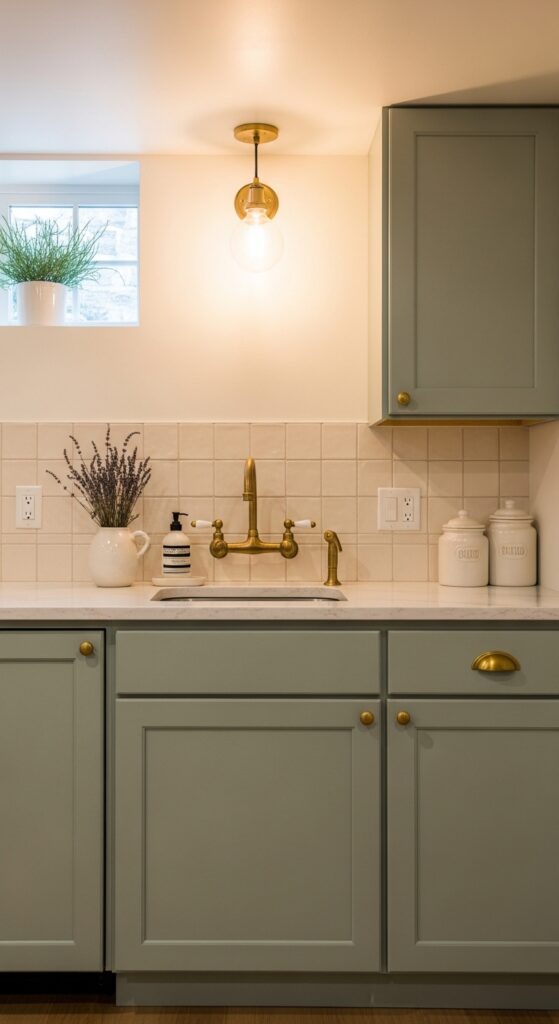
Vibe sentence: Sage green has a quiet confidence that makes a tiny kitchenette feel like the most considered space in the home.
What makes it work: The combination of muted sage green and unlacquered brass hits a sweet spot between vintage charm and contemporary sophistication. Unlike polished brass, unlacquered brass develops a natural patina over time, which only deepens the character of this palette.
How to achieve it: Paint cabinets with Farrow & Ball “Mizzle,” Benjamin Moore “Rosemary,” or Sherwin-Williams “Privilege Green” — all hit that ideal sage tone. Unlacquered brass hardware from sources like Rejuvenation or Etsy sellers typically runs $8–$25 per pull.
💡 Cabinet paint transformations cost as little as $80 in paint and primer — one of the highest ROI updates in any kitchenette.
6. Concrete Counter with Raw Wood Lower Cabinets
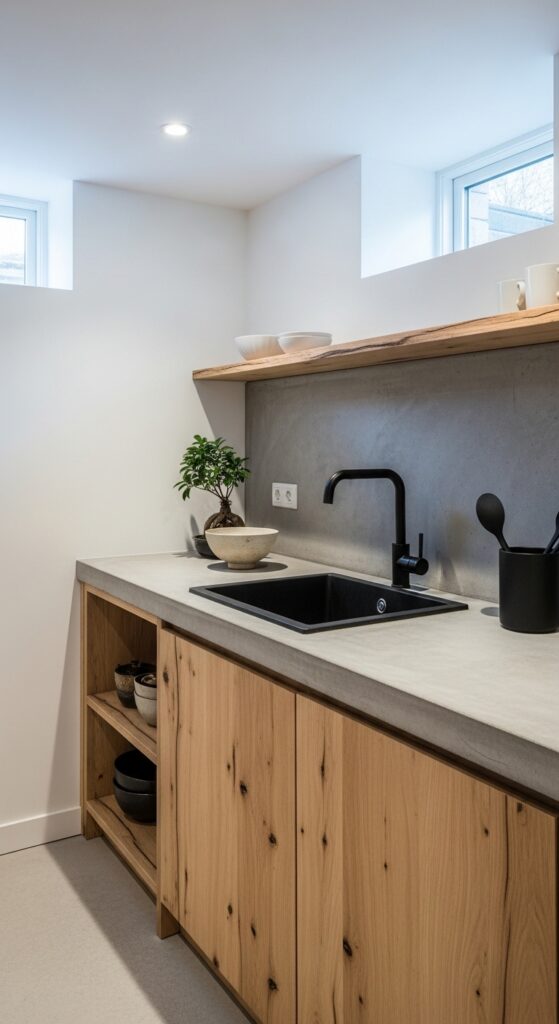
Vibe sentence: This combination feels like a contemporary art installation that also happens to make coffee perfectly.
What makes it work: Concrete and raw oak share a quality of honest materiality — both show their natural character rather than pretending to be something else. Together, they create a Japandi-adjacent aesthetic where restraint is the luxury.
How to achieve it: DIY concrete countertops using Ardex Feather Finish (a thin skim coat over plywood) can achieve the look for under $100. Pair with slab-front cabinet doors in natural oak veneer — IKEA’s ASKERSUND door fronts are an affordable option.
7. Two-Tone Cabinetry with Dark Lowers and White Uppers
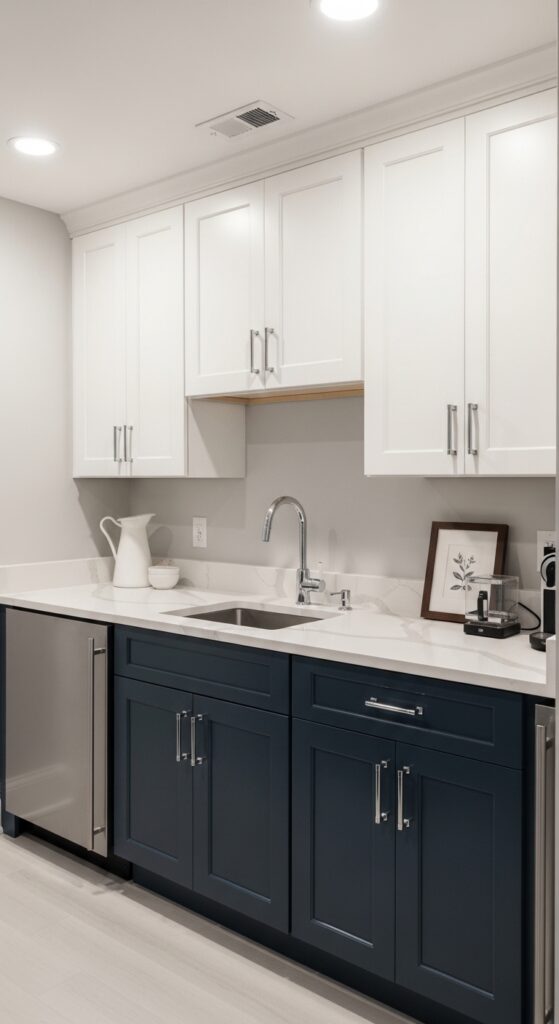
Vibe sentence: Two-tone cabinetry is the designer trick that makes a small kitchenette look twice its size while adding serious visual interest.
What makes it work: Dark lowers visually anchor the space to the floor — grounding it — while white uppers draw the eye upward and reflect light. This contrast creates the illusion of more vertical space, which is particularly valuable in a basement where ceiling heights may be limited.
How to achieve it: Navy lower cabinets in Benjamin Moore “Hale Navy” or Sherwin-Williams “Naval” are classic choices that won’t date quickly. Keep upper cabinets in a warm white (not stark bright white) to soften the contrast. Chrome bar pulls tie both tones together cleanly.
8. Penny Tile Backsplash with Vintage Character
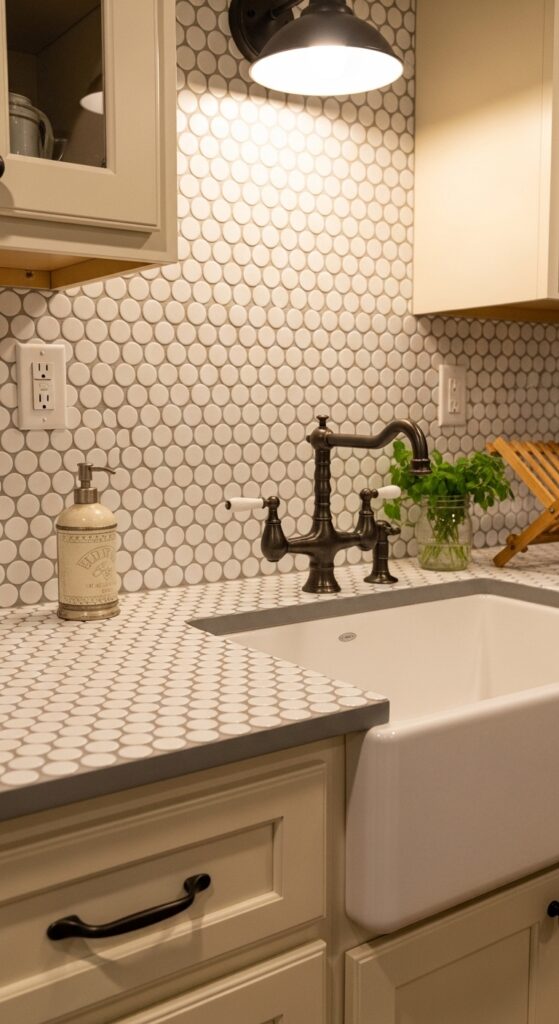
Vibe sentence: Penny tile has a handcrafted charm that makes modern kitchenettes feel like they have a hundred years of good stories behind them.
What makes it work: The circular pattern of penny tile creates an almost mosaic-like texture that flat subway tile simply can’t replicate. Dark gray grout (rather than matching white) is the key — it highlights the tile geometry and gives the surface depth and visual weight.
How to achieve it: Sheet-mounted penny tile is surprisingly DIY-friendly; the mesh backing keeps spacing consistent. Use unsanded grout in a warm medium gray like Mapei “Pewter” for the most flattering contrast. Extend the tile to the ceiling in a small kitchenette to create a dramatic, boutique-bathroom-adjacent effect.
💡 Penny tile sheets run $4–$8 per square foot — a full backsplash in a compact kitchenette typically costs $80–$150 in tile alone.
9. Murphy Bed + Kitchenette Wall Unit Combo
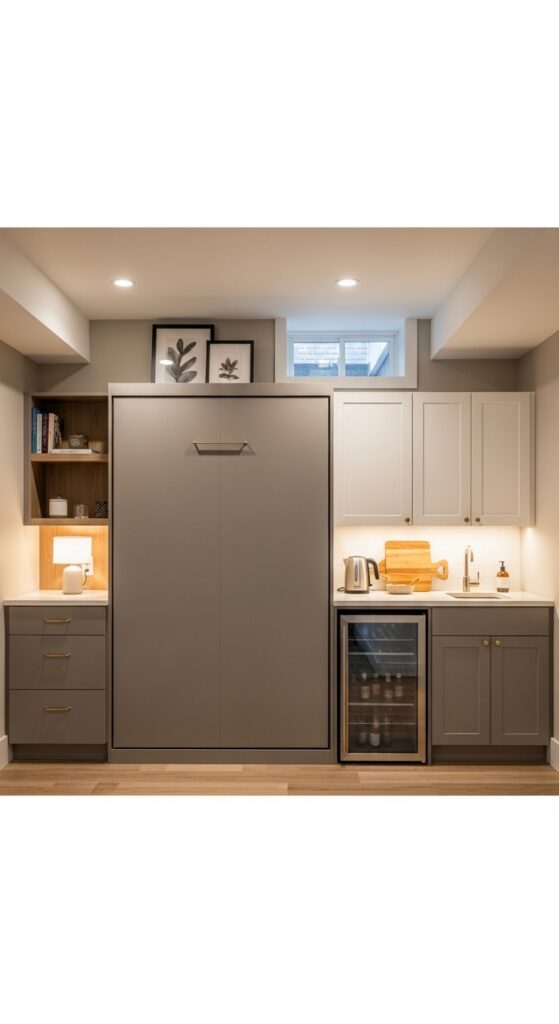
Vibe sentence: When space is the constraint, ingenuity becomes the design feature — and this combination is peak basement-suite intelligence.
What makes it work: Aligning the Murphy bed and kitchenette within a single continuous wall unit creates the illusion of purposeful, architect-designed built-ins rather than separate pieces. Matching cabinet finishes across both the sleeping and kitchenette zones unifies the visual language of the entire space.
How to achieve it: Murphy bed wall unit systems from companies like Resource Furniture or IKEA Hack builds (PAX wardrobe + murphy bed mechanism) can be designed to incorporate an adjacent kitchenette counter run. Plan the plumbing rough-in before any wall unit installation.
10. Subway Tile to Ceiling Feature Wall
Vibe sentence: Taking tile all the way to the ceiling is an architectural commitment that pays off every single time in a small space.
What makes it work: Floor-to-ceiling tile eliminates the visual “stop point” that half-height backsplashes create, making walls read as taller and the space feel more expansive. In a basement where height may already feel compressed, this vertical emphasis is especially valuable.
How to achieve it: A stacked (straight) tile pattern rather than offset brick bond emphasizes verticality most strongly. Use a medium warm gray grout rather than bright white — it defines each tile without creating a stark grid pattern. Keep the rest of the space neutral to let the tile wall be the statement.
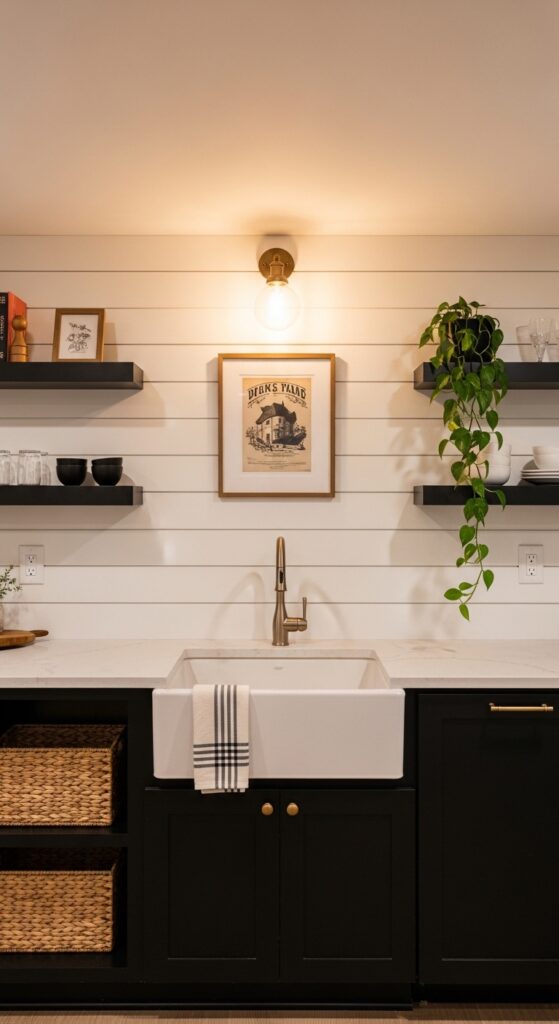
11. Farmhouse Sink in a Compact Basement Kitchenette
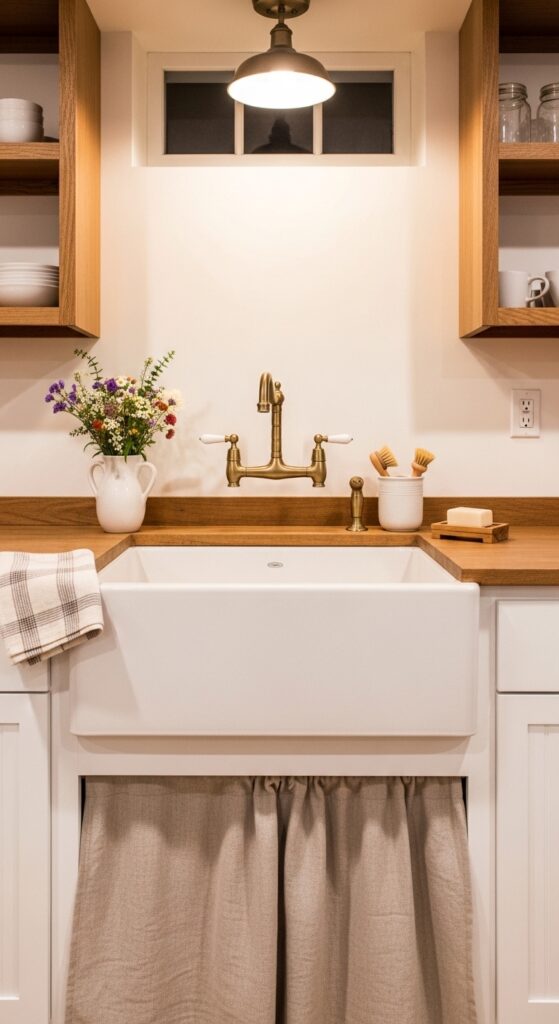
Vibe sentence: Even in a basement, a farmhouse sink makes everything feel like Sunday morning.
What makes it work: The apron-front profile of a farmhouse sink is inherently decorative — it’s a design statement that single-bowl undermount sinks simply cannot replicate. The exposed base (finished with a simple linen curtain) adds softness and reinforces the unfussy, cottage-style character.
How to achieve it: Fireclay apron sinks (the authentic material choice) start around $300 from brands like Kohler or Rohl, but cast-iron fireclay-look sinks from Amazon run $150–$200 and perform comparably in a low-traffic basement kitchenette. Always pair with a bridge faucet — the silhouette is essential to the look.
💡 A tension-rod with a linen panel below an open-base farmhouse sink costs under $25 and is infinitely easier than building cabinet doors.
12. Warm Walnut Cabinetry with Terracotta Accents
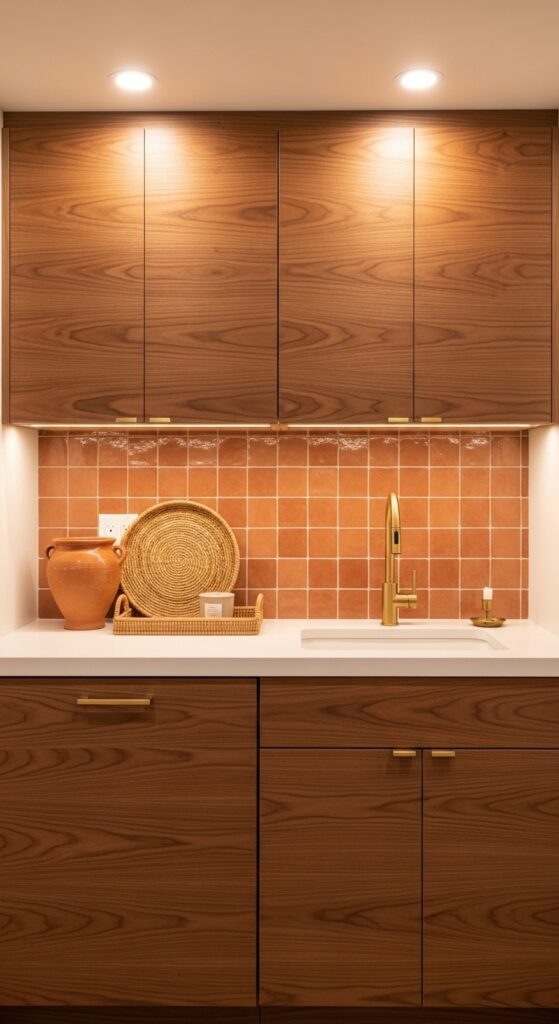
Vibe sentence: This palette feels like the south of France filtered through a Pinterest board — earthy, warm, and effortlessly stylish.
What makes it work: Walnut and terracotta share the same warm undertone frequency, which is why they work together so organically. The brushed gold hardware bridges both materials — picking up the warmth of the walnut while complementing the reddish-clay hues of terracotta tile.
How to achieve it: Source handmade terracotta-look tile from tile brands like Clé or Fireclay Tile — or affordable versions from Wayfair or BuildDirect starting around $3 per square foot. Use IKEA’s JUTIS or similar flat-front doors in a wood tone for cabinet fronts without custom pricing.
13. Black-and-White Checkered Floor Tile Kitchenette
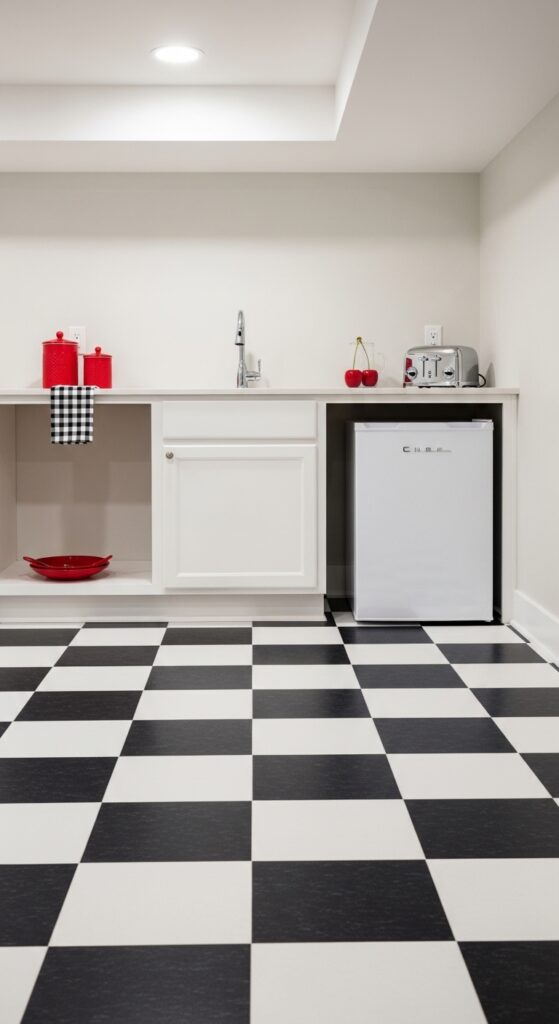
Vibe sentence: There’s a reason the checkerboard floor never truly goes out of style — it’s bold, graphic, and impossible not to love.
What makes it work: A black-and-white floor tile is a single installation that provides the entire personality of the room, which means the rest of the kitchenette can stay simple and it still reads as designed. The diagonal installation of the checker pattern maximizes the visual impact and makes the space feel larger than a straight grid would.
How to achieve it: Peel-and-stick vinyl checkerboard tile (available from Wayfair and Amazon in 12×12 inch tiles) is a renter-friendly, entirely DIY option starting at $1–$2 per tile. Install diagonally at 45 degrees for the most classic look. Keep cabinets and walls neutral to let the floor be the star.
14. Under-Stair Basement Kitchenette Build-Out
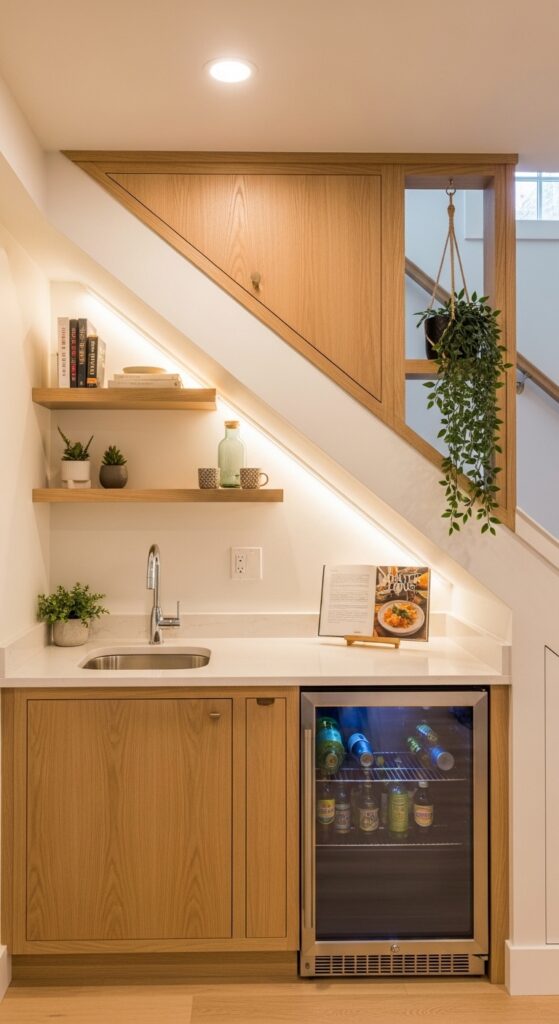
Vibe sentence: The under-stair kitchenette is a design move that turns a structural inevitability into the cleverest feature in the basement.
What makes it work: Using the triangular dead space beneath stairs requires custom cabinetry at the tall end that decreases in height as it follows the stair slope — and that angled geometry becomes an architectural detail rather than a compromise. LED strip lighting tucked under the stair soffit illuminates the work surface beautifully.
How to achieve it: Hire a carpenter for the angled cabinetry, but reduce costs by using stock cabinet boxes and custom-cutting the top frame only. Plan the rough plumbing before framing begins — moving it later is the single biggest cost in under-stair builds.
15. Scandi-Minimalist White and Light Wood Kitchenette
Vibe sentence: Scandi minimalism in a basement kitchenette feels like a deep exhale — simple, intentional, and quietly beautiful.
What makes it work: The Scandinavian approach to small kitchenettes relies on seamlessness: cabinets, counters, and walls share a white-to-light-wood palette that reads as unified rather than busy. Touch-to-open cabinet mechanisms (eliminating hardware entirely) maximize that seamless quality.
How to achieve it: IKEA’s AXSTAD or RINGHULT cabinet fronts in white, combined with a light birch butcher block counter sealed with a matte finish, deliver authentic Scandi style at accessible prices. Avoid warm-white bulbs — opt for 2700K to 3000K LED bulbs to complement the cool, clean palette.
💡 Touch-to-open cabinet hardware (push-to-open clips) runs $2–$5 per door and completely transforms the look of IKEA or stock cabinets.
16. Floating Counter Kitchenette for Tight Basement Spaces
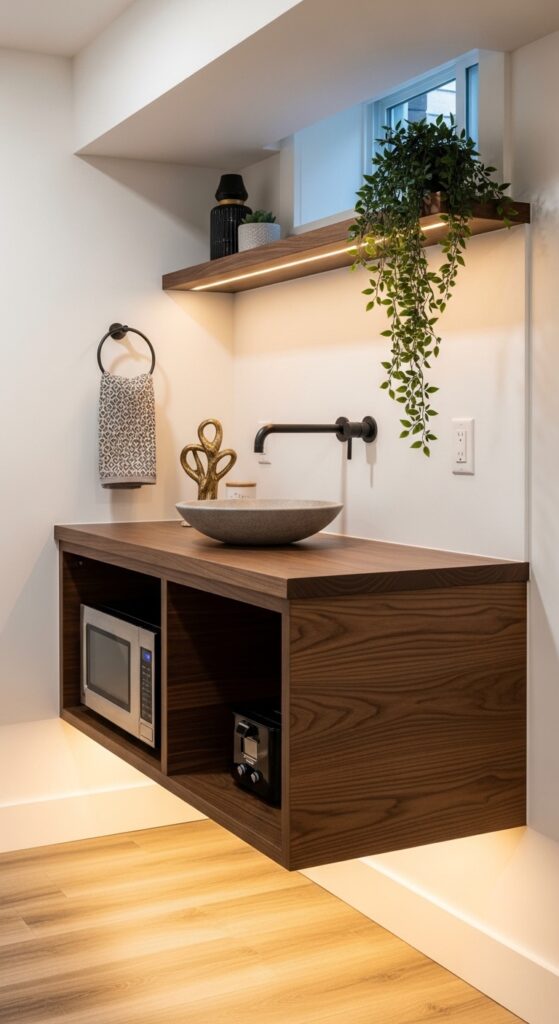
Vibe sentence: When there’s nowhere to go out, you go up — and a wall-mounted floating counter is the ultimate space-forward solution.
What makes it work: Removing the base cabinet entirely and floating the countertop from the wall creates visual breathing room that makes even a very narrow kitchenette feel open. The floor visible beneath the counter reads as continuous, extending the perceived floor area.
How to achieve it: A floating counter requires a wall-mounted faucet (rough plumbing inside the wall) and a counter supported by wall-mounted brackets or a floating shelf system rated for countertop weight. Consult a plumber for the wall faucet rough-in — the counter installation itself is DIY-able.
17. Colorful Maximalist Kitchenette with Pattern Tile
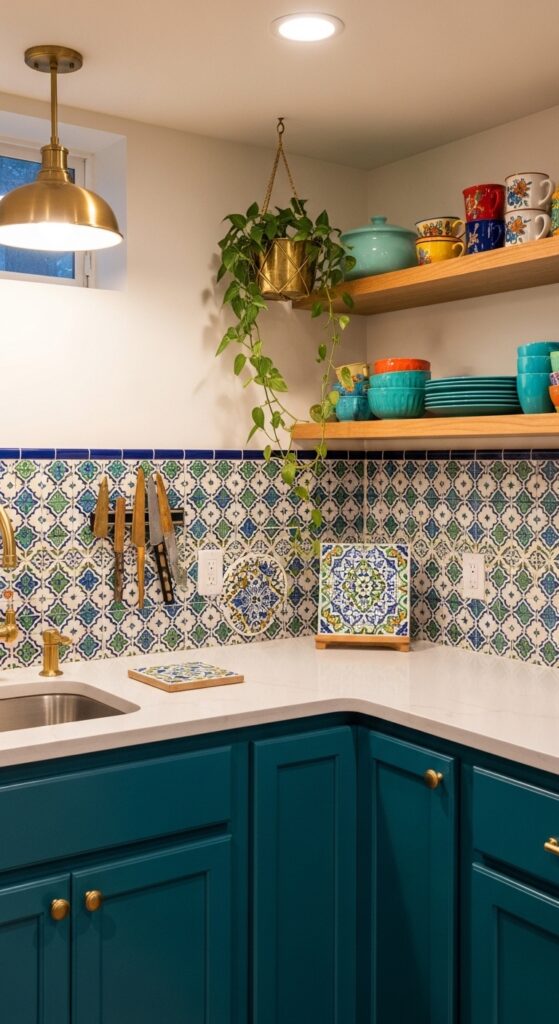
Vibe sentence: This is the basement kitchenette that proves small doesn’t have to mean quiet.
What makes it work: Pattern tile does the heavy lifting here — one tile choice delivers color, pattern, and personality simultaneously without requiring multiple competing elements. The key is restraining everything else: keep cabinet colors pulled from the tile palette and leave walls neutral so the tile can breathe.
How to achieve it: Moroccan cement tiles or Spanish-style porcelain pattern tiles are available from Wayfair, Overstock, or Etsy shops starting at $5–$12 per square foot. Restrict pattern tile to the backsplash only — repeating it on the floor creates visual overload in a small space.
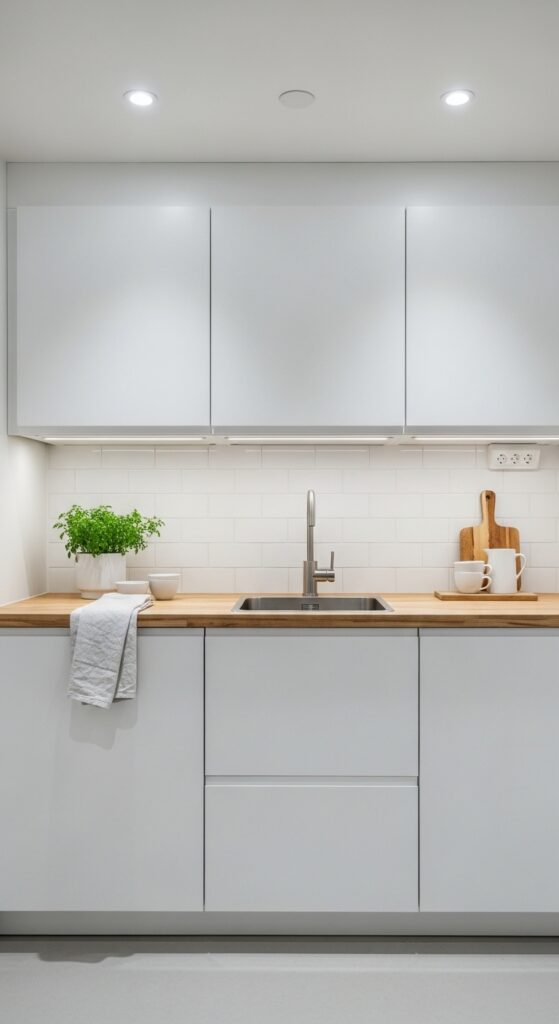
18. All-White Clean Slate Basement Kitchenette
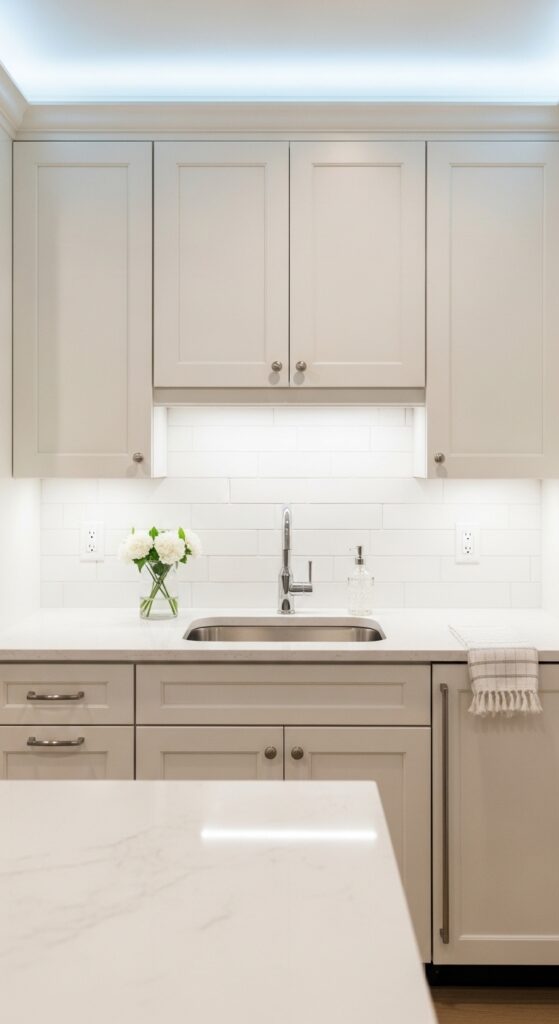
Vibe sentence: An all-white kitchenette is a lesson in restraint — and when done right, it’s the most sophisticated thing in the basement.
What makes it work: The sophistication in an all-white palette comes from variation within white: warm white cabinets against a cooler white quartz, an off-white subway tile against crisp cabinet faces. These subtle tonal differences create depth that prevents the space from reading as flat or sterile.
How to achieve it: Choose whites intentionally — Benjamin Moore “White Dove” for cabinets (warm), Cambria Quartz “Torquay” for counters (cool white), and white subway tile in a classic 3×6 offset pattern. The mix of warm and cool whites in the same family creates sophistication without any color.
19. Built-In Mini Fridge and Microwave Column
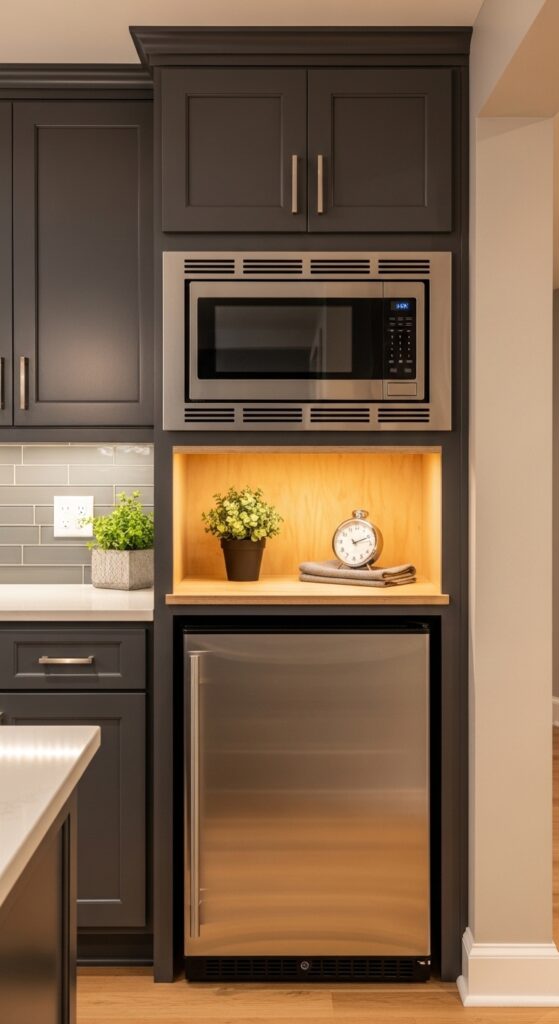
Vibe sentence: A built-in appliance column transforms a collection of appliances into an architectural feature.
What makes it work: Housing the microwave and mini fridge within a continuous cabinetry column eliminates the cluttered, “appliances added as an afterthought” appearance. Trim filler panels between the appliances and surrounding cabinets — even if they’re just painted plywood strips — complete the built-in illusion.
How to achieve it: Measure your microwave and mini fridge precisely before designing the column. Build the surrounding cabinet box from MDF or plywood and finish to match existing cabinetry. Trim panels (available from cabinet manufacturers or cut from matching finish board) bridge any gaps cleanly.
💡 A $15 trim kit from the microwave manufacturer often includes all the filler panels needed for a seamless built-in look.
20. Basement Kitchenette with Shiplap Accent Wall
Vibe sentence: Shiplap behind a kitchenette brings texture, warmth, and a coastal-farmhouse energy that drywall simply can’t replicate.
What makes it work: The horizontal lines of shiplap draw the eye along the wall, creating a sense of width that’s particularly flattering in narrow basement kitchenette spaces. Painting it in warm white and contrasting with matte black cabinetry creates a modern farmhouse palette that feels current without being trendy.
How to achieve it: True shiplap lumber is available at lumber yards; alternatively, groove-cut MDF boards or even peel-and-stick shiplap panels (starting at $1.50/sq ft) deliver the shadow-gap look with significantly easier installation. Paint in a flat or matte finish rather than eggshell to maintain the rustic texture.
21. Herringbone Tile Floor in a Basement Kitchenette
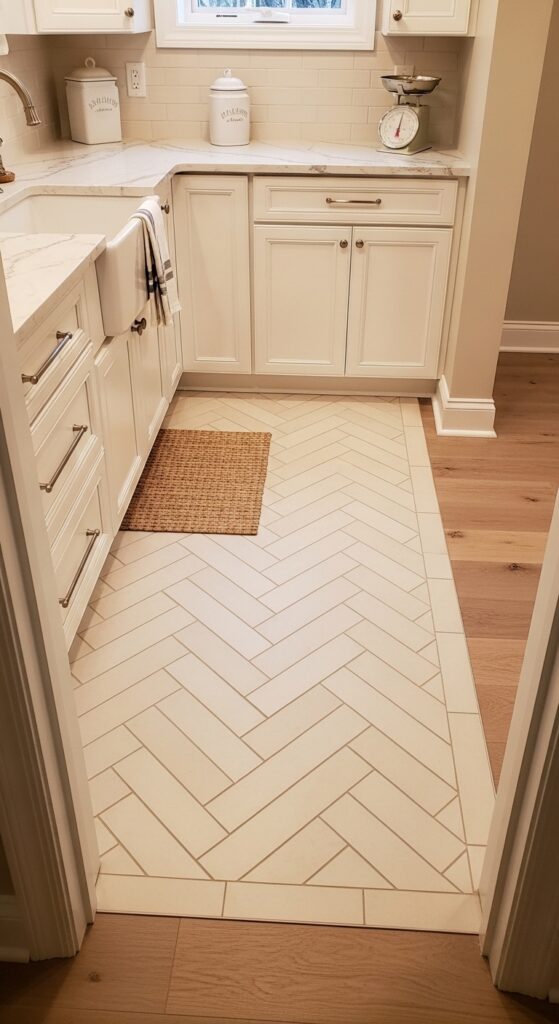
Vibe sentence: Herringbone tile underfoot gives even the most compact basement kitchenette a foundation of quiet elegance.
What makes it work: The herringbone pattern’s zigzag geometry draws the eye through the space rather than across it, creating an optical lengthening effect. In a cream-on-cream colorway with a light grout, the pattern reads as sophisticated texture rather than bold statement — adding interest without competing with other elements.
How to achieve it: Choose 2×8 inch or 3×12 inch tiles for herringbone — proportions narrower than standard square tiles emphasize the pattern most effectively. A professional tile installer will achieve cleaner results on herringbone than most DIY attempts, given the precision required at cuts and edges.
💡 Porcelain look-alike “wood plank” tiles in herringbone pattern (4×24 inch) are trending on Pinterest and cost $2–$4 per square foot at Home Depot.
22. Copper Accents and Warm Brick Kitchenette
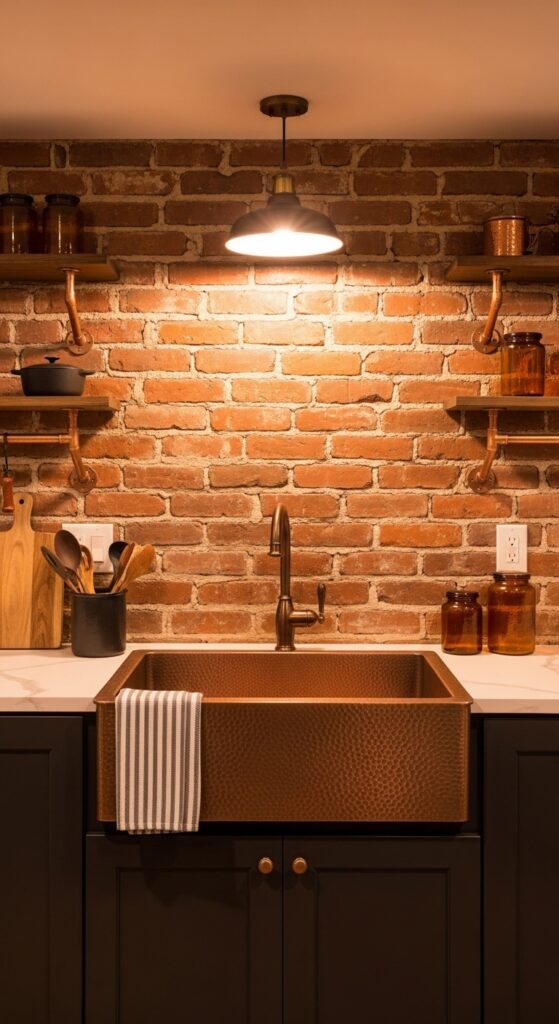
Vibe sentence: An exposed brick wall in a basement kitchenette is the architectural gift that requires zero decorating — it is the decoration.
What makes it work: Brick’s inherent warmth, texture, and depth make it a perfect anchor for a kitchenette aesthetic that leans rustic or industrial. Copper is the ideal metallic companion — its warm reddish tone rhymes visually with the brick’s red and orange undertones rather than fighting them.
How to achieve it: If real brick isn’t exposed, thin brick veneer panels (available from brands like Old Mill Brick for $5–$9 per square foot) adhere directly to drywall and are indistinguishable from real brick at normal viewing distance. Seal brick or veneer with a water-based matte sealer to protect from kitchen moisture.
23. Mirrored Backsplash to Reflect Light in a Dark Basement
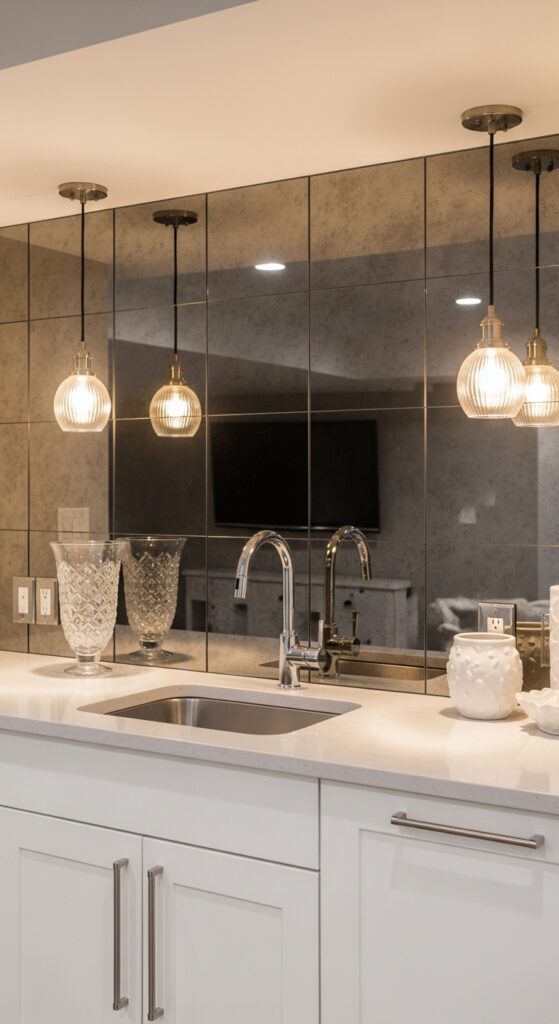
Vibe sentence: In a basement where natural light is scarce, a mirrored backsplash doesn’t just solve a problem — it turns the limitation into a glamorous design feature.
What makes it work: Mirror tile doubles the apparent depth of a wall and multiplies whatever light is present — pendant reflections, under-cabinet LEDs, and even ambient overhead lighting all become more dynamic and layered. Antiqued or smoked mirror avoids the clinical feel of plain mirror while still delivering the light-amplifying effect.
How to achieve it: Antiqued mirror tiles are available from specialty tile retailers and on Etsy in various sizes; standard 4×4 or 4×12 inch formats are easiest to install. Install with mirror mastic adhesive (never standard tile adhesive, which can cloud the backing) and use mirror-edge clips or thin grout lines for a finished look.
24. Galley-Style Basement Kitchenette for Narrow Spaces
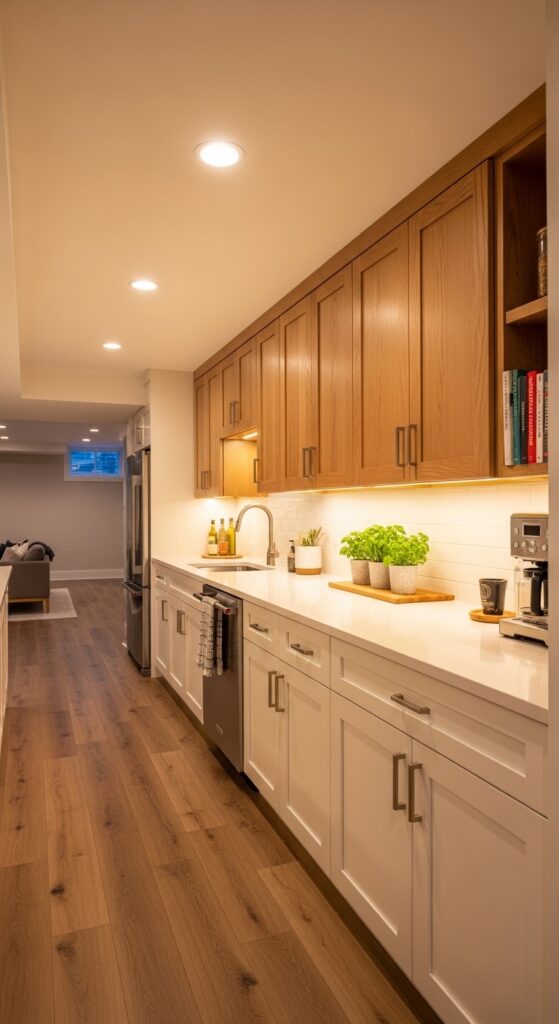
Vibe sentence: The galley layout is the most efficient floor plan in kitchen design — and in a basement corridor, it becomes a natural fit.
What makes it work: Single-wall galley layouts work especially well in basements where a dedicated “kitchen room” isn’t the goal — they allow the kitchenette to function as a service zone along one wall while the main basement space remains open. Continuous countertop without breaks maximizes prep surface and visual cleanliness.
How to achieve it: Plan the galley kitchenette along the longest unobstructed wall in the basement. Allow a minimum 42-inch clearance in front of the counter for comfortable use. Under-cabinet LED lighting is critical in a one-wall layout — the counter is against the wall, making overhead lighting alone insufficient.
25. Moody Jewel-Tone Kitchenette with Velvet and Brass

Vibe sentence: This is the basement kitchenette that makes you pour a drink just so you have an excuse to linger in it.
What makes it work: Deep jewel tones like forest green read as luxurious rather than dark when paired with warm brass and honed marble — the combination is rich without being heavy. Lacquered cabinet finishes reflect light in a way that matte finishes don’t, keeping the deep green from absorbing too much of the basement’s limited illumination.
How to achieve it: Lacquered or high-gloss paint finishes require excellent surface prep and often a professional spray finish for a truly smooth result. Benjamin Moore “Tarrytown Green” or Farrow & Ball “Calke Green” hit the ideal deep forest tone. Pair with unlacquered or aged brass hardware sourced from Anthropologie, Etsy, or specialty hardware brands.
How to Start Your Basement Kitchenette Transformation
The most common mistake homeowners make with a basement kitchenette is trying to do everything at once. Start with one decision that drives all the others: your cabinet color. Whether you choose deep charcoal, sage green, or crisp white, that choice will determine your hardware finish, counter material, and backsplash direction. Make the cabinet decision first, then build outward.
Before purchasing anything, rough-in the plumbing and electrical. Moving a drain line or adding a 20-amp circuit after cabinets are installed is both expensive and disruptive. Work with a licensed plumber and electrician at the framing stage — it’s a small cost that prevents large headaches.
For budget-conscious builds, prioritize splurging on the sink and faucet (they’re handled daily and quality shows) and save on upper cabinet boxes, which can be painted stock units. The backsplash is your highest-value design investment per square foot — a beautiful tile there elevates the entire kitchenette.
Realistic timeline for a DIY basement kitchenette from scratch: 3–6 weeks including rough-in, cabinet installation, countertop templating (usually a 7–10 day turnaround for quartz), and finish work. Budget $3,000–$8,000 for a full build depending on material choices.
Frequently Asked Questions
What is the minimum size for a basement kitchenette?
A functional basement kitchenette can fit in as little as 5 feet of linear wall space, enough for a small sink, a section of counter, and under-counter appliances like a mini fridge or microwave. For a more comfortable configuration with upper storage, plan for 6–8 linear feet. The critical measurement is the 42-inch clearance in front of the counter — this is non-negotiable for comfortable daily use and meets most building codes for kitchen corridors.
Do I need a permit for a basement kitchenette?
In most U.S. jurisdictions, yes — any plumbing work (adding a drain and supply line) and electrical work (adding circuits) requires permits. The permit threshold varies by location; some areas specifically regulate the addition of a second kitchen (which can affect zoning for rental purposes). Contact your local building department before beginning work. Unpermitted plumbing and electrical work creates complications during home sales and can void homeowner’s insurance in the event of a related incident.
What’s the best countertop material for a basement kitchenette?
Quartz is the top choice for basement kitchenettes for three reasons: it’s non-porous (resisting moisture, which is more prevalent in below-grade spaces), extremely durable, and available in a huge range of colors from $50–$100 per square foot installed. Butcher block is a warm, affordable alternative (starting around $30 per square foot installed) but requires regular oiling and should be avoided in basements with humidity issues. Laminate countertops have improved dramatically in quality and are the best budget option at $15–$40 per square foot installed.
How do I make a basement kitchenette feel less like a cave?
Lighting is the single most impactful tool. Layer three types: recessed overhead lighting for general illumination (choose 3000K LED bulbs for warmth), under-cabinet LED strips for task lighting on the counter, and at least one pendant or decorative fixture for visual interest and warmth. For surfaces, use light reflective materials: gloss or satin cabinet finishes, a mirrored or light tile backsplash, and a light-toned countertop. Avoid flat dark finishes on all surfaces at once — contrast is key to keeping a basement kitchenette from feeling heavy.
Can I put a full-size refrigerator in a basement kitchenette?
Yes, a full-size refrigerator is technically possible if your space and ceiling height accommodate it, but a counter-depth or apartment-sized refrigerator (typically 24 inches deep vs. standard 30 inches) is usually better suited to the compact footprint of a kitchenette. Counter-depth models from brands like Samsung, Bosch, and LG start around $800–$1,200 and integrate beautifully with standard cabinetry depth. For wine and beverage storage, a dedicated under-counter wine fridge (starting around $150–$300) is more space-efficient than a full-size unit.
Ready to Create Your Dream Basement Kitchenette?
You now have 25 specific, actionable basement kitchenette ideas spanning every style, budget, and basement layout — from the moody jewel-tone maximalist to the quietly beautiful Scandi-minimalist. The beauty of a basement kitchenette is that it rewards intentional choices: every material, every fixture, every tile decision matters more when the scale is compact.
Save your favorites to a Pinterest board and look for patterns — your instinctive saves will reveal your design direction faster than any style quiz. Then start small: a paint color decision, a hardware swap, a backsplash sample order. The most remarkable basement kitchenettes weren’t built in a day, but they all started with one good decision. Yours is waiting.