A staircase is one of the most architecturally significant interior elements in a home — a functional structure that also serves as a vertical design statement visible from multiple rooms and levels. This article gives you 29 specific, actionable staircase ideas spanning railings, treads, risers, walls, lighting, and layout to help you transform how your staircase looks, feels, and functions.
Think of the staircase as the spine of your home’s interior story. It’s the one element you pass multiple times a day, the backdrop for every family photo, the first thing a guest sees from the front door. When it’s considered — truly designed rather than defaulted — it changes the entire register of the home around it. Here are 29 ideas worth saving — and stealing.
Why Staircase Design Works So Well as a Style Transformation
Staircase design as a deliberate interior discipline draws from both architectural and furniture-making traditions. The great Georgian and Victorian staircases were crafted by joiners who treated each baluster as a turned column, each newel post as a piece of freestanding sculpture. Contemporary staircase design pulls from mid-century Scandinavian minimalism (open risers, unfinished oak treads), Japanese joinery principles (concealed hardware, clean material honesty), and the industrial loft aesthetic (powder-coated steel cable railings, exposed concrete). What distinguishes a transformed staircase from a renovated one is that the design choice reflects a philosophy, not just a preference.
The material palette of elevated staircase design is precise: white oak and walnut dominate contemporary treads for their grain clarity and staining versatility. Wrought iron and powder-coated steel handle balusters and handrails in traditional and transitional settings. Cable railing systems use 1×19 stainless steel wire tensioned between posts. Risers see painted MDF, shiplap, wallpaper, tile, and even upholstered fabric. Paint colors that define staircase transformations include Farrow & Ball Railings (No. 31) for black handrails, Benjamin Moore Simply White (OC-17) for crisp risers, and Sherwin-Williams Accessible Beige (SW 7036) for warm-toned wall treatments alongside the stair.
Staircase renovation is trending for a specific reason rooted in the home-design culture shift of the past several years: as open-plan living gave way to a renewed appreciation for defined rooms and vertical space, the staircase — long treated as a transitional afterthought — re-emerged as a primary design canvas. Social media accelerated this by making staircase makeovers among the most-shared home transformation content online. A repainted balustrade or wallpapered riser wall takes a weekend and photographs dramatically — the transformation-to-effort ratio is hard to beat anywhere else in the home.
Even small or tightly configured staircases — a straight run in a narrow hallway, a steep cottage stair — respond well to design attention. The priority for compact stairs is the vertical wall beside the run, which offers proportionally more surface area relative to the stair width than a grand open staircase. One bold wallpaper choice or a gallery wall tightly curated alongside a narrow stair can register as a deliberate design move regardless of the stair’s footprint.
| Element | Core Trait 1 | Core Trait 2 |
| Philosophy | Vertical design intentionality | Structure as sculpture |
| Materials | White oak, walnut, wrought iron, steel cable | MDF risers, shiplap, wallpaper, tile |
| Color palette | Railings black, Simply White, warm greige | Warm charcoal, dusty sage, deep navy |
29 Staircase Ideas
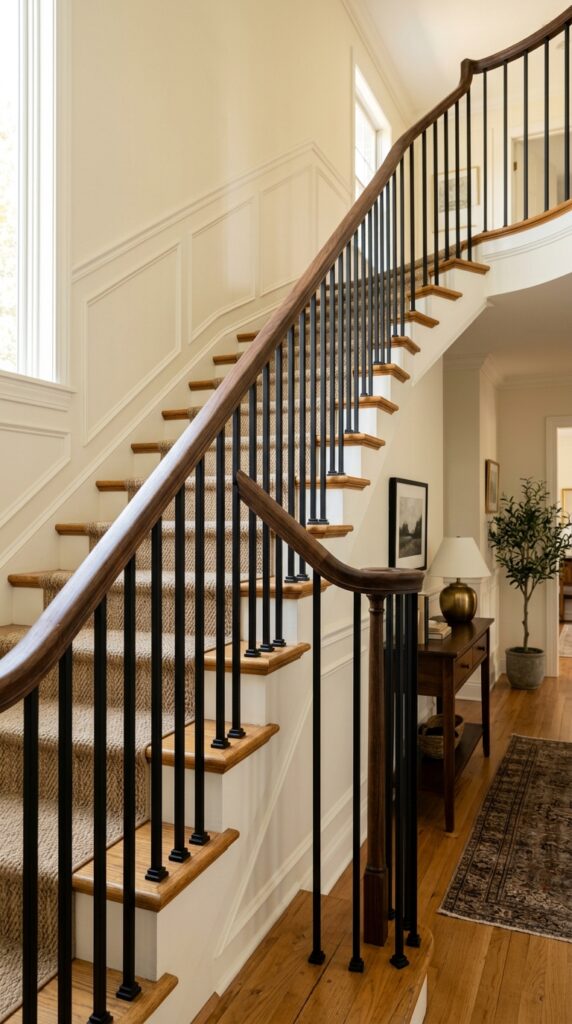
1. Painted Black Handrail Against White Balusters
Vibe: Crisp and confident — a staircase that knows the difference between decoration and design.
Why it works: The black-and-white handrail-baluster contrast applies the design principle of tonal separation: by painting the handrail and newel post black while keeping balusters white, the horizontal and vertical members of the railing system read as distinct architectural elements rather than a single undifferentiated mass. This technique was standard practice in Georgian interiors, where handrails were always a darker tone than the balustrade below. Farrow & Ball Railings (No. 31) — a near-black with a subtle blue undertone — is the most commonly specified choice because it reads as true black in daylight and warm charcoal in evening light.
How to get it: Use a high-gloss finish on the handrail specifically — gloss on a horizontal surface that receives constant hand contact is more durable and easier to wipe clean than eggshell or satin. Apply the black to the newel post caps as well, tying the anchors of the railing run into the color and preventing the black from reading as an isolated line.
💡 Quick Win: Painting only the handrail — not the balusters — is a half-day project with a small brush and painter’s tape. This single change costs under $30 in paint and transforms the entire staircase’s design register without touching the balusters, treads, or risers.
🛍️ Shop the Look — Amazon Product Ideas
| # | Product Search Phrase | Why It Fits |
| 1 | black high gloss stair handrail paint quart | Signature black handrail |
| 2 | painter’s tape 1 inch multi-surface | Clean baluster masking |
| 3 | small angled trim brush 2 inch | Handrail edge painting |
| 4 | charcoal grey stair runner rug non-slip | Floor-level coordination |
| 5 | newel post cap finial wood replacement | Post cap accent detail |
2. White Oak Tread Replacement with Open Risers
Vibe: Airy and architectural — a staircase that makes the space below feel larger by giving it the air from above.
Why it works: Open risers eliminate the visual mass of a closed staircase by allowing light and sightlines to pass through the stair structure — the design principle of transparency in built form. White oak in 2-inch thickness (rather than the standard ¾-inch) reads as substantial and sculptural, with enough mass to visually balance the lightness of the open riser without requiring any bulky structural members. The slim black steel stringer (the diagonal side member) contrasts with the pale oak, making the structural system legible and honest — a key principle of contemporary and Japandi-inflected interiors.
How to get it: Specify white oak treads at 8/4 thickness (actual 1¾ inches) from a hardwood lumber supplier — home improvement stores typically only stock ¾-inch tread stock. Sand with 120 then 180 grit before finishing with Rubio Monocoat Pure or Bona Traffic HD for a matte, grain-enhancing result. Open-riser steel stringers require a structural engineer’s sign-off in most jurisdictions before installation.
🛍️ Shop the Look — Amazon Product Ideas
| # | Product Search Phrase | Why It Fits |
| 1 | white oak stair tread solid hardwood 48 inch | Natural grain tread base |
| 2 | Rubio Monocoat Pure oil finish wood | Grain-enhancing matte finish |
| 3 | matte black powder coat spray paint metal | Stringer touch-up finish |
| 4 | orbital sander 5 inch random orbit | Tread surface preparation |
| 5 | stair tread installation adhesive construction | Tread bonding adhesive |
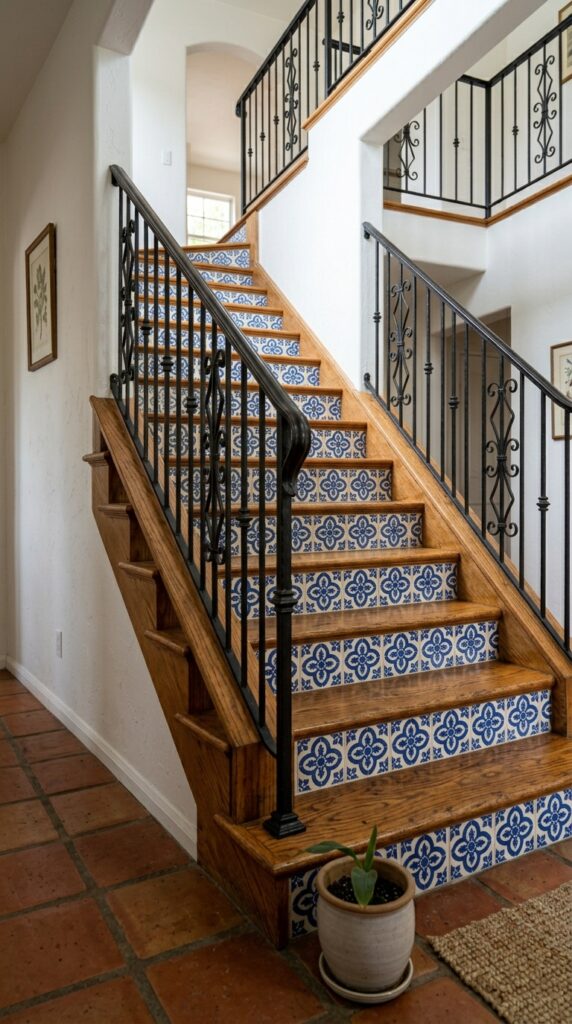
3. Patterned Tile Risers on a Classic Wood Stair
Vibe: Warm and artisan-layered — a staircase that tells you where the homeowner has been and what they love.
Why it works: Tiling risers while keeping the treads in natural wood applies the principle of surface hierarchy — the horizontal tread surface (where your foot lands) remains in the dominant, tactile material while the vertical riser face (a surface never touched by foot) becomes the decorative canvas. This is both practical (tile on a tread would be dangerously slippery) and visually correct. Portuguese azulejo-pattern tiles in 4×4-inch format repeat across each riser without requiring complex cutting, making the installation achievable for an intermediate tiler.
How to get it: Use a thinset rated for vertical tile application — standard floor thinset is too heavy and will cause the tiles to slip before curing. Apply tile starting from the center of each riser working outward to keep the pattern optically centered, even if the edge tiles require cutting. Seal the grout with a penetrating sealer after curing to prevent staining from foot traffic air turbulence.
🛍️ Shop the Look — Amazon Product Ideas
| # | Product Search Phrase | Why It Fits |
| 1 | blue white geometric stair riser tile 4×4 inch | Azulejo-style riser tile |
| 2 | vertical wall thinset adhesive tile mortar | Riser-specific adhesive |
| 3 | ivory unsanded grout joint tile | Palette-matched grout |
| 4 | grout sealer penetrating clear | Stain protection |
| 5 | tile cutter manual score snap 16 inch | Edge tile trimming tool |
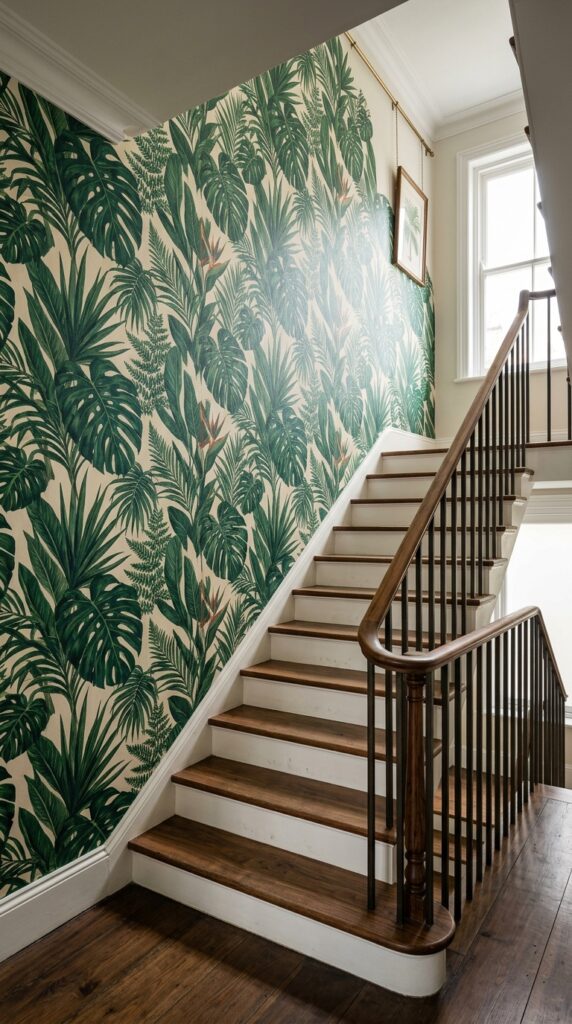
4. Dramatic Wallpapered Staircase Wall
Vibe: Lush and transporting — a staircase wall that makes the climb feel like a destination.
Why it works: The staircase wall is the largest uninterrupted vertical surface in most homes — it runs diagonally from floor to ceiling across the full stair height without doors, windows, or interruptions breaking the field. This makes it the ideal canvas for a large-scale wallpaper pattern, where the full repeat can express itself without being cut off. Large botanical motifs work particularly well in this position because their diagonal leaf structures echo the diagonal geometry of the stair run, creating a subconscious visual harmony.
How to get it: Measure the full staircase wall height at its tallest point — typically where the wall meets the ceiling above the landing — before ordering wallpaper. Order 15% more than the calculated square footage to account for pattern matching on the diagonal. Use a laser level to establish a perfectly vertical plumb line as the starting edge, as the stair geometry will visually pull the eye toward the diagonal and make any slight vertical deviation look worse than it would on a flat-room wall.
💡 Quick Win: Peel-and-stick wallpaper in a large botanical print costs $35–55 per roll, requires no paste, and can be repositioned during installation — a significant advantage on the tricky diagonal geometry of a staircase wall.
🛍️ Shop the Look — Amazon Product Ideas
| # | Product Search Phrase | Why It Fits |
| 1 | large botanical leaf peel stick wallpaper | Staircase wall statement |
| 2 | laser level self-leveling vertical line | Plumb starting guide |
| 3 | wallpaper smoother paddle brush | Bubble-free application |
| 4 | brass picture rail with clips ceiling mount | Ceiling line definition |
| 5 | walnut wood handrail profile 8 foot | Warm tone rail upgrade |
5. Shiplap Riser Wall with Painted Risers

Vibe: Warm and grounded — a staircase that makes a farmhouse feel like it was always there.
Why it works: Shiplap cladding on the staircase wall creates horizontal line repetition that contrasts directly with the diagonal line of the stair run — the tension between the horizontal boards and the diagonal stair geometry is what gives the composition its visual energy. The 1/8-inch reveal gap between boards is critical — without it the boards read as flat paneling; with it they create a grid of shadow lines that give the wall depth in any light condition. Bright white semi-gloss (rather than flat) is the correct finish choice because it amplifies the shadow lines in the gaps.
How to get it: Install shiplap over existing drywall using 2-inch finish nails driven at the board’s top nailing flange — this creates a clean painted surface without visible fasteners. Start from a level line established at the base of the stair and work upward, checking horizontal level every 3–4 boards to prevent drift on the diagonal wall.
🛍️ Shop the Look — Amazon Product Ideas
| # | Product Search Phrase | Why It Fits |
| 1 | shiplap wall planks primed white 3.5 inch | Horizontal cladding base |
| 2 | white semi-gloss interior paint quart | Shiplap surface finish |
| 3 | finish nails 2 inch 18 gauge brad | Hidden fastening method |
| 4 | black iron wall sconce plug-in farmhouse | Shiplap wall lighting |
| 5 | level 48 inch magnetic box level | Board horizontal check |
6. Gallery Wall Running the Full Stair Height
Vibe: Warm and layered — a wall that builds a story as you climb.
Why it works: A gallery wall ascending the staircase diagonal exploits the staircase’s built-in diagonal geometry to create a naturally dynamic arrangement — the frames ascend like a visual score that plays as you climb. Unifying all frames in a single matte black profile is the single most important design decision: it allows the art inside the frames to be wildly varied (photographs, illustrations, abstract work) without the arrangement reading as chaotic, because the eye categorizes the black frames as one repeating element. The 3-inch consistent gap between frames is non-negotiable — varied gaps create visual noise.
How to get it: Cut paper templates of each frame, tape them to the wall in the planned arrangement before drilling, and live with the layout for 24 hours. The diagonal stair line creates optical distortions that make perfectly level frames appear to tilt — use a laser level on every frame, not just every other one.
🛍️ Shop the Look — Amazon Product Ideas
| # | Product Search Phrase | Why It Fits |
| 1 | black gallery frame set mixed sizes 8×10 11×14 | Unified frame collection |
| 2 | laser level cross-line self leveling | Precision frame alignment |
| 3 | picture hanging strips no nail damage | Wall-safe mounting |
| 4 | picture arrangement template paper roll | Pre-drill layout planning |
| 5 | botanical art prints black white set | Gallery art content |
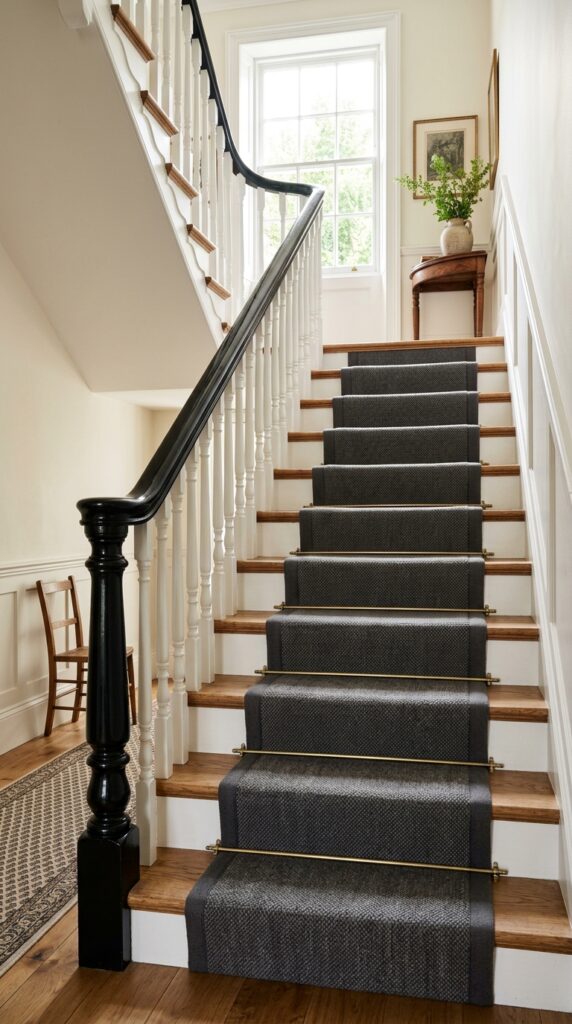
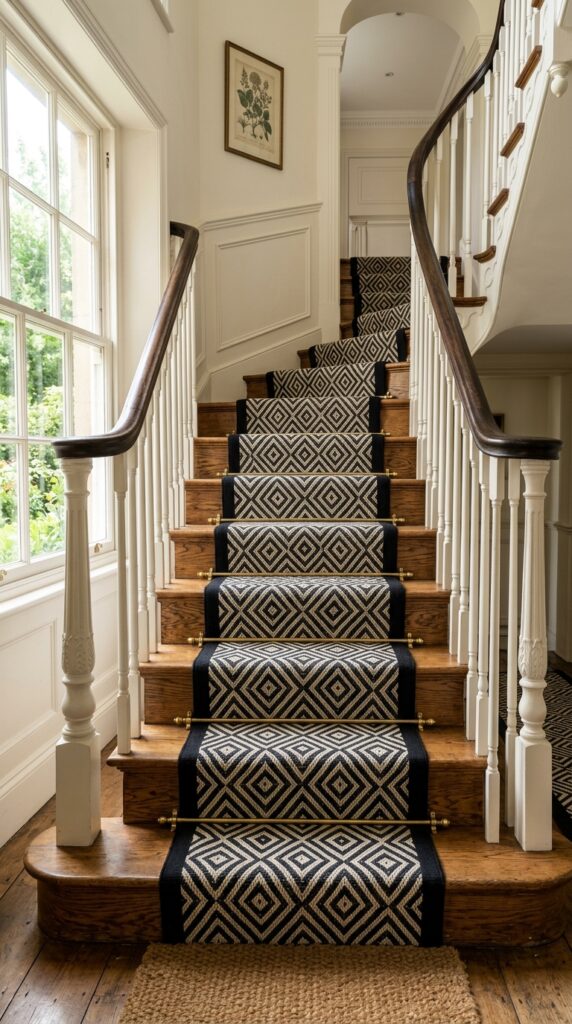
7. Stair Runner in a Bold Geometric Pattern
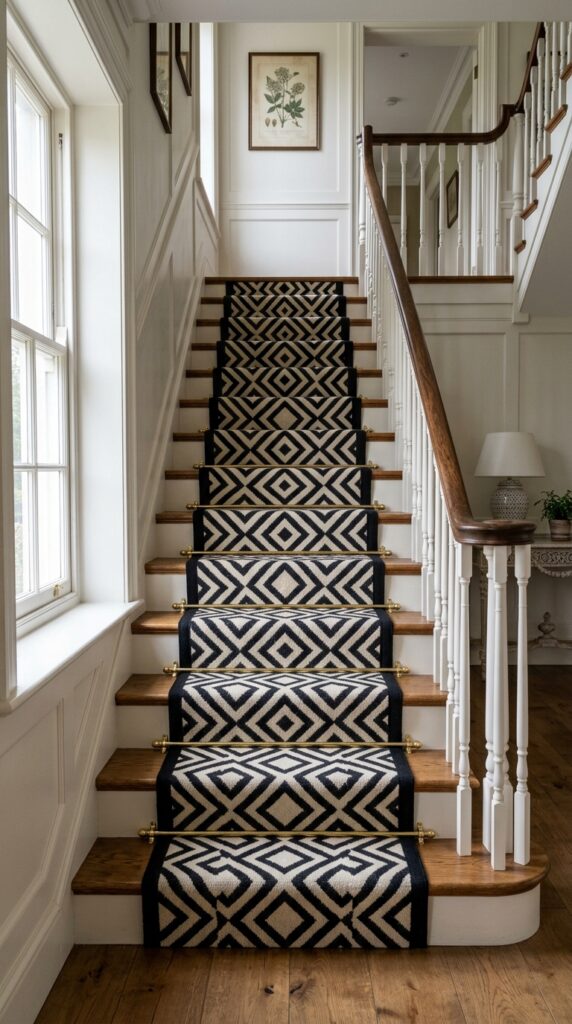
Vibe: Confident and richly layered — a stair runner that makes every step feel considered.
Why it works: A centered stair runner with 3 inches of tread exposed on each side creates a framing effect — the visible wood tread border acts as a mat around the runner, making the runner read as a deliberate insert rather than wall-to-wall carpeting. Bold geometric patterns (diamond, chevron, Greek key) perform better on stairs than organic patterns because the geometric repeat aligns with the stair’s own regular geometry of uniform tread and riser dimensions. Brass stair rods are both functional (keeping the runner from shifting) and decorative — their horizontal line at each riser junction creates a rhythmic accent pattern across the stair run.
How to get it: Have the runner bound at a carpet retailer before installation — machine-stitched cotton binding in black or navy prevents fraying and allows the runner to be removed for cleaning without unraveling. Stair rods should be installed at the junction of tread and riser, not on the tread face — placement on the tread face creates a trip hazard.
🛍️ Shop the Look — Amazon Product Ideas
| # | Product Search Phrase | Why It Fits |
| 1 | geometric black ivory wool stair runner per foot | Bold pattern anchor |
| 2 | brass stair rod set with bracket 36 inch | Decorative runner hold |
| 3 | stair runner pad non-slip underlay | Runner grip and cushion |
| 4 | rug binding tape cotton black roll | Runner edge finishing |
| 5 | stair rod installation bracket wall mount | Rod fastening hardware |
8. Cable Railing System with Wood Posts
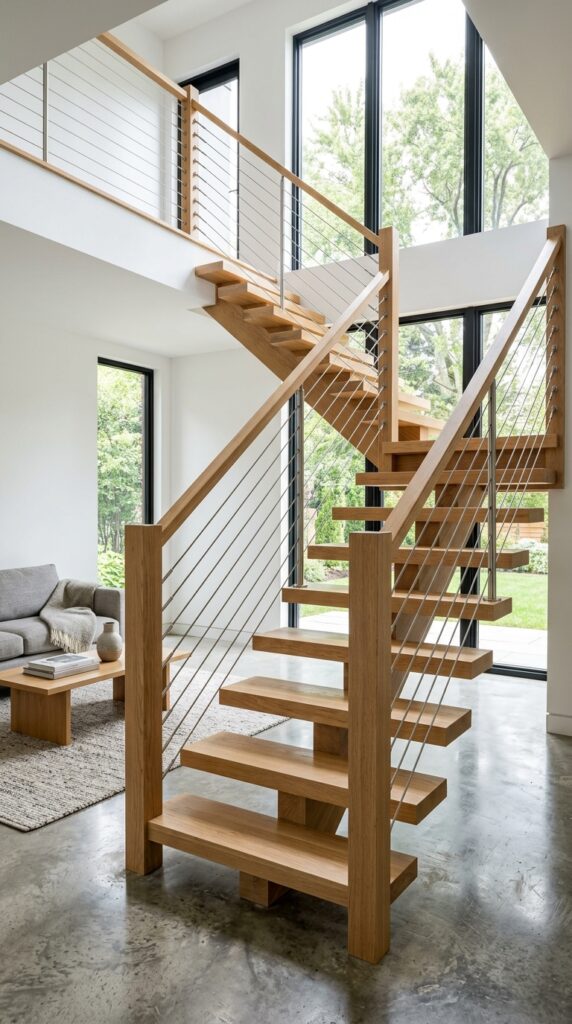
Vibe: Airy and architecturally confident — a railing system that opens the room rather than dividing it.
Why it works: Horizontal cable railing exploits the design principle of visual permeability — the thin stainless cables allow sightlines to pass through the railing plane, preserving the sense of open space that a solid balustrade or even vertical balusters would interrupt. This is particularly impactful in homes with staircase-to-living-room sightlines, where a traditional railing would block a significant portion of the view. The white oak posts provide the warm material counterweight that prevents the cable system from reading as cold or industrial.
How to get it: Cable must be tensioned to a minimum of 50 pounds of force per cable to meet most building codes — use a cable tensioner tool rather than hand-tensioning, which never achieves sufficient and consistent tension. End-post anchoring requires posts that are significantly thicker and better supported than intermediate posts — consult the cable railing manufacturer’s engineering specs before sizing posts.
🛍️ Shop the Look — Amazon Product Ideas
| # | Product Search Phrase | Why It Fits |
| 1 | stainless cable railing kit 1×19 DIY | Cable railing system base |
| 2 | white oak newel post 3×3 inch square | Warm material post |
| 3 | cable tensioner tool hand ratchet | Proper tension installation |
| 4 | brushed stainless cable end fitting terminal | Clean cable termination |
| 5 | cable railing lag eye bolt stainless | Post anchoring hardware |
9. Painted Ombre Risers from Pale to Deep
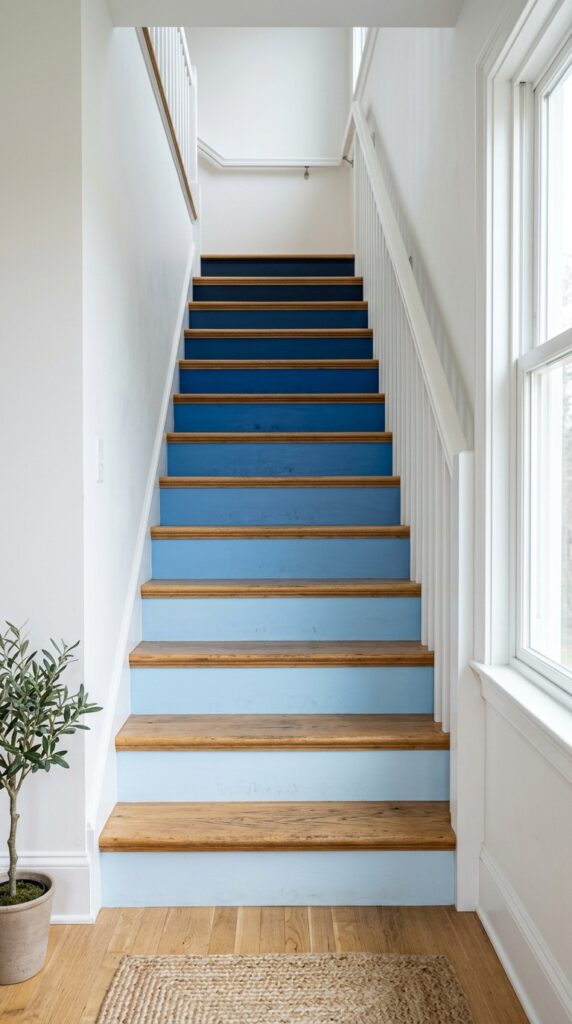
Vibe: Serene and quietly artful — a staircase that turns a routine climb into a colour experience.
Why it works: The graduated ombre treatment uses the staircase’s inherent structure — a series of identical horizontal bands at equal intervals — as a ready-made color field. The riser faces become the stripes of an ombre composition, and the gradation creates an upward visual momentum that makes the stair feel less like an effort and more like a transition. The single-hue ombre (all blue) maintains chromatic coherence so the effect reads as intentional rather than indecisive. White treads throughout maintain neutral visual rest between each colored step.
How to get it: Mix your own graduated shades by starting with your darkest target color and progressively adding white in incremental amounts for each lighter step. This ensures all shades share the same base pigment and read as a true gradient. Mark each paint batch with the step number before starting — mixed shades cannot be reproduced exactly once the batch is split.
💡 Quick Win: A quart of the mid-range color in the gradient plus a pint of white and a pint of black allows you to mix the full range without purchasing 12 separate paint cans — the total material cost for an ombre riser treatment is typically $25–40.
🛍️ Shop the Look — Amazon Product Ideas
| # | Product Search Phrase | Why It Fits |
| 1 | small sample paint pots blue range tester | Gradient shade testing |
| 2 | stair riser paint porch floor enamel | Durable riser finish |
| 3 | angled 2 inch trim brush short handle | Tight riser surface painting |
| 4 | painter’s tape thin 3/4 inch | Tread-riser junction masking |
| 5 | paint mixing containers 8 oz clear lid | Shade-marking storage |
10. Slim Profile Metal Baluster Replacement
Vibe: Warm and refined — an existing staircase that suddenly reads as designed rather than inherited.
Why it works: Replacing turned wood balusters with slim square wrought iron profiles is the highest-impact single change available for a traditional staircase renovation. Turned wood balusters carry a specific historical style code (Victorian, colonial) that can date a home interior. Slim square iron balusters are stylistically neutral — they read as contemporary without being modernist, and they complement both traditional handrails and clean-profile ones. The 5/8-inch square section is the critical sizing: thinner looks willowy, thicker looks heavy and contractor-grade.
How to get it: Most wood tread systems accept iron balusters using a shoe rail at the tread surface — the baluster pin fits into a pre-drilled hole in the shoe rail and is secured with a set screw, requiring no glue or structural modification. Measure your existing baluster spacing before ordering: building codes require that a 4-inch sphere cannot pass between balusters, meaning maximum 3⅞-inch clear span.
🛍️ Shop the Look — Amazon Product Ideas
| # | Product Search Phrase | Why It Fits |
| 1 | wrought iron square baluster 5/8 inch matte black | Main railing upgrade |
| 2 | baluster shoe rail base plate black | Tread mounting plate |
| 3 | baluster installation kit set screw drill bit | Fitting hardware set |
| 4 | walnut stair handrail profile 8 foot length | Rail upgrade pairing |
| 5 | baluster spacing tool jig 4 inch | Code-compliant spacing guide |
11. Under-Stair Storage Built-Ins with Shaker Doors
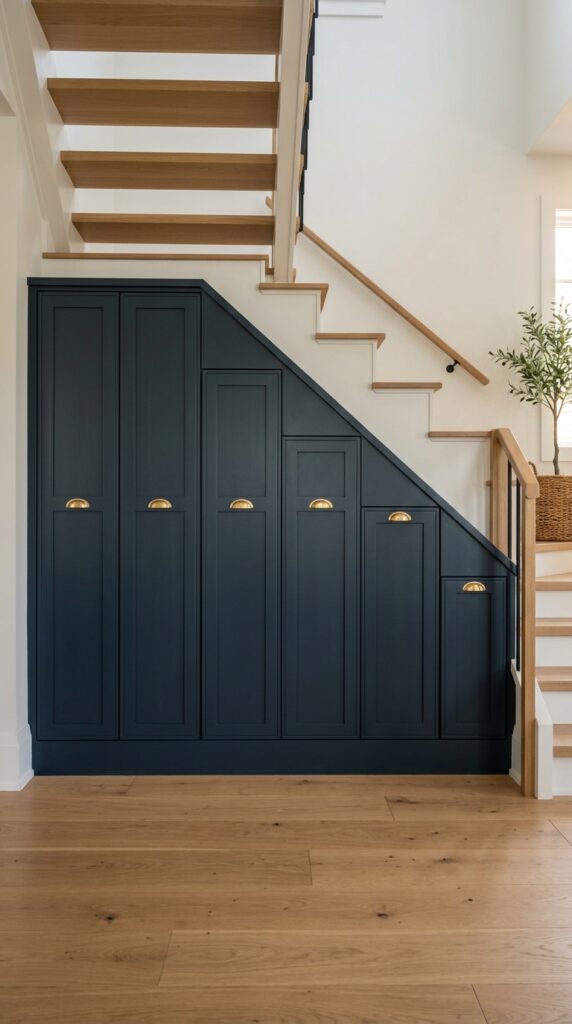
Vibe: Grounded and resolved — a space that used to embarrass the house, now one of its best ideas.
Why it works: The under-stair triangular void is one of the most consistently wasted spaces in residential architecture. Filling it with Shaker-style built-ins converts dead volume into functional storage while simultaneously giving the stair base a composed, intentional finish that it almost never has. Painting the cabinetry in a deep navy (Benjamin Moore Hale Navy, HC-154) rather than white creates a visual anchor that defines the base of the staircase as a feature zone, not a concealed utility space. The stepping door heights following the stair profile make the architecture visible in the cabinetry — structure informing design.
How to get it: Commission the cabinets from a local cabinet shop using standard face-frame Shaker door construction — specify ¾-inch plywood carcass, solid wood face frame, and MDF door panels. Painting rather than staining means MDF doors are entirely appropriate and significantly less expensive than solid wood. Install piano hinges on the taller doors (over 36 inches) to prevent warping and sagging on the door face.
🛍️ Shop the Look — Amazon Product Ideas
| # | Product Search Phrase | Why It Fits |
| 1 | navy blue cabinet paint quart semi-gloss | Built-in door color |
| 2 | brushed brass cup pull 3 inch cabinet hardware | Brass accent hardware |
| 3 | piano hinge continuous 36 inch stainless | Tall door support |
| 4 | shaker cabinet door MDF unfinished | Door panel blank |
| 5 | soft close cabinet hinge overlay 35mm | Door closing mechanism |
12. Reclaimed Wood Feature Wall on the Stair Landing
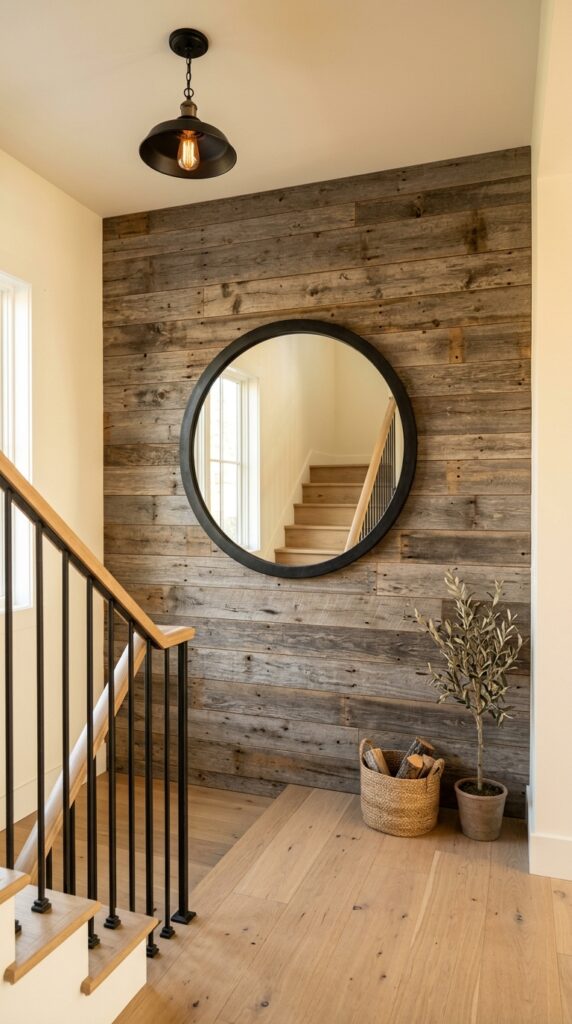
Vibe: Raw and warmly storied — a landing that rewards the climb with texture worth standing in front of.
Why it works: The stair landing is an overlooked premium position — it’s the first full stop on the stair journey, a natural pause point where the eye rests. A reclaimed wood feature wall at this location transforms it from a directional node (where you turn to continue climbing) into a destination worth arriving at. Varying plank widths (3, 5, and 7 inches) create a more authentic reclaimed look than uniform-width boards and produce a subtle visual rhythm across the wall field. The centered round mirror reads as a collected object against the raw background, preventing the wall from feeling like a craft store display.
How to get it: Seal reclaimed barn wood with a diluted matte polyurethane (1:1 with mineral spirits) before installation — this stabilizes the wood and reduces off-gassing from the old wood while preserving the weathered appearance. Install boards using a pneumatic nail gun with 2-inch finish nails driven at a 45-degree angle into the top edge of each plank — this is an invisible fastening method that leaves no nail holes on the face.
🛍️ Shop the Look — Amazon Product Ideas
| # | Product Search Phrase | Why It Fits |
| 1 | reclaimed barn wood wall planks mixed width | Weathered feature wall |
| 2 | round iron mirror 36 inch black | Landing focal object |
| 3 | matte polyurethane clear finish quart | Wood stabilizing seal |
| 4 | pneumatic nail gun 18 gauge finish | Hidden fastening tool |
| 5 | wood wall plank leveling spacer | Even gap installation |
13. Newel Post Statement Upgrade
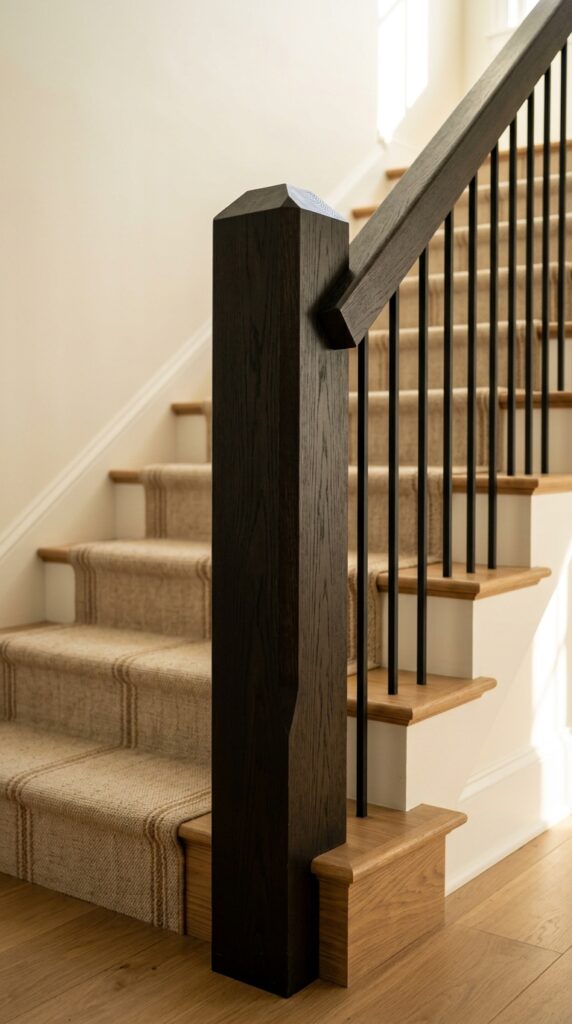
Vibe: Architectural and anchoring — a newel post that makes the whole staircase feel like it meant to be there.
Why it works: The newel post is the staircase’s visual anchor — the element that terminates the railing run and grounds the entire composition at the base. Standard builder newel posts (3.5 inches square, generic turned profile) are proportionally underscaled for most stair runs, which makes the entire balustrade feel provisional. Upgrading to a 6×6-inch post with a clean chamfered cap (rather than a decorative turned capital) creates what furniture makers call a furniture-scaled element — one with enough mass and proportion to read as considered rather than incidental. The dark ebony stain on white oak creates surface richness through grain contrast that black paint cannot replicate.
How to get it: A 6×6-inch newel post must be anchored through the floor into the framing below — this typically requires a threaded rod drilled through the subfloor into a joist or blocking. This is not a surface-mount installation and requires basic carpentry skill or a finish carpenter for a structurally sound result.
💡 Quick Win: A newel post cap upgrade alone — replacing just the decorative top cap piece on an existing post — costs $15–35 and changes the silhouette of the post without requiring structural work. Look for square pyramid or flat chamfered caps that fit over the existing post top.
🛍️ Shop the Look — Amazon Product Ideas
| # | Product Search Phrase | Why It Fits |
| 1 | wood newel post 6×6 unfinished oak square | Architectural post blank |
| 2 | ebony wood stain gel minwax dark | Rich dark grain finish |
| 3 | newel post cap square chamfered top | Silhouette-defining cap |
| 4 | newel post anchor threaded rod kit | Structural base fixing |
| 5 | stair post mounting bolt floor flange | Floor-level anchoring |
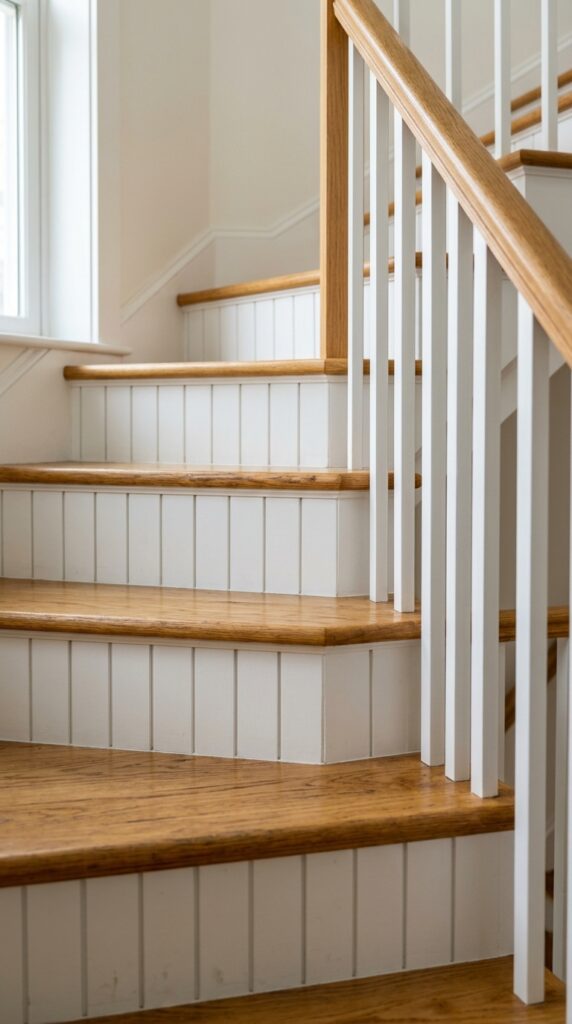
14. Wainscoting Panels Along the Stair Wall
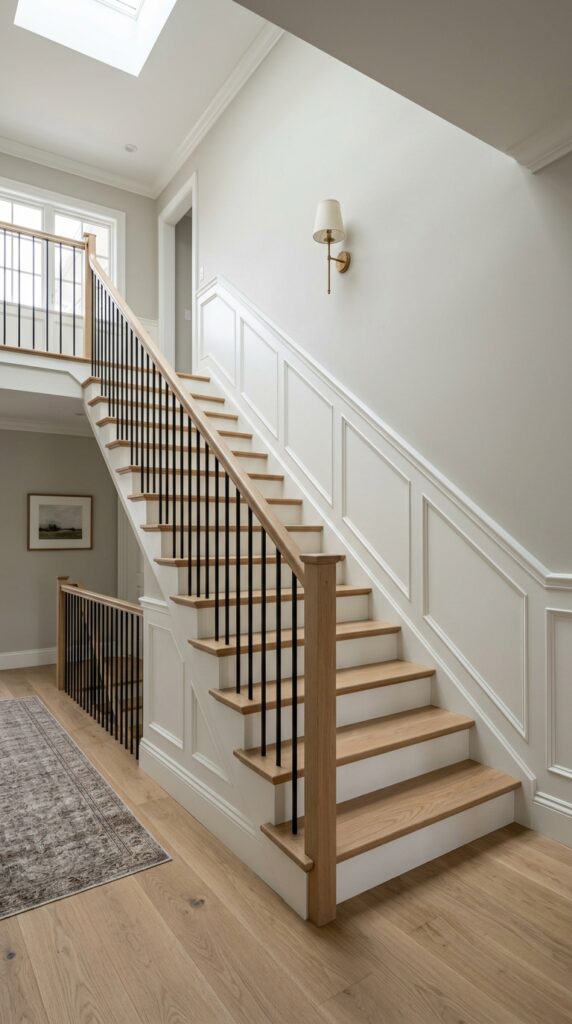
Vibe: Warm and classically refined — a staircase that makes the whole house feel like it has better bones than it started with.
Why it works: Wainscoting on a stair wall is one of the oldest and most architecturally validated wall treatments in residential design — it protects the wall at the zone most vulnerable to scuffing (hand-height and bag-height as people navigate the stair) while providing visual articulation of the lower wall field. Running it along the diagonal stair wall requires mitering the top rail at the stair pitch, which is the critical technical challenge — the chair rail must follow the stair’s exact angle rather than running level. Two-tone painting (Simply White below rail, Edgecomb Grey above) gives the staircase a formal sophistication that single-color treatment does not.
How to get it: Pre-primed MDF wainscoting panels from millwork suppliers are the most practical solution — they arrive ready to paint and avoid the grain-raise issues of raw wood. The chair rail miter at the stair angle requires setting the miter saw to match the exact rise-over-run angle of your stair, which varies by house. Calculate this angle using a digital angle finder held against the stair nosing.
🛍️ Shop the Look — Amazon Product Ideas
| # | Product Search Phrase | Why It Fits |
| 1 | MDF wainscoting raised panel kit primed | Pre-made paneling system |
| 2 | chair rail molding MDF 8 foot primed | Diagonal cap molding |
| 3 | digital angle finder protractor tool | Exact stair pitch measurement |
| 4 | Benjamin Moore Simply White paint quart | Below-rail finish |
| 5 | Edgecomb Grey paint interior eggshell | Above-rail accent tone |
15. Compact Stair Library with Built-In Bookshelf
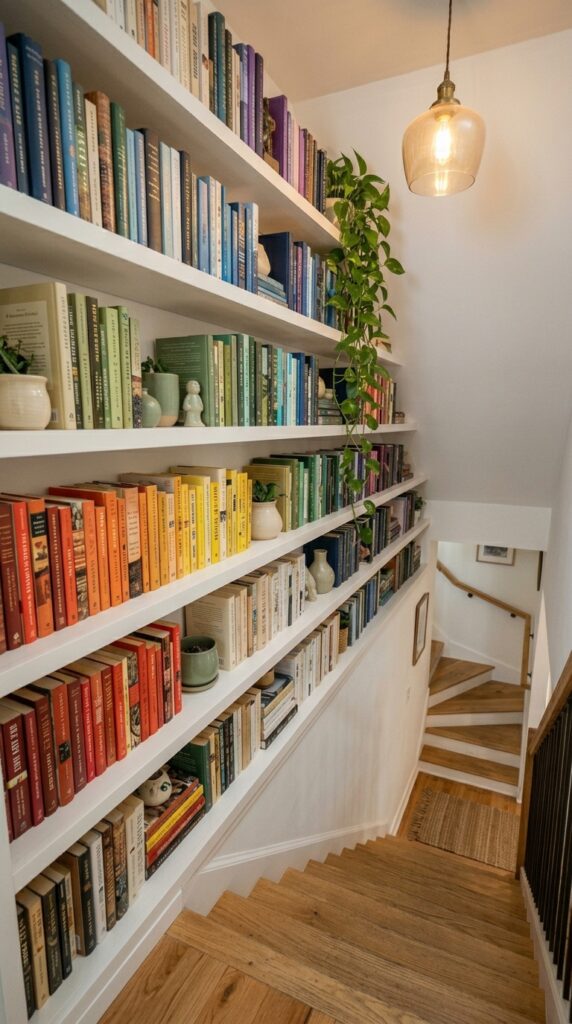
Vibe: Warm and quietly abundant — a staircase that gives you a reason to pause on every landing.
Why it works: A built-in bookshelf running diagonally alongside the stair is one of the most spatially efficient design moves in a small home — it uses the wall plane that would otherwise be blank and unmarked, converting a transitional surface into a display and storage zone without occupying any floor area. Books arranged by spine color (warm tones at the base graduating to cool tones toward the ceiling) create a gradient composition across the full shelf field that reads as intentional curation from across the room. The diagonal stair shelf arrangement echoes the stair geometry rather than fighting it.
How to get it: Shelf depth must be 10 inches minimum for standard book storage — shallower shelves work for paperbacks but not standard hardcovers. Set individual shelf heights at 11–12 inches for most fiction and non-fiction, with one or two taller bays (14–16 inches) for oversized art books and to break the uniformity of the shelf rhythm.
🛍️ Shop the Look — Amazon Product Ideas
| # | Product Search Phrase | Why It Fits |
| 1 | adjustable shelf bracket standard white 10 inch | Diagonal shelf mounting |
| 2 | melamine shelf board white 10×96 inch | Painted shelf surface |
| 3 | book display organizer shelf ledge | Decorative book display |
| 4 | small trailing plant pot 4 inch ceramic | Shelf greenery accent |
| 5 | cream ceramic bud vase set shelf decor | Ceramic styling accent |
16. Herringbone Wood Tread Inlay on a Landing

Vibe: Warm and architecturally layered — a landing that makes you stop before you turn to climb.
Why it works: The herringbone inlay on a landing floor takes the pause-point function of the landing and reinforces it with a floor-level focal element — the eye naturally follows the chevron geometry toward the center of the pattern, which anchors you in the space for a moment. Using two tones of white oak (natural and lightly smoked) creates the visual contrast needed to read the herringbone pattern clearly without introducing a second wood species or a dark stain that would feel heavy. The plain plank border “frames” the herringbone as a contained field, preventing it from reading as a patterned floor that simply stops at the wall.
How to get it: A landing herringbone inlay is best specified as engineered white oak rather than solid — engineered wood’s dimensional stability across seasons prevents the small herringbone blocks from gapping and cupping, which is a critical concern on a landing that may receive direct sunlight from a nearby window.
🛍️ Shop the Look — Amazon Product Ideas
| # | Product Search Phrase | Why It Fits |
| 1 | engineered white oak herringbone parquet tile | Inlay pattern blocks |
| 2 | smoked white oak engineered floor plank | Contrast tone pairing |
| 3 | parquet floor adhesive trowel set | Inlay bonding method |
| 4 | floor finishing mop applicator oil | Post-installation finishing |
| 5 | floor border transition strip oak | Inlay-to-surround join |
17. Staircase Lighting with Recessed Riser LEDs
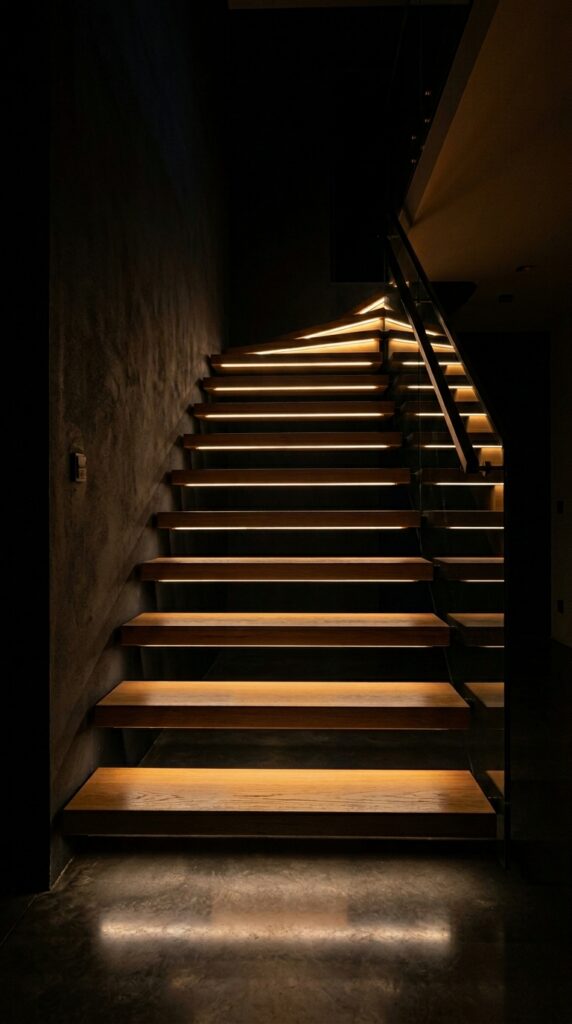
Vibe: Warm and dramatically architectural — the staircase at night becomes the best version of itself.
Why it works: Recessing LED strips into the underside of each tread nosing uses the grazing light technique — light that travels parallel to a surface before hitting it at a shallow angle — to simultaneously illuminate the riser face and create a dramatic step shadow on the floor below. This is the same technique used in museum lighting to reveal surface texture in stone and art. At 2700K the warm amber tone maintains the warmth of the wood treads rather than creating the clinical blue-white wash that higher color temperatures produce on light wood surfaces.
How to get it: Route a 10mm channel into the underside of each tread at the nosing — approximately 1 inch back from the front edge and 10mm deep — using a router with a straight bit. The LED strip channel should be pointed downward and slightly forward to project light onto the riser face rather than the floor directly below. Use a low-voltage LED controller with a dimmer so the stair lighting can function as ambient night lighting at 10–20% intensity without blinding residents at 2am.
🛍️ Shop the Look — Amazon Product Ideas
| # | Product Search Phrase | Why It Fits |
| 1 | LED strip light 2700K warm white 16 foot reel | Riser recessed lighting |
| 2 | LED channel aluminum recessed 10mm | Strip housing channel |
| 3 | LED dimmer controller 12V low voltage | Brightness adjustment |
| 4 | router straight bit 10mm 1/2 shank | Channel routing bit |
| 5 | LED diffuser lens frosted strip cover | Soft glow diffusion |
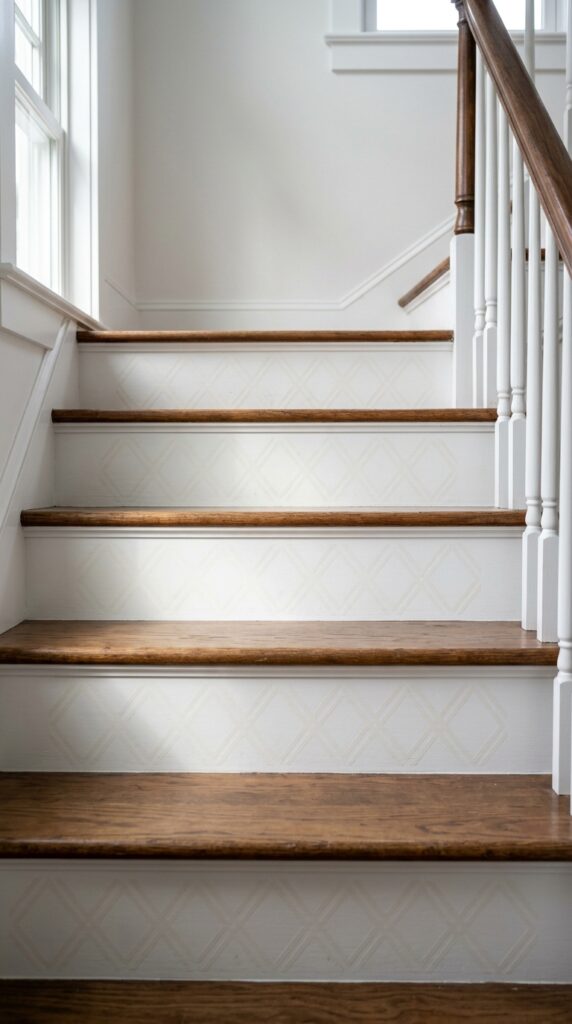
18. Dark Walnut Treads on Painted White Risers
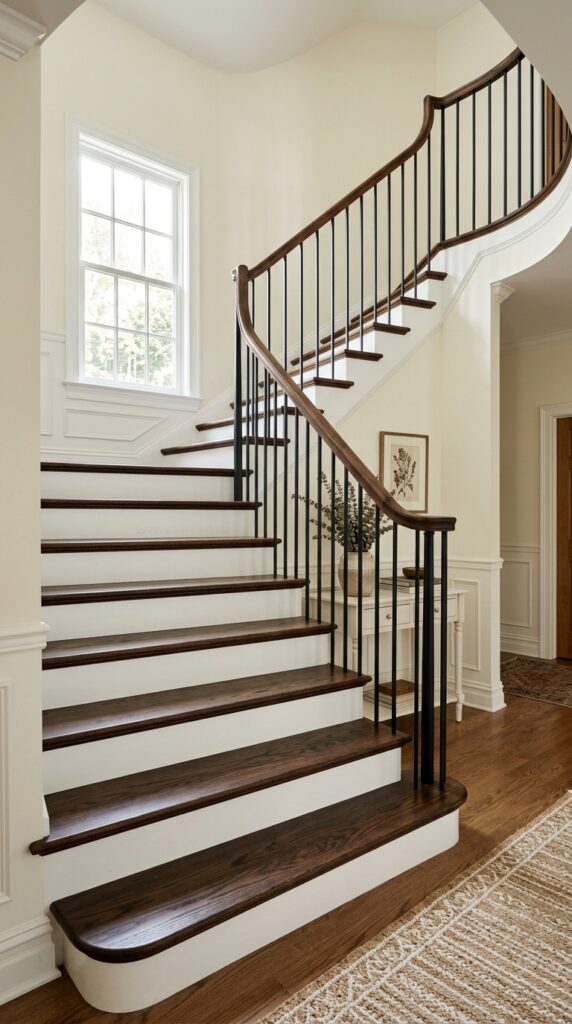
Vibe: Confident and crisp — the most widely applicable tread-riser combination in residential design.
Why it works: Dark walnut treads against white risers create maximum value contrast within the stair structure — the stair effectively becomes a graphic composition of alternating dark and light horizontal bands. This contrast is the design principle of figure-ground reversal applied to stair architecture: the dark tread is the figure and the white riser is the ground, and the alternation as you look up the stair creates a strong visual rhythm. The tread nosing overhang (1¼ inches is the standard code-compliant minimum) creates a shadow line at the front edge of each tread that reinforces the dark-light separation.
How to get it: Staining existing pine treads to achieve a walnut-dark result requires two applications of Minwax Dark Walnut (225) with full drying time between coats and a final coat of Minwax Polyurethane in satin for foot traffic durability. Pine takes gel stain more evenly than oil stain — use Minwax Gel Stain if your existing treads are pine rather than oak.
🛍️ Shop the Look — Amazon Product Ideas
| # | Product Search Phrase | Why It Fits |
| 1 | Minwax Dark Walnut 225 gel stain quart | Tread rich dark staining |
| 2 | Minwax satin polyurethane floor finish | Durable tread topcoat |
| 3 | Benjamin Moore Simply White interior paint | White riser standard |
| 4 | foam stain applicator pad sponge | Even stain application |
| 5 | tack cloth pre-stain surface wipe | Tread prep cleaning |
19. Vertical Shiplap Riser Accent
Vibe: Textured and quietly artisanal — the kind of detail you notice on the way down, not the way up.
Why it works: Vertical shiplap on the riser face creates a counter-directional texture to the horizontal grain of the tread above — the vertical boards on the riser read as a visual rhythm that plays against the horizontal tread-riser alternation. The result is a texture-rich stair surface that adds complexity without adding color. The 1/16-inch reveal between vertical boards creates shadow lines that, in raking side light, make each riser face appear to glow with dimensional texture rather than sitting flat. This is a detail that rewards close inspection and builds the kind of design credibility that makes an interior feel custom rather than remodeled.
How to get it: Cut 2-inch-wide strips of ¼-inch MDF for the riser shiplap — this thickness keeps the boards flush with the tread nosing without requiring a shim. Use panel adhesive and 1-inch finish brads to install, starting from the center of each riser and working outward to keep the reveal pattern visually centered.
🛍️ Shop the Look — Amazon Product Ideas
| # | Product Search Phrase | Why It Fits |
| 1 | narrow shiplap wall plank 2 inch primed MDF | Vertical riser material |
| 2 | panel adhesive construction grip tube | Riser bonding adhesive |
| 3 | 1 inch finish brad nails 18 gauge | Surface fastening |
| 4 | riser face template cutting guide | Riser sizing jig |
| 5 | white semi-gloss trim paint quart | Riser finish coat |
20. Stair Nook Reading Corner Below the Landing
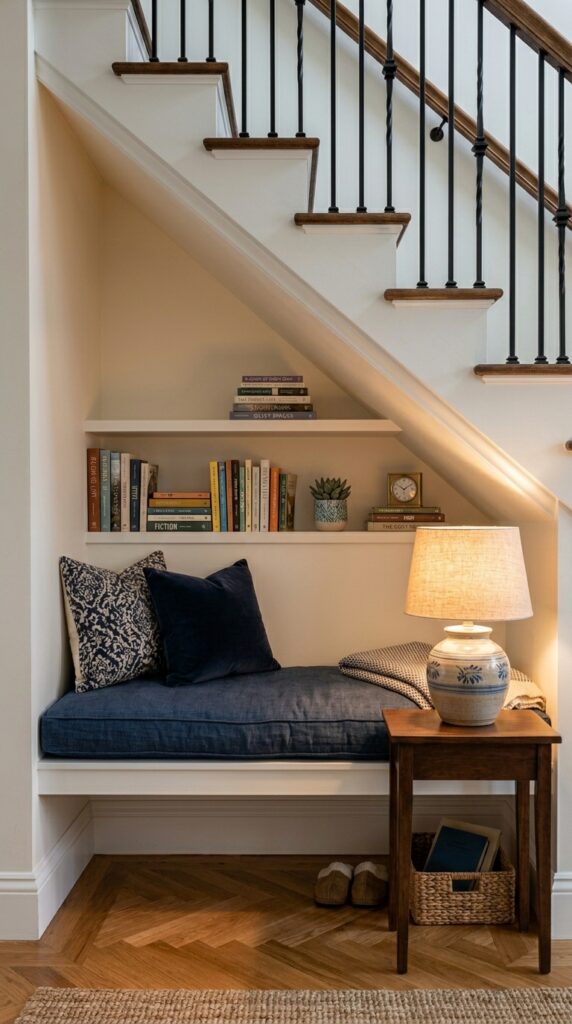
Vibe: Warm and intimate — a corner of the house that suddenly has a purpose and a personality.
Why it works: The under-stair void beside the newel post is typically the most awkward and underused space in the home — too small for furniture, too large to ignore. A built-in bench converts this dead zone into the most covetable seat in the house: tucked, defined, with overhead shelter from the stair above that creates the psychological feeling of enclosure that humans instinctively find restorative. The floating shelves beside the bench bring reading material within arm’s reach of the seat, completing the functional logic of the nook.
How to get it: The bench seat should be 18 inches deep and 17–18 inches from the floor — the standard seating height. A cushion at 3–4 inch thickness brings the seated height to a comfortable 20–22 inches. Install a standard household outlet inside the nook before finishing the wall — the ability to plug in a lamp or charge a device transforms the nook from a decoration into a room.
💡 Quick Win: A navy linen bench cushion cut to your specific bench dimensions by a local upholstery shop costs $45–90 and transforms a bare built-in bench platform into a genuinely inviting seat in a single piece.
🛍️ Shop the Look — Amazon Product Ideas
| # | Product Search Phrase | Why It Fits |
| 1 | navy linen bench cushion custom cut 18×36 | Nook seating comfort |
| 2 | floating wall shelf 8 inch white 24 inch | Nook side storage |
| 3 | small ceramic table lamp 14 inch warm light | Intimate nook lighting |
| 4 | built-in bench platform frame lumber kit | Bench base construction |
| 5 | in-wall electrical outlet recessed kit | Nook power access |
21. Exposed Brick Staircase Feature Wall
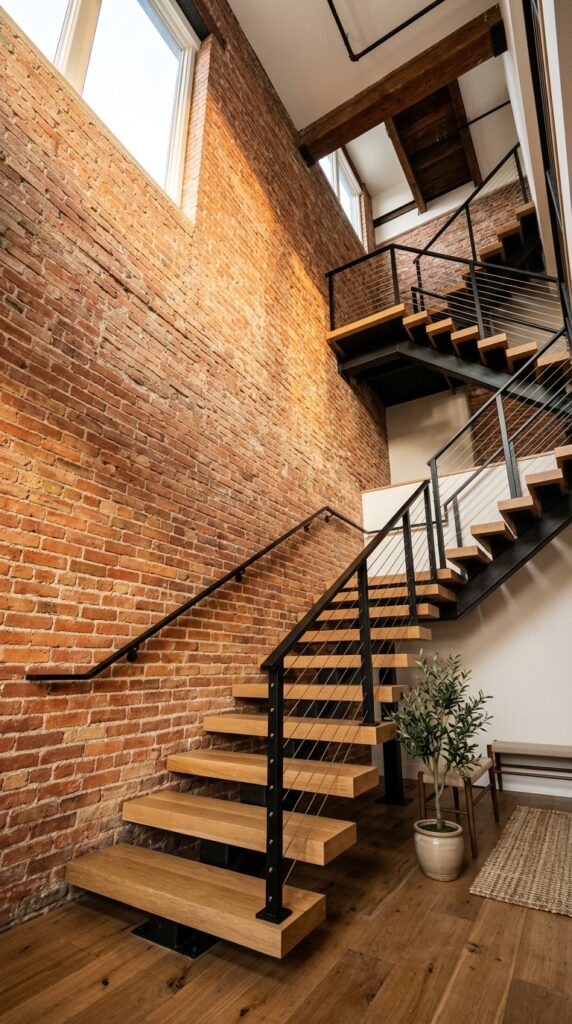
Vibe: Raw and warmly industrial — a staircase that carries the history of the building rather than covering it.
Why it works: Exposed brick is the ultimate example of material honesty in interior design — the principle that structural materials used without concealment create authenticity that applied finishes cannot replicate. The warm spectrum of tones in genuine brick (red-orange, buff, deep red) creates a naturally varied surface that reads as rich rather than monotonous, in the way that a single paint color never can. Recessed mortar joints (achieved by raking the mortar before it fully cures) create horizontal shadow lines that add depth in directional light and prevent the wall from appearing flat.
How to get it: Existing brick should be wire-brushed, cleaned with a diluted brick acid wash (follow manufacturer dilution ratios exactly — undiluted acid will etch and damage the surface), and sealed with a breathable clear masonry sealer (Thompson’s WaterSeal or equivalent). Avoid film-forming sealers that create a sheen — matte penetrating sealers preserve the raw texture appearance while preventing moisture ingress and dust absorption.
🛍️ Shop the Look — Amazon Product Ideas
| # | Product Search Phrase | Why It Fits |
| 1 | matte clear masonry sealer breathable brick | Brick protection finish |
| 2 | brick acid wash cleaner diluted | Surface cleaning solution |
| 3 | wire brush stiff brick cleaning | Surface preparation tool |
| 4 | exposed brick mortar rake tool | Joint depth definition |
| 5 | faux brick panel textured realistic | Non-structural alternative |
22. Half-Height Partition Wall with Open Spindles
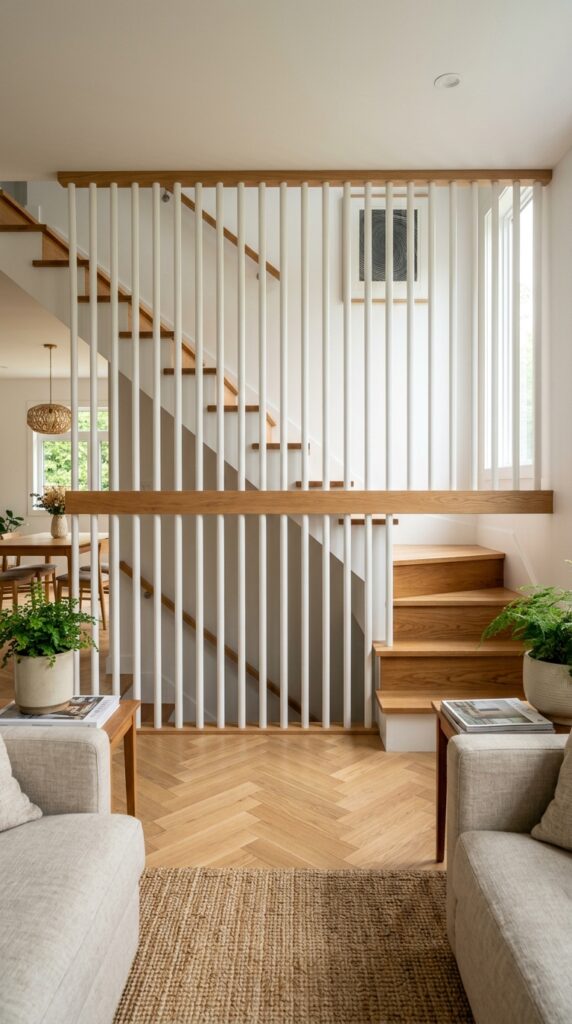
Vibe: Airy and warmly connected — a boundary that separates spaces without closing them off.
Why it works: A half-height spindle partition wall solves one of residential architecture’s most common problems: how to define the stair boundary against an open living space without blocking light or sightlines. Round wood spindles at 2-inch diameter and 4-inch spacing create a screen rather than a wall — light and visual connection pass through while the physical boundary remains clear. The flat white oak handrail cap atop the half-wall is the detail that elevates this from a simple partition to a design feature: the warm wood surface becomes a horizontal datum line that visually connects the stair zone to the living space.
How to get it: Mount the spindles in a top plate and bottom plate rather than individually pinning each one to the wall — this creates a true panelized railing unit that can be installed as a single element. Ensure the bottom plate is anchored into floor framing or a blocking header, not just the subfloor surface — spindle partitions receive lateral force from leaning occupants.
🛍️ Shop the Look — Amazon Product Ideas
| # | Product Search Phrase | Why It Fits |
| 1 | round wood dowel spindle 2 inch 36 inch length | Open spindle railing |
| 2 | white oak handrail cap flat profile 2.5 inch | Warm wood top cap |
| 3 | top plate bottom plate lumber kit | Spindle frame assembly |
| 4 | white exterior grade paint spindles | Spindle surface finish |
| 5 | lag bolt floor anchor heavy duty | Partition base anchoring |
23. Staircase Wall Sconce Lighting Row

Vibe: Warm and rhythmic — the stair wall becoming a score of soft light notes on the way up.
Why it works: Mounting wall sconces in a diagonal line ascending the stair wall creates a lighting composition that echoes the staircase geometry — the ascending sconce line reads as a secondary stair, reinforcing the upward direction of travel. Placing sconces at 36-inch vertical intervals ensures that each sconce falls at approximately eye level for someone standing on the adjacent tread, creating an intimate lighting relationship between fixture and occupant. Ceramic cylinder sconces are the most appropriate material choice for stair walls because their matte white surface disappears against a light wall in daylight and glows as a lit object at night.
How to get it: Use plug-in sconces with concealed cord covers painted to match the wall — cord covers are available in paintable PVC in ½-inch and ¾-inch widths and are nearly invisible when color-matched. Run all five sconce cords down the stair wall into a single power strip concealed at the base behind a baseboard gap, controlled by one switch.
🛍️ Shop the Look — Amazon Product Ideas
| # | Product Search Phrase | Why It Fits |
| 1 | white ceramic cylinder wall sconce plug-in | Rhythmic stair lighting |
| 2 | paintable cord cover raceway 1/2 inch | Concealed cord solution |
| 3 | smart plug Wi-Fi outlet single sconce | Group sconce switching |
| 4 | Edison filament bulb E26 2700K | Warm amber bulb glow |
| 5 | wall sconce mounting plate swivel arm | Angle adjustment mount |
24. Stenciled Riser Pattern in Subtle Tone-on-Tone
Vibe: Serene and quietly considered — the kind of detail guests notice on their second visit, not their first.
Why it works: Tone-on-tone stenciling — applying a pattern in a color only one or two values away from the base — creates what designers call a whisper detail: present and legible in certain light conditions, absent in others. This is the technique used in luxury wallpaper and high-end textile design where the visual richness comes from surface complexity rather than color contrast. On stair risers, a tone-on-tone stencil adds artisanal craft detail without the visual noise of a contrasting-color pattern, allowing the stair to read as simple from across the room and surprising up close.
How to get it: Apply the stencil using chalk paint one to two values lighter than the riser base coat — chalk paint’s matte finish creates a subtle sheen-difference texture even where the color difference is minimal, which makes the pattern legible in directional light even if the color is nearly identical.
🛍️ Shop the Look — Amazon Product Ideas
| # | Product Search Phrase | Why It Fits |
| 1 | geometric diamond stencil 12×12 inch repeat | Riser pattern template |
| 2 | chalk paint white off-white craft | Tone-on-tone stencil paint |
| 3 | stencil brush set short bristle | Stippling application |
| 4 | stencil adhesive repositionable spray | Non-slip stencil hold |
| 5 | painter’s tape 1 inch low tack | Riser edge masking |
25. Arched Doorway Framing the Stair Entry

Vibe: Warm and transporting — a doorway that makes arriving at the staircase feel like entering a different part of the house’s story.
Why it works: An arched opening framing the stair entry uses the principle of prospect and refuge — the arch creates a defined threshold that separates the stair zone from the adjacent room, giving both spaces a clearer identity. The curved arch profile introduces organic geometry into a rectilinear interior, and the contrast between the arch’s warm terracotta plaster and the white walls on either side creates a focal moment that announces the stair as a destination rather than a passage. This is the Mediterranean and Spanish Colonial architectural tradition — archways as interior portals.
How to get it: Create the arch by building a curved plywood form over an existing rectangular doorway opening, then skim-coating with joint compound or plaster in multiple thin passes. A 36-inch radius arch in a standard 7-foot doorway begins the curve at approximately 4 feet from the floor — leaving 48 inches of straight wall on either side before the curve begins. Apply Portola Paints Roman Clay finish for an authentic limewash-adjacent texture that no standard paint replicates.
🛍️ Shop the Look — Amazon Product Ideas
| # | Product Search Phrase | Why It Fits |
| 1 | Roman Clay plaster wall finish terracotta | Arch surface texture paint |
| 2 | arch doorway kit flexible curved trim | Arch profile framing |
| 3 | joint compound 3.5 gallon all purpose | Arch skin coat base |
| 4 | plaster venetian trowel 14 inch | Smooth application tool |
| 5 | potted olive tree artificial indoor large | Arch entry accent plant |
26. Upholstered Riser Panels in Velvet
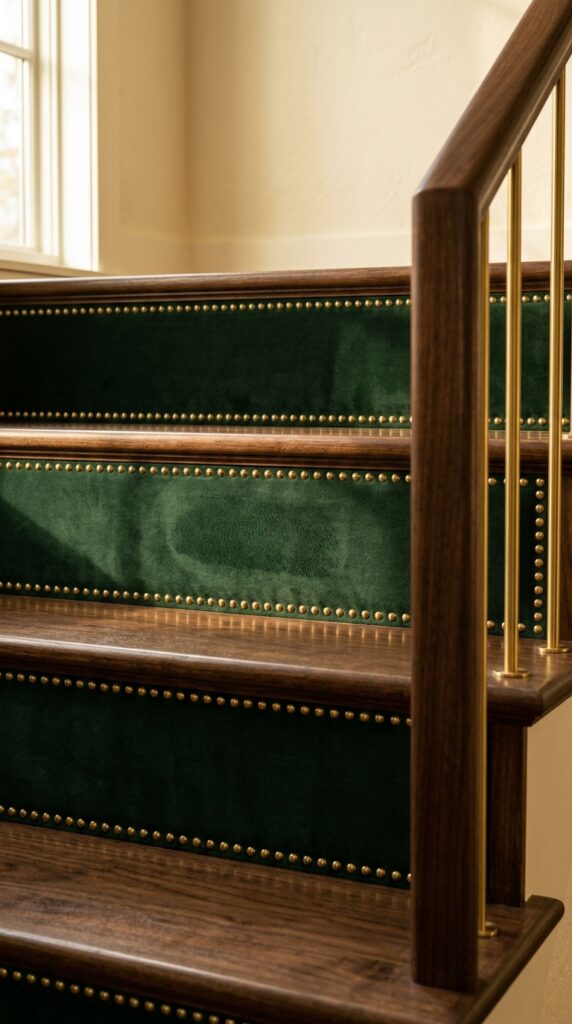
Vibe: Luxuriously layered and unexpected — risers that make you look twice and reach out to touch.
Why it works: Upholstering stair risers in velvet is a maximalist application of the riser-as-canvas principle, borrowed from the grand staircases of early 20th-century European hotels. Velvet is specifically effective because its pile direction creates a surface that shifts in tone as the viewing angle changes — risers in a straight run will each appear slightly different shades of the same color depending on whether light hits the pile with or against the grain, creating visual depth without pattern. Brass nail-head trim at the top and bottom edges performs a dual function: it is both the fastening mechanism (nails penetrate through the fabric into the riser face) and the decorative border element.
How to get it: Stretch the velvet over a ¼-inch MDF panel cut to the exact riser dimensions, stapling the fabric to the back of the panel before mounting the upholstered panel to the riser face using panel adhesive. Pre-cut panels allow the upholstery to be done on a flat work surface rather than on the stair, which is significantly more controllable and produces a tighter result.
💡 Quick Win: Velvet fabric remnants in 54-inch widths from a fabric retailer cost $15–30 per yard, and a single yard covers 4–6 standard risers depending on riser height — the full material cost of an upholstered riser project is often under $60 in fabric.
🛍️ Shop the Look — Amazon Product Ideas
| # | Product Search Phrase | Why It Fits |
| 1 | forest green velvet upholstery fabric yard | Riser upholstery material |
| 2 | brass nail head trim strip tape 1/4 inch | Riser edge trim detail |
| 3 | MDF panel 1/4 inch sheet cut to size | Upholstery backing board |
| 4 | upholstery staple gun heavy duty | Fabric tensioning tool |
| 5 | panel adhesive heavy duty construction | Panel-to-riser bonding |
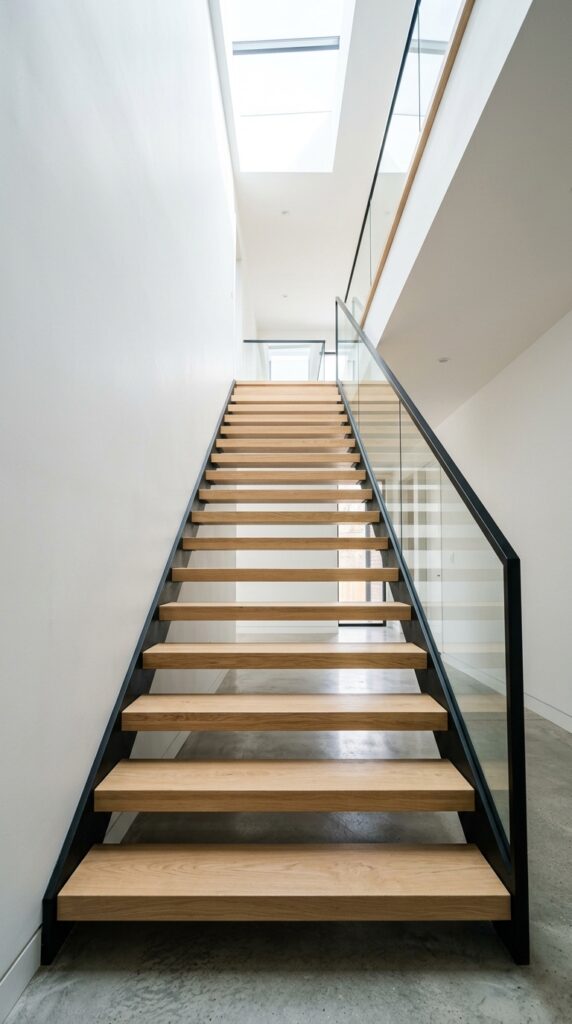
27. Floating Tread Staircase Against a White Wall

Vibe: Architecturally confident and airy — a staircase that looks like a structural proof of concept.
Why it works: Floating tread staircases — cantilevered from a structural wall with no visible support — are the most architecturally pure expression of the staircase as sculpture. The design principle is structural honesty taken to its logical extreme: the tread appears to defy gravity, and the shadow below each tread (created by the 3-inch tread thickness in side light) becomes the only visual element marking the space between steps. The white wall behind the treads is not background — it is the primary design element, the canvas against which the floating wood forms are composed.
How to get it: Floating treads require steel stringers embedded within the structural wall — typically a steel C-channel or knife-plate recessed into the wall framing and concealed by the plaster finish. This is a structural engineering and general contractor project, not a DIY installation. Tread thickness at 3 inches (rather than standard ¾-inch) is required to conceal the embedded stringer and to provide the visual mass that makes the composition credible — thin floating treads read as fragile.
🛍️ Shop the Look — Amazon Product Ideas
| # | Product Search Phrase | Why It Fits |
| 1 | solid white oak floating stair tread 3 inch | Thick cantilevered tread |
| 2 | knife plate steel tread support hidden | Structural concealed bracket |
| 3 | white oak tread oil finish matte Rubio | Grain-revealing finish |
| 4 | digital level 12 inch tread alignment | Perfect horizontal check |
| 5 | wall anchor heavy duty 500 lb rated | High-load wall fastening |
28. Color-Drenched Staircase Hall in Deep Navy
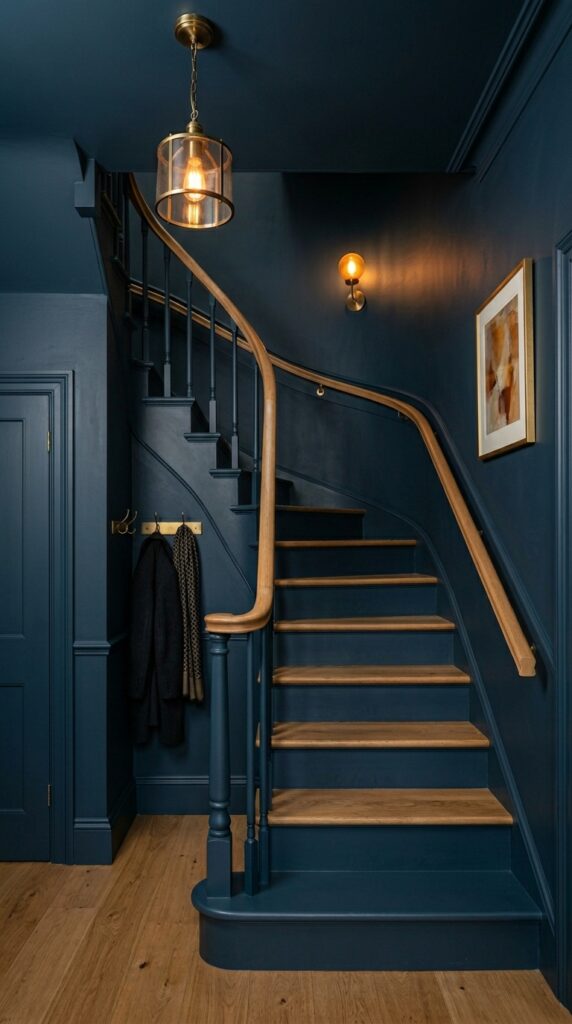
Vibe: Moody and dramatically enveloping — a staircase hall that makes the rest of the house feel lit by contrast.
Why it works: Color drenching — applying one color to every surface in a room, including ceiling and trim — eliminates all the visual interruptions created by color transitions and allows the eye to perceive the space as a single unified volume rather than a collection of surfaces. The design principle is spatial compression through tonal uniformity: the navy absorbs the room’s complexity and what remains is only the geometry of the space and the warm oak treads as the sole material contrast. Farrow & Ball Hague Blue (No. 30) is the canonical deep navy for this treatment — its complex blue-green undertone prevents it from reading as corporate or flat on matte painted surfaces.
How to get it: Apply two coats of Farrow & Ball Estate Emulsion (matte) on walls and ceiling, then two coats of their Eggshell on the trim, balusters, and risers. The slightly higher sheen of Eggshell on the trim creates a subtle surface differentiation that prevents the space from reading as undifferentiated darkness — the trim glints slightly in light while the walls absorb it.
🛍️ Shop the Look — Amazon Product Ideas
| # | Product Search Phrase | Why It Fits |
| 1 | Farrow Ball Hague Blue No 30 estate emulsion | Signature drench color |
| 2 | ceiling paint deep tinted custom dark navy | Ceiling color match |
| 3 | aged brass pendant ceiling light warm | Warm accent lighting |
| 4 | wall sconce plug-in brass warm | Secondary stair lighting |
| 5 | brass coat rail hook wall mount | Base of stair accent |
29. Compact Staircase Transformed with One Bold Wallpaper
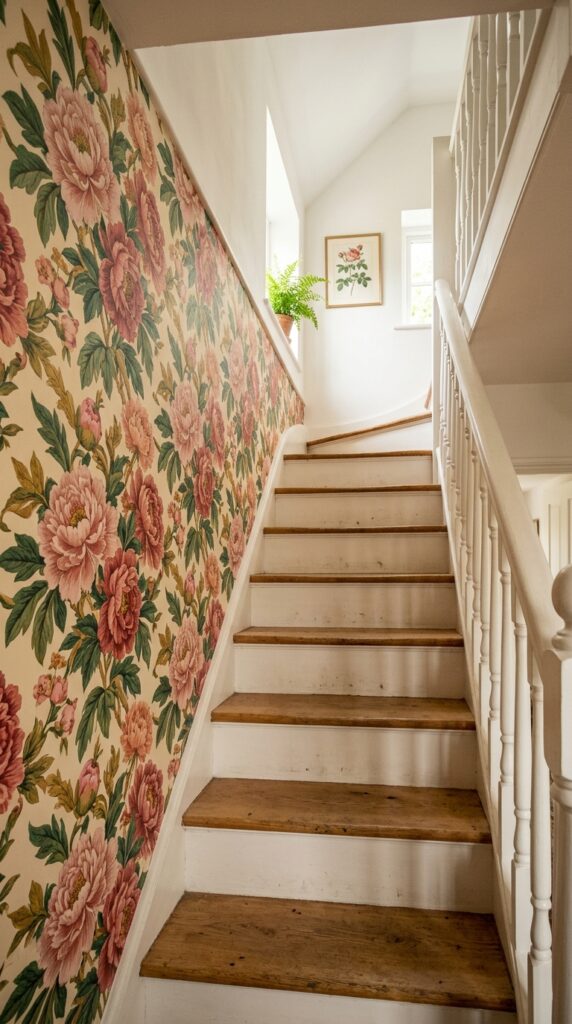
Vibe: Joyfully layered and unexpectedly lush — a narrow stair that is suddenly the best room in the house.
Why it works: A compact staircase with minimal floor width has disproportionately large wall surface relative to its footprint — the diagonal wall beside a steep stair can be 8–10 feet tall at its highest point, making it a significant canvas. A large-scale botanical wallpaper on this wall does what paint cannot: it creates visual depth through the layering of illustrated forms, making the narrow space feel rich rather than cramped. The design principle is perceived spaciousness through visual interest — the eye has so much to travel across the wallpapered surface that the narrow physical width goes unregistered.
How to get it: On a steep, narrow stair, paste the wall rather than the paper — this eliminates the challenge of handling a wet, floppy wallpaper sheet in a tight space. Paste the wall in sections and press the pre-cut paper lengths directly onto the tacky surface, which gives you more working time and better control of the difficult diagonal geometry.
🛍️ Shop the Look — Amazon Product Ideas
| # | Product Search Phrase | Why It Fits |
| 1 | large scale peony floral wallpaper blush cream | Maximalist stair wall |
| 2 | wall paste adhesive heavy duty wallpaper | Paste-the-wall method |
| 3 | wallpaper brush 12 inch smoothing | Application smoothing |
| 4 | seam roller wallpaper joint press | Seam adhesion finishing |
| 5 | plumb bob string line wall vertical | Pattern starting guide |
How to Start Your Staircase Transformation
The single most effective first move for a staircase transformation is to repaint the risers and balusters in Benjamin Moore Simply White (OC-17) in a semi-gloss finish. This one paint choice — not the handrail, not the treads, just the white vertical surfaces — is the foundational reset that makes every subsequent addition (a runner, new balusters, wallpaper) read correctly. Dirty, yellowed, or unpainted risers and balusters undermine every other design choice made in the staircase; clean white surfaces are the neutral canvas that allows everything else to register.
The most common beginner mistake is replacing the stair runner before repainting the risers. A new runner on dirty, un-designed risers and balusters reads as a rug placed in a neglected space — the contrast between the fresh runner and the untouched surrounding elements makes the renovation feel incomplete rather than considered. Always address the fixed surfaces (risers, balusters, walls) before adding the layered elements (runner, art, sconces).
For under $50 of immediate style impact: a pint of semi-gloss white trim paint and a 2-inch angled brush ($22 total) freshens all the risers and balusters; a $14 digital angle finder measures your exact stair pitch for any future project with precision; and a magnetic handrail bracket in brushed brass ($12) replaces one existing chrome or outdated bracket and starts the hardware transition.
A realistic weekend transformation — freshly painted risers and balusters, a stair runner installed, and basic wall treatment begun — takes two full days and runs $150–350 depending on runner quality. A full staircase renovation (new treads, new balusters, wallpaper, sconce lighting) is typically a 2–4 week project spanning multiple weekends, with a realistic budget of $800–2,500 for materials in a standard 12–14 step residential stair. Professional installation adds $500–1,500 depending on the scope.
Frequently Asked Questions About Staircase Design
What is the difference between a staircase baluster and a newel post?
A baluster is one of the vertical members that fill the open space between the handrail and the tread or bottom rail — a single staircase typically has 2–3 balusters per step, spaced to meet code requirements of no more than 4-inch clear span. A newel post is the larger, structurally significant anchor post at the base, top, and any landing of the staircase — it terminates the handrail run and provides the primary structural anchoring for the entire railing system. Newel posts are typically 3.5–6 inches square and 42–54 inches tall; balusters are typically ¾–1 inch in diameter or ⅝–¾ inch square and much slimmer. Replacing both gives the most complete transformation; replacing only balusters gives a strong mid-level result for a fraction of the cost.
What paint colors work best on stair risers?
Benjamin Moore Simply White (OC-17) in semi-gloss is the most universally successful riser color — its warm-leaning white reads as crisp but not harsh against both light oak and dark walnut treads and works with wall colors from warm greige to deep navy. For a bolder approach, all-over riser color — using the same color as the adjacent walls in an eggshell finish — creates a color-drenched effect where the stair feels embedded in the room rather than separate from it. Avoid flat or matte finishes on risers: scuffs and marks don’t wipe clean from matte surfaces, and riser faces are constantly hit by shoes, bags, and vacuum cleaners.
How much does it cost to install a new stair runner?
A stair runner installation typically costs $400–1,200 in materials plus $150–400 in professional installation for a standard 12-step residential stair. Material cost is driven primarily by runner quality: a wool runner from a quality manufacturer runs $25–55 per foot (for 36-inch width), while a synthetic or polypropylene runner runs $8–18 per foot. A 12-step stair with a landing typically requires 16–20 linear feet of runner. Brass stair rods add $25–65 per step in hardware cost. DIY installation using a carpet installer’s knee kicker and stair tool is achievable in a full day for someone with basic home improvement experience.
Can I replace my staircase balusters without replacing the handrail?
Yes — this is one of the most common and cost-effective staircase upgrades. Most existing handrail systems use a shoe rail at the tread surface that accepts interchangeable baluster pins, meaning new balusters simply drop into the existing holes with a set screw or pin-top connection. The handrail above and the shoe rail below remain untouched. The only compatibility check required is pin diameter: balusters come in ½-inch and 1⅜-inch pin sizes depending on the system. Photograph the existing baluster base before ordering replacements and confirm the pin size with the manufacturer. Converting from turned wood to square iron balusters typically requires a new shoe rail rather than re-using the existing one — this adds $40–80 in materials but is a straightforward swap.
What staircase tread material is the most durable for high traffic?
White oak with a hardwax oil finish (such as Rubio Monocoat) is the most durable residential staircase tread material for visible surface wear — white oak’s Janka hardness rating of 1,360 lbf exceeds maple’s standard floor-grade rating, and the open grain accepts oil finishes that penetrate rather than film, meaning spot repairs don’t show sheen differences the way polyurethane-finished treads do. For extreme durability in rental or commercial settings, porcelain tile treads rated for stair use (look for DCOF — Dynamic Coefficient of Friction — of 0.42 or higher wet) outlast any wood option but require an anti-slip nosing strip to meet code. Avoid bamboo and engineered wood on stair treads: both show denting and crushing damage at the nose edge significantly faster than solid white oak under foot traffic.
Ready to Transform Your Staircase Style?
These 29 ideas address every zone and material of staircase design — from the color of the handrail to the texture of the riser face, from the lighting embedded in the tread nosing to the wallpaper climbing the full stair height — because a true staircase transformation works as a system, not as a single swap. Starting with one clearly resolved element — the riser paint, the baluster replacement, the stair runner — is not a partial commitment; it is the correct sequence, building a foundation that makes every subsequent layer legible and intentional. Today, take your existing stair’s measurements — rise, run, total step count, wall height — and keep them in your phone. With those numbers in hand, every idea in this list becomes actionable in a single shopping session. When the transformation is complete and you stand at the base and look up at a staircase that finally reflects the care that was put into it, you’ll understand why so many designers call it the spine of the interior. Pin the ideas that made you stop scrolling — your staircase has been waiting for exactly this.