There’s something undeniably exciting about descending those stairs and stepping into a space that feels like your own private lounge — built entirely around good drinks, great company, and nights that stretch a little longer than planned. Basement bars carry that rare magic: part speakeasy mystique, part home sanctuary, part entertainment hub. Whether you’re dreaming of a sleek modern cocktail counter, a rustic whiskey den, or a neon-lit game room bar, the right design can transform a forgotten basement into the most-used room in your house. These 28 brilliant basement bar ideas cover every style, budget, and square footage — and every one of them is worth saving.
Why a Basement Bar Works So Well
A basement bar succeeds where other entertaining spaces fall short because it operates on its own terms. Unlike a living room, a basement naturally creates separation — it becomes a destination. That enclosed atmosphere, combined with intentional lighting and materials, generates an ambiance that upper-floor rooms simply can’t replicate. You’re not just adding a bar; you’re building a room with its own distinct personality.
The defining materials of a great basement bar lean into contrast and texture. Think dark wood countertops against exposed pale brick, matte black fixtures paired with warm Edison bulbs, or glossy subway tile reflecting low pendant lighting. These pairings create depth and visual richness that photograph beautifully and feel genuinely luxurious in person. The tactile quality of leather barstools, worn oak shelving, and brushed metal hardware signals that real thought went into the space.
Basement bars are having a genuine cultural moment. Pinterest searches for “home bar ideas” and “basement entertainment room” have surged as homeowners reclaim underused spaces. The desire to build real, curated experiences at home — rather than defaulting to restaurants and venues — has deepened into a full interior design movement, and the basement bar sits right at its center.
Even compact basements can pull this off beautifully. A single 8-foot run of cabinetry, open shelving for bottle display, and two barstools can create a fully functional, visually stunning bar in under 40 square feet. The key is intention — every element should earn its place.
1. The Dark Wood Whiskey Den
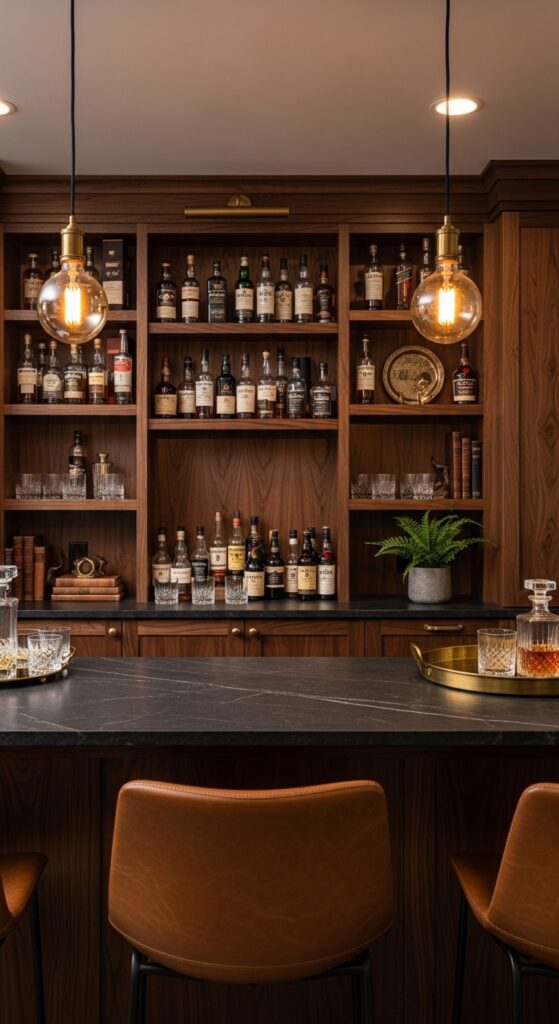
Vibe sentence: This is the bar that feels like it smells of leather and oak even in a photograph — a slow, unhurried space built for serious sipping.
What makes it work: Floor-to-ceiling dark walnut shelving creates a cocooning effect that makes the room feel like a private club. The deep wood tones absorb ambient light while letting the glowing amber bottles and crystal decanters become natural focal points. Brass hardware bridges the gap between old-world elegance and livable warmth.
How to achieve it: Source reclaimed walnut shelving boards from lumber yards or architectural salvage shops for authentic grain texture. Pair with unlacquered brass bar rail and simple Edison pendants — this three-element combination does most of the heavy lifting.
💡 Swap standard cabinet pulls for solid brass bar handles ($25–$40 per pair) — the color shift alone adds years of character.
2. The White Subway Tile Cocktail Bar
Vibe sentence: Crisp, bright, and impossibly clean — this bar looks like it belongs in a boutique hotel rooftop, not a basement.
What makes it work: White beveled subway tile creates a graphic rhythm on the wall that looks intentional and timeless rather than trendy. The contrast between the bright tile and black iron shelving gives the composition strong visual structure. Marble countertops — even a marble-look quartz — add a luxury finish without overwhelming the palette.
How to achieve it: Use 3×6 beveled subway tile with slightly darker grout (warm grey, not bright white) to emphasize the grid pattern. Pair with Carrara marble-look quartz countertops — far more durable than real marble and available from $50 per square foot.
3. The Exposed Brick Speakeasy

Vibe sentence: Walking up to this bar feels like you’ve found a hidden door in a 1920s building — and that’s exactly the point.
What makes it work: Raw exposed brick is the ultimate shortcut to instant atmosphere; it brings decades of texture and history into a space no new material can fake. The combination of antique mirrored shelving with low filament lighting creates infinite warm reflections that make the room feel larger and more layered. Dark mahogany grounds it all without competing.
How to achieve it: If your basement walls aren’t brick, use thin brick veneer panels ($3–$6 per square foot) applied directly to drywall — they’re indistinguishable at a glance. Finish the look with an antique mirror sheet cut to fit your back bar shelving unit.
💡 Vintage cocktail posters in uniform black frames cost under $50 total and add enormous personality to bare brick walls.
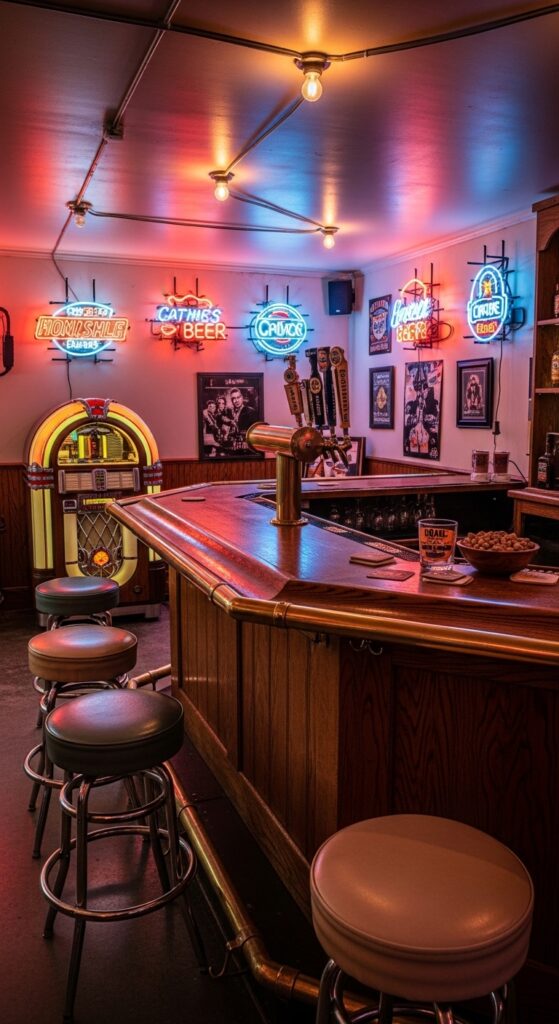
4. The Neon Sign Game Room Bar
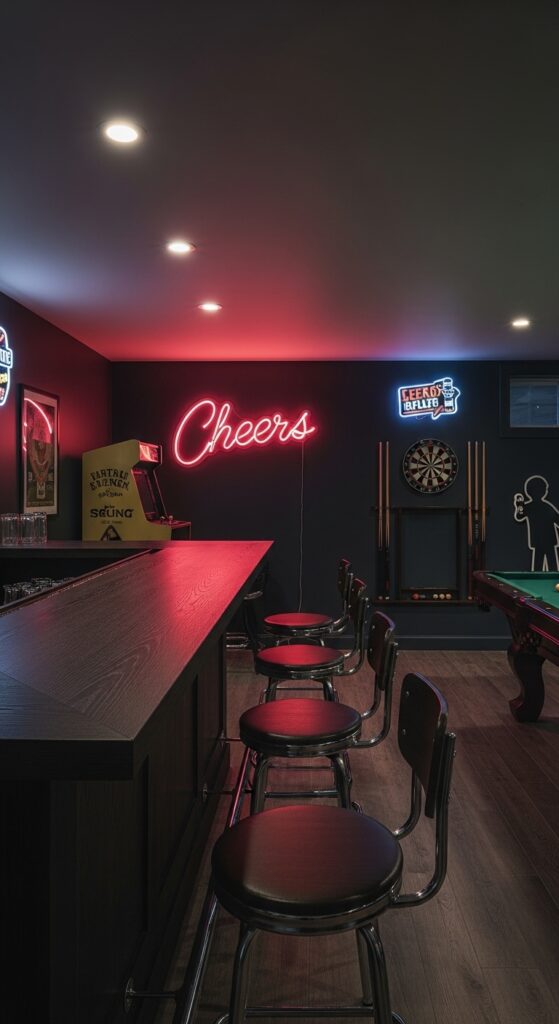
Vibe sentence: This basement doesn’t whisper “home bar” — it shouts “the party starts here” in glowing neon.
What makes it work: A single custom neon sign transforms a functional bar into a personality-filled destination. Placing it against a dark charcoal or black accent wall amplifies the glow dramatically, turning it from decoration into the room’s defining light source. The contrast of warm wood tones against cool neon creates a surprisingly sophisticated tension.
How to achieve it: Custom LED neon signs (far safer and more affordable than glass neon) run $80–$200 from Etsy makers — choose a phrase, your last name, or a cocktail motif. Mount on a painted black or deep charcoal wall for maximum impact.
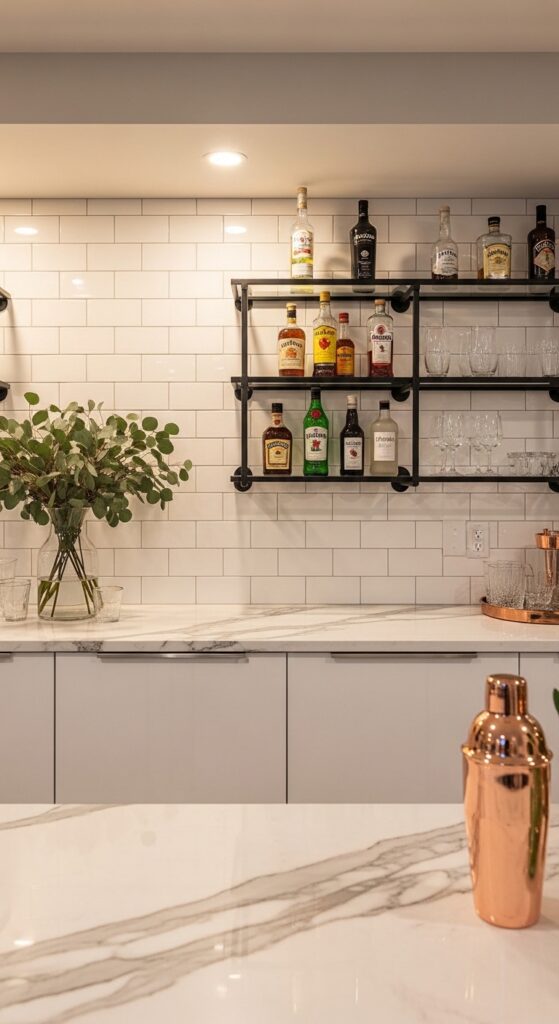
5. The Industrial Pipe Shelf Bar
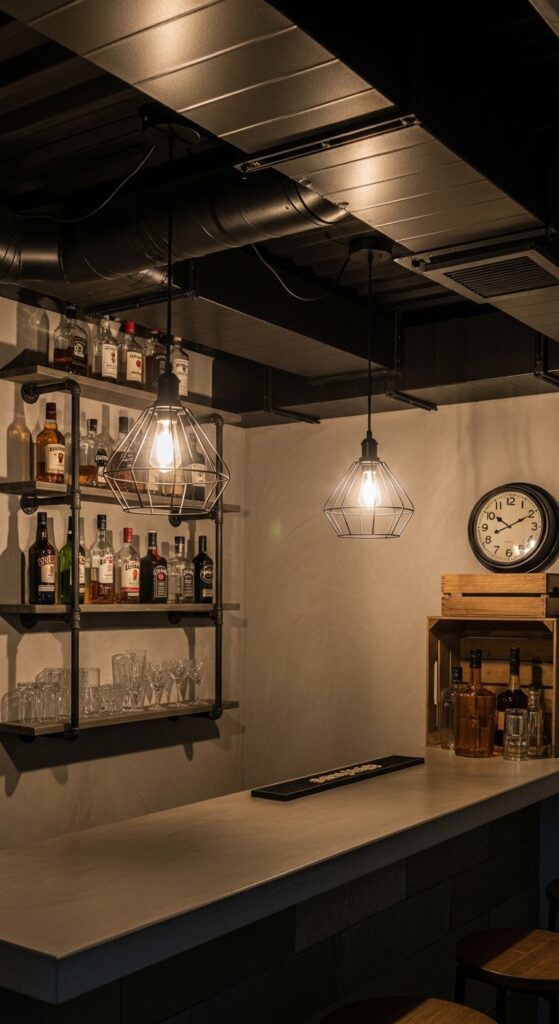
Vibe sentence: This bar looks like it was built inside a converted factory — deliberately raw, unapologetically cool.
What makes it work: Black iron pipe shelving has structural honesty — you can see exactly how it works, and that transparency reads as confidence. Paired with a poured concrete countertop, the industrial language becomes a complete design vocabulary rather than an afterthought. Exposed ceiling ductwork, painted black instead of hidden, reinforces that aesthetic throughout the whole room.
How to achieve it: DIY iron pipe shelving kits are available from home improvement stores for $80–$150 per shelf run. For the countertop, Ardex feather finish applied over existing surfaces mimics concrete for under $100 and requires no new slab.
💡 Paint exposed HVAC ducts and beams matte black — it’s a $30 project that makes the ceiling look intentional rather than unfinished.
6. The Floating Shelves Minimalist Bar
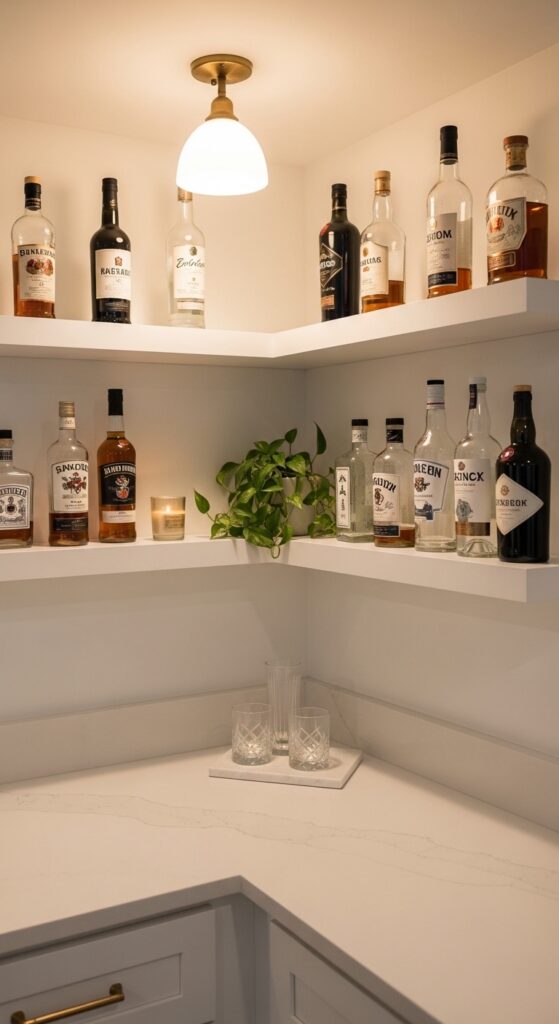
Vibe sentence: Less is genuinely more here — every bottle, every glass, every inch is chosen deliberately, and the restraint is what makes it beautiful.
What makes it work: Floating shelves with no visible brackets create a seamless, gallery-quality presentation for your bottle collection. Limiting decor to three to five curated items prevents visual clutter and ensures the bottles themselves become the art. White-on-white cabinetry and shelving keeps the eye focused on the warm colors of the spirits.
How to achieve it: Install IKEA BERGSHULT floating shelves (hidden bracket system) in white or oak-effect. Edit your bottle display ruthlessly — keep only the most visually interesting labels and decant into matching glass decanters for a unified look.
7. The Basement Tiki Bar
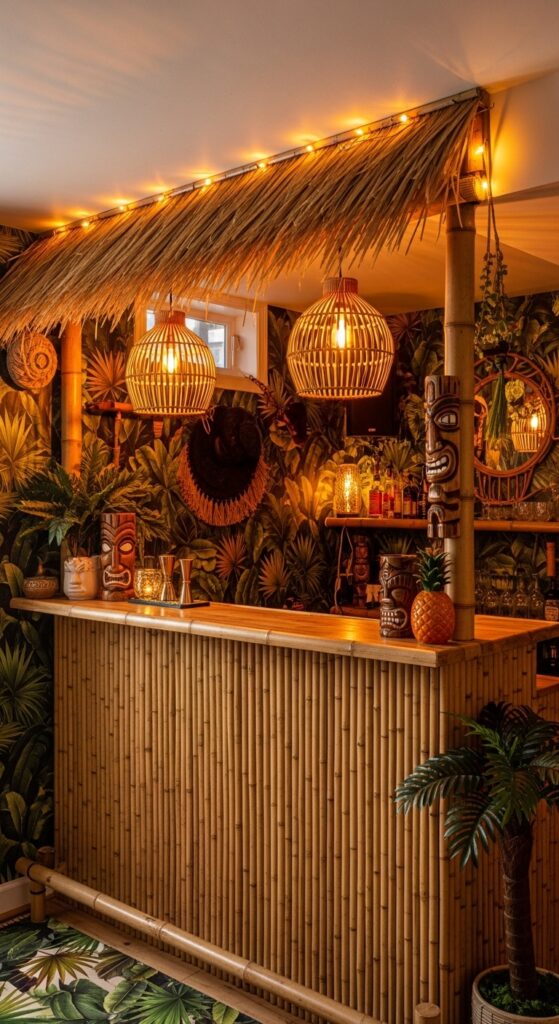
Vibe sentence: Step down those stairs and suddenly you’re three thousand miles away — this bar is a full sensory vacation.
What makes it work: The tiki bar works because it commits completely to its theme. Bamboo cladding on the bar face, thatched roof details, and tropical wallpaper create a layered environment where every glance reinforces the escapism. The warmth of natural bamboo and rattan against tropical green is one of the most cheerful, inviting combinations in interior design.
How to achieve it: Bamboo roll fencing ($20–$40 per roll) attached to a plywood bar face instantly creates the tiki look. Layer peel-and-stick tropical leaf wallpaper on the back bar wall for under $60. String lights threaded through bamboo complete the ambiance.
💡 Tiki mugs collected gradually from flea markets ($5–$15 each) build a collection that doubles as both décor and drinkware.
8. The Built-In Banquette Bar Nook
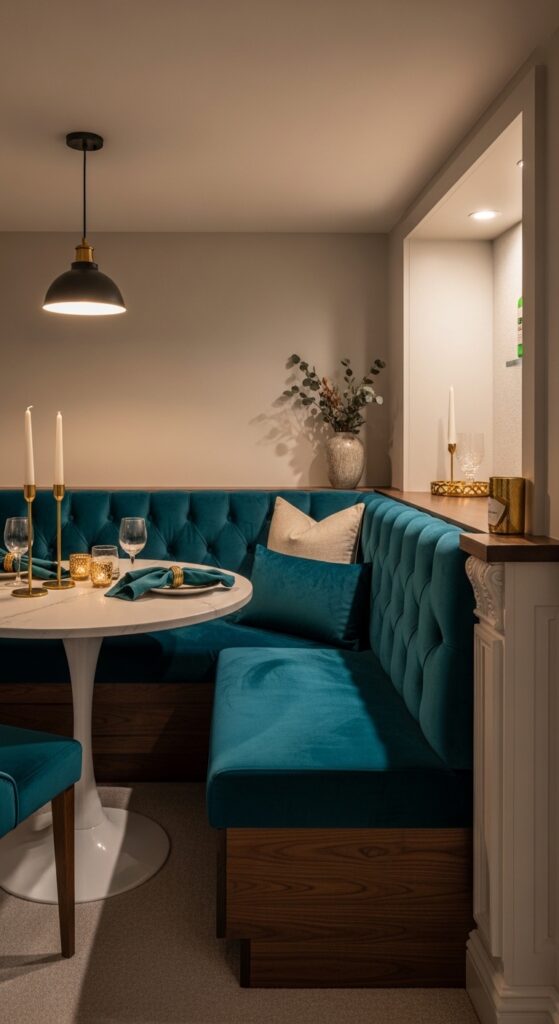
Vibe sentence: This is the corner where conversations go long and glasses get refilled without anyone wanting to leave.
What makes it work: Pairing a built-in bar alcove with a permanent banquette seating nook solves the layout problem most basement bars ignore — the drinking space and the sitting space are designed together rather than as afterthoughts to each other. Deep velvet upholstery in a jewel tone (teal, forest green, bordeaux) adds sensory luxury at a fraction of furniture cost.
How to achieve it: Build a simple plywood banquette box and have a local upholsterer pad and cover the seat and back cushions in performance velvet — total cost around $300–$500 for the full nook. Add a $150–$200 pedestal dining table and the pairing looks custom.
9. The Chalkboard Menu Wall Bar
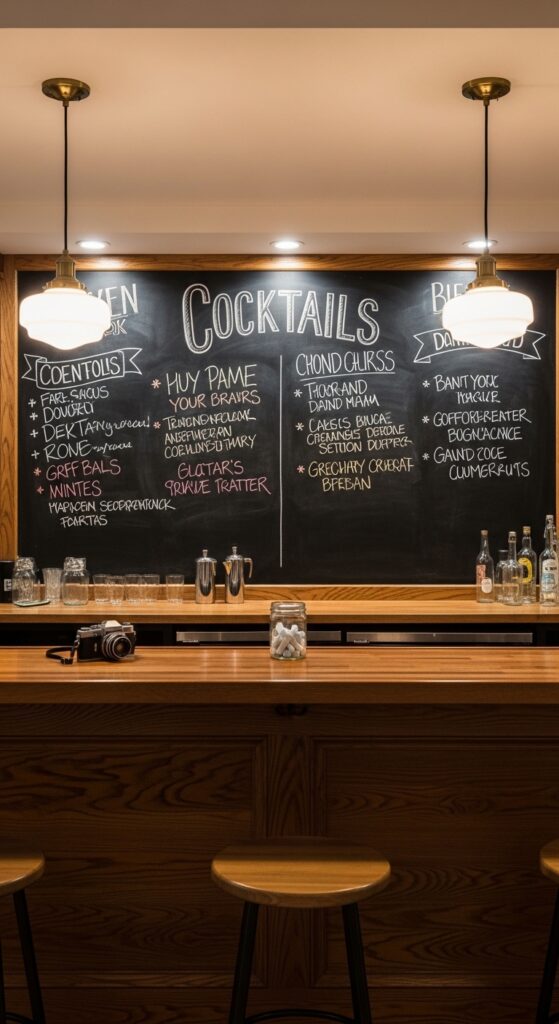
Vibe sentence: There’s something endlessly charming about a handwritten cocktail menu — it makes even Tuesday night feel like a special occasion.
What makes it work: A chalkboard wall solves the blank back bar wall problem while adding interactivity and personality. It functions simultaneously as décor, menu board, and conversation piece — guests always stop to read it. The matte black surface provides ideal contrast for your bottle display placed in front of it.
How to achieve it: Apply chalkboard paint (two coats, $15–$20 per quart) to the entire back bar wall. Season the surface before first use by rubbing chalk across the whole wall and wiping clean — this prevents ghosting. Use chalk markers for crisp, legible lettering that won’t smear.
10. The Mirrored Back Bar Glamour Wall
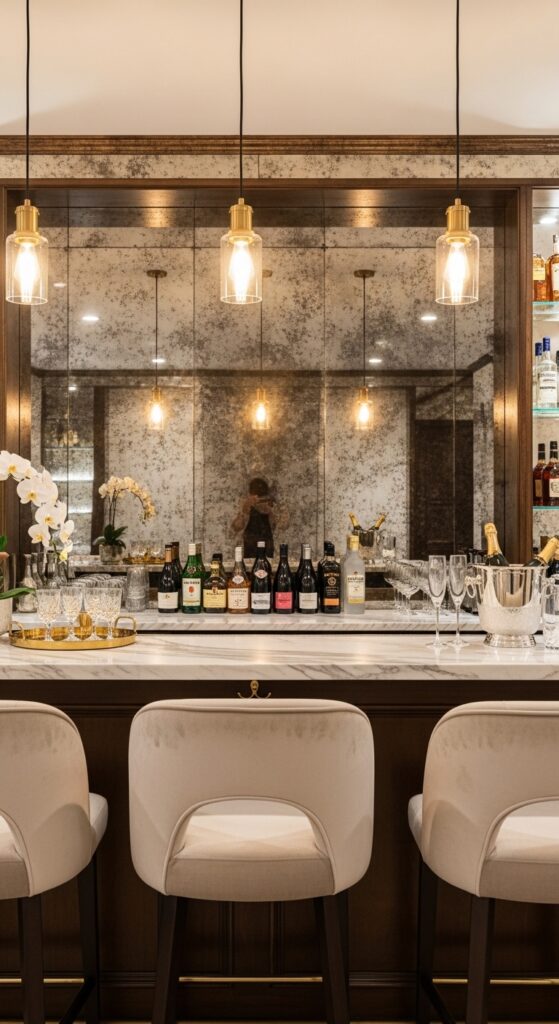
Vibe sentence: This bar doesn’t just reflect light — it multiplies the whole room, making a basement feel as grand as a five-star hotel bar.
What makes it work: An antiqued or smoked mirror panel on the back bar wall does two things simultaneously: it creates the illusion of depth and doubled space, and it elevates every bottle displayed in front of it into something resembling a jeweled installation. Gold fixtures against ivory velvet barstools create a glamorous tone without becoming garish.
How to achieve it: Purchase pre-cut antiqued mirror panels from glass suppliers — expect $8–$15 per square foot. Install on a flat back bar wall with mirror adhesive and secure with decorative mirror clips. Pair with matte gold cabinet hardware from Amazon ($3–$5 per knob).
💡 Even one 24×36″ antiqued mirror panel behind your bottles makes a dramatic visual difference — you don’t need to cover the entire wall.
11. The Moody Dark Green Jewel Box Bar

Vibe sentence: Stepping into this bar feels like ducking into a velvet-lined jewelry box — rich, enveloping, and completely transportive.
What makes it work: Painting walls and ceiling the same deep color is the single most impactful technique for creating drama in a small space. Deep forest green (think Farrow & Ball’s “Calke Green” or Benjamin Moore’s “Hunter Green”) wraps the room in a lush, almost botanical warmth. Aged brass hardware against that green is one of the most photographed combinations in contemporary interior design for good reason.
How to achieve it: Paint all four walls and the ceiling the same deep green in eggshell finish — this costs under $100 in paint. Follow with aged brass fixtures: Rejuvenation and Schoolhouse Electric carry affordable options in this finish from $40–$120.
12. The Wine Cellar Corner Bar
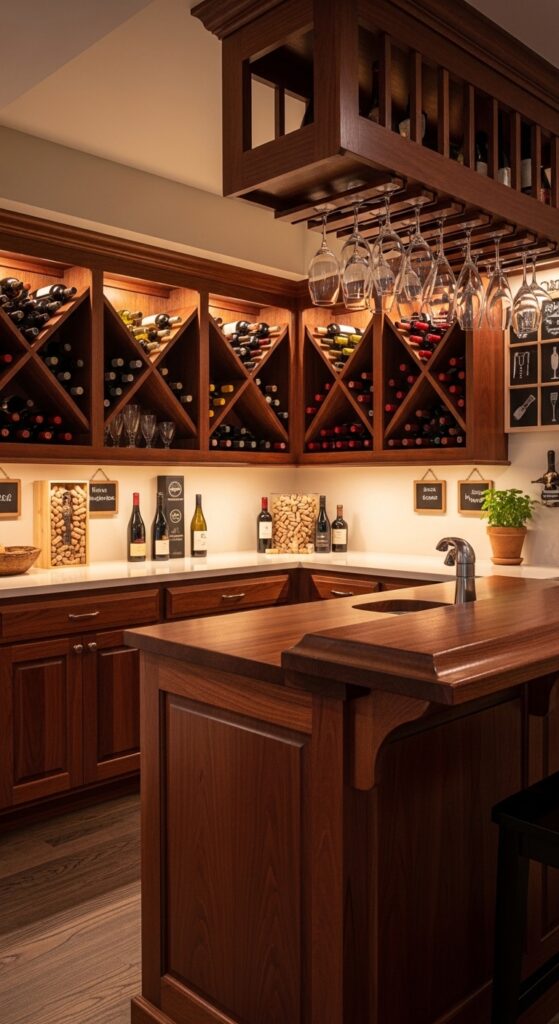
Vibe sentence: This corner quietly announces that the host takes both wine and hospitality seriously — and it delivers on both counts.
What makes it work: A floor-to-ceiling wine rack wall transforms bottle storage from a practical necessity into the room’s central visual feature. Under-cabinet lighting illuminating the bottles from below makes the collection glow like a display case. Overhead hanging glass storage keeps the bar top clear while creating a beautiful canopy of stemware.
How to achieve it: Modular wine rack systems (IWA Wine Accessories, Wine Enthusiast) allow you to build a custom-sized wall unit without carpentry skills — from $200 for a 50-bottle unit. Add LED strip lighting underneath each shelf level for the glowing bottle effect.
💡 Mount a hanging wine glass rack (IKEA GRUNDTAL, ~$25) under open shelving — it frees counter space and looks intentional.
13. The Reclaimed Wood Rustic Farmhouse Bar
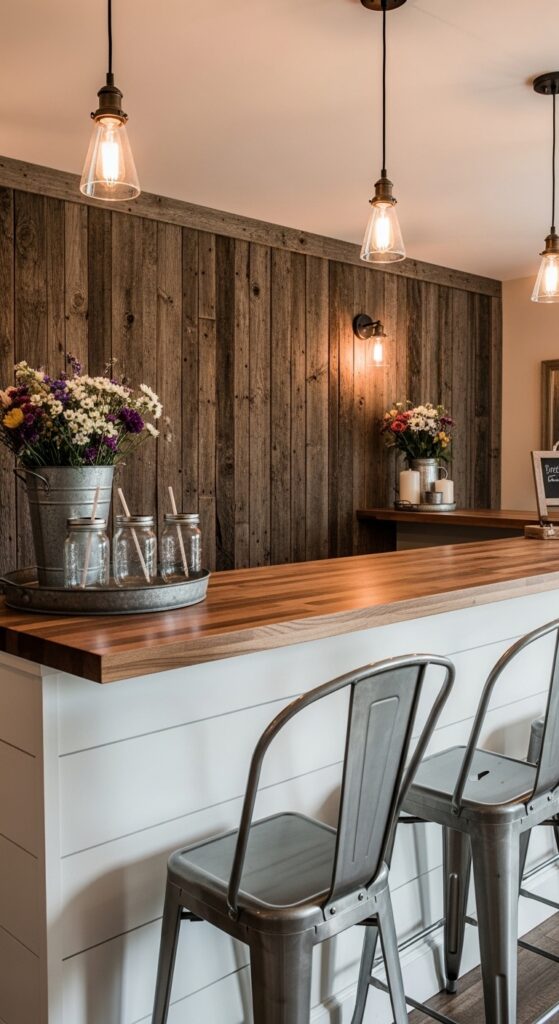
Vibe sentence: This bar feels inherited rather than designed — like it’s been part of the home forever, full of warmth and honest materials.
What makes it work: Reclaimed barn wood on the feature wall brings genuine texture that no new material can fake — every knot, crack, and grain variation tells a story. The combination of weathered grey-brown wood with clean white shiplap on the bar front creates a pleasing contrast between rough and refined. Butcher block countertops add warmth and an organic quality that stone counters can’t match here.
How to achieve it: Source reclaimed barn wood planks from Etsy sellers or local salvage yards — expect $3–$8 per square foot. Install horizontally with a nail gun on a plywood backer. Seal with matte polyurethane to preserve the weathered look without making it shiny.
14. The Tropical Wallpaper Statement Bar
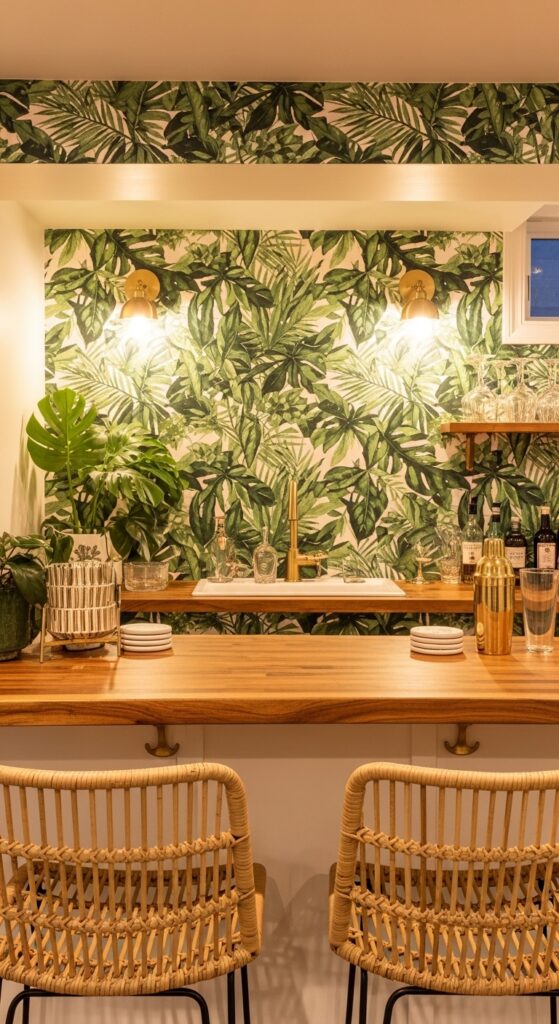
Vibe sentence: One wall of the right wallpaper and suddenly a plain basement bar has the confidence of an interior designer’s showroom.
What makes it work: A single bold wallpaper on the back bar wall functions as artwork scaled to fit the entire room. Large-format botanical prints in deep greens against cream or white backgrounds have become a signature of considered modern interiors. The key is limiting the wallpaper to one wall — the contrast with the remaining plain walls amplifies its impact.
How to achieve it: Peel-and-stick wallpaper from Spoonflower or Chasing Paper makes this a commitment-free project — the best botanical prints run $5–$9 per square foot. Cover only the back bar wall (typically 8–12 square feet for a standard bar) and keep everything else neutral.
15. The Concrete and Steel Modern Bar
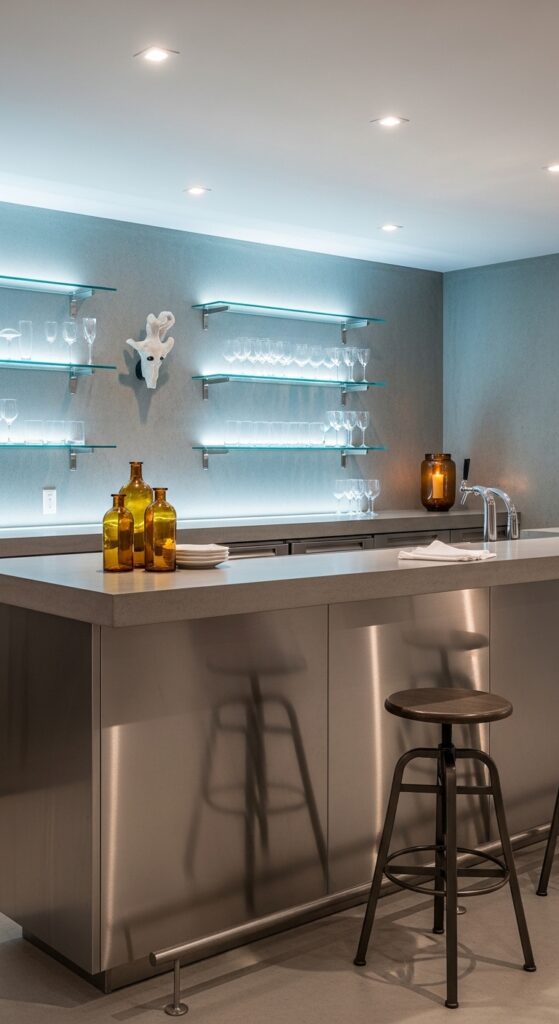
Vibe sentence: This bar is edited to its absolute essence — clean, architectural, and entirely sure of itself.
What makes it work: The visual power here comes from contrast in surface finish rather than color — matte concrete against reflective steel, solid mass against transparent glass. LED strip lighting under glass shelves makes each shelf appear to float while illuminating the bottles from below with a gallery-like precision. The restraint in décor forces the materials to do all the work, and they do it beautifully.
How to achieve it: Install tempered glass shelves on standoff hardware ($15–$30 per bracket) mounted directly to the concrete or drywall wall. Add adhesive LED strips ($20–$40 for a full run) underneath each shelf for the illuminated floating effect.
16. The Vintage Saloon Bar
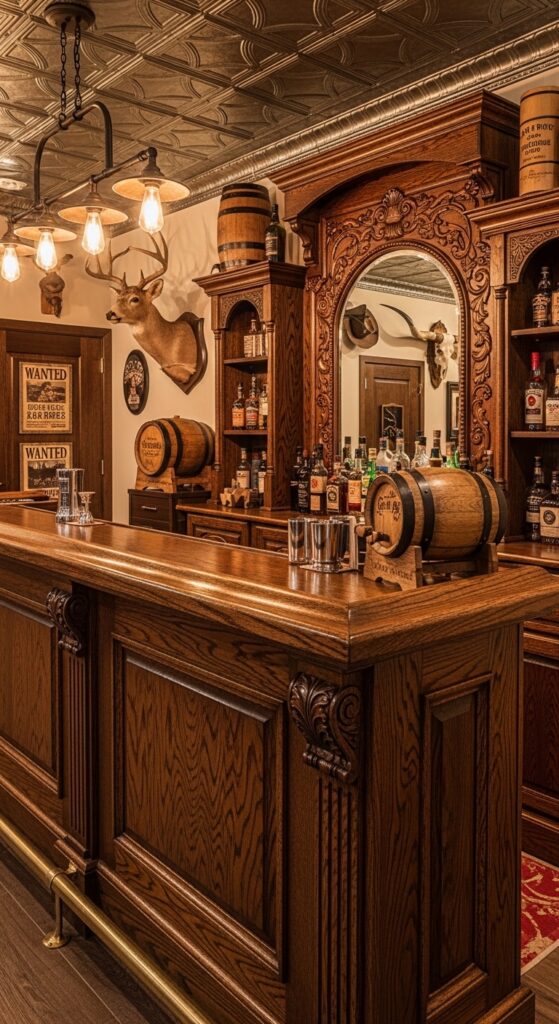
Vibe sentence: This bar has stories — decades of them, pressed into every carved detail of that oak back bar and every scratch on the old mirror.
What makes it work: The ornate carved back bar mirror is the anchor piece that makes the whole saloon aesthetic work — its scale and presence command the room in a way no modern fixture can. Vintage whiskey barrel accents as side tables or pedestals reinforce the narrative without needing more wall décor. Tin ceiling tiles complete the period illusion above.
How to achieve it: Antique back bar mirrors appear regularly on Facebook Marketplace, Craigslist, and architectural salvage sites — budget $200–$800 depending on condition. For new builds, decorative framed mirror units mimicking antique bar mirrors are available from specialty retailers around $300–$600.
17. The Black Matte Cabinet Sleek Bar
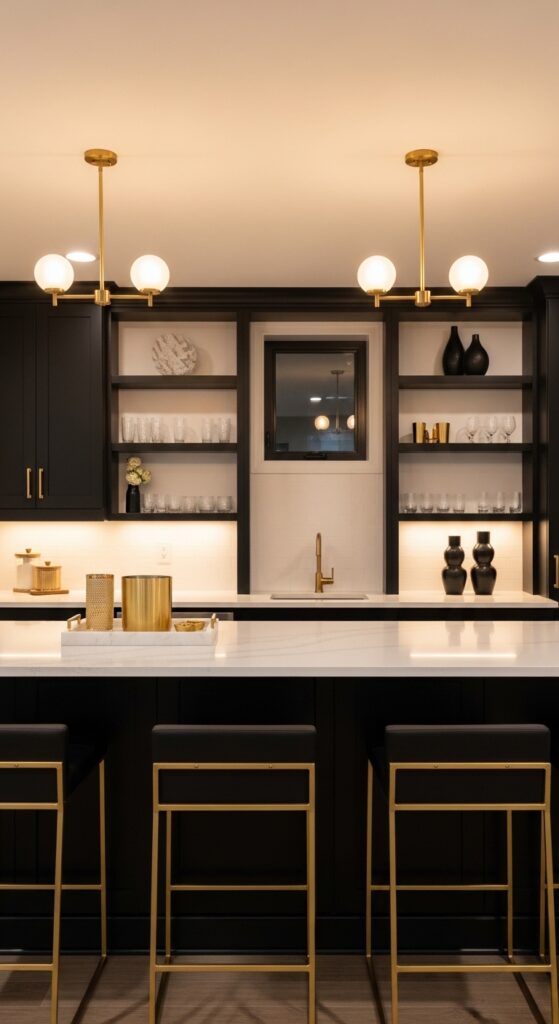
Vibe sentence: High contrast and zero apology — this bar is designed for people who know exactly what they want.
What makes it work: Matte black cabinetry with a white quartz waterfall countertop is the strongest high-contrast pairing in contemporary kitchen and bar design. The waterfall edge — where the countertop flows vertically down the side panel — adds a custom, architectural detail that signals real design investment. Gold fixtures act as warm punctuation against the cool black-and-white scheme.
How to achieve it: Matte black cabinet paint (Rust-Oleum Cabinet Transformations in matte finish, ~$70 per kit) can update existing cabinetry without replacement. Pair with brushed gold bar pulls ($5–$15 each) and a quartz countertop in Calacatta or Statuario pattern.
💡 Under-cabinet LED strips in warm white ($25 for a full run) do more visual work in a dark cabinet scheme than any overhead fixture.
18. The Corner Wet Bar with Sink
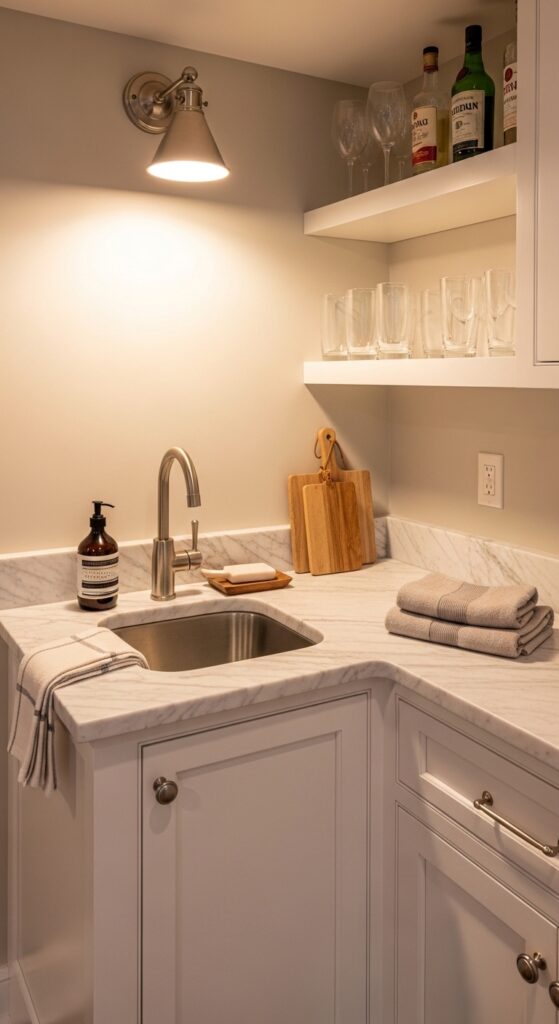
Vibe sentence: A wet bar with a real sink transforms a fun project into a genuinely functional feature that earns its place every single day.
What makes it work: A built-in sink elevates the entire bar experience — you can rinse glasses, fill ice, and make cocktails without a single trip upstairs. Corner layouts are particularly efficient because they use two walls for storage and display while leaving floor space open for barstools. White shaker cabinetry keeps the utility of the wet bar from feeling clinical.
How to achieve it: A 15″ undermount bar sink (BLANCO, Kraus, or Elkay) costs $100–$250 and installs on the same plumbing principles as a full-sized sink. Pair with a single-hole bar faucet in brushed nickel or matte black, $60–$150, for a complete look.
19. The Gallery Wall Sports Bar
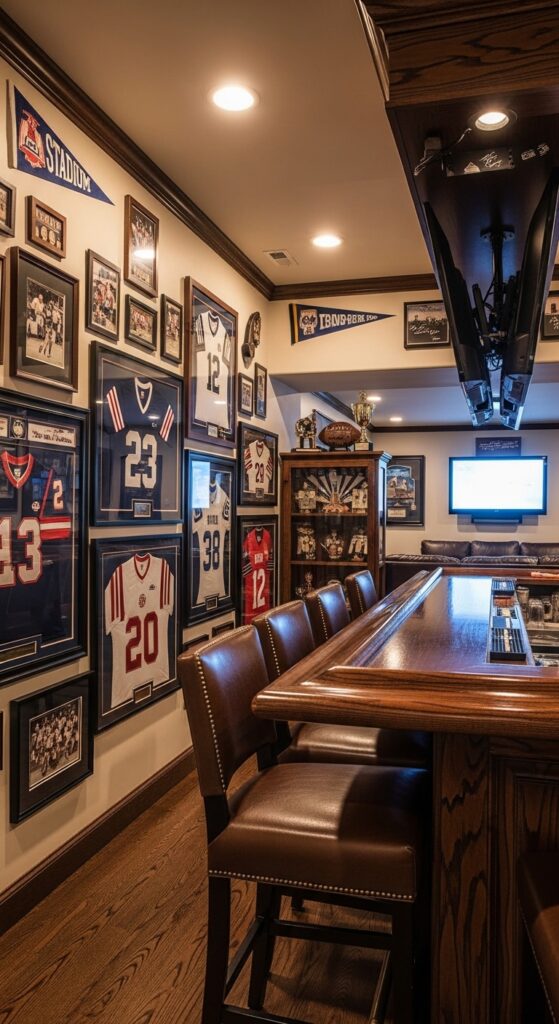
Vibe sentence: This bar is unabashedly for fans — and it makes no apologies for knowing exactly who it’s designed to please.
What makes it work: Framing jerseys and sports photography in uniform black frames transforms personal memorabilia into a cohesive gallery wall that looks designed rather than accumulated. The consistency of frame color and spacing is everything — the same collection in mismatched frames would feel like a storage room wall. A dark wood bar with leather seating gives the sports memorabilia a premium backdrop.
How to achieve it: Display jerseys in shadow box frames (IKEA RIBBA deep box frames work perfectly, $20–$30 each). Maintain a 3-inch gap between all frames and a consistent grid layout — use painter’s tape on the floor to plan placement before driving nails.
20. The Basement Pool Bar with Pass-Through Window
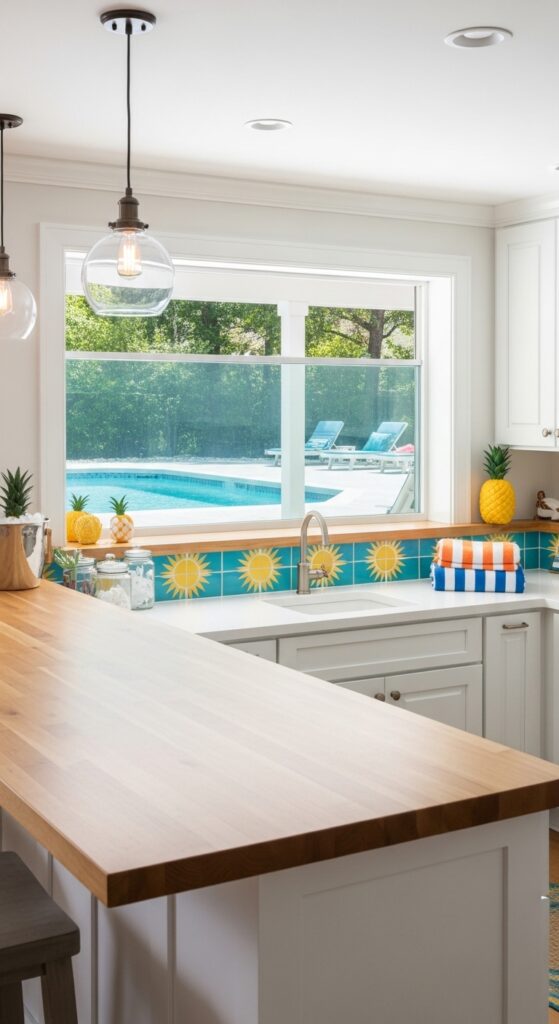
Vibe sentence: Opening a pass-through window to the pool area is the architectural move that turns a basement bar into a full resort experience.
What makes it work: A pass-through window connecting the indoor bar to an outdoor pool deck creates seamless indoor-outdoor entertaining — guests can order drinks from the pool without drying off and coming inside. The natural light flooding through the window visually expands the basement, solving the “too dark” problem many basement bars face. Aqua tile accents on the bar face echo the pool water beautifully.
How to achieve it: A pass-through window requires cutting through the foundation wall, which needs a structural engineer’s sign-off — budget $1,500–$3,000 for the opening including lintel. Finish with a fold-down wood-topped serving ledge on the exterior side for a full bar window effect.
21. The Moody Blue Velvet Lounge Bar
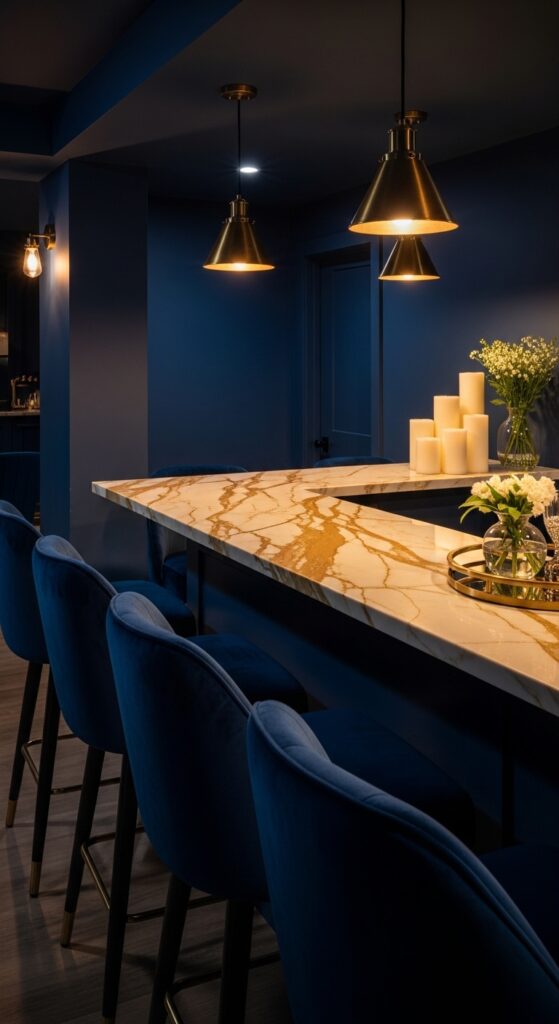
Vibe sentence: This bar exists entirely in evening mode — from the velvet to the candlelight, everything here is designed for after dark.
What makes it work: Deep navy walls with pale gold marble countertops create a jewel-box richness that photographs dramatically and feels even better in person. Navy velvet barstools add tactile luxury that plain upholstery or wood seats can’t approach. The rule here is consistency — let the navy and brass tell the whole story and resist adding other colors.
How to achieve it: Paint walls in Benjamin Moore’s “Hale Navy” or Sherwin-Williams’ “Naval” in eggshell — both are benchmark navy shades that interior designers return to repeatedly. Reupholster existing barstools in performance velvet from Fabric.com ($15–$25 per yard) for a fraction of new stool cost.
22. The Ceiling-Mounted Bottle Rack Bar
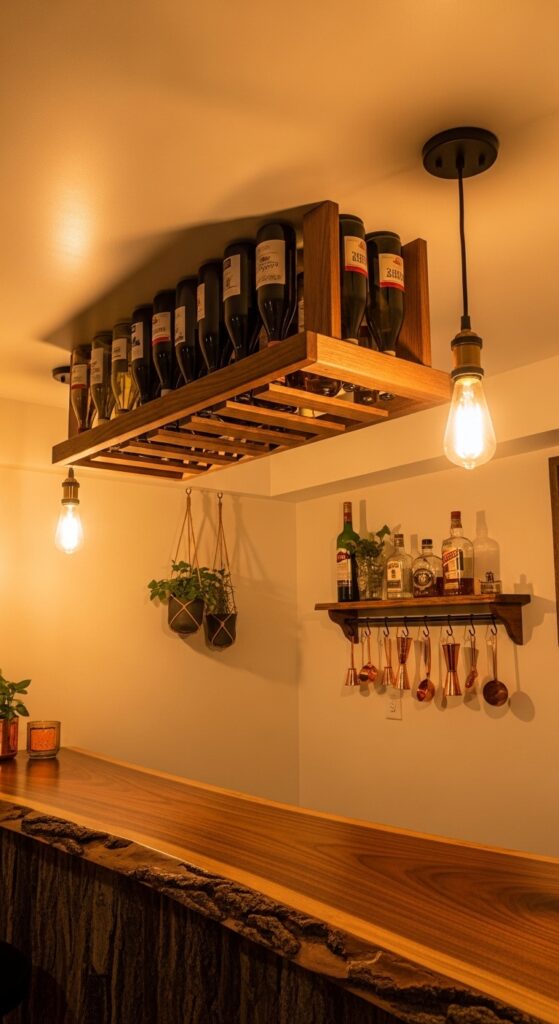
Vibe sentence: Looking up in this bar is half the experience — bottles hanging overhead like amber-lit architectural sculpture.
What makes it work: A ceiling-mounted bottle rack solves wall space limitations brilliantly while creating a conversation piece that no guest can ignore. The overhead position draws the eye upward, making the room feel taller, while the warm amber colors of the spirits bottles create a warm, glowing canopy. A live edge wood countertop below connects the earthy, handcrafted quality of the rack.
How to achieve it: Build a simple ceiling-mounted grid from 2×4 lumber with drilled holes to accept standard bottle necks — wine bottle necks fit a 1.25″ drill bit hole precisely. Mount to ceiling joists with lag bolts for secure support. Paint the rack the same color as the ceiling for a seamless built-in appearance.
💡 Hang a few copper bar tools (jigger, strainer, muddler) from S-hooks on the rack edge for décor that’s also completely functional.
23. The Vintage Apothecary Bar
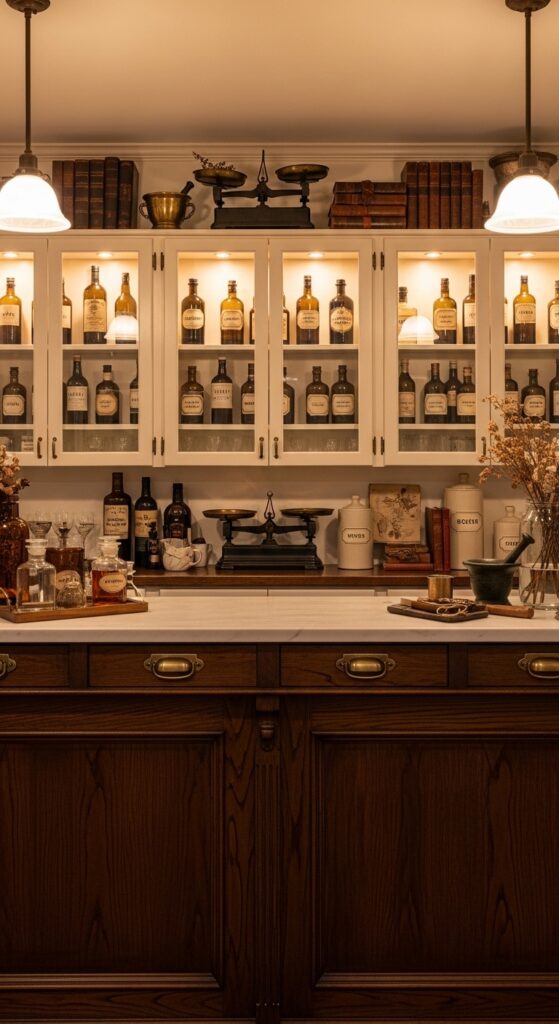
Vibe sentence: This bar rewards curiosity — every labeled bottle, every antique instrument, every small discovery makes the space feel genuinely alive.
What makes it work: An apothecary aesthetic works brilliantly for bars because both spaces are fundamentally about carefully measured ingredients and precise craft. Using glass-front display cabinets with hand-labeled bottles transforms the spirits collection into a curated exhibit. Antique scales, dried botanicals, and leather-bound recipe books layer in the “mad scientist mixologist” narrative that makes this concept so shareable.
How to achieve it: Source apothecary-style swing-top glass bottles (Weck jars, Bormioli bottles) from kitchen stores and decant syrups, bitters, and mixers into them with hand-written kraft paper labels. Use IKEA DETOLF glass-front display cabinets ($150 each) as the apothecary shelving.
24. The Tile Mosaic Statement Bar Front

Vibe sentence: The bar face is the most overlooked canvas in the entire room — and Moroccan zellige tile reminds you of everything you’ve been missing.
What makes it work: The handmade quality of zellige tile — with its naturally irregular glaze, slight imperfections, and color variation — brings warmth that machine-made tile simply cannot replicate. Applied to just the bar front (typically 8–15 square feet), it delivers maximum visual impact at minimum tile cost. The reflective glaze catches and shifts in light throughout the day in a way that keeps the bar visually alive.
How to achieve it: Zellige tile from Moroccan importers or specialty tile shops (Tabarka Studio, Cle Tile) runs $18–$40 per square foot. A standard bar front requires 10–15 square feet — a meaningful but manageable investment. Hire a tile setter experienced with handmade tile; the irregular thickness requires more care than standard ceramic.
25. The Speakeasy Hidden Door Bar
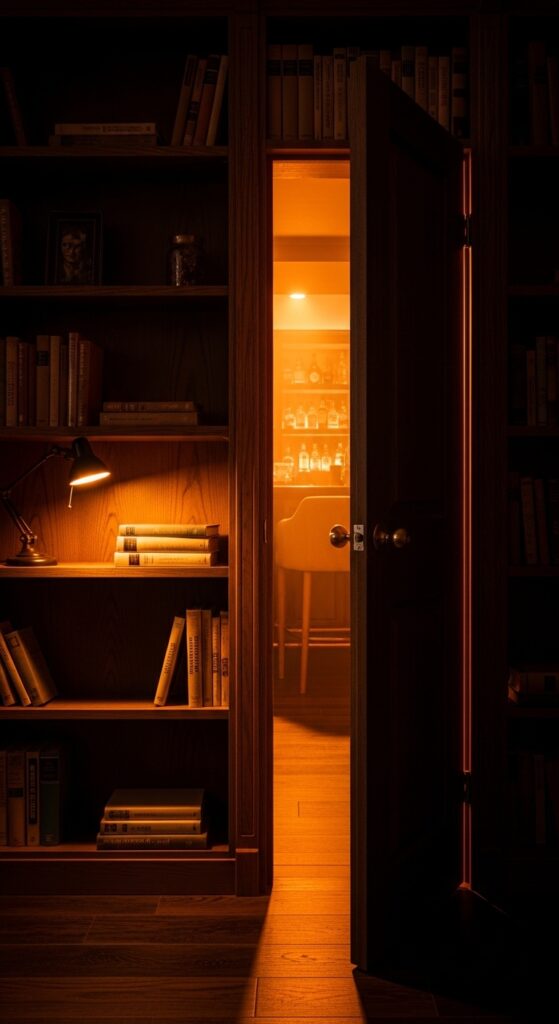
Vibe sentence: The moment guests discover a bookshelf is actually a door to a hidden bar, the room becomes the most talked-about space in the house.
What makes it work: A hidden door bar operates on pure narrative power — it transforms a practical room into an experience. The contrast between the ordinary-looking bookshelf exterior and the atmospheric bar interior creates a reveal that guests will describe to others for years. This concept photographs extraordinarily well for social media, which explains its explosion on Pinterest home design boards.
How to achieve it: Bi-fold hidden door hardware kits ($300–$600) allow a standard bookshelf to swing open with a concealed push-latch mechanism. Build the bookshelf from standard MDF and stud framing, then fill with real books for weight and authenticity. Ensure the door opening is at least 32″ wide for comfortable passage.
💡 A push-latch mechanism (no visible handle needed) enhances the illusion completely — guests push the “wrong” shelf section and the whole wall opens.
26. The Marble and Brass Luxury Bar
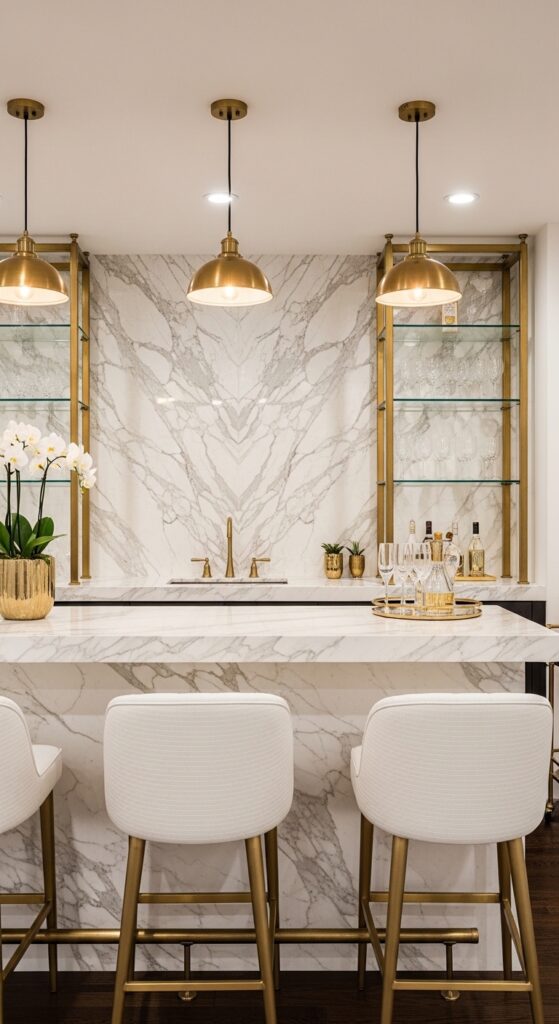
Vibe sentence: Marble and brass don’t whisper — they announce, and this basement bar announces itself as the finest room in the house.
What makes it work: Calacatta marble’s dramatic gold-grey veining on white has become the defining luxury surface of contemporary interior design. Paired with polished brass, the combination reads as warm opulence rather than cold formality. Tall brass-framed glass shelving keeps the display open and airy rather than heavy, preventing the room from feeling over-furnished.
How to achieve it: Calacatta marble-look quartz (MSI Calacatta Laza, Cambria Brittanicca) delivers the visual at $60–$100 per square foot versus $200+ for real marble — and it’s impervious to the red wine spills a bar will inevitably see. Pair with polished or satin brass fixtures from Newport Brass or Rohl for a genuinely premium finish.
27. The Basement Dive Bar
Vibe sentence: This bar doesn’t take itself seriously for a single second — and that complete lack of pretension is precisely what makes it the most welcoming room imaginable.
What makes it work: The “perfectly imperfect” dive bar aesthetic works because it’s the only bar style that actively benefits from the accumulation of mismatched, second-hand, and worn items. Every vintage beer sign, every mismatched barstool, every scratched brass foot rail adds to the authenticity rather than detracting from it. This is the one style where a smaller budget produces a more convincing result.
How to achieve it: Source vintage neon beer signs from eBay, flea markets, and bar liquidation sales — authentic old signs run $40–$200 and new LED reproductions start at $30. Install a real brass foot rail along the bar base (DIY kits, $80–$150) — it’s the one element that immediately signals “real bar.”
28. The Backlit Onyx Luxury Feature Bar
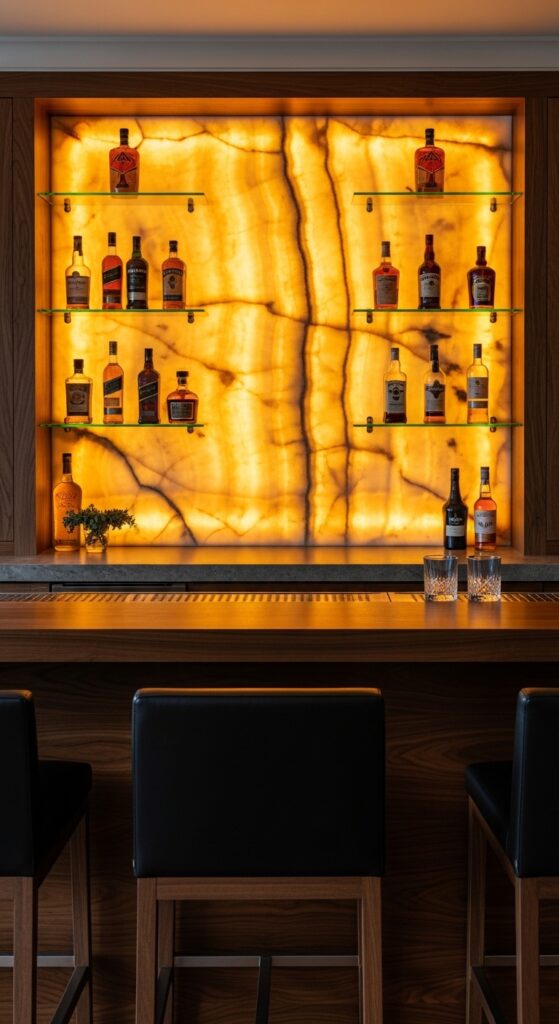
Vibe sentence: A backlit onyx panel doesn’t just light up a bar — it turns the wall into something molten and alive, like a window into the earth itself.
What makes it work: Backlit onyx is genuinely one of the most spectacular effects achievable in residential interior design. Onyx is naturally translucent, and when LED-backlit, it glows with a warm amber depth that makes the natural veining patterns visible in three dimensions. This single material choice transforms a basement bar from impressive to unforgettable, and it photographs unlike anything else.
How to achieve it: Book-matched onyx panels from stone suppliers (Dal-Tile, MSI, local stone yards) run $40–$120 per square foot for smaller slabs. A standard 4×8′ panel for the back bar wall costs $1,300–$3,800 — significant, but the single most impactful design investment available. Mount LED light panels ($60–$120 per panel) in a frame behind the stone with a 2–3″ air gap for even illumination.
💡 If onyx is outside the budget, backlit white Thassos marble or translucent alabaster tile creates a similar ethereal effect at $15–$30 per square foot.
How to Start Your Basement Bar Transformation
The single most common mistake first-time basement bar builders make is starting with the wrong thing. Begin with your countertop and cabinetry selection — these are the largest visual surfaces and will dictate everything else. Once you’ve committed to a countertop material (butcher block for warmth, quartz for durability, concrete for industrial edge), the hardware, fixtures, and barstools should follow its lead.
Before spending a dollar on furniture, address the walls and lighting. Paint is the highest return-on-investment project in any room — a $80 investment in the right deep color can transform a beige box into a moody destination. Pair the new wall color with intentional lighting: one or two pendant lights over the bar top and dimmable recessed cans for ambient control.
Common mistakes to avoid: under-lighting (basement bars need more light than you expect because they lack natural window light), over-furnishing a small space (two good barstools beat six cramped ones), and choosing a theme you’ll tire of in a year (classic materials — wood, tile, stone, brass — outlast trend-driven choices every time).
Budget entry points exist at every tier. A functional, attractive basement bar can be built for $800–$1,500 using IKEA cabinet bases, butcher block countertops, open shelving, and two quality barstools. Set realistic timeline expectations: a full built-in bar with wet bar plumbing is a two-to-four-week project including cure times and inspections.
Frequently Asked Questions
What is the best countertop material for a basement bar?
Quartz is the top choice for most basement bars because it combines the luxury appearance of marble with the durability and low maintenance a bar surface genuinely needs. Real marble stains permanently from red wine and citrus — both inevitable at a bar. Quartz in patterns like Calacatta or Carrara gives you the veined stone look without the vulnerability. Butcher block is the best warm, budget-friendly alternative at $40–$80 per linear foot, but it requires annual oiling and should be sealed well against moisture.
How much does it cost to build a basement bar?
Basement bar costs range dramatically based on scope. A basic open-shelving setup with a countertop and two barstools can come together for $500–$1,500. A mid-range built-in bar with cabinetry, a quality countertop, and a wet bar sink typically runs $3,000–$8,000. A high-end basement bar with custom millwork, marble counters, full plumbing, and premium lighting can reach $15,000–$40,000. The biggest cost variables are cabinetry (custom versus IKEA), countertop material, and whether plumbing is involved.
Do I need a permit to build a basement bar?
You need a permit any time plumbing (adding a sink or drain line) or electrical work (new circuits for refrigerators, lighting, or outlets) is involved. Simple cosmetic basement bars — adding cabinetry, shelving, a countertop, and barstools with no new plumbing or electrical — generally don’t require a permit in most jurisdictions. Always check with your local building department before starting; penalties for unpermitted plumbing work can complicate home sales later.
What size should a basement bar be?
A functional home bar needs a minimum of 6–8 linear feet of counter space to feel usable rather than cramped. The ideal bar depth is 24 inches (standard countertop depth) with a bar overhang of 8–12 inches for barstool knee clearance. Bar height should be 40–42 inches (versus standard 36-inch kitchen counter height) to work comfortably with standard 28–30 inch barstools. If you’re including back bar shelving, allow at least 36 inches of working aisle space between the bar counter and the back bar wall.
What lighting works best for a basement bar?
Layered lighting is the key to a great basement bar: ambient (general room light from recessed cans), task (bright focused light over the bar prep area), and accent (decorative pendants, under-shelf LEDs, or neon signs that set mood). Dimmer switches on all circuits are non-negotiable — the ability to dial from bright “cleaning mode” to low “cocktail hour” ambiance changes the entire experience of the room. Warm white bulbs (2700K–3000K color temperature) universally flatter wood tones, stone surfaces, and people better than cool daylight bulbs.
Ready to Create Your Dream Basement Bar?
You’ve just explored 28 brilliant basement bar ideas — from the moody whiskey den and the hidden speakeasy door to the glowing backlit onyx panel and the nostalgic dive bar. That’s 28 different directions you could take a space that’s currently sitting under your feet, waiting. The transformation doesn’t have to start big: the right paint color, a pair of the perfect barstools, or a single shelf of curated bottles can be the first step that makes everything click into place. Save the ideas that stopped you mid-scroll, gather the ones that made you lean in, and let that instinct guide your first move. Your basement bar is already closer than you think.