
Rustic farmhouse style is a design approach rooted in 19th-century American rural architecture — warm, unpretentious, and built around natural materials that show their age with pride. These 22 rustic farmhouse kitchen island ideas give you everything from paint colors and wood choices to lighting and layout, so you can build the heart of your home exactly the way you’ve imagined it.
There’s something deeply grounding about a farmhouse kitchen. The smell of aged wood, the weight of a hand-thrown ceramic bowl, the way afternoon light catches the grain on a butcher block counter — it’s a space that feels lived-in before you’ve even cooked a single meal. Rustic farmhouse design doesn’t ask you to be perfect. It asks you to be real. Here are 22 ideas worth saving — and stealing.
Why Rustic Farmhouse Works So Well
Rustic farmhouse design draws from the working kitchens of 19th-century American homesteads, where beauty was a byproduct of function rather than an intention. Unlike the polished “modern farmhouse” trend popularized by shiplap-heavy renovation shows, the rustic variant leans harder into imperfection — hand-hewn beams, chippy paint, mismatched hardware, and surfaces that wear their history honestly. It sits adjacent to cottagecore and American country style but is distinguished by its emphasis on structural, architectural elements rather than purely decorative layering.
The material palette is precise and shopable: unfinished white oak, reclaimed pine, aged brass, wrought iron, and raw linen are the core players. Colors run warm and muted — antique white, warm cream, oat, dusty sage, tobacco brown, and the occasional brick red or deep navy as an accent. Countertops favor butcher block, rough-hewn marble, or soapstone. Cabinet hardware in oil-rubbed bronze or unlacquered brass completes the picture.
The style’s surge in popularity isn’t accidental. Post-pandemic, people began craving spaces that feel restorative rather than impressive. The rustic farmhouse kitchen delivers exactly that — it’s the antithesis of the sterile, all-white, Instagram-optimized kitchen. Pinterest searches for “rustic kitchen island ideas” have grown steadily, and designers report clients explicitly asking for spaces that feel “like they’ve always been there.”
Small kitchens can absolutely pull this off. The key is prioritizing one statement piece — usually the island itself — and keeping everything else restrained. A reclaimed wood island in a 10×10 kitchen reads as intentional; three competing rustic elements in the same space reads as cluttered.
Style at a Glance
| Element | Characteristic | Expression in the Kitchen |
| Philosophy | Imperfect beauty, function-first | Worn surfaces, visible joinery, honest materials |
| Key Materials | Reclaimed pine, butcher block, wrought iron, raw linen | Island tops, open shelving, pendant hardware |
| Key Colors | Antique white, warm cream, tobacco brown, dusty sage | Cabinetry, walls, accents |
22 Rustic Farmhouse Kitchen Island Ideas to Steal
1. Butcher Block Island with Deep Tobacco Stain
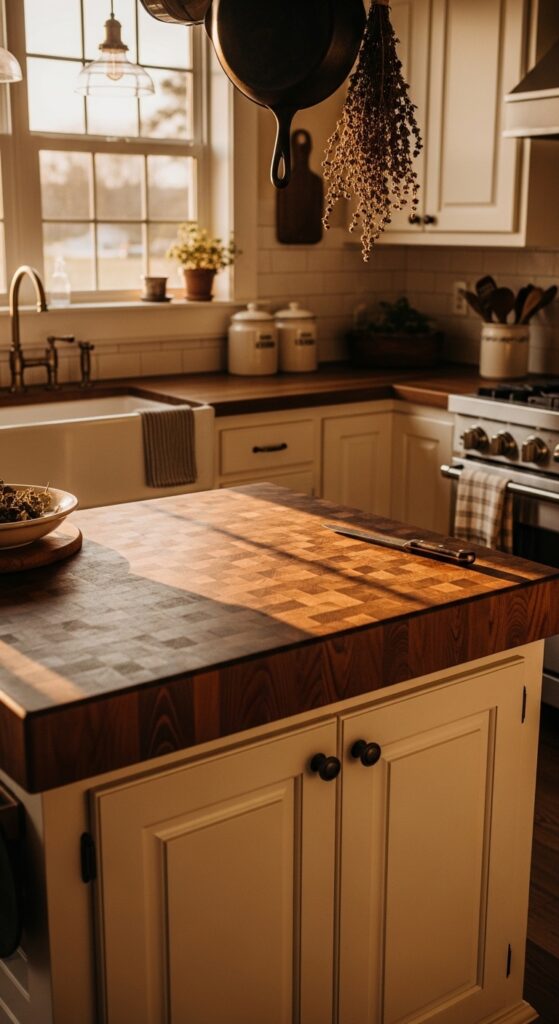
Vibe: Sun-warmed and solid, like a kitchen that has fed generations without apology.
Why it works: The deep tobacco stain does two things simultaneously — it creates visual weight that anchors the island as the room’s focal point, and it introduces a rich mid-tone that bridges the gap between light cabinetry and dark flooring. End-grain butcher block in particular has a natural texture variation that reads as intentional rather than rustic-by-accident. The warmth of the stain also makes aged brass hardware look inevitable rather than chosen.
How to get it: Buy unfinished maple or white oak butcher block and apply Rubio Monocoat in “Tobacco” — two thin coats, buffed between. It penetrates rather than sitting on the surface, so it deepens the grain without looking lacquered. Re-oil once a year with food-safe mineral oil to maintain that lived-in warmth.
💡 Quick Win: IKEA’s KARLBY countertop in walnut runs about $150 for a 74″ section and mimics this look convincingly — cut it to island size and mount it on a base of painted stock cabinets.
2. Open Shelving Island with Painted Shiplap Sides
Vibe: Layered and collected, like a kitchen assembled over years rather than an afternoon.
Why it works: Open shelving on island sides solves a common farmhouse kitchen problem: storage that doesn’t disappear behind closed doors. The shiplap cladding adds architectural texture without requiring a full renovation — it’s applied directly over a basic cabinet box. The horizontal lines of the boards also make the island read wider and more substantial, which is particularly useful in narrow kitchen layouts where the island might otherwise feel like an afterthought.
How to get it: Apply 1×4 pine shiplap boards horizontally to the sides of your existing island base using construction adhesive and finish nails. Prime with shellac-based primer, then paint in Benjamin Moore “Linen White” OC-146 — it reads warm rather than stark under incandescent light. Leave a hairline gap between boards for authenticity.
3. Wrought Iron Pendant Lights Over a White Island
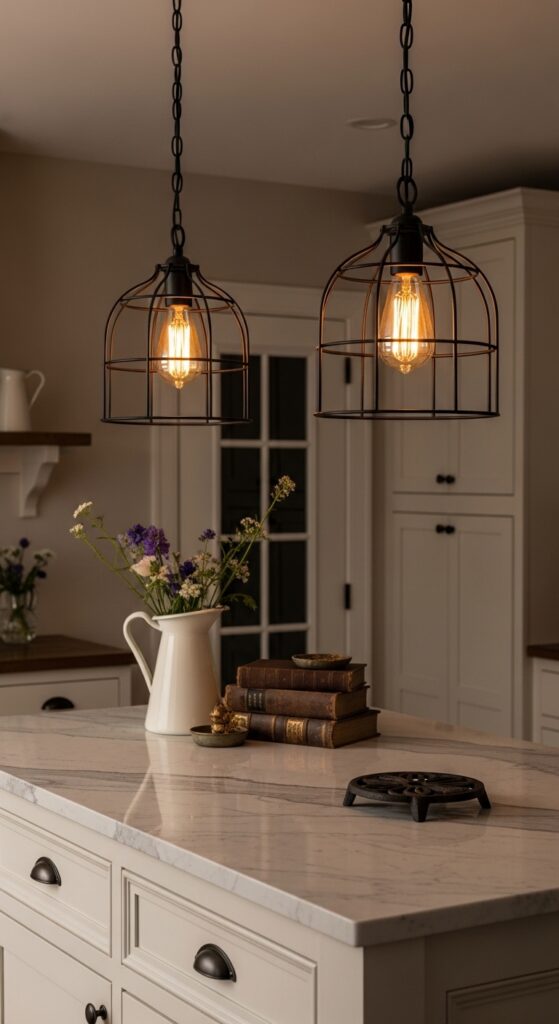
Vibe: Hushed and elemental — the glow of amber through wrought iron is something between a farmhouse and a forge.
Why it works: The visual weight of dark pendant hardware over a light island creates the single most effective contrast move in rustic farmhouse design. It draws the eye upward, defines the island as a distinct zone within an open-plan kitchen, and introduces the black accent color that keeps the palette from reading too sweet. Hand-forged or cage-style iron has surface variation that catches light differently throughout the day, making the same fixture feel different morning to evening.
How to get it: Hang pendants so the bottom of the shade sits 30–36 inches above the island surface — most people hang them too high, which kills the intimacy. For a two-pendant arrangement, space them one-third of the island length from each end. Schoolhouse Electric’s “Opal” pendant in blackened brass ($185 each) is a period-appropriate choice that won’t look trendy in five years.
💡 Quick Win: Swap standard bulbs for 2200K Edison ST19 bulbs — the lower color temperature shifts the entire kitchen’s mood toward amber warmth for under $15.
4. Reclaimed Wood Island in a White Kitchen
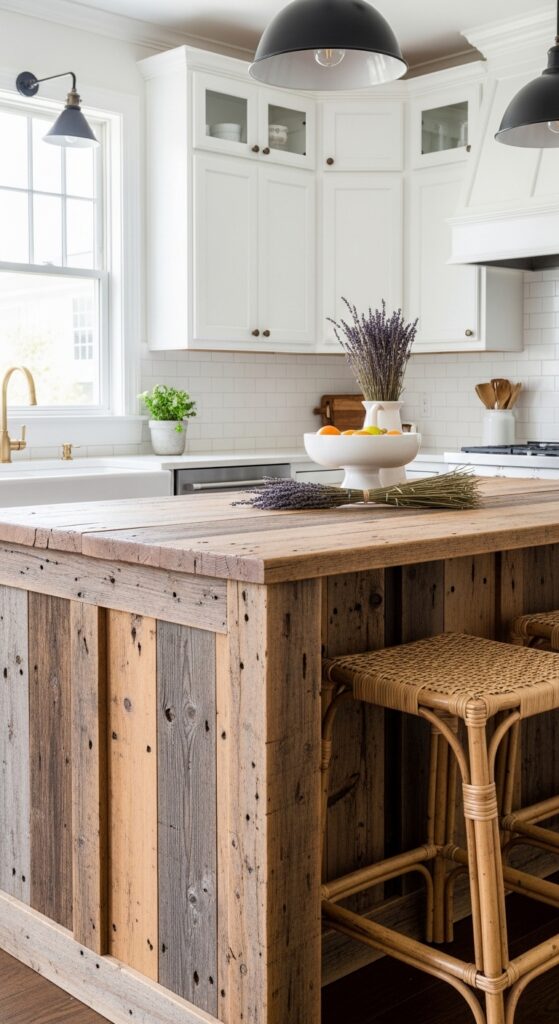
Vibe: Raw and still — reclaimed wood against white walls is the farmhouse equivalent of a deep breath.
Why it works: The principle at work here is intentional contrast: the roughness of barn wood reads more beautiful, not less, when placed against a clean, monochromatic backdrop. The white kitchen acts as negative space that lets the wood’s natural variation — silver grays, honey browns, even the occasional knot or nail hole — become the art. This approach also means you can source genuinely aged barn wood (imperfect by nature) without it overwhelming the space.
How to get it: Source reclaimed pine or oak through Elmwood Reclaimed Timber or a local salvage yard — expect to pay $8–$15 per square foot. Seal with a matte polyurethane rather than an oil, which can go rancid in a kitchen environment. Leave existing nail holes and weathering untouched; filling them defeats the purpose entirely.
5. Navy Blue Island with Brass Hardware
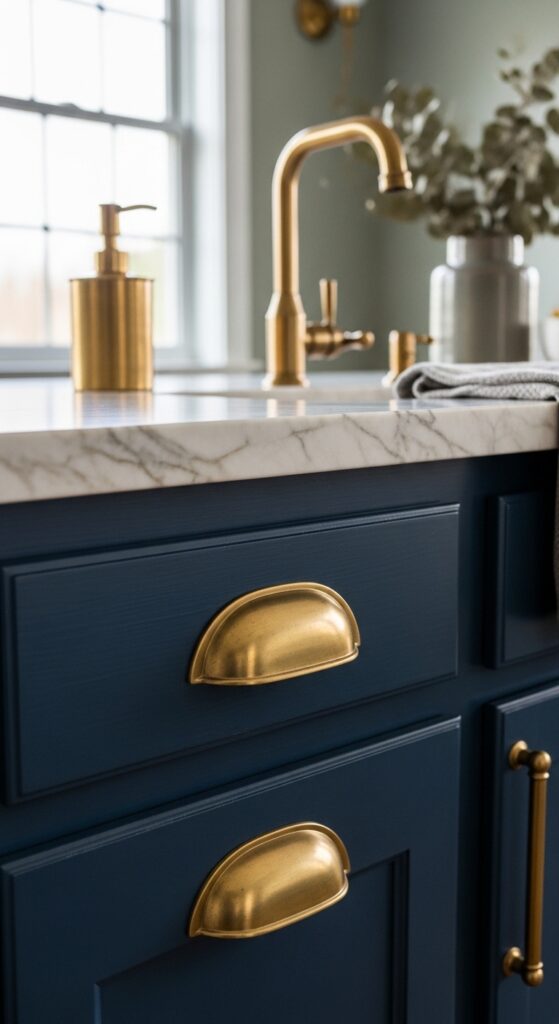
Vibe: Grounded and deliberate — navy anchors a farmhouse kitchen the way a good wool blanket anchors a cold room.
Why it works: Deep navy is the most underused color in the rustic farmhouse palette, and it earns its place through contrast and visual weight. Painted against cream or white upper cabinets, it creates the kind of two-tone kitchen that reads sophisticated rather than busy. Unlacquered brass hardware is the critical pairing: unlike polished brass, unlacquered develops a natural patina over time, which is precisely the aged quality that makes it feel authentic in this style.
How to get it: Paint with Farrow & Ball “Hague Blue” No. 30 or Benjamin Moore “Van Deusen Blue” HC-156 in an eggshell finish — matte shows brush marks too readily, and high gloss reads too refined. Install unlacquered brass hardware from House of Antique Hardware; budget $4–$8 per pull. The patina develops beautifully within 6–12 months of regular use.
💡 Quick Win: You don’t need to repaint a full island — paint just the island and leave the perimeter cabinets cream. The contrast does the heavy lifting at a fraction of the cost and commitment.
6. Farmhouse Island with Seating for Four
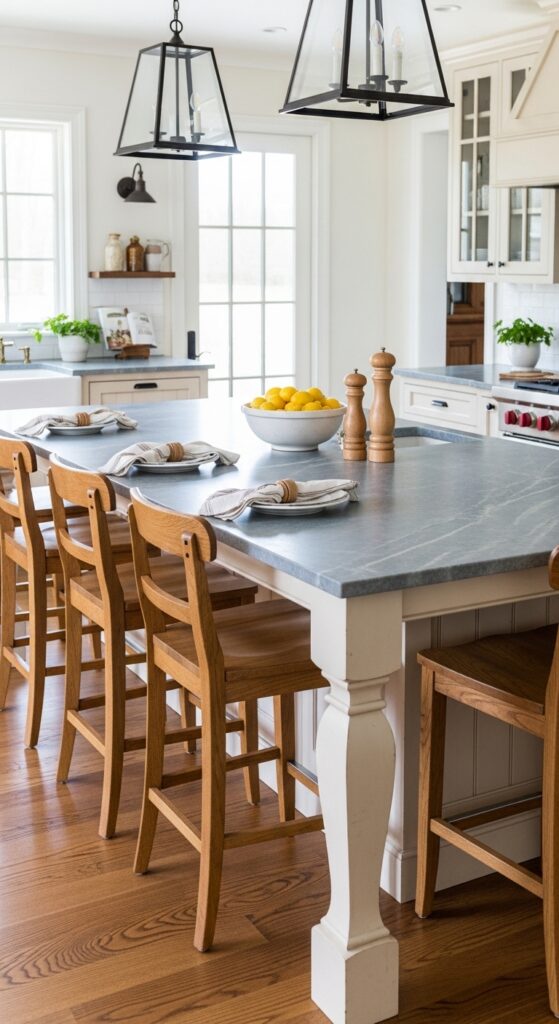
Vibe: Convivial and wide-open — the kind of island that makes people pull up a stool without being asked.
Why it works: A 12-inch overhang on the seating side is the structural minimum for comfortable knee clearance, but 15 inches is the sweet spot — it allows adults to sit squarely without perching. Backless stools read less visually heavy than those with backs, which is important for maintaining sightlines through an open-plan space. Pairing soapstone with warm-toned wood stools works because soapstone’s cool blue-gray offsets the warmth of the wood rather than competing with it.
How to get it: Standard bar stool height (28–30 inches) works for a 36-inch-tall island. For a more farmhouse-specific look, seek out turned-leg bar stools in unfinished oak or maple from McGee & Co or World Market — paint the legs or leave them natural, then wax with clear beeswax for a subtle sheen.
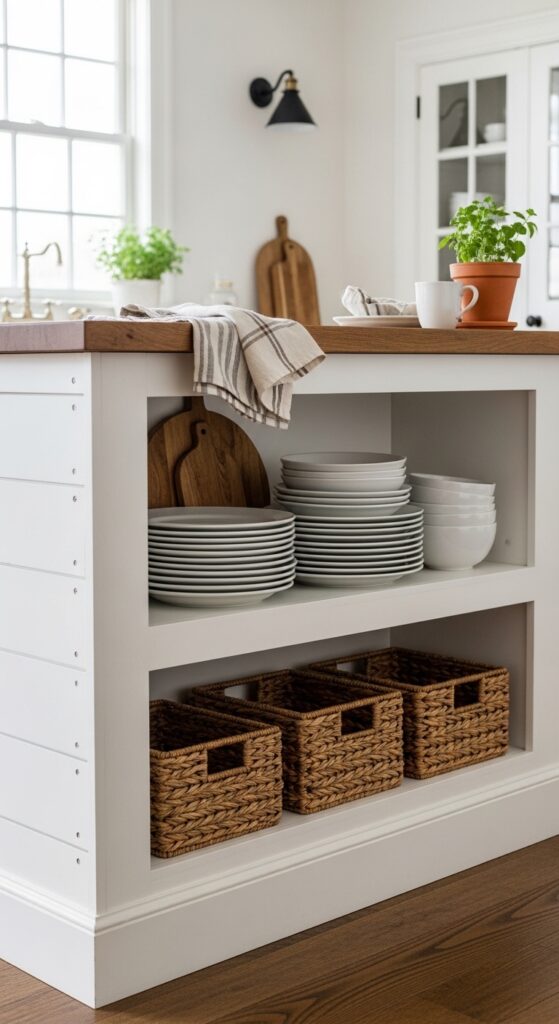
7. Sage Green Island with Open Shelves and Rattan Baskets
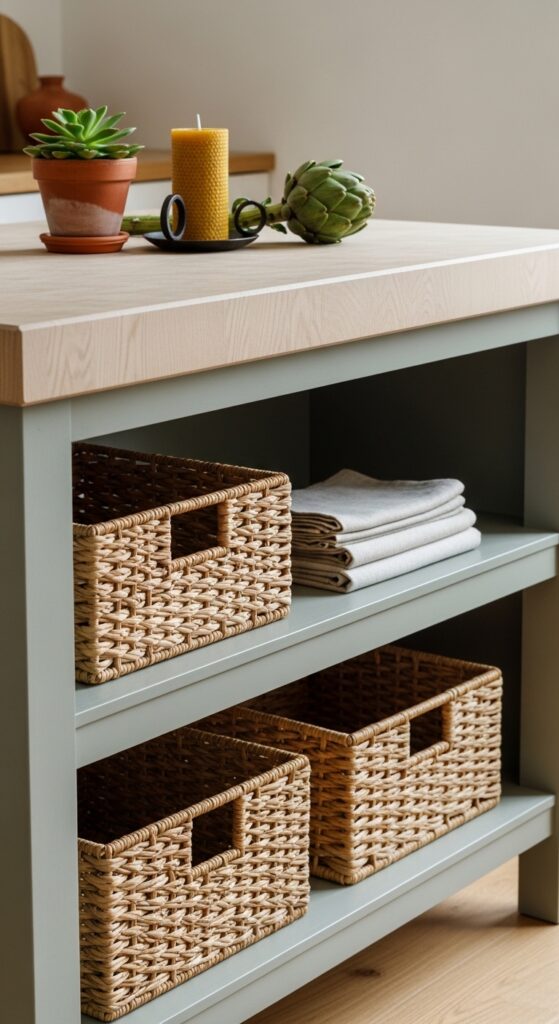
Vibe: Still and organic — sage green in a kitchen feels like something growing rather than something painted.
Why it works: Muted sage is a chameleon in the farmhouse palette — it reads green against white, gray against wood, and almost earthy against terracotta. The chalky finish that comes from a mineral-based paint softens the color further, making it feel botanical rather than trendy. Rattan baskets on open lower shelves add a second organic texture that reinforces the sage’s natural quality without introducing another hard material.
How to get it: Use Farrow & Ball “Mizzle” No. 266 or Clare Paint’s “Sage Advice” — both read warm-sage rather than gray-green, which is important in kitchens with mixed lighting. For the baskets, Seagrass or tightly woven water hyacinth from IKEA’s KNIPSA line ($8–$12 each) fit standard shelf depths and hold up to regular kitchen use.
💡 Quick Win: Paint only the island in sage and leave all other cabinetry white — one can of paint transforms the entire room’s personality for under $50.
8. Vintage Kitchen Cart Repurposed as an Island
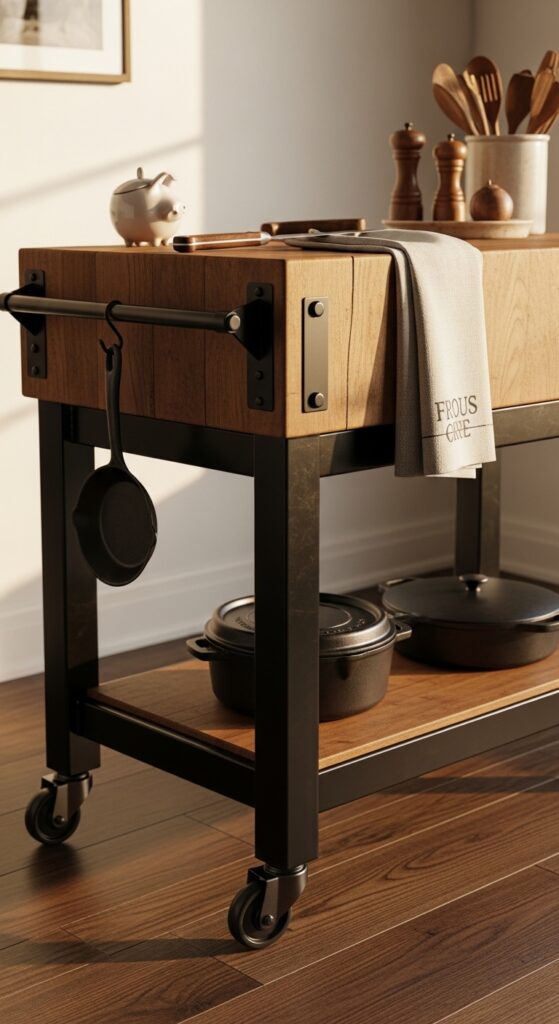
Vibe: Functional and storied — this is a kitchen that takes cooking seriously without taking itself seriously.
Why it works: A freestanding cart solves a specific small-kitchen problem: it provides island function without committing to island footprint. The mobility matters — it can roll to where prep is happening, then slide against a wall when floor space is needed. Authentic vintage butcher carts (versus their reproduction counterparts) have thick maple tops with visible history — darkened where oil has accumulated, lighter where it’s been scrubbed. That variation is exactly what gives the piece its farmhouse credibility.
How to get it: Search Facebook Marketplace, Chairish, or local estate sales for authentic restaurant supply carts from the 1950s–1970s — budget $200–$600. Avoid refinishing the top entirely; instead, scrub with coarse salt and lemon juice to clean, then condition with food-grade mineral oil. The patina is the point.
9. Shiplap Island Base in Antique White
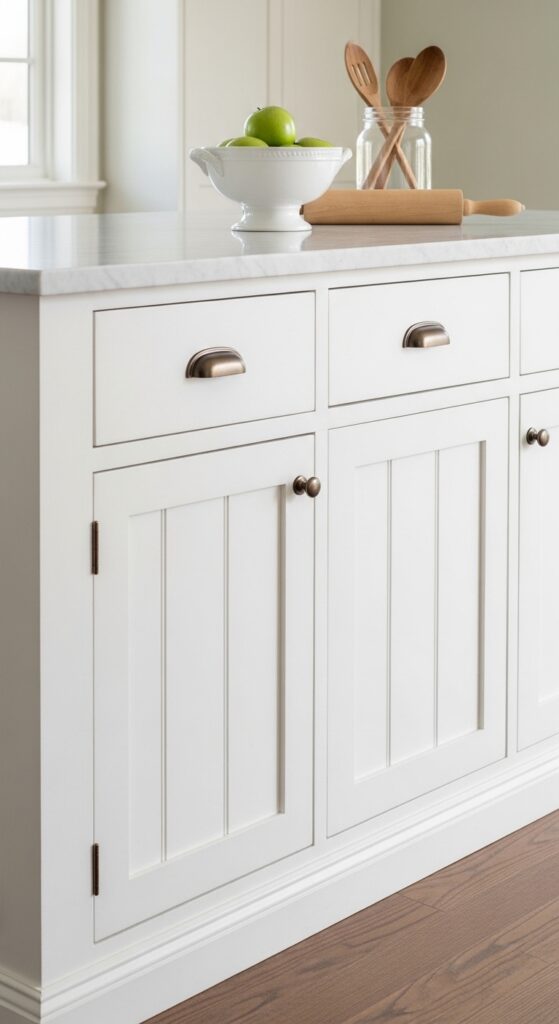
Vibe: Clean and quiet — vertical shiplap makes even a small island feel like it was built into the house from day one.
Why it works: Vertical shiplap (versus the more common horizontal run) creates the illusion of height and makes a standard 36-inch island feel taller and more architectural. The shadow lines between boards add depth without adding visual weight — you perceive texture rather than bulk. Pairing with honed (not polished) Carrara marble keeps the surface matte and tactile, which suits the farmhouse ethos far better than a high-gloss finish.
How to get it: Use 1×3 tongue-and-groove pine boards installed vertically with a 1/8-inch reveal. Prime with two coats of shellac primer before painting to prevent tannin bleed-through — antique white paint over unprimed pine yellows within months. Benjamin Moore “White Dove” OC-17 in a matte finish is the standard-bearer for this look.
💡 Quick Win: Pre-primed shiplap panels from Home Depot (sold in 4×8 sheets) cut installation time in half and cost under $30 per sheet.
10. Copper Farmhouse Sink Integrated into Island
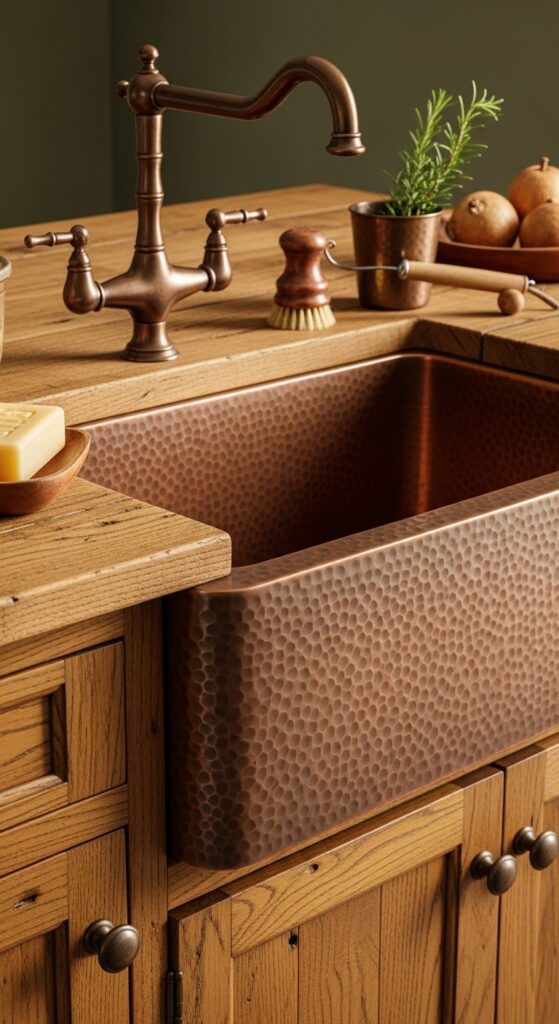
Vibe: Elemental and warm — copper in a farmhouse kitchen ages the way a good cast iron skillet ages: better every year.
Why it works: A copper apron-front sink introduces a material that is both visually warm and historically authentic to the farmhouse tradition. The “living finish” of unlacquered copper deepens and develops through regular contact with water and air — it moves through bright copper to amber to a rich verdigris over years. This is a material that gets more interesting with time, which is the exact philosophy underpinning rustic farmhouse design at its best.
How to get it: Native Trails and Rachiele both produce hand-hammered copper farmhouse sinks in the 30–36 inch apron sizes most common in island applications — budget $800–$2,000. Avoid harsh cleaning products; a weekly rub with beeswax paste keeps the patina developing evenly. Pair with a bridge faucet in unlacquered brass for a cohesive metals palette.
11. Two-Tone Island with Chalkboard Panel End
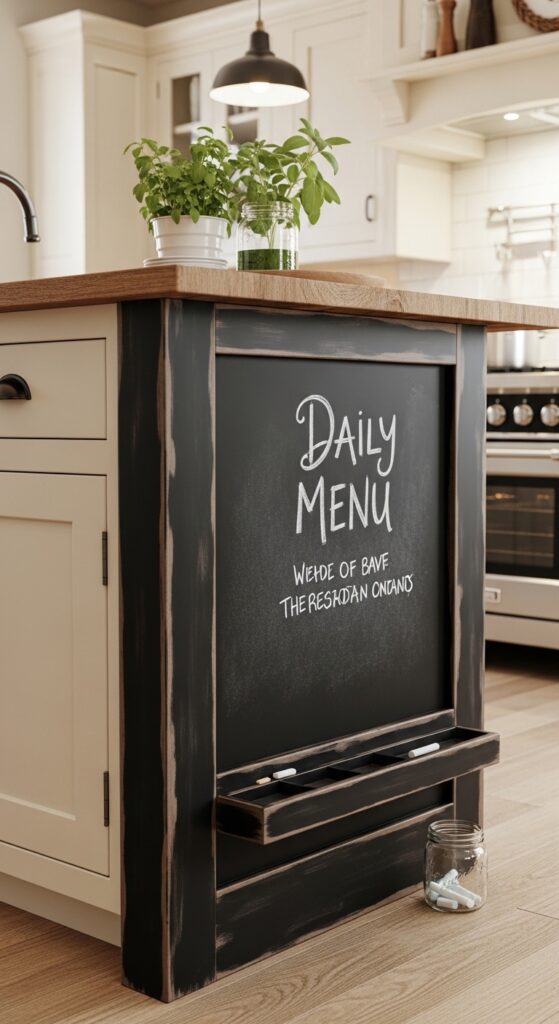
Vibe: Warm and spontaneous — a chalkboard end panel turns a kitchen island into a living piece of the household.
Why it works: End panels are among the most underutilized surfaces in kitchen design. A chalkboard finish on one end adds function (grocery lists, menus, kids’ drawings) while reinforcing the farmhouse aesthetic’s emphasis on honest, working surfaces. The visual weight of the dark panel also provides a bookend to the island that makes it feel like a finished piece of furniture rather than a floating cabinet. It contrasts the light cabinetry without requiring permanent paint commitment.
How to get it: Apply two coats of Rust-Oleum Chalkboard Paint in flat black to a primed MDF panel — sand between coats with 220-grit for a smooth writing surface. Season the board before first use by rubbing the flat side of chalk across the entire surface, then erasing. This prevents ghosting. The entire material cost runs under $25.
💡 Quick Win: Frame the chalkboard panel with simple 1×2 pine trim painted to match the island — it immediately elevates from DIY to built-in.
12. Farmhouse Island with Turned Leg Details
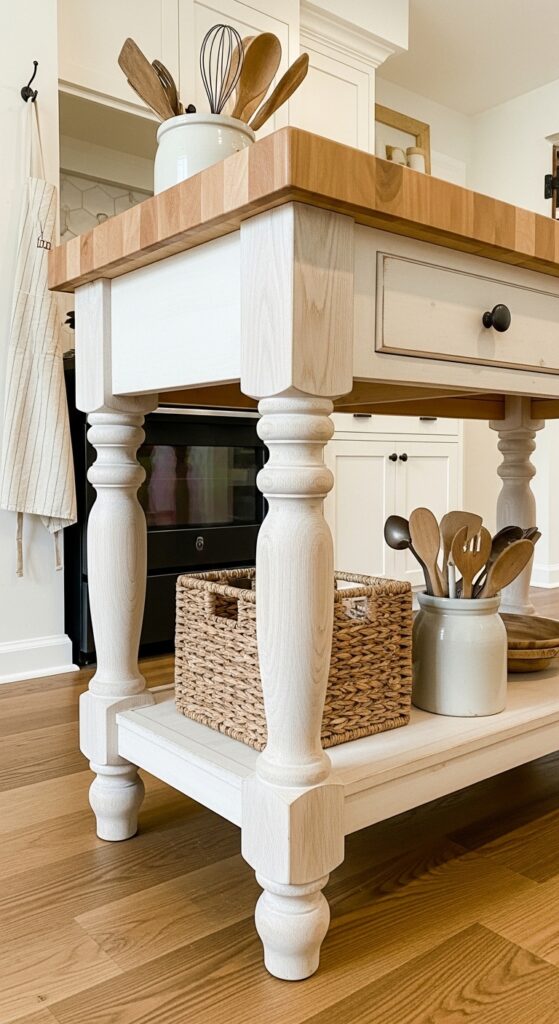
Vibe: Architectural and grounded — turned legs transform a kitchen island from a box into a piece of furniture.
Why it works: Furniture-style legs introduce vertical rhythm and lift the island visually off the floor, which reduces visual weight while adding historical character. The turning profile — the specific shape of the lathe-cut leg — carries enormous style information. A simple baluster profile reads early American farmhouse; a heavier barley-twist reads English country. Leaving the legs in an unfinished or lightly waxed oak while painting the body creates a two-material contrast that reinforces the furniture aesthetic.
How to get it: Source pre-turned furniture legs in 28–34-inch lengths from House of Antique Hardware or Osborne Wood Products ($25–$60 per leg). Attach to a standard base cabinet using metal corner brackets rated for the countertop weight. Sand the legs to 220-grit and finish with clear beeswax paste rather than polyurethane — it reads as furniture, not construction.
13. Pendant Lights with Woven Rattan Shades
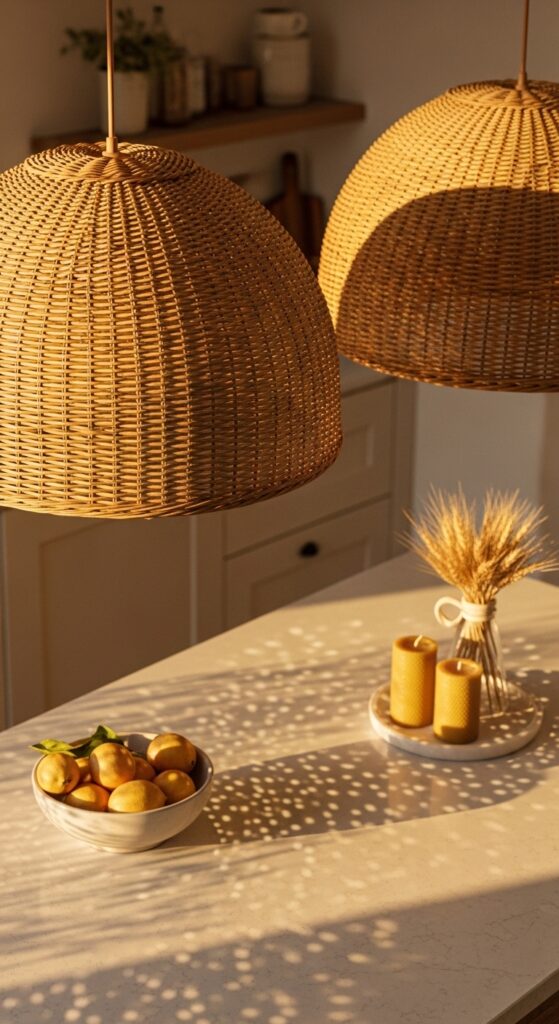
Vibe: Luminous and layered — rattan pendants don’t just provide light, they create patterns of it.
Why it works: Rattan shades introduce the warmest of the farmhouse textures — organic, hand-crafted, and imperfect in the way that only natural materials can be. The weave casts dappled light onto countertops and walls below, which creates visual depth that a solid shade simply can’t achieve. The honey-tan of natural rattan also bridges the gap between warm wood tones and cream cabinetry, functioning as a transitional material that makes disparate elements cohere.
How to get it: For kitchen pendants, choose rattan shades in the 14–18 inch diameter range — anything larger overwhelms a standard 8-foot ceiling. MUJI, Serena & Lily, and Amazon’s private-label options ($35–$120 each) all offer comparable quality at different price points. Fit with 2700K Edison bulbs for maximum warmth.
💡 Quick Win: A single oversized rattan pendant (20+ inches) centered over a small island does more design work than two smaller ones — and costs less in total.
14. Whitewashed Island Base with Raw Edge Countertop
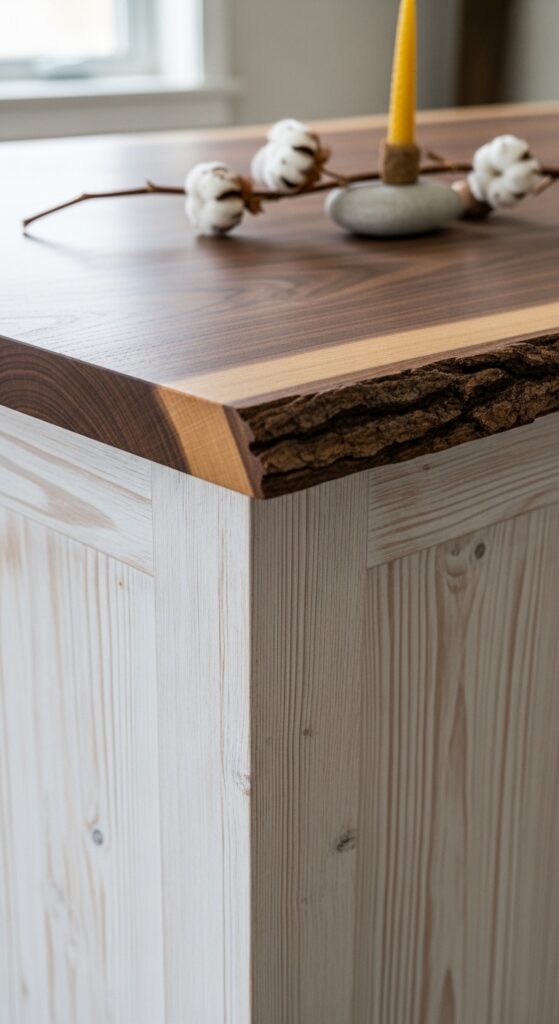
Vibe: Raw and honest — a live-edge counter over a whitewashed base is a conversation between wood and wood.
Why it works: Whitewashing — applying diluted white paint that allows grain to show through — is distinct from opaque painting in one crucial way: it preserves the material’s identity while modifying its color. Paired with a live-edge countertop, the result is an island that reads as entirely natural rather than constructed. The live edge retains the tree’s original silhouette, introducing an organic curve into a room full of straight lines, which creates visual relief without breaking the palette.
How to get it: To whitewash existing pine, mix one part flat white latex paint with two parts water. Brush on in the direction of the grain, then wipe back immediately with a clean rag to control opacity. For the live-edge top, source locally through Etsy woodworkers or salvage shops — expect $200–$600 for a slab in the 4–6 foot range. Seal with food-safe hardwax oil like Rubio Monocoat “Pure.”
15. Industrial Pipe Shelving at Island End
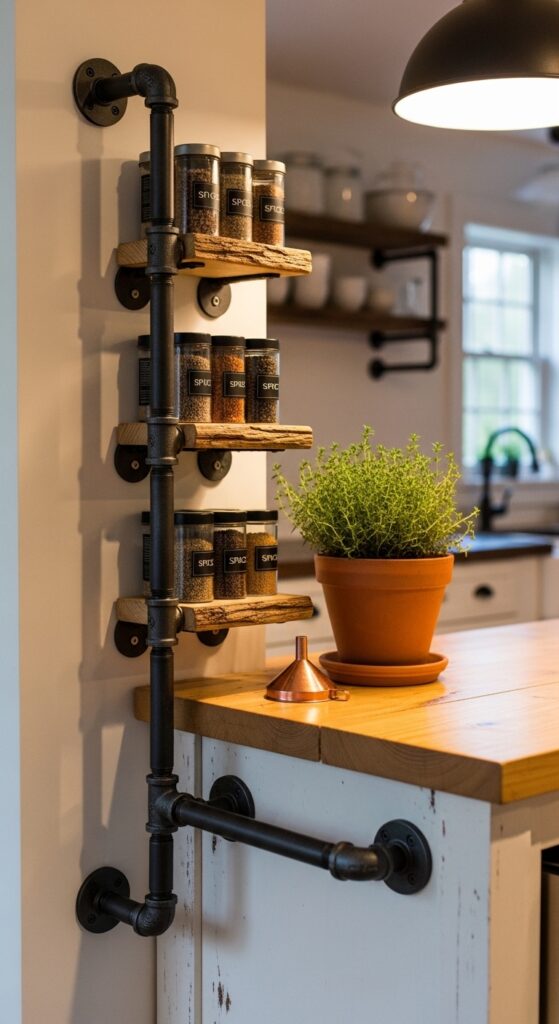
Vibe: Functional and found — industrial pipe on a farmhouse island looks less like a design choice and more like a perfectly logical solution.
Why it works: Iron pipe shelving introduces the industrial element that keeps rustic farmhouse from veering into precious or overly decorated territory. The threading on the pipe fittings and the visible bracket connections read as honest construction — nothing hidden, nothing pretending to be something it isn’t. Vertically mounted at one end of the island, it creates a kitchen vignette without using any wall space, which is genuinely useful in small kitchens where every square inch matters.
How to get it: Purchase pre-cut black iron pipe and flanges from a plumbing supply store or pre-assembled as pipe shelf kits on Amazon for $40–$80. Sand rough-cut pine boards (1×8 works well) to 150-grit and seal with a thin coat of beeswax — leave them slightly raw rather than fully finished for authenticity. Use pipe clamps rather than screws through the shelves to keep the industrial aesthetic consistent.
💡 Quick Win: Pipe shelf kits from Amazon ship pre-assembled with flanges — install your own wood shelves for a look that costs under $60 total.
16. Terracotta Tile Inset into Island Countertop
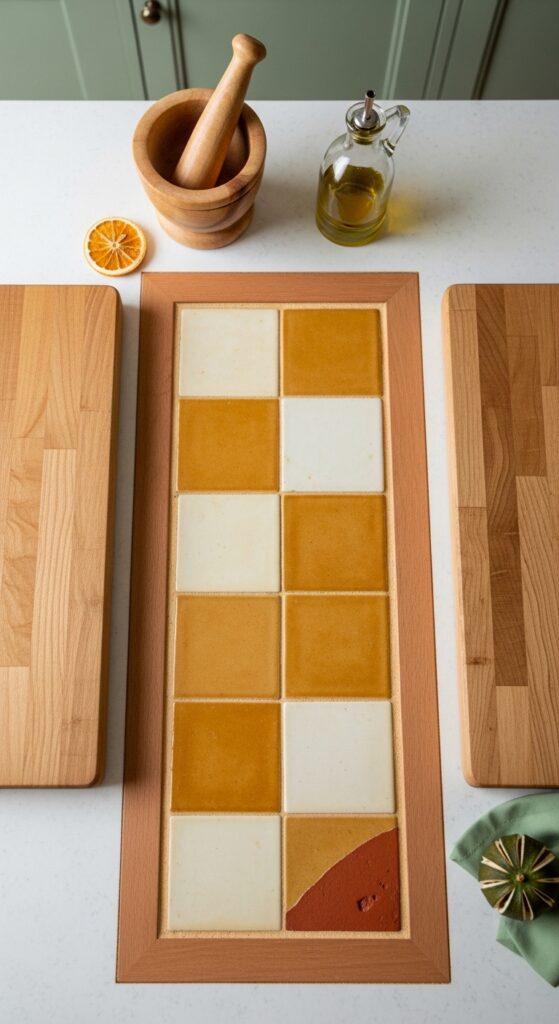
Vibe: Artisanal and sun-touched — terracotta tiles in a kitchen counter bring the warmth of a Provençal farmhouse without the plane ticket.
Why it works: A tile inset solves the practical limitation of butcher block (not the best surface directly under hot pots) while introducing pattern and color that makes the island distinctly handcrafted-looking. The imperfect glaze variation of hand-painted terracotta tiles — each one slightly different — reinforces the rustic farmhouse commitment to materials that show their making. Framing the tile with butcher block on either side keeps the overall feel warm and wood-dominant.
How to get it: Spanish or Mexican hand-painted terracotta tiles run $3–$8 each — source from Rustico Tile or Clé Tile. Rout a recess in the butcher block to the tile thickness (typically 3/8 inch) so the finished surface sits flush. Use an epoxy grout in warm cream (Mapei “Biscuit” is a reliable match) and seal the tiles and grout with a penetrating sealer rated for countertop use.
17. Farmhouse Island with Built-In Wine Storage
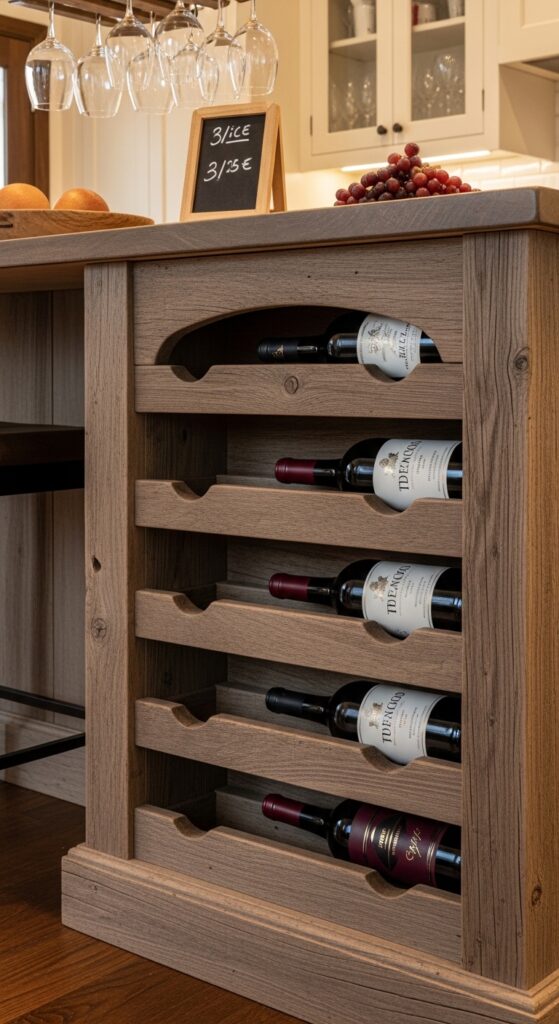
Vibe: Convivial and complete — built-in wine storage turns a kitchen island into a gathering destination.
Why it works: Horizontal wine cubby slots built from the same material as the island base create a seamless, furniture-quality look that separate wine racks can rarely achieve. The functional element also introduces visual rhythm — the repetition of slots and bottle necks creates a subtle grid pattern that gives the island’s side panel structure and interest. In a farmhouse kitchen specifically, the wine storage reads as a pantry element rather than a showpiece, which fits the style’s working-kitchen ethos.
How to get it: Standard wine bottle slots require a minimum 3.75-inch square opening and 11 inches of depth. Build them from 3/4-inch plywood faced with the same reclaimed wood as the rest of the island — the plywood provides structure while the facing provides aesthetics. A six-bottle column requires approximately 24 inches of height, which fits within a standard 34.5-inch base cabinet.
💡 Quick Win: A pre-built wine cubby insert from Rev-A-Shelf ($45–$75) drops into a standard base cabinet opening and looks custom-built from the outside when faced with wood.
18. Farmhouse Kitchen Island with Exposed Brick Base
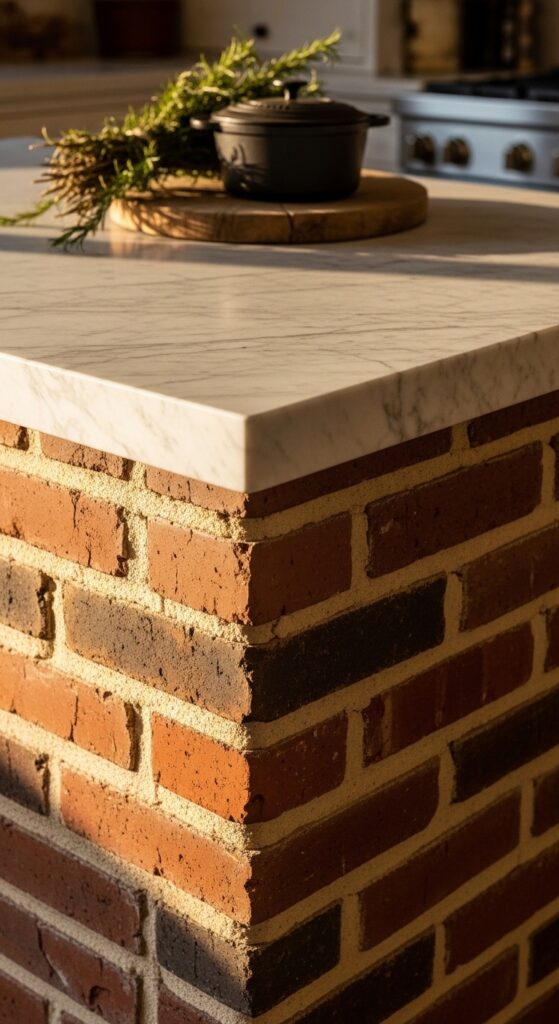
Vibe: Elemental and permanent — a brick island base looks as if the farmhouse was built around it.
Why it works: Exposed brick introduces a scale of texture unavailable in any other material — the individual units, the mortar joints, the slight imperfection of each face — and creates a base that reads as genuinely structural rather than decorative. The thermal mass of real brick also makes intuitive sense in a kitchen context. Topped with cool white marble, the combination creates a temperature contrast — warm brick below, cool stone above — that is as visually satisfying as it is historically authentic.
How to get it: Genuine brick island bases require structural reinforcement and typically a mason — this is a project with a $2,000–$5,000 labor budget. For a shortcut with nearly identical results, use thin brick veneer tile (Realstone Systems or Old Mill Brick, $3–$8 per square foot) applied with mortar adhesive over a cement board substrate. White Sanded Grout in “Cream” completes the look.
19. Floating Shelf Above the Island
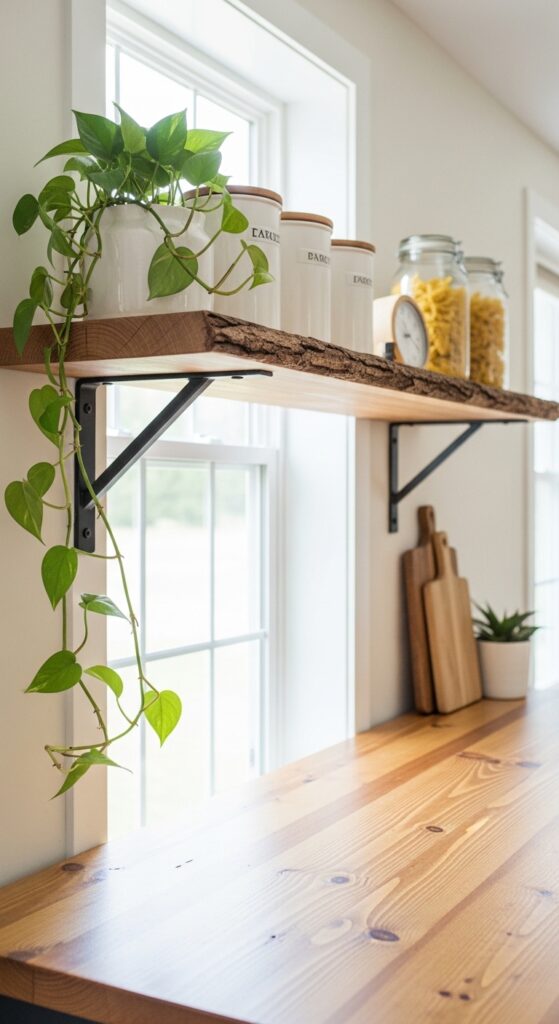
Vibe: Layered and lived-in — a shelf above the island creates a vertical world that makes the kitchen feel curated rather than equipped.
Why it works: A single shelf directly above an island activates the vertical space without enclosing it — it defines the island’s zone from above without creating a heavy overhead structure. The principle of visual layering is at work: objects on the shelf exist at eye level or just above, creating a secondary plane of interest that makes the kitchen feel populated even when the island surface itself is clear. Heavy iron brackets also reinforce the visual weight of the island below, tying the two elements together.
How to get it: Install the shelf 24–30 inches above the countertop surface — this leaves room for task lighting below if needed, and keeps the shelf accessible without stretching. Use 3/8-inch lag screws into wall studs for a 3-inch-thick pine shelf. Floating shelf brackets from Rejuvenation in blackened steel ($35–$55 per bracket) have the appropriate weight for a farmhouse context.
💡 Quick Win: A single wide shelf reads more cohesive than multiple small ones — buy one 60-inch slab and cut it to fit rather than using two shorter pieces.
20. Galley-Style Island with Double-Sided Storage
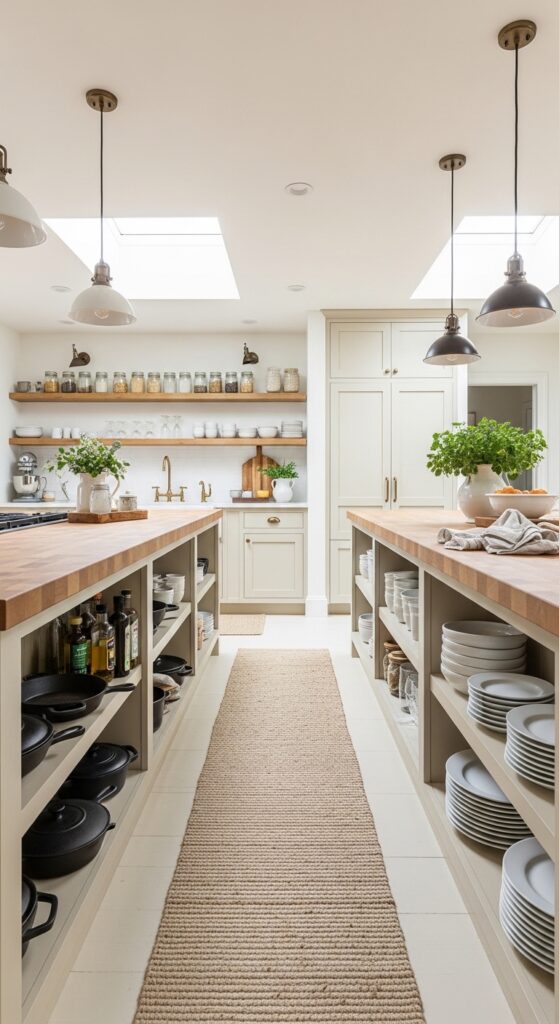
Vibe: Efficient and purposeful — a double-sided island is the farmhouse kitchen at its most honestly functional.
Why it works: Double-sided open storage solves a specific layout challenge in open-plan farmhouse kitchens: the transition zone between cooking and dining. Facing cookware and ingredients toward the range and dishes toward the table makes the island a genuine work hub rather than a decorative centerpiece. Keeping both sides open (no doors) is a commitment to the farmhouse ethos — nothing hidden, nothing pretentious, everything where it can be found immediately.
How to get it: This layout works best in islands of 60 inches or longer, with a minimum 42-inch clearance on each working side. Build shelf openings at 12-inch intervals for maximum plate and bowl versatility. Apply a food-safe butcher block sealer (Waterlox Original) rather than an oil to the countertop — it cures harder and handles the heavy use that a working farmhouse island demands.
21. Farmhouse Island with Pendant Lanterns
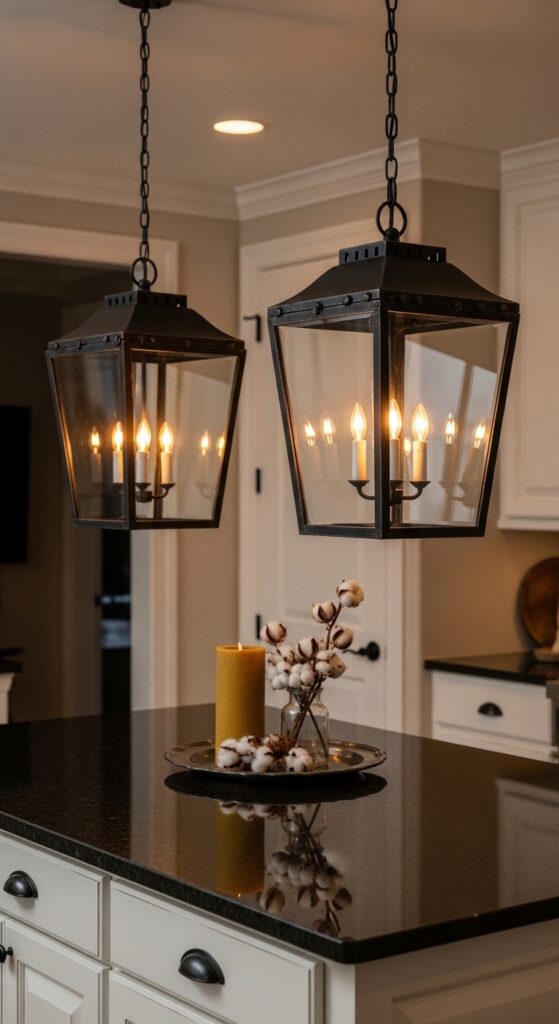
Vibe: Romantic and grounded — a farmhouse lantern pendant is the indoor equivalent of a porch light on a warm summer night.
Why it works: Lantern-style pendants with clear glass panels create a different light behavior than solid shades: the bulb is visible, which means the fixture becomes a light source in two ways — direct downlight onto the island and ambient glow from the exposed bulb. This dual quality makes the kitchen feel genuinely warm rather than merely well-lit. The iron frame in a lantern pendant also has more visual complexity than a simple shade — the grid of the frame creates shadow patterns on surrounding walls that shift as the light source heats up.
How to get it: Visual Comfort and Pottery Barn both produce well-proportioned lantern pendants in the $150–$350 range that suit farmhouse kitchens. Fit them with flame-tip candelabra bulbs at 2200K — the pointed bulb tip reads as a candle flame from a distance, reinforcing the lantern aesthetic beyond just the fixture shape.
22. All-White Island with Apron Front and Carved Panel Detail
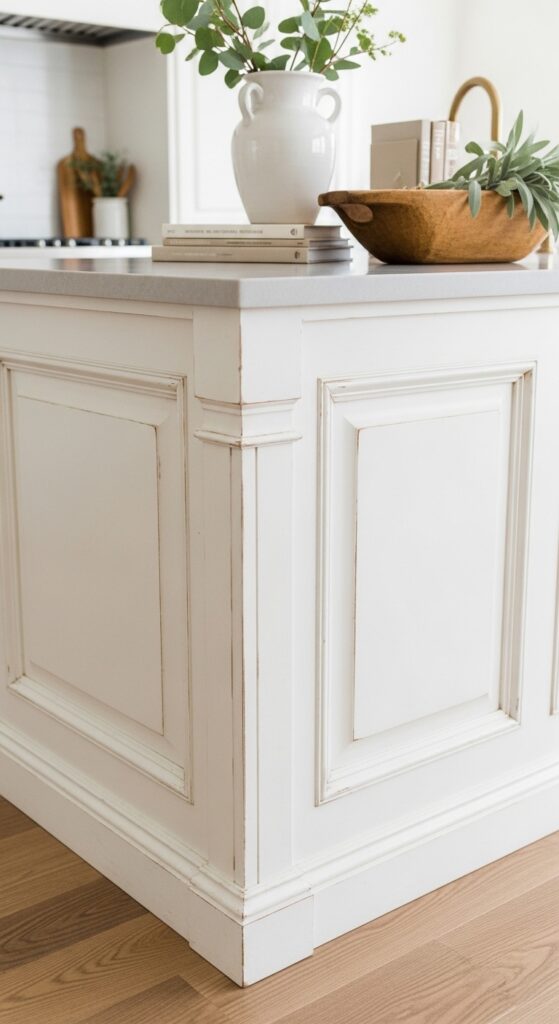
Vibe: Luminous and serene — an all-white island with carved detail is the farmhouse kitchen at its most quietly confident.
Why it works: An all-white palette for the island creates maximum reflectivity, making even a north-facing kitchen feel brighter and more open. The carved raised panel detail introduces dimensionality and shadow lines without adding color — the interest comes entirely from light behavior across the carved surface. Deliberate distressing at corners and edges is the final step that separates a farmhouse island from a merely white one: the revealed primer beneath mimics the natural wear patterns of a genuinely old piece.
How to get it: To achieve controlled distressing, paint the island in two colors — warm white as a base coat, then antique white as the topcoat. Once dry, use 150-grit sandpaper to lightly abrade corners and edges where real wear would naturally occur: pulls, corners, the apron edge. The warm white base reads as natural wear. Finish with a clear matte wax rather than polyurethane to keep the surface looking aged rather than protected.
💡 Quick Win: American Paint Company’s “Farmhouse White” chalk paint ($25/quart) is pre-formulated to distress easily and doesn’t require priming on previously painted surfaces.
How to Start Your Rustic Farmhouse Kitchen Transformation
Start with the island color. Paint it in Benjamin Moore “White Dove” OC-17 before buying a single accessory, piece of hardware, or light fixture. This single move establishes the tonal foundation — warm, not stark — that makes every subsequent choice feel grounded and coherent rather than random. It’s the anchor from which everything else calibrates.
The most common beginner mistake is mixing too many wood species without intention. Reclaimed pine, white oak, walnut, and maple all read differently — some warm, some cool, some red-toned. When a farmhouse kitchen has three or four unrelated wood tones competing for attention, the result is visual noise rather than the layered warmth the style promises. Choose one primary wood species for the island and repeat it in at least one other element (open shelves, a stool, a floating shelf) to create cohesion.
Three items under $50 that create immediate farmhouse impact: a hand-thrown ceramic canister set in matte white from IKEA’s VARDAGEN line ($12–$18 per piece), a set of linen dish towels in natural undyed flax from Fog Linen Work ($28 for two), and a bundle of dried pampas grass in a secondhand stoneware crock found at a thrift store for under $10.
A starter farmhouse kitchen — new island paint, updated hardware, and a few key accessories — can be achieved in a weekend for $150–$400. A full transformation with new countertops, lighting, and furniture typically runs $3,000–$8,000 and unfolds over two to six months. The best farmhouse kitchens aren’t finished in a weekend; they accumulate over time.
Frequently Asked Questions About Rustic Farmhouse Kitchen Islands
What is the difference between rustic farmhouse and modern farmhouse kitchen design?
Rustic farmhouse design prioritizes genuinely aged, imperfect materials — reclaimed wood, worn paint, unlacquered metals — while modern farmhouse (think Joanna Gaines-era aesthetics) uses the visual language of farmhouse but applies it with cleaner lines, more uniform finishes, and a more polished overall appearance. In practice, rustic farmhouse leans harder into texture and patina, while modern farmhouse leans toward graphic contrast (typically black and white). If you want a shiplap accent wall with pristine white cabinets and matching hardware, that’s modern farmhouse. If you want a butcher block island that shows its knife marks, that’s rustic farmhouse.
What colors work best for a rustic farmhouse kitchen island?
Antique white, warm cream, and soft off-white are the most versatile — they read as architectural rather than decorative and work with virtually every wood tone. For accent island colors, deep navy (Benjamin Moore “Van Deusen Blue”), muted sage (Farrow & Ball “Mizzle”), and tobacco brown (as a stained wood tone rather than a painted color) are the three that appear most consistently in professionally designed rustic farmhouse kitchens. Avoid cool grays and bright whites, which strip the warmth the style depends on.
Is rustic farmhouse kitchen design expensive to achieve?
It doesn’t have to be — and in fact, the style’s emphasis on aged, imperfect materials means that secondhand and salvage sources are not a budget compromise but an aesthetic advantage. An authentic farmhouse island can be assembled for $300–$800 using a secondhand cart, new hardware, and a butcher block top. A full custom build with reclaimed wood and stone countertops can reach $5,000–$15,000. The sweet spot for most homeowners is a stock IKEA base cabinet system dressed with wood faces, quality hardware, and a butcher block top — which runs $800–$2,000 installed.
Can I mix rustic farmhouse with other styles?
Yes — and often the most interesting farmhouse kitchens do exactly this. Rustic farmhouse pairs naturally with Southwestern elements (terracotta, woven textiles), English country details (floral ceramics, painted furniture), and even industrial accents (iron pipe, exposed Edison bulbs). The important principle is that the warm, natural material palette of rustic farmhouse should remain dominant — about 70% of the room. The mixed style elements work as accents within that framework. Where mixing fails is when a competing style demands cool materials (marble, chrome, lacquer) that work against the warm farmhouse foundation.
What lighting works best over a rustic farmhouse kitchen island?
Wrought iron, aged brass, and rattan are the three best materials for island pendant lighting in a rustic farmhouse kitchen. Wrought iron cage pendants introduce darkness and contrast that prevent the palette from reading too sweet; aged brass brings warmth and historical authenticity; rattan adds organic texture and dappled light. All three work best with bulbs in the 2200K–2700K range — anything cooler strips the warmth from the wood and cream tones that the style depends on. Hang pendants 30–36 inches above the island surface and keep them proportional: for a 6-foot island, two 12–14-inch pendants or one large 18–20-inch pendant works better than three small ones.
Ready to Create Your Dream Rustic Farmhouse Kitchen Island?
These 22 ideas have covered the full range of what makes this style work — from material choices like reclaimed wood and copper, to color decisions in sage and navy, to layout strategies like double-sided storage and open-shelf integration. Transformation doesn’t happen in a weekend, and it doesn’t need to — the farmhouse kitchen is, by its very nature, a space that gets better the more slowly it’s built.
Start today by pulling one piece of natural wood into your kitchen: a simple cutting board leaned against the backsplash, a raw-edge wooden bowl on the counter, or a turned-wood trivet by the stove. Notice how it changes the room’s temperature immediately — that’s the material doing exactly what it’s supposed to do.
When this kitchen is finished — in whatever increments and timeline you choose — you’ll have a space that doesn’t just look warm, it feels warm. A kitchen that asks nothing of you except that you show up and cook in it. Pin the ideas that stopped you mid-scroll, especially the ones you’re not quite ready for yet — those are usually the ones that end up defining the room.