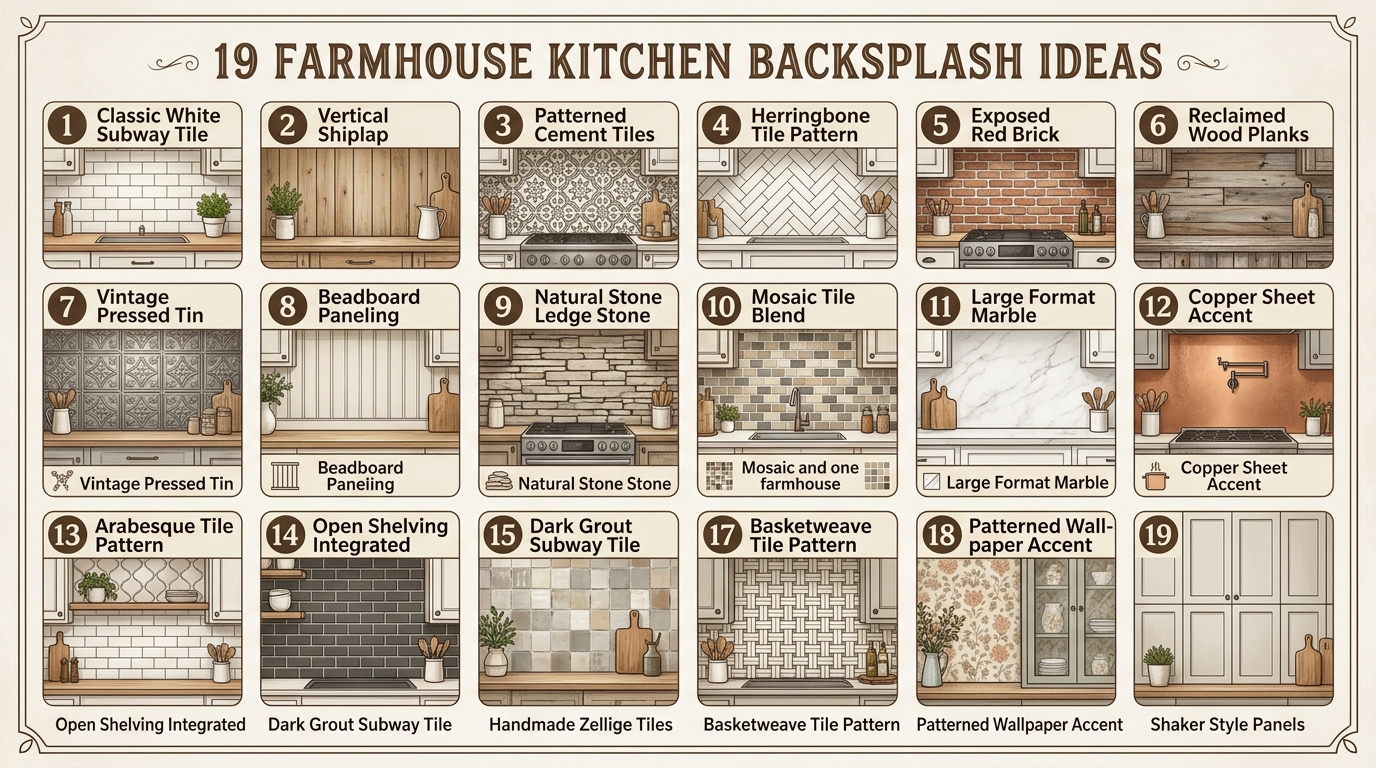
A farmhouse kitchen backsplash is a wall treatment behind the stove and sink that uses honest, tactile materials — subway tile, shiplap, brick, or handmade ceramic — to anchor the kitchen in rustic, rural character. This article gives you exactly 19 farmhouse kitchen backsplash ideas, from classic white subway tile to unexpected reclaimed wood, so you can find the treatment that fits your kitchen and your budget.
Run your hand along a hand-glazed tile and you’ll understand what farmhouse is actually about — texture you can feel, materials that hold history, surfaces that only get better with a little grease and time. A farmhouse kitchen backsplash doesn’t try to disappear; it contributes. It grounds the most-used wall in the home with something real. Here are 19 ideas worth saving — and stealing.
Why Farmhouse Kitchen Backsplash Style Works So Well
Farmhouse design draws from American agrarian vernacular — the practical, unpretentious interiors of 18th and 19th-century working farms that prized durability and honest material over ornamentation. For backsplashes specifically, this translates into surfaces that reference actual farm-building materials: brick, whitewashed wood, hand-pressed clay tile, and simple stacked stone. What separates farmhouse backsplash from “rustic” is restraint — it never tips into themed territory because it stays grounded in materials that could plausibly have always been there.
The color palette for a farmhouse kitchen backsplash stays close to undyed natural tones: warm white, aged cream, greige, soft dove grey, weathered brick red, and the occasional dusty sage or slate blue as accent. Materials are intentionally imperfect — handmade subway tile with glaze variation, reclaimed wood with saw marks still visible, thin brick with mismatched mortar depth. Grout color is as important as tile color: warm grey (never bright white) grounds the grid and keeps the eye reading the surface as aged rather than new.
Farmhouse backsplash ideas are trending because they solve the problem most homeowners wrestle with: a backsplash that photographs well but also holds up to real cooking. Post-pandemic, the kitchen became the most emotionally loaded room in the home — the place where people actually wanted to spend time. A surface that looks better with a little cooking patina rather than worse is exactly what that cultural moment called for.
Small kitchens can absolutely achieve this style. The key is choosing a low-contrast backsplash — a warm white subway tile with a warm grey grout, rather than a dark grout — so the eye moves through the space rather than stopping on the wall. Smaller tile formats (3×6 over 4×8) scale better in compact kitchens and maintain the farmhouse proportion without overwhelming the room.
Style at a Glance
| Element | Detail |
| Philosophy | Honest, durable surfaces that improve with use |
| Key Materials | Handmade subway tile, thin brick, shiplap, hand-thrown ceramic, reclaimed wood |
| Key Colors | Warm white, aged cream, greige, dove grey, weathered brick red, dusty sage |
19 Farmhouse Kitchen Backsplash Ideas
1. Classic White Subway Tile With Warm Grey Grout
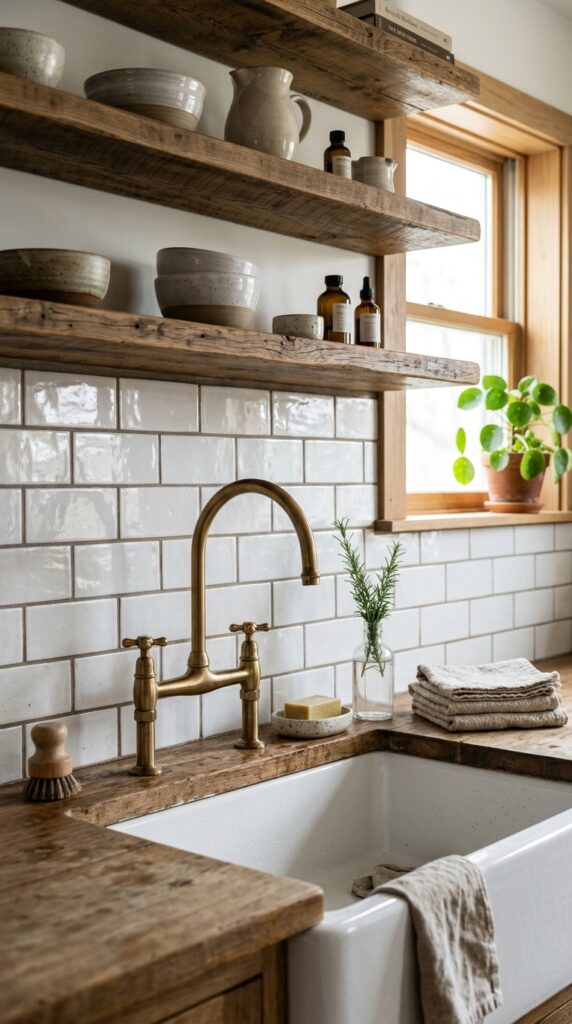
Vibe: Clean and grounded — the farmhouse backsplash that earns its place by never asking for attention.
Why it works: The 3×6 subway tile in a running bond (brick) pattern is the most historically accurate farmhouse backsplash choice because it references actual 19th-century institutional tile used in dairies and washrooms — the original working-farm interiors. The critical detail is the grout color: warm grey (Mapei “Warm Gray” or similar) instead of bright white prevents the wall from reading as clinical. Glaze variation across handmade tiles adds the subtle imperfection that separates farmhouse from simply “white kitchen.”
How to get it: Specify handmade-look subway tile rather than perfectly uniform machine-made tile — the slight warping and glaze variation is the entire point. Install in a classic running bond (offset by half the tile length) and use a 3/16-inch grout joint for the most authentic scale. Grout in Mapei “Warm Gray” 112 and seal within 48 hours of application.
💡 Quick Win: A peel-and-stick subway tile backsplash in a warm white with pre-applied grey grout lines installs in one afternoon for under $80 and is completely renter-safe — perfect for testing the look before committing to permanent tile.
🛍️ Shop the Look — Amazon Product Ideas
| # | Product Search Phrase | Why It Fits |
| 1 | White handmade subway tile 3×6 box 10 sqft | Core backsplash material |
| 2 | Mapei warm gray grout sanded 10lb | Farmhouse-accurate grout color |
| 3 | Brushed brass kitchen faucet apron sink | Hardware color story |
| 4 | Ceramic soap dish farmhouse white | Sink-area accent |
| 5 | Linen dish towel striped cream set of 3 | Textile layering at sink |
2. Reclaimed Shiplap Wood Backsplash Behind the Range
Vibe: Raw and warm — the kind of kitchen wall that smells faintly of wood and last night’s roast.
Why it works: Shiplap as a backsplash is a bold move because it introduces a non-tile material in a zone conventionally reserved for wipeable surfaces — and that contrast is exactly what makes it work. The horizontal board lines create a strong directional movement that visually widens the range wall. The key is the finish: a penetrating oil sealer (not a glossy polyurethane) keeps the wood looking raw while providing enough protection against splatter in a low-moisture zone.
How to get it: Use shiplap only behind a range with a proper range hood — not behind a sink or in a high-moisture zone. Apply two coats of Rubio Monocoat Pure in matte finish to seal the wood without altering its raw appearance. Mount a stainless or galvanized rail for hanging tools rather than drilling into the sealed surface repeatedly.
🛍️ Shop the Look — Amazon Product Ideas
| # | Product Search Phrase | Why It Fits |
| 1 | Shiplap wall panel pine 8 foot board | Core backsplash material |
| 2 | Rubio Monocoat wood finish matte clear | Raw-look sealer for wood |
| 3 | Galvanized metal kitchen rail hooks 24 inch | Tool storage on shiplap |
| 4 | Cast iron skillet set 2 piece farmhouse | Hanging pan display |
| 5 | Ceramic canister set farmhouse matte white 3 | Adjacent shelf styling |
3. Thin Brick Veneer With a Whitewash Finish
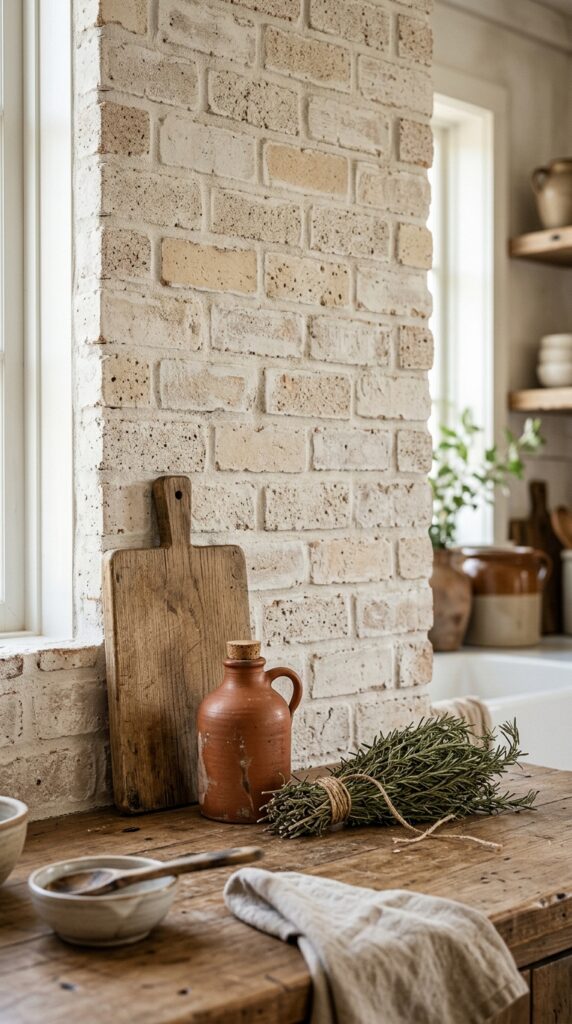
Vibe: Layered — like a wall that has been painted over, lived against, and worn back to something truer.
Why it works: Thin brick veneer brings the depth and texture of full brick at a fraction of the weight and cost — important for backsplash applications where structural support is limited. The whitewash technique (diluted white latex paint, roughly 1 part paint to 2 parts water) is applied with a brush and immediately wiped back, leaving paint in the mortar joints and the lightest film on the brick face. The result is a surface that reads as genuinely aged, not newly decorated.
How to get it: Use a 1:2 ratio of flat white latex paint to water, applied with a natural bristle brush in the direction of the mortar joints. Wipe back immediately with a damp rag, working in 2-square-foot sections so the wash doesn’t dry before you can soften it. For more coverage, apply a second pass after the first dries fully — you can build up without going back.
💡 Quick Win: Peel-and-stick thin brick tiles in a “weathered white” tone are available in case quantities online and install over existing smooth walls without mortar — a weekend project that creates a genuine-looking whitewashed brick backsplash for around $120.
🛍️ Shop the Look — Amazon Product Ideas
| # | Product Search Phrase | Why It Fits |
| 1 | Thin brick veneer tile peel stick weathered white | Renter-safe brick backsplash |
| 2 | Limewash paint white interior textured | Authentic brick wash finish |
| 3 | Terracotta oil jar ceramic Italian style | Adjacent counter accent |
| 4 | Wooden cutting board end grain large | Leaning counter detail |
| 5 | Dried rosemary bundle wrapped twine farmhouse | Organic herb accent |
4. Handmade Ceramic Tile in Soft Sage Green
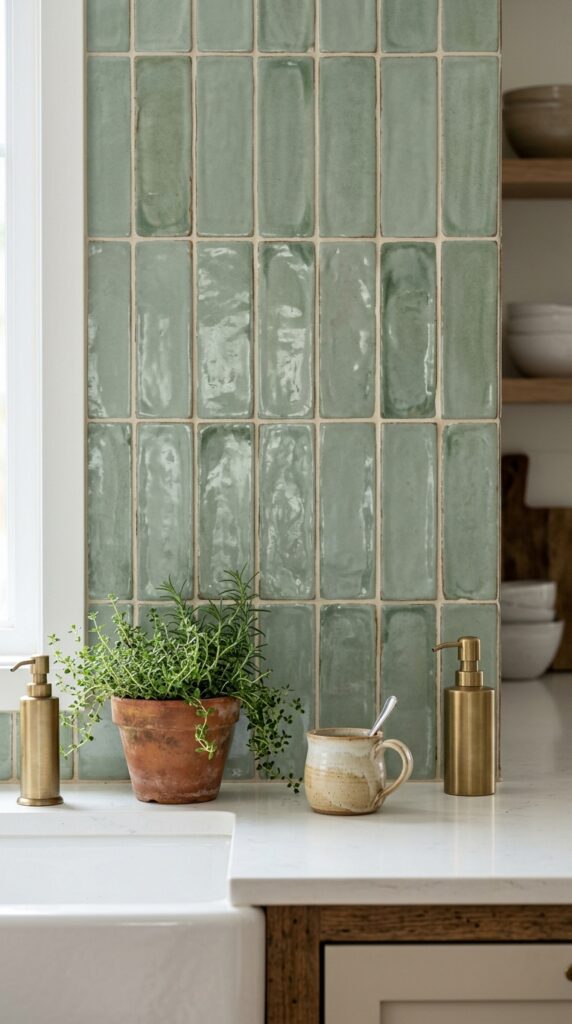
Vibe: Serene — the colour of herb gardens and overcast mornings, quiet enough to think inside.
Why it works: Handmade ceramic tile succeeds as a farmhouse backsplash because its imperfections are the product — glaze pooling, slight warping, irregular edges. Each tile is technically unique, which gives the wall the kind of visual variation that machine-made tile cannot achieve at any price point. Sage green in a muted, grey-toned formula (not yellow-green) reads as a neutral in farmhouse contexts, allowing it to live quietly beside warm wood tones, cream cabinets, and brushed brass without competing.
How to get it: Source handmade ceramic tile from small-batch makers on Etsy (search “handmade sage ceramic tile 4×4”) or from Fireclay Tile. Install in a stacked (straight-set) pattern rather than running bond — the stacked grid emphasizes the individual tile variation rather than the overall pattern. Use a cream unsanded grout at 1/8-inch joint for the most handcrafted result.
🛍️ Shop the Look — Amazon Product Ideas
| # | Product Search Phrase | Why It Fits |
| 1 | Handmade ceramic wall tile sage green 4×4 | Core handcrafted material |
| 2 | Cream unsanded grout 10lb wall tile | Soft joint, handmade look |
| 3 | Brass soap dispenser farmhouse pump top | Sink area hardware accent |
| 4 | Trailing herb pot terracotta small 3 inch | Living organic counter detail |
| 5 | Hand-thrown stoneware mug cream speckled | Counter-level ceramic accent |
5. Open Wood Shelving as the Backsplash Design Anchor

Vibe: Warm and layered — the backsplash you barely notice because what’s on the shelves is so alive.
Why it works: This layout uses a neutral subway tile backsplash as a backdrop rather than a feature, letting the open shelving carry the visual weight. It’s a principle called “layered depth” — the eye reads the closest layer (shelf contents) first, then moves to the shelf material, then finally to the tile behind. The reclaimed pine shelf with its raw edge and visible grain is the actual farmhouse design element; the tile is simply a clean, wipeable surface that lets the wood breathe.
How to get it: Mount shelves at 18 inches above the counter surface and 24 inches apart if doubling up. Use 10-inch-deep boards (minimum) so plates can stack front-to-back. Install an LED strip light along the back underside of each shelf — it warms the tile behind and makes the ceramics glow without requiring any overhead fixture changes.
💡 Quick Win: A single floating shelf in weathered grey pine (available pre-made online for under $45) mounted above your existing backsplash immediately shifts the room’s entire visual hierarchy — the wall becomes a vignette rather than a surface.
🛍️ Shop the Look — Amazon Product Ideas
| # | Product Search Phrase | Why It Fits |
| 1 | Reclaimed wood floating shelf 36 inch raw edge | The visual anchor piece |
| 2 | Raw steel shelf bracket heavy duty black | Honest industrial support |
| 3 | LED strip light warm white under cabinet | Shelf-glow lighting layer |
| 4 | Cream ceramic dinner plate set 4 farmhouse | Open shelf dishware styling |
| 5 | Glass canister dry goods farmhouse lid set 3 | Functional shelf display |
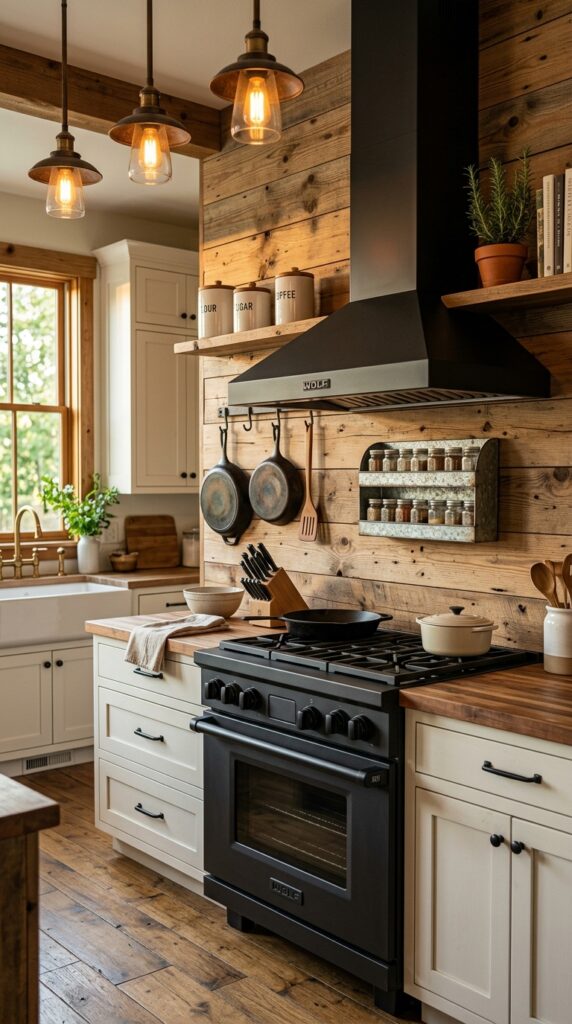
6. Vertical Shiplap Backsplash in Matte Black
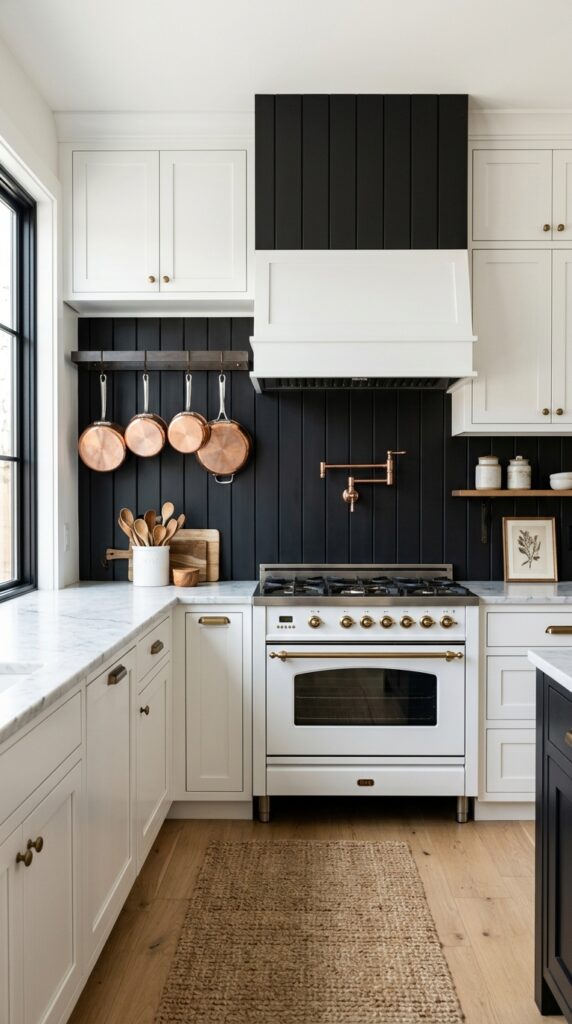
Vibe: Dramatic and grounded — the farmhouse kitchen that isn’t afraid of dark.
Why it works: Vertical shiplap in matte black behind a range inverts the usual farmhouse color logic — instead of a light backsplash against dark counters, the darkest element sits at the wall and everything else recedes. This contrast principle (maximum value difference between backsplash and cabinet) makes the range feel like a designed focal point rather than an appliance. Matte black specifically (not satin, not gloss) is essential: sheen on a dark surface reads as modern; matte reads as aged, chalky, and farmhouse-appropriate.
How to get it: Install 3-inch pine shiplap vertically — the direction switch from horizontal reads as more dramatic and elongates the wall height behind a range. Paint in Farrow & Ball “Pitch Black” No. 256 in a dead flat finish. Because this is behind a range, seal with two coats of matte clear polyurethane — flat enough to maintain the matte appearance but protective enough to wipe down after cooking.
🛍️ Shop the Look — Amazon Product Ideas
| # | Product Search Phrase | Why It Fits |
| 1 | Pine shiplap board 3 inch narrow tongue groove | Vertical installation material |
| 2 | Matte black interior paint quart flat finish | The defining color choice |
| 3 | Copper pot set hanging kitchen 3 piece | Warm contrast against black |
| 4 | White ceramic utensil holder farmhouse large | Counter-level white anchor |
| 5 | Wooden spoon set cooking farmhouse 6 piece | Displayed utensil detail |
7. Cream Zellige-Style Tile With Irregular Glaze
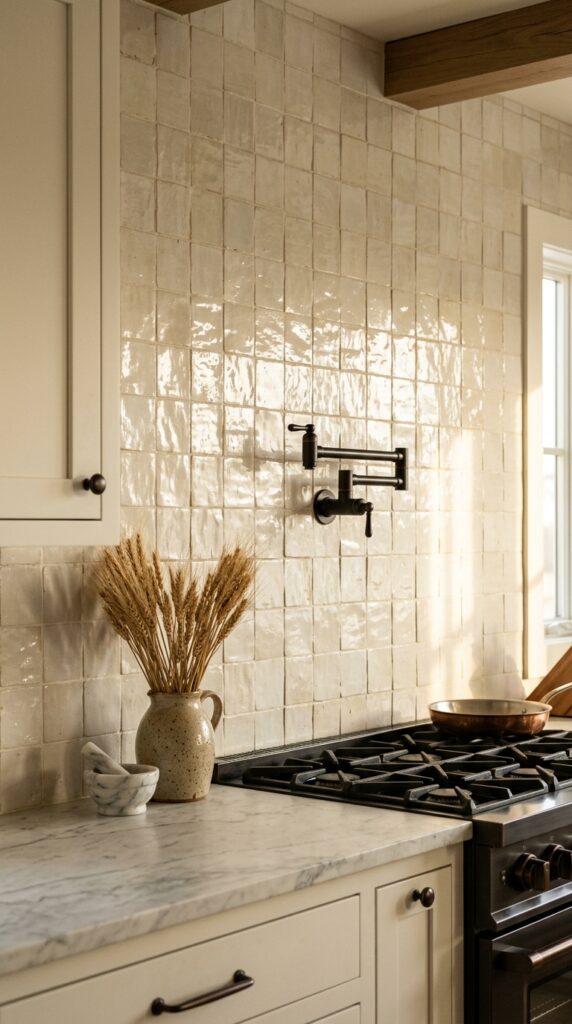
Vibe: Luminous — every tile catches light differently, so the wall is never the same twice.
Why it works: Zellige-style tile (flat tiles with deliberately uneven, slightly wavy surfaces and pooled glaze) does something no flat subway tile can: it reflects light at multiple angles simultaneously, creating a surface that appears to shift and glow throughout the day. The cream-to-ivory glaze variation means the wall reads as three-dimensional without any relief pattern — just the physics of light on an imperfect surface. This is the farmhouse tile upgrade that reads as genuinely artisanal.
How to get it: True Zellige tile from Moroccan makers is significantly more expensive ($25–$45/sq ft) than the machine-made style — for farmhouse kitchens on a budget, look for “Zellige-look” ceramic tile from domestic manufacturers like Fireclay or Granada Tile. Install with a very thin grout joint (1/8 inch) in a cream-toned unsanded grout — the tile variation does the work; the grout should disappear.
💡 Quick Win: A single row of Zellige-style tile installed as a horizontal accent border between existing plain tile and a flat wall section costs a fraction of a full installation and creates a custom, layered look for under $60 in tile.
🛍️ Shop the Look — Amazon Product Ideas
| # | Product Search Phrase | Why It Fits |
| 1 | Zellige look ceramic tile cream 4×4 handmade | Luminous irregular surface tile |
| 2 | Cream unsanded grout non-sanded 7lb | Thin joint, tile-blending grout |
| 3 | Oil rubbed bronze pot filler wall mount | Bronze hardware against cream |
| 4 | Marble mortar pestle large farmhouse kitchen | Counter texture contrast |
| 5 | Dried wheat bundle natural tall arrangement | Organic tall accent display |
8. Penny Tile Mosaic in Warm Greige
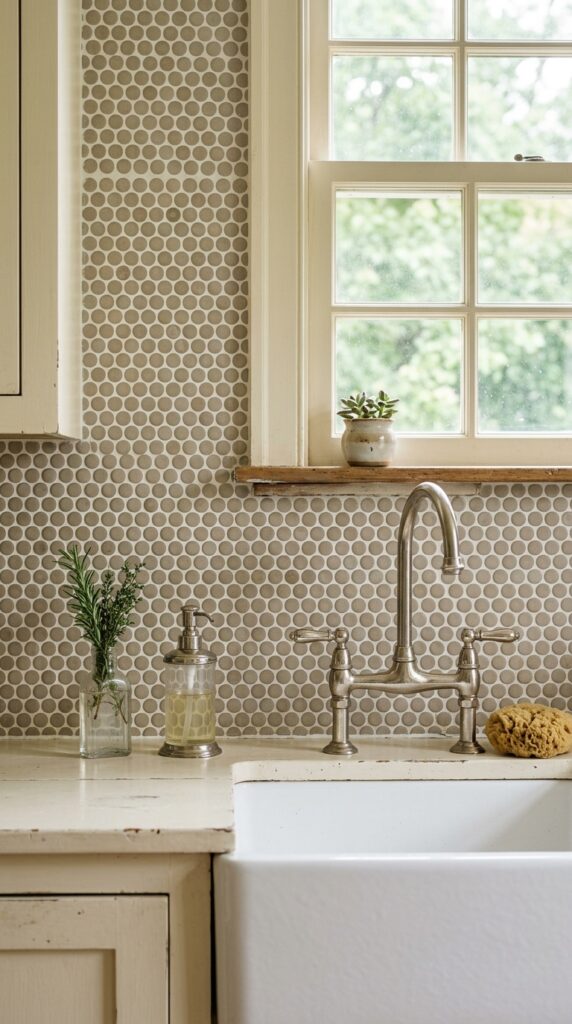
Vibe: Hushed and textural — a thousand small circles making something quietly whole.
Why it works: Penny tile’s circular geometry is the one farmhouse mosaic that reads as antique rather than modern, because it references actual early 20th-century floor tile used in farmhouse mudrooms and dairies. At backsplash scale, the high grout-to-tile ratio creates a surface with tremendous visual texture despite the tiles being small and flat. Warm greige (a tone that reads as neither beige nor grey — think Sherwin-Williams “Accessible Beige” as a color reference) prevents the mosaic from going cold or institutional.
How to get it: Penny tile comes pre-mounted on 12×12-inch mesh sheets for straightforward installation. Buy 10% more than your square footage — the circular tile shape means you lose more material to cuts at edges than with square formats. Grout in bright white (Laticrete “Bright White”) rather than grey to maintain the quiet, aged-dairy aesthetic.
🛍️ Shop the Look — Amazon Product Ideas
| # | Product Search Phrase | Why It Fits |
| 1 | Penny round mosaic tile greige warm 12×12 mesh | Core mosaic backsplash tile |
| 2 | White ceramic tile grout sanded 10lb bright white | High-ratio grout surface |
| 3 | Polished nickel soap dispenser pump farmhouse | Sink area hardware match |
| 4 | Glass bud vase set 3 clear farmhouse | Light-catching sink accent |
| 5 | Natural sea sponge large kitchen soap | Organic texture at sink edge |
9. Farmhouse Kitchen Backsplash With Plate Rail Display
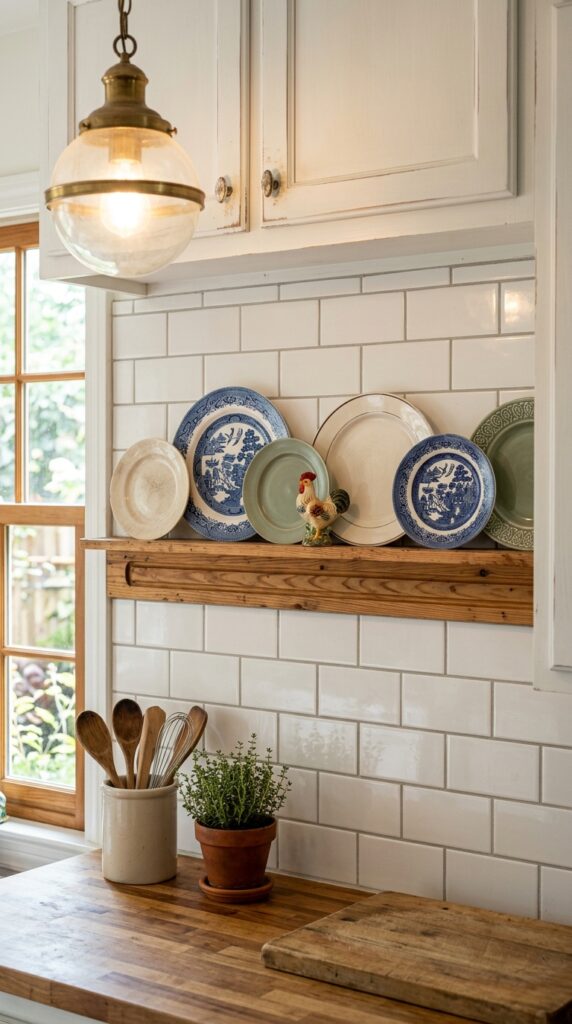
Vibe: Collected and warm — like plates gathered from different kitchens across different decades, finally together.
Why it works: A plate rail at the top of the backsplash zone is a farmhouse design technique with direct historical precedent — plate rails were functional storage in 19th-century farm kitchens before upper cabinets existed. Mounting one at the tile termination line (the top edge of the backsplash) bridges the tile and the wall above, solving the common problem of an abrupt tile end that reads as unfinished. The displayed plates add three-dimensional character to a flat tile surface.
How to get it: Cut a 3×3-inch pine board and rout a 1/4-inch groove along the front face, 1 inch from the bottom edge — this groove holds plate edges at a lean. Mount with two toggle anchors into drywall above the tile line. Paint in the same color as upper cabinets for a built-in look, or in raw pine for contrast.
💡 Quick Win: A pre-made wooden plate rail (available for under $30 online in standard lengths) mounts directly over any existing backsplash without tile work — it adds instant farmhouse character and a display ledge in one weekend afternoon.
🛍️ Shop the Look — Amazon Product Ideas
| # | Product Search Phrase | Why It Fits |
| 1 | Wooden plate rail display ledge 36 inch | The defining architectural add-on |
| 2 | Ironstone white dinner plate farmhouse set 4 | Classic display plate style |
| 3 | Blue transferware decorative plate farmhouse | Antique-style accent plate |
| 4 | Cream glazed ceramic dessert plate set | Tonal variation in display |
| 5 | Small ceramic figurine rooster farmhouse white | Between-plate character accent |
10. Slate Blue Subway Tile for a Moodier Farmhouse Kitchen
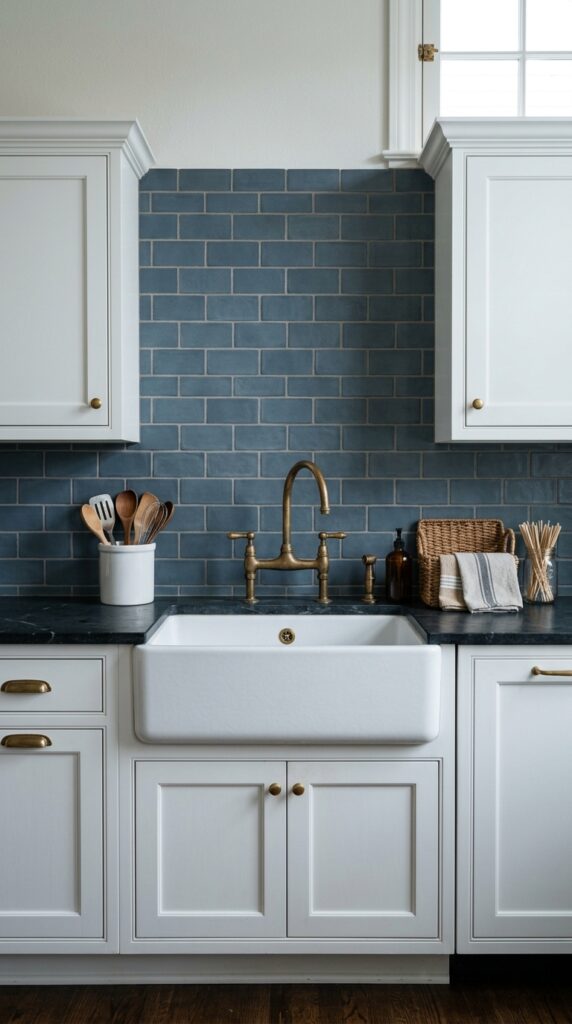
Vibe: Moody — the farmhouse kitchen in the light just before the day decides what it wants to be.
Why it works: Slate blue as a backsplash color is a historically grounded farmhouse choice — early American milk paint in “slate” or “Prussian blue” was used extensively on interior walls and furniture. Against white Shaker cabinets, the value contrast creates a clear focal point at the sink wall without introducing color elsewhere. Unlacquered brass hardware is the critical pairing detail: its warm, aging patina bridges the cool slate tile and the warm wood tones typically present in farmhouse kitchens.
How to get it: Source subway tile in a matte (not glossy) glaze — Fireclay Tile makes a “Slate” that is exactly the right muted, grey-blue tone. Pair with Mapei “Warm Gray” grout to prevent the joint from going purple-grey (a common mismatch with blue tile). Unlacquered brass faucets are available from unlacqueredbrass.com and similar retailers — they will darken naturally with use to a beautiful lived-in patina.
🛍️ Shop the Look — Amazon Product Ideas
| # | Product Search Phrase | Why It Fits |
| 1 | Slate blue subway tile matte 3×6 box | The moody color material |
| 2 | Unlacquered brass kitchen faucet farmhouse | Aging-patina hardware pairing |
| 3 | White ceramic utensil crock large farmhouse | Counter-level white anchor |
| 4 | Wicker basket small rectangular kitchen | Texture at counter level |
| 5 | Glass jar large wooden skewers farmhouse | Functional counter display |
11. Stacked Stone Veneer Behind the Range
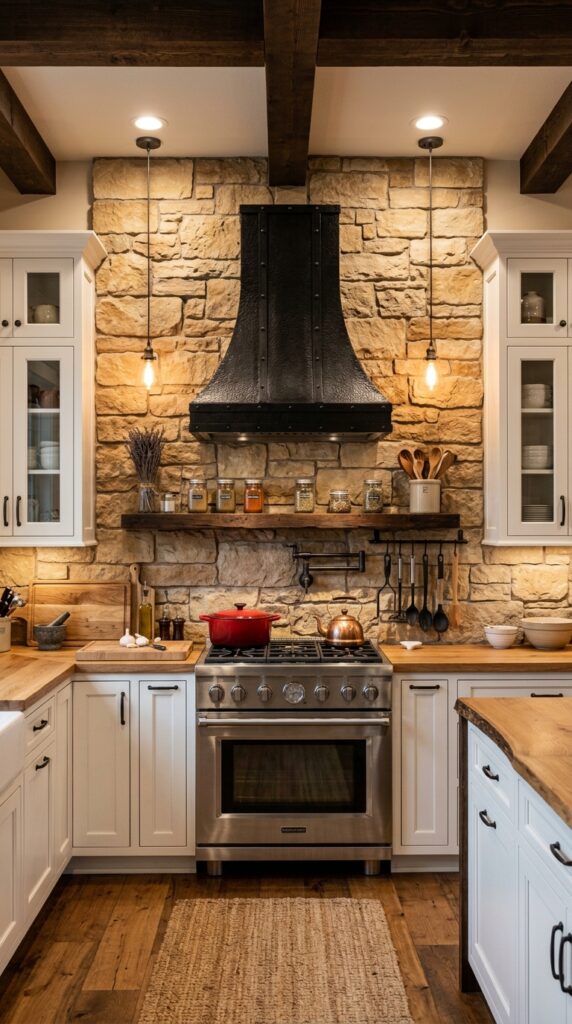
Vibe: Warm and rustic — a wall that makes the range feel like a hearth, which is exactly what it is.
Why it works: Stacked ledger stone behind the range is the most dramatic farmhouse backsplash choice because it references the actual stone fireplace surrounds and hearth walls of original farmhouses — the range literally takes the visual role of the open fire. The three-dimensional surface of ledger stone panels creates strong shadows in raking light, making the wall appear to be genuinely constructed from individual stones. This visual weight anchors the range as the kitchen’s center of gravity.
How to get it: Use natural stone ledger panels (not manufactured stone — the color consistency is too uniform) in a warm sandstone or rustic quartz variety. Install from the floor up, dry-laying the first row to check pattern variation before mortaring. Seal with a penetrating stone sealer rated for kitchen use — not a topical sealer, which will yellow over time.
🛍️ Shop the Look — Amazon Product Ideas
| # | Product Search Phrase | Why It Fits |
| 1 | Ledger stone veneer panel sandstone 6×24 | Core stacked stone material |
| 2 | Penetrating stone sealer natural finish | Kitchen-safe stone protection |
| 3 | Hand forged iron range hood wall mount | Hearth-scale statement piece |
| 4 | Cast iron Dutch oven 5 quart black | Displayed cook pot on range |
| 5 | Mounted wood spice shelf wall narrow | Stone-mounted functional detail |
12. White Plaster Finish Backsplash for a Seamless Look
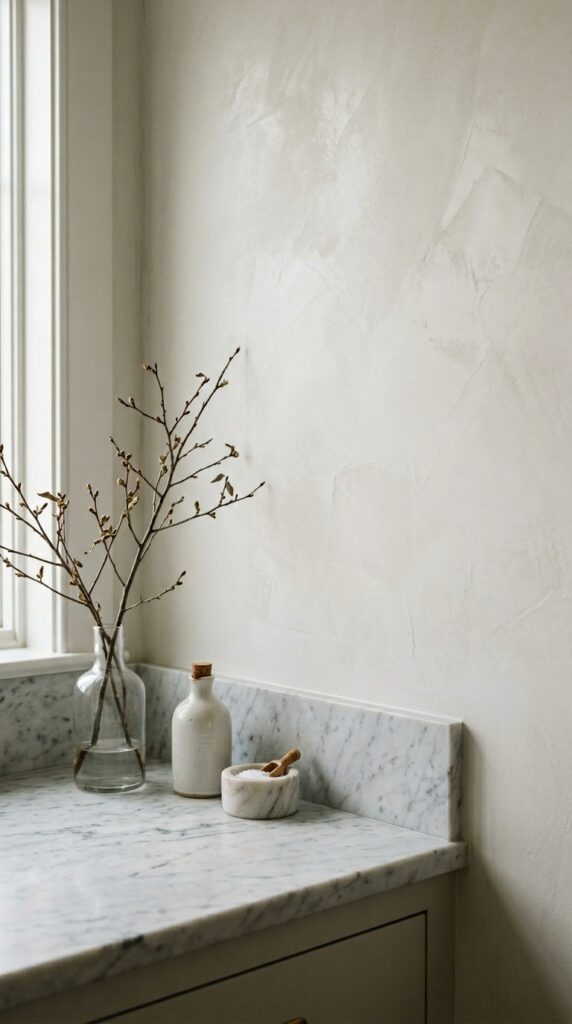
Vibe: Seamless and still — the absence of a grid is its own kind of rest.
Why it works: A plaster finish backsplash is the anti-tile move — no grout lines, no grid, no repeated pattern. This “seamless” approach is historically accurate to original farmhouse construction where lime plaster was the standard wall finish throughout, including in kitchen areas. The slight irregularity of a trowel-applied plaster surface (visible only at raking light angles) provides visual texture without pattern, which keeps the room calm and cohesive from a distance.
How to get it: Apply Venetian plaster compound in two coats using a Japanese-style trowel (a flexible, round-cornered stainless steel tool). Tint the plaster slightly with raw umber universal colorant to warm the white. The key technique: the second coat, applied in tight circular motions with the trowel nearly flat, is what creates the characteristic micro-texture. Seal with Polyvine clear matte wax — the only sealant that preserves the flat appearance.
💡 Quick Win: Limewash paint (Portola Paints “Classico” or similar) applied with a chip brush in overlapping strokes over a primed wall creates a plaster-look backsplash finish for under $40 in materials — no trowel technique required.
🛍️ Shop the Look — Amazon Product Ideas
| # | Product Search Phrase | Why It Fits |
| 1 | Venetian plaster compound white interior wall | Seamless backsplash finish |
| 2 | Limewash paint warm white interior | Budget plaster-look alternative |
| 3 | Japanese flexible trowel stainless steel | Plaster application tool |
| 4 | White ceramic oil bottle farmhouse pour | Counter-level surface accent |
| 5 | Marble salt cellar small pinch bowl | Minimal organic counter detail |
13. Farmhouse Kitchen Backsplash With Terracotta Tile Accents
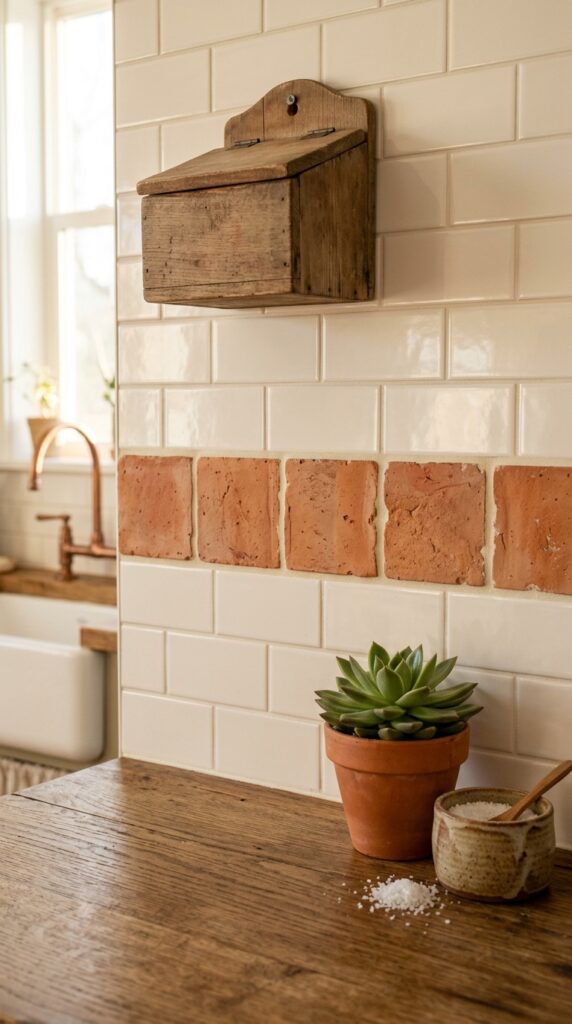
Vibe: Earthy — a kitchen that smells like clay and sun even before anything is cooking.
Why it works: Inserting a horizontal band of unglazed terracotta tile into a white subway tile field is a “feature row” technique that adds color and material contrast without committing to a full terracotta installation. The two materials (ceramic and terracotta) share a clay base, which means they are harmonious in origin even when different in color — the combination never fights. Unglazed terracotta reads as more farmhouse-authentic than glazed terra cotta because it shows the material’s natural fired surface without the decorative layer.
How to get it: Position the terracotta accent row at one tile height above the counter surface — roughly 6–8 inches up — so it sits at the visual midpoint of the backsplash field rather than at the top, which would read as a border. Seal the unglazed terracotta with a penetrating tile sealer before grouting to prevent the grout from staining the porous tile face permanently.
🛍️ Shop the Look — Amazon Product Ideas
| # | Product Search Phrase | Why It Fits |
| 1 | Unglazed terracotta square tile 4×4 natural | Earthy accent row material |
| 2 | Penetrating tile sealer porous tile terracotta | Pre-grout sealing essential |
| 3 | Terracotta pot succulent small 3 inch set | Living counter accent |
| 4 | Earthenware serving bowl large farmhouse | Adjacent earthy vessel |
| 5 | Wooden salt box wall mount farmhouse | Mounted counter-adjacent storage |
14. Galvanized Metal Sheet Backsplash Behind the Sink
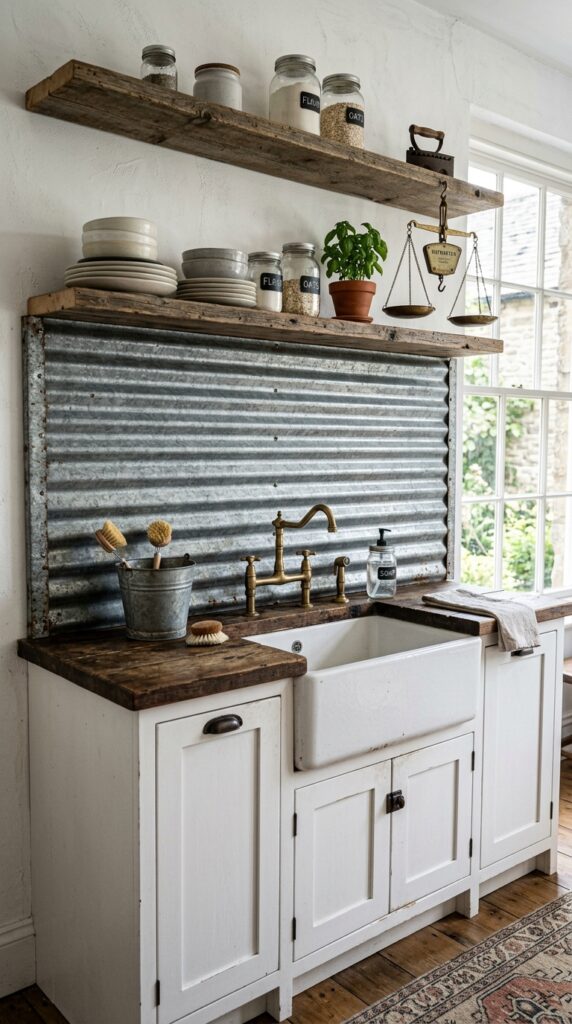
Vibe: Raw — the kitchen stripped back to where the farm actually meets the house.
Why it works: Corrugated galvanized metal is the most authentically agricultural farmhouse backsplash material possible — it is literally the material used on working farm outbuildings, water tanks, and barn walls. At domestic scale, the corrugated ridge pattern creates a strong horizontal texture that absorbs light rather than reflecting it (unlike polished stainless), which keeps the material from reading as commercial or restaurant-style. The slight patina that develops over time — rust blooms at cut edges, water marks from the sink — only improves the aged farmhouse look.
How to get it: Purchase galvanized corrugated roofing sheet from a hardware or farm supply store (sold by the linear foot). Cut to backsplash dimensions with tin snips. Mount using construction adhesive applied to the backs of furring strips (which protect the wall from any galvanic reaction) and secure with self-tapping screws with decorative washers at corners. Seal exposed cut edges with a rust-inhibiting primer to control edge weathering.
💡 Quick Win: A flat (not corrugated) galvanized steel sheet cut to backsplash dimensions and mounted with double-sided construction tape gives the same industrial-farmhouse material story with easier installation and a smoother profile — under $50 from a local metal supply shop.
🛍️ Shop the Look — Amazon Product Ideas
| # | Product Search Phrase | Why It Fits |
| 1 | Corrugated galvanized metal sheet wall panel | Core industrial-farm material |
| 2 | Galvanized metal bucket sink caddy with brushes | Material-matching sink organizer |
| 3 | Mason jar soap dispenser clear glass farmhouse | Counter-level functional accent |
| 4 | Vintage hanging kitchen scale wall mount | Above-sink farmhouse display |
| 5 | Rust inhibiting primer spray metal edges | Cut-edge protection finish |
15. Farmhouse Kitchen Backsplash in Soft Charcoal Brick
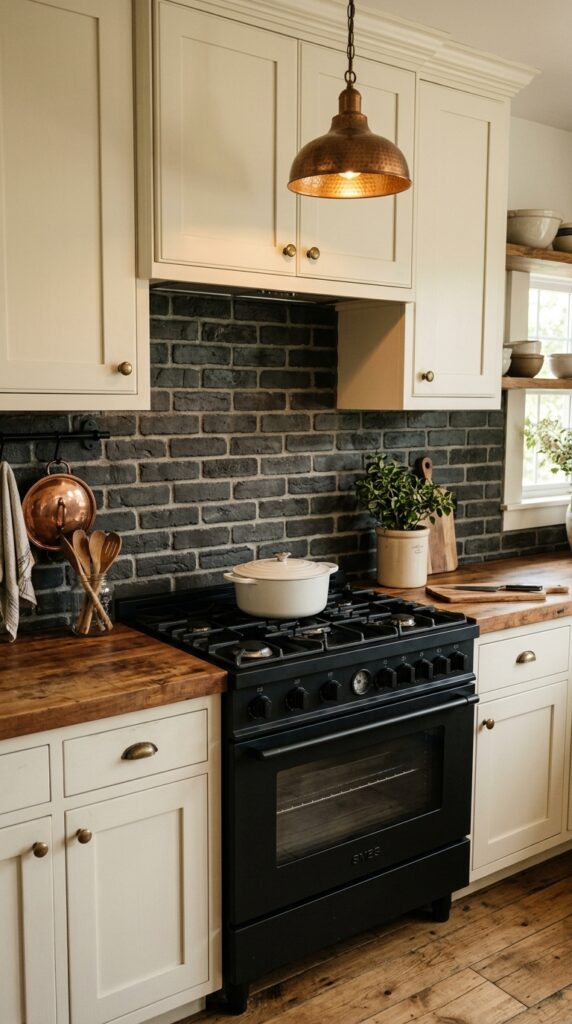
Vibe: Moody and warm — a kitchen that earns the darkness by making everything around it feel luminous.
Why it works: Charcoal brick behind a black range deploys the tonal layering principle — placing the darkest background behind the darkest appliance creates a surface that seems to recede, making the range appear to float rather than sit heavily against the wall. The cream cabinets directly above create maximum value contrast at eye level, which is where the room wants the eye to land anyway. Butcher block counter provides the warm wood tone that prevents the dark palette from going cold.
How to get it: Use charcoal-toned thin brick tile in a standard running bond. Mix your mortar slightly darker than typical grey — add a small amount of black concrete pigment to a standard grey mortar mix to achieve a true warm charcoal joint that reads as intentional rather than faded. This is a detail that separates a professionally considered installation from a DIY approximation.
🛍️ Shop the Look — Amazon Product Ideas
| # | Product Search Phrase | Why It Fits |
| 1 | Charcoal grey thin brick veneer tile running bond | Dark backdrop material |
| 2 | Butcher block counter top 25×72 natural | Warm wood counter contrast |
| 3 | Copper pot lid set hanging display | Warm metal kitchen accent |
| 4 | Matte black range 30 inch freestanding | Appliance matching dark palette |
| 5 | White oval ceramic Dutch oven 5qt | Pop of light on dark range |
16. Painted Brick Backsplash in Antique Cream
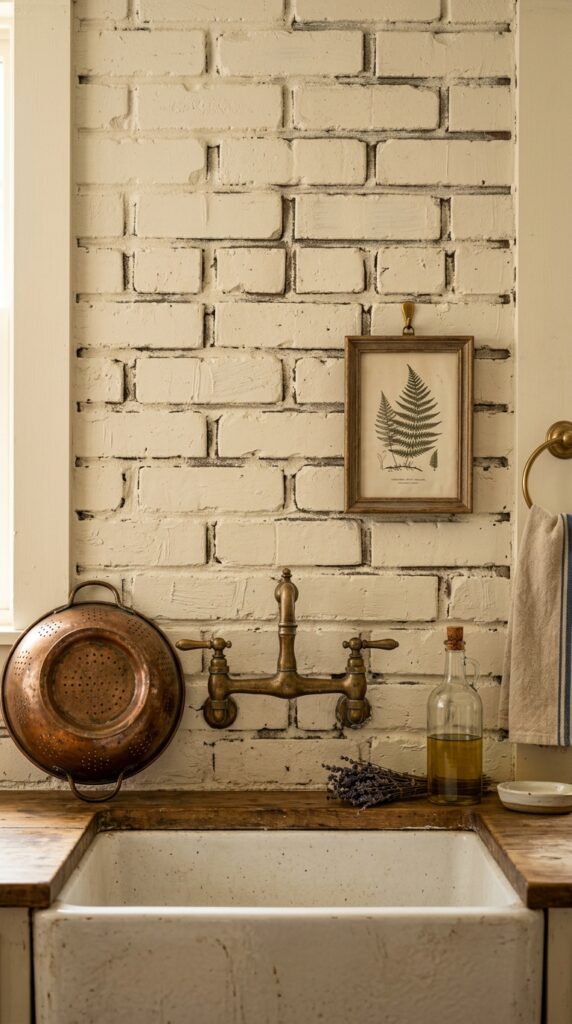
Vibe: Layered and imperfect — a brick wall with a history that decided to dress up just a little.
Why it works: Painting existing exposed brick in antique cream is one of the most cost-effective farmhouse transformations available — it preserves the three-dimensional texture of the brick mortar joints (which still read as shadows through the paint) while unifying the color to the cream palette that farmhouse requires. The antique cream tone (warmer and more aged than pure white) prevents the painted brick from reading as freshly renovated; it looks like a wall that was painted decades ago and has since settled into itself.
How to get it: Use a thick nap roller (3/4-inch) to apply flat latex paint in Benjamin Moore “Antique White” 2148-60, then immediately follow with a chip brush to work paint into mortar joints before it sets. Two coats give full coverage while preserving mortar joint shadows. Do not use primer on brick — paint adhesion on brick is better without primer, which can seal off the porous surface.
💡 Quick Win: A chip brush and a quart of flat latex “Antique White” paint (under $20) is all you need to paint an existing brick backsplash — the entire sink wall can be transformed in under two hours with no tile removal, no demolition, and no mess beyond a drop cloth.
🛍️ Shop the Look — Amazon Product Ideas
| # | Product Search Phrase | Why It Fits |
| 1 | Chip brush set 3 inch flat natural bristle | Brick joint paint application |
| 2 | Flat latex interior paint antique white quart | Farmhouse cream brick paint |
| 3 | Copper colander vintage farmhouse large | Leaning brick accent |
| 4 | Glass olive oil bottle pour spout clear | Counter-level minimalist accent |
| 5 | Botanical print framed farmhouse wall art 5×7 | Above-brick small art detail |
17. Small Kitchen Farmhouse Backsplash With Mirrors and Tile
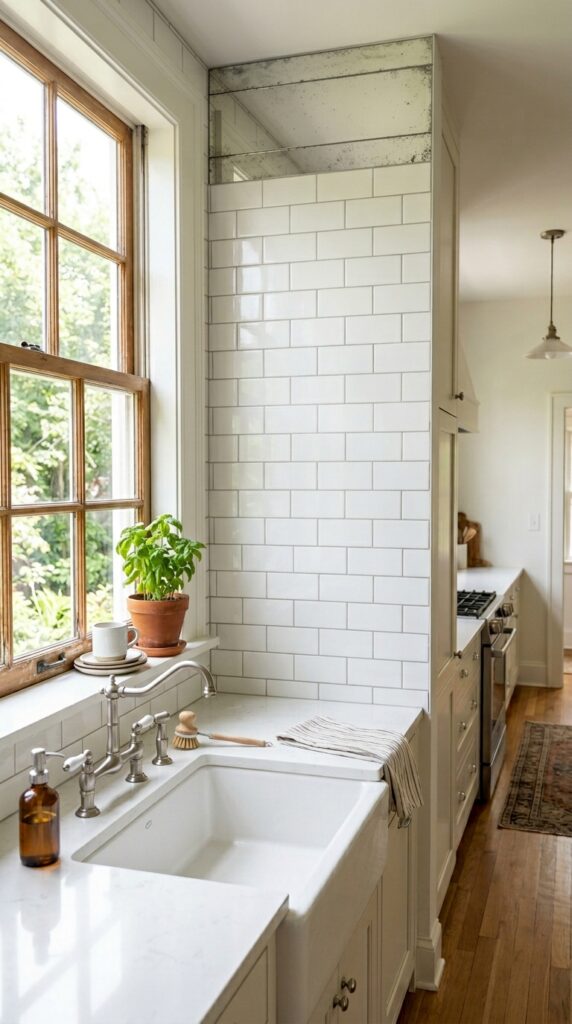
Vibe: Luminous — a small kitchen that borrowed a little of the sky and kept it on the wall.
Why it works: A strip of antiqued (foxed) mirror tile at the top of a backsplash field in a small kitchen does something structural: it reflects the window light source back into the room, optically doubling the perceived depth of the space. Standard mirror would read as modern; antiqued mirror (with intentional dark speckling and silver foxing) references antique farmhouse mirrors and reads as aged and collected rather than decorative. The light bounce also makes the adjacent tile appear more luminous than it actually is.
How to get it: Install one row of 3×12-inch antiqued mirror tiles at the top of the backsplash field, directly below the upper cabinet line. Use mirror adhesive (not standard tile mastic — the alkali content in regular adhesive deteriorates mirror backing). Leave a 1/16-inch gap at all edges to allow for thermal expansion; fill with clear silicone caulk, not grout.
🛍️ Shop the Look — Amazon Product Ideas
| # | Product Search Phrase | Why It Fits |
| 1 | Antiqued mirror tile subway 3×12 foxed silver | Light-doubling small space tile |
| 2 | Mirror tile adhesive mastic trowel application | Mirror-safe installation adhesive |
| 3 | Clear silicone caulk mirror safe kitchen | Thermal expansion gap fill |
| 4 | Small herb pot windowsill farmhouse terracotta | Minimal sill accent |
| 5 | Brushed nickel single hole faucet farmhouse | Hardware for compact sink |
18. Herringbone White Oak Wood Tile Backsplash

Vibe: Warm and geometric — a wood-look backsplash that earns pattern without ever overwhelming the room.
Why it works: Herringbone pattern in a wood-grain porcelain tile is the best of both worlds: the warmth and grain variation of real wood, with the durability and cleanability of porcelain. The herringbone layout (tiles set at 45 degrees in a repeating V-pattern) adds geometry that is historically appropriate in farmhouse contexts, where herringbone brick and wood floors were common in working buildings. Porcelain with a realistic wood print means the backsplash can be installed behind the sink — where actual wood shiplap would fail from moisture exposure.
How to get it: Choose a 3×12-inch format wood-grain porcelain tile in a white oak or ash tone (look for tiles with printed grain variation rather than a repeating pattern). Lay the herringbone starting from the horizontal center of the backsplash, working outward — this ensures the pattern is symmetrically framed by the cabinets on each side. Use a warm beige unsanded grout to complement the wood tones.
🛍️ Shop the Look — Amazon Product Ideas
| # | Product Search Phrase | Why It Fits |
| 1 | Wood look porcelain tile 3×12 white oak herringbone | Durable wood-grain backsplash |
| 2 | Warm beige unsanded grout wall tile 7lb | Wood-tone complementary grout |
| 3 | Rattan tray rectangular small farmhouse | Counter organizer with texture |
| 4 | Ceramic spice jar set with labels farmhouse | Functional counter display |
| 5 | Brass measuring cup set hanging hook | Metallic hanging kitchen display |
19. Full-Height Farmhouse Kitchen Backsplash in Warm White
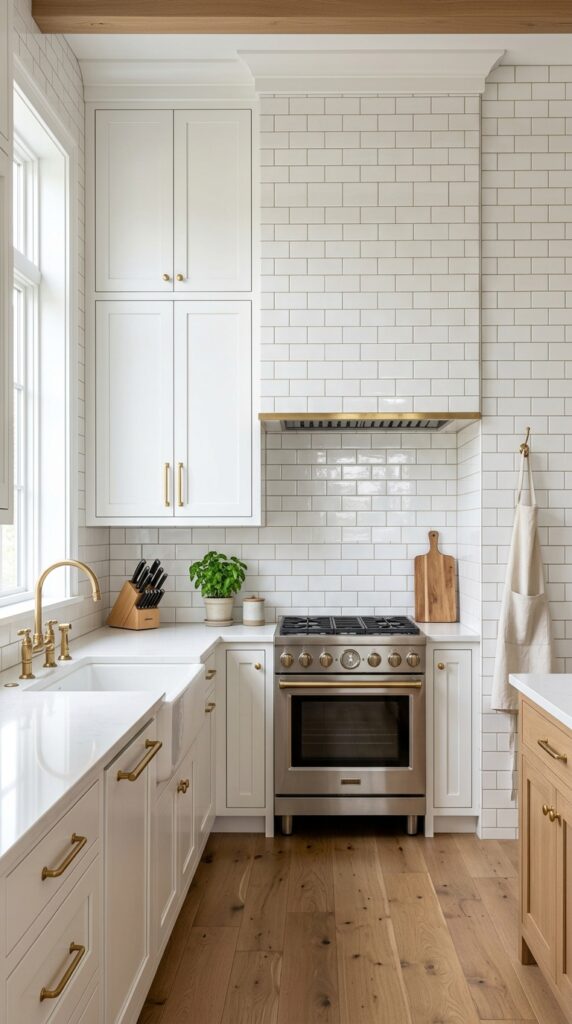
Vibe: Airy and expansive — a kitchen that breathes because the tile never stops.
Why it works: Full-height tile (counter to upper cabinet underside) is a proportion move that makes even an average-size kitchen feel taller and more considered. By eliminating the painted drywall band that typically sits between the backsplash top and cabinet bottom, the kitchen reads as a continuous, unified surface — grout lines are the only texture. This is particularly powerful in farmhouse kitchens where the simplicity of the tile palette aligns perfectly with the style’s honest, undecorated philosophy.
How to get it: The critical installation detail for full-height tile is the final row — the cut tiles that meet the cabinet underside. Measure from the cabinet bottom down and plan your layout so the last row is at least half a tile height; anything less than 1/3 a tile height at the top looks like an afterthought. Scribe-cut the final tiles to follow any slight variation in cabinet height for a truly built-in result.
💡 Quick Win: Even without full tile installation, painting the band of wall between your existing backsplash top and cabinet underside in the same color as your tile grout creates a visual continuation that suggests full-height tile for zero materials cost.
🛍️ Shop the Look — Amazon Product Ideas
| # | Product Search Phrase | Why It Fits |
| 1 | White subway tile glossy 3×6 bulk case 40sqft | Full-height coverage quantity |
| 2 | Brushed brass bar pull cabinet hardware 5 inch | Hardware row across cabinets |
| 3 | Wooden knife block countertop 8 slot natural | Simple functional counter display |
| 4 | Linen apron farmhouse kitchen hanging hook | Organic textile counter accent |
| 5 | Tile grout float rubber grouting tool | Installation tool for full height |
How to Start Your Farmhouse Kitchen Backsplash Transformation
The single best first move is to determine your grout color before you choose your tile. Grout accounts for 15–25% of a backsplash’s visual surface, and the wrong grout color — bright white behind cream tile, cool grey behind warm tile — undermines the entire farmhouse character you’re working toward. Commit to a warm grey or cream grout first, then select your tile knowing the joints will read as aged and honest rather than freshly grouted.
The most common beginner mistake is choosing a tile with too much gloss. High-gloss subway tile reads as modern and clinical in farmhouse kitchens, because it reflects light in a way that emphasizes its newness rather than its warmth. The fix is simple: specify “matte” or “satin” glaze — most tile manufacturers offer the same tile profile in multiple finishes. The matte version of a tile will look 10 years more lived-in from the day it is installed.
For under $50, these three buys make an immediate farmhouse backsplash impact: (1) a chip brush and quart of Benjamin Moore “Antique White” flat latex to paint an existing brick or plain wall, (2) a bundle of dried rosemary tied with jute twine displayed in a wide-mouth mason jar at the counter, and (3) a set of adhesive tile stickers in a subway tile pattern applied over outdated laminate backsplash.
A weekend tile project — peel-and-stick subway tile or painting an existing surface — costs $40–$120 and transforms the kitchen immediately. A full professional tile installation runs $800–$2,500 depending on kitchen size, tile selection, and labor market. Budget 2–4 weeks for tile to be ordered, delivered, and scheduled for professional installation.
Frequently Asked Questions About Farmhouse Kitchen Backsplash
What is the difference between a farmhouse backsplash and a traditional backsplash?
A traditional backsplash focuses on pattern and elegance — often featuring ornate motifs, tumbled marble, or decorative medallions. A farmhouse kitchen backsplash prioritizes material honesty and tactile imperfection — the same visual goal achieved through handmade tile, natural brick, or whitewashed wood. The telling distinction is the finish: farmhouse backsplashes are almost always matte, while traditional backsplashes frequently use polished or glossy surfaces. Grout is also different — farmhouse styles use warm grey or cream grout, while traditional installs often use bright white grout for maximum tile-to-tile contrast.
What color grout should I use for a farmhouse kitchen backsplash?
Warm grey is the most universally flattering grout color for farmhouse kitchen backsplashes — specifically tones like Mapei “Warm Gray” 112 or Laticrete “Warm Gray.” For cream or sage tile, a cream unsanded grout (Mapei “Antique White”) creates a softer, more unified surface. Avoid cool-toned grey grouts with blue or green undertones — they fight the warm wood tones that are fundamental to the farmhouse palette. Bright white grout is the one color to avoid categorically: it makes tile look newly installed and lacks the aged, time-worn quality the style depends on.
How much does it cost to install a farmhouse kitchen backsplash?
DIY peel-and-stick tile runs $1.50–$4.00 per square foot, making a full backsplash project $80–$200 in materials. Standard ceramic subway tile professionally installed (tile + labor) averages $15–$30 per square foot, with a typical 30-square-foot backsplash costing $450–$900. Handmade ceramic tile like Fireclay or imported Zellige tile runs $25–$55 per square foot before labor, bringing a full installation to $1,500–$3,000. Natural stone ledger panels are the premium option at $30–$65 per square foot installed. Budget planning tip: labor costs are often 40–60% of total project cost, so investing in better tile and negotiating on labor yields the best visual return.
Can I install a farmhouse backsplash over existing tile?
Yes, in most cases — with two conditions. The existing tile must be firmly adhered (no loose or hollow tiles) and the surface must be flat enough to accept new tile without creating lippage (uneven edges between tiles). Peel-and-stick tile installs directly over existing smooth tile without any surface preparation. For permanent thin-set tile installation, use a glass-mesh mortar board as an intermediate layer if the existing tile surface has pronounced grout lines. The one situation where overlay doesn’t work: if the existing tile is already raised enough that the new installation would conflict with cabinet or countertop clearances.
What type of tile is most popular for farmhouse kitchen backsplashes?
The 3×6 inch subway tile in a running bond (brick) pattern remains the single most searched and installed farmhouse kitchen backsplash format. Its popularity is not accidental — the format originated in New York subway stations in 1904 and quickly spread to domestic kitchens because of its durability, easy cleaning, and modular scalability. For farmhouse applications, handmade-look ceramic subway tile with glaze variation is the preferred version over machine-made uniform tile. On Pinterest, handmade sage ceramic tile and whitewashed brick are the fastest-growing searches in the farmhouse kitchen category, suggesting that 2025–2026 is shifting toward more color and material variety than the previous decade’s white-on-white approach.
Ready to Create Your Dream Farmhouse Kitchen Backsplash?
These 19 ideas cover the full material and color range of what a farmhouse kitchen backsplash can be — from the honest simplicity of white subway tile with warm grey grout to the architectural drama of stacked ledger stone and the artisanal depth of hand-glazed sage ceramic. You don’t need to tackle the whole kitchen at once; even one changed surface — the wall behind the sink, the band behind the range — shifts the entire room’s character. Start today by holding a warm grey grout chip against your existing tile and see whether your backsplash is already one grout color away from farmhouse. When this kitchen is finished, it will feel the way farmhouse always promises: real, used, yours, and impossible to get tired of. Pin the ideas that made you slow down and look twice — the ones where the grout lines or the brick texture made you want to run a hand along the wall.