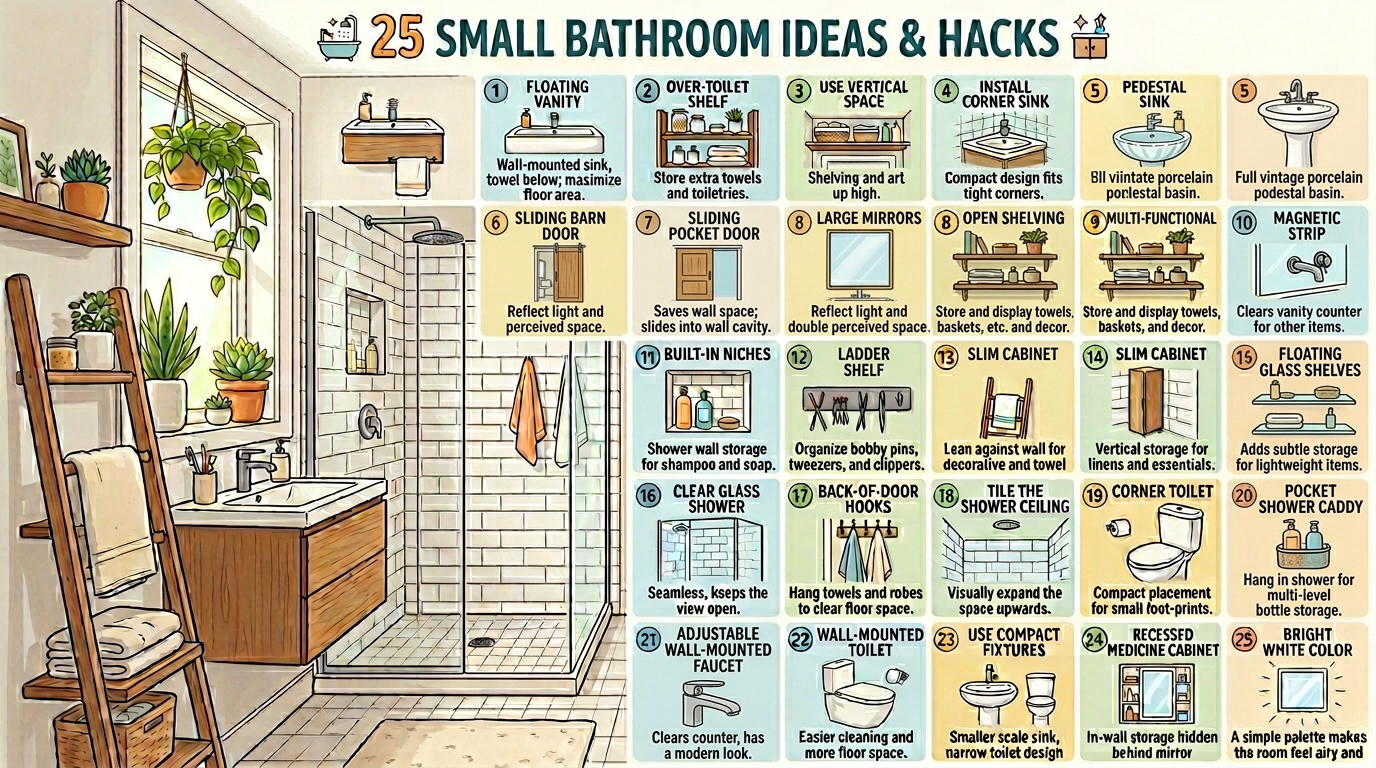
A tiny bathroom is any bathroom under 40 square feet where every design decision carries double the consequence — the wrong choice shrinks the space, the right one expands it. This article gives you 25 specific, actionable tiny bathroom ideas and hacks covering layout, storage, lighting, color, mirrors, fixtures, and small-space illusion techniques.
Step into a well-designed tiny bathroom and something unexpected happens: it doesn’t feel small. It feels considered. The light lands correctly. The wall does three jobs at once. The fixtures are exactly the right scale, and there is nothing — not one object — that doesn’t belong. Tiny bathrooms are the design problem that rewards precision more than any other room in the house. Here are 25 ideas worth saving — and stealing.
Why Tiny Bathroom Design Works So Well
The tiny bathroom is not a modern problem — it is an ancient one. Urban apartments in Paris, London, and New York have always compressed bathing into the smallest possible footprint, and the design tradition that evolved from this constraint is one of the most sophisticated in residential interiors. Japanese bathroom design, in particular, has contributed an entire philosophy of compact bathing space — the wet room, the soaking tub as vertical volume rather than horizontal spread, the elimination of every redundant surface — that informs the best small bathroom thinking today.
The material vocabulary for a tiny bathroom is specific to the scale. Large-format tile in light tones (24×24 inch or 12×24 inch porcelain) for floors and walls — counterintuitively, large tile in a small room creates fewer grout lines and makes the space feel larger, not smaller. Wall-mounted fixtures that free the floor plane entirely: floating vanity, wall-hung toilet, wall-mount faucet. Frameless glass — for shower enclosures and mirrors — that allows sightlines to pass through rather than terminate at a surface. Recessed niches and in-wall storage that add function without consuming floor or wall projection. A single strong material or color used consistently across all surfaces to eliminate visual interruption.
The tiny bathroom has been a sustained design conversation since the pandemic made people spend far more time in their homes noticing every square inch. Pinterest searches for “small bathroom ideas,” “tiny bathroom storage hacks,” and “bathroom remodel small space” have remained among the top home search categories since 2020, consistently outperforming general bathroom searches. The movement toward intentional, high-function small spaces — influenced by Japanese minimalism, the ADU (accessory dwelling unit) building wave, and urban density — has made the tiny bathroom a genuine design category rather than an apology.
The honest truth about tiny bathrooms: every square foot gained is worth more here than anywhere else in the home. A 3-inch reduction in vanity depth returns visible floor space that makes the room feel 20% larger. A wall-hung toilet gains 6–8 inches of visual floor plane. A recessed medicine cabinet replaces a protruding cabinet without losing a single inch of storage. In a tiny bathroom, the hack is the design.
Style at a Glance
| Element | Small Space Principle | Design Payoff |
| Philosophy | Every inch intentional, nothing redundant | Perceived space doubles |
| Materials | Large-format tile, frameless glass, wall-mount fixtures | Floor plane freed, sightlines extended |
| Color Palette | Light, warm whites, soft stone, single-tone continuity | Visual boundaries dissolve |
25 Tiny Bathroom Ideas & Hacks
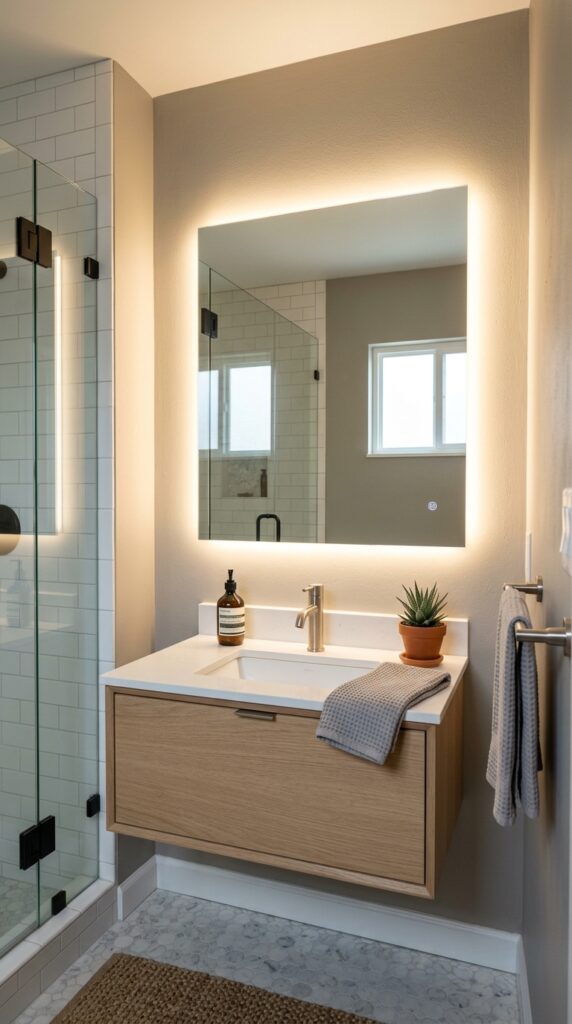
1. Wall-Mounted Floating Vanity

Vibe: Airy — the floor continuing uninterrupted beneath the vanity changes the entire room.
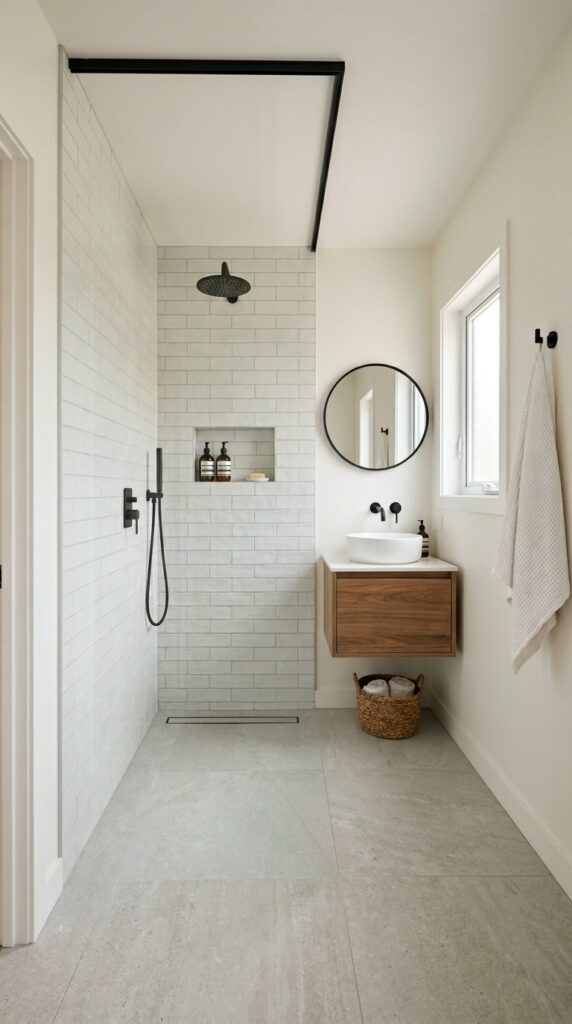
Why it works: A wall-mounted floating vanity is the single most spatially transformative fixture change in a tiny bathroom because it frees the floor plane completely — the eye reads the continuous floor as uninterrupted space, making the room feel larger than its footprint. The design principle is visual floor extension: when the floor runs wall-to-wall without any cabinet leg or pedestal interrupting it, the brain perceives the space as continuous and open rather than divided and contained. The 16-inch floor clearance also allows a floor-level light strip or simply the floor tile to read as a bright horizontal band that anchors the room.
How to get it: Wall-mount vanities require blocking in the wall framing behind the drywall — 2×6 or plywood blocking between studs — to carry the load of the vanity plus occupant weight when leaning. This is a rough-in task done before drywall if you’re renovating, or a targeted wall-opening repair in an existing bathroom. IKEA’s GODMORGON floating vanity system is the most widely available quality option at $300–$600 and mounts to standard stud framing.
💡 Quick Win: If replacing a vanity isn’t in the budget, removing the cabinet doors from an existing floor-standing vanity and cutting the toe kick panel to floor height creates a partial floating effect at zero cost — the visible floor beneath the open cabinet base reads similarly to a true float.
Shop The Look
| Product |
| Floating wall mount vanity 24 inch white oak |
| Undermount ceramic sink small oval |
| Matte black bathroom faucet single hole |
| Wall mount vanity bracket hardware set |
| Large format porcelain tile 12×24 soft white |
2. Full-Height Mirror Entire Wall
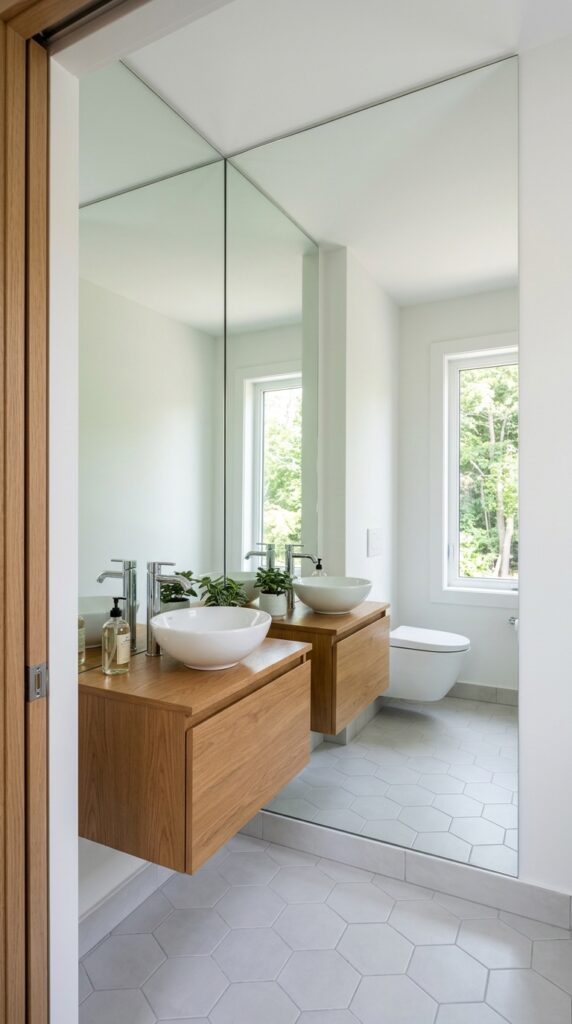
Vibe: Expansive — the room that wasn’t there before.
Why it works: A full-wall mirror is the most powerful optical illusion available in a tiny bathroom — it literally doubles the perceived depth of the room by reflecting a complete second room behind the glass plane. The design principle is reflected spatial duplication: a frameless mirror with no visible edge at the wall junction reads as a window or portal rather than a reflective surface, and the brain interprets the reflection as additional room rather than a mirror image. The effect is strongest when the mirror wall faces the window — natural light reflects back into the room, simultaneously brightening and visually deepening the space.
How to get it: Use mirror panels adhered directly to the wall with mirror mastic adhesive — no frame required. Cut panels to fit wall-to-wall and floor-to-ceiling by a glass shop (typically $8–$15 per square foot cut to size). The critical installation detail: use a continuous bead of mirror mastic rather than dot application — adhesive dots create visible pressure points that warp thin mirror panels over time. Seal all exposed edges with clear silicone caulk.
Shop The Look
| Product |
| Frameless wall mirror large bathroom |
| Mirror mastic adhesive mirror mounting |
| Frameless mirror panel 48×36 bathroom |
| Mirror edge clip set polished chrome |
| Anti-fog mirror film adhesive sheet |
3. Recessed Medicine Cabinet Instead of Surface-Mount
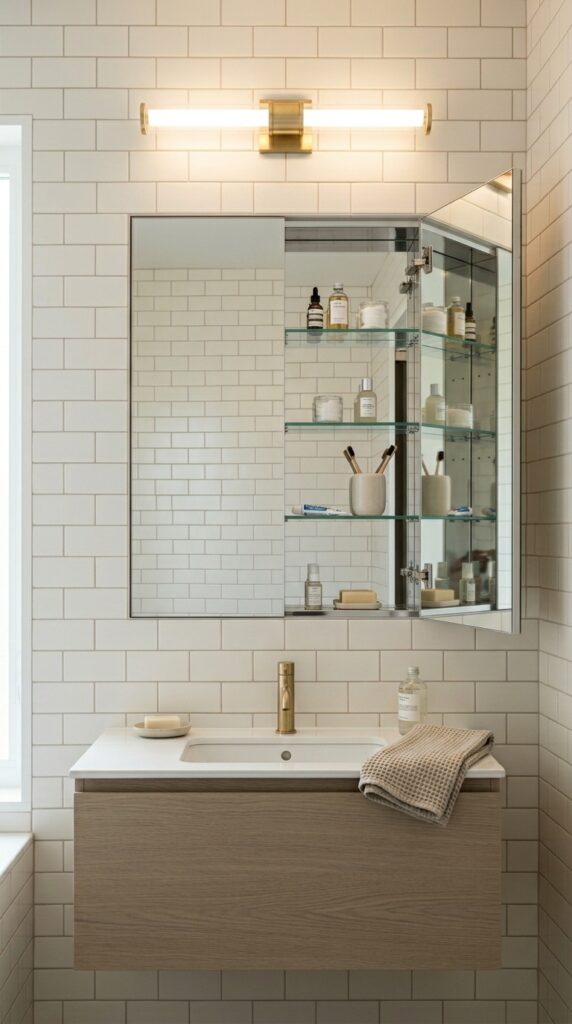
Vibe: Clean — the storage that erased itself.
Why it works: A recessed medicine cabinet recovers 3–4 inches of projection from a standard surface-mount cabinet without sacrificing a single inch of interior storage — it moves the storage volume into the wall cavity rather than into the room. In a tiny bathroom where 3 inches of projection on every fixture adds up to a corridor barely wide enough to turn around in, this matters enormously. The design principle is in-wall volume displacement: moving storage mass behind the wall plane keeps the room’s navigable space intact while maintaining full function.
How to get it: Recessed medicine cabinets require cutting an opening between wall studs (standard 14.5-inch stud bay width accommodates most single-door recessed cabinets). In an exterior wall or a wall with insulation, consult a contractor before cutting — cavity depth may be limited. The Robern R3 series and Kohler Verdera are the best quality recessed cabinet options; IKEA’s ENHET cabinet adapts to recess mounting with modification.
Shop The Look
| Product |
| Recessed medicine cabinet mirrored door 24 inch |
| Recessed bathroom cabinet frameless flush mount |
| Medicine cabinet recessed single door mirror |
| Cabinet hinge concealed soft close pair |
| Recessed niche shelf bathroom wall insert |
4. Continuous Tile Floor-to-Wall Single Material
Vibe: Serene — the room without boundaries.
Why it works: Running the same tile continuously from floor to wall — and ideally to the ceiling — eliminates the visual interruption of a baseboard, a border tile, or a color change, which in a tiny bathroom is the most aggressive space-expanding technique available. The design principle is surface continuity as spatial expansion: when the eye cannot find a terminating line at the floor-wall junction, it cannot locate the boundary of the room, and the space reads as significantly larger than its footprint. A matching grout color amplifies this — contrasting grout creates a visible grid that marks every tile edge and makes the space feel measured and finite.
How to get it: Use the same tile vertically and horizontally with the same matching grout color throughout. The floor tile should be rated for slip resistance (R10 or higher) — many wall tiles are not floor-rated, so specify a single tile that meets both requirements. Schluter KERDI-BOARD or similar backer is required behind wall tile in wet zones.
Shop The Look
| Product |
| Large format porcelain tile wall floor 12×24 warm white |
| Matching grout color warm white sanded |
| Tile backer board waterproof shower wall |
| Porcelain tile floor rated wall rated combo |
| Tile trim strip matte black schluter |
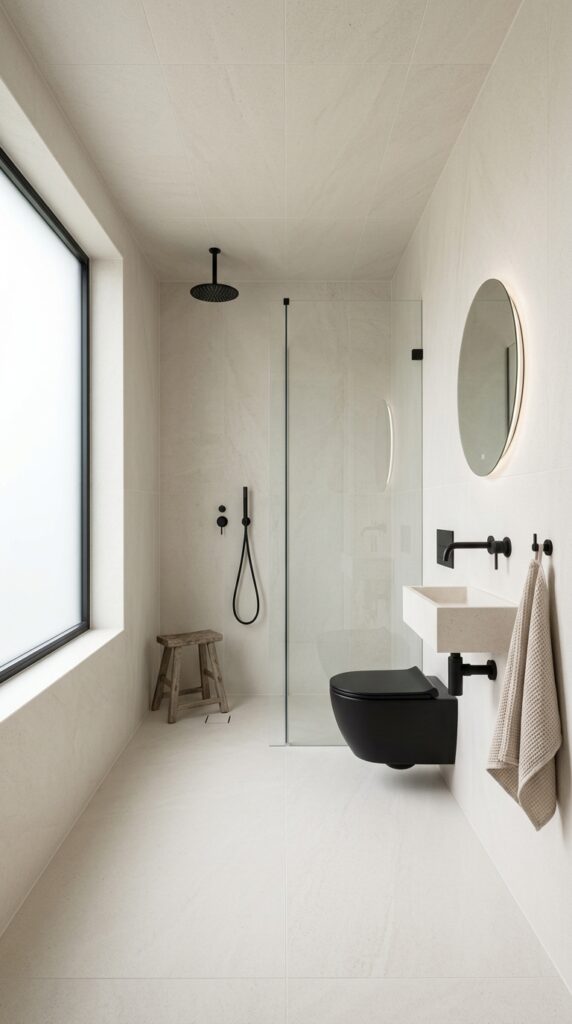
5. Wall-Hung Toilet
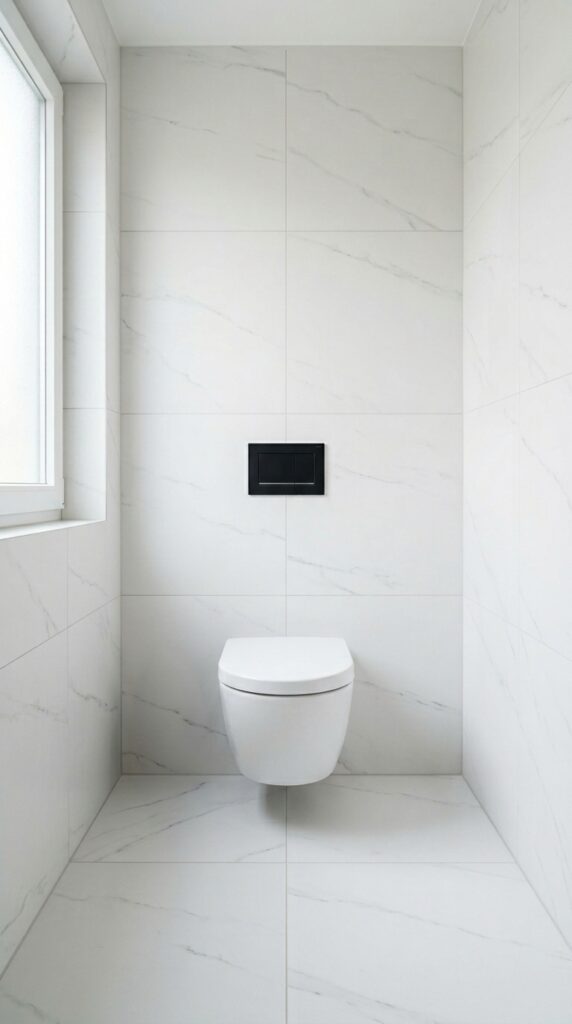
Vibe: Clean — a toilet that negotiated a truce with the room it’s in.
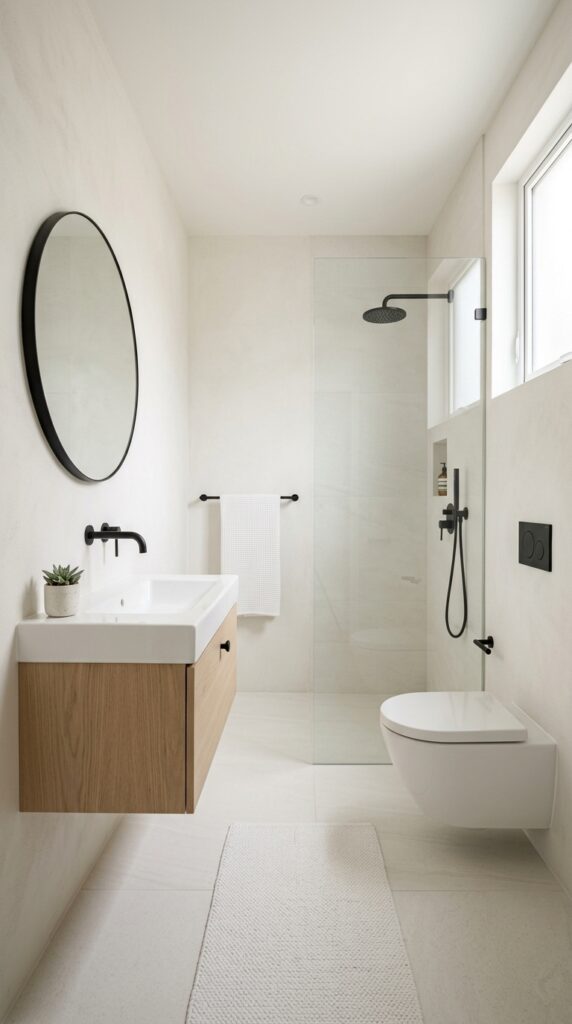
Why it works: A wall-hung toilet with in-wall cistern gains 6–10 inches of visual floor plane compared to a floor-mount toilet — the entire plumbing and tank volume disappears into the wall, and the floor runs uninterrupted beneath the bowl. This is the bathroom equivalent of the floating vanity: freeing the floor plane is the most reliable way to make a tiny bathroom feel larger. The wall-hung toilet also makes floor cleaning dramatically easier, which in a tiny bathroom (where the toilet is always close to everything) has genuine daily-life value.
How to get it: Wall-hung toilets require a carrier frame (Geberit or Kohler Veil carrier systems are the standard) installed inside the wall framing, which adds 4–6 inches to the wall thickness. This is most cost-effective during a renovation before drywall; retrofitting into an existing bathroom requires opening the wall. The total installed cost runs $800–$2,500 including the carrier frame, cistern, and bowl. Geberit’s systems are the most reliable for long-term maintenance access.
Shop The Look
| Product |
| Wall hung toilet elongated bowl white |
| In-wall toilet carrier frame Geberit |
| Matte black flush plate actuator wall hung |
| Wall hung toilet seat soft close |
| In-wall cistern installation kit |
6. Corner Sink to Reclaim Floor Space
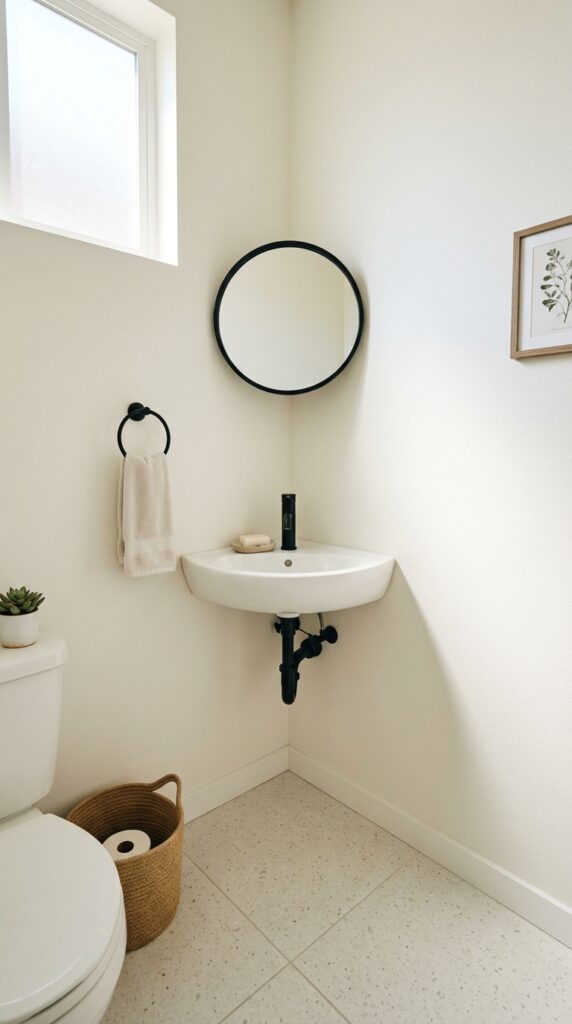
Vibe: Organized — the corner that was wasted is now doing the work.
Why it works: A corner sink repositions the vanity from the main wall — where it consumes the most visually prominent surface — into the corner, which is the lowest-value real estate in a small bathroom. This frees the primary wall for a large mirror, towel storage, or simply open space, which makes the room feel dramatically more open from the door. The design principle is peripheral function placement: moving functional fixtures to the edges and corners of a room preserves the center and the primary sightlines as open space, which the brain registers as generous room volume.
How to get it: Corner sinks are available in both pedestal and wall-mount configurations — the wall-mount version (which requires wall blocking) is preferable in a tiny bathroom because it frees the floor beneath the corner as well. Standard corner sinks are 19–22 inches diagonally — verify clearance to adjacent fixtures before specifying. American Standard’s Cadet corner sink is the most widely available quality option.
💡 Quick Win: A corner shelf unit installed at countertop height (approximately 32 inches) holding a small vessel sink and a single-hole faucet is a DIY corner vanity that costs under $200 in materials and reclaims the main wall entirely.
Shop The Look
| Product |
| Corner wall mount sink small bathroom |
| Corner pedestal sink compact bathroom |
| Matte black wall mount faucet corner sink |
| Corner bathroom vanity small compact |
| Round mirror small 18 inch bathroom |
7. Pocket Door or Barn Door Instead of Swing Door
Vibe: Open — the square footage that a door was borrowing, returned.
Why it works: A standard 28-inch bathroom door swings through a 3.4-square-foot arc — in a 35-square-foot bathroom, that arc is approximately 10% of the total floor area. Converting to a pocket door (which slides fully into the wall) or a barn door (which slides along the wall face) eliminates that swing arc entirely and returns it as usable floor space. The pocket door is preferable to the barn door in most tiny bathroom situations because the barn door’s sliding track protrudes into the room when open, and the door panel itself blocks the adjacent wall surface when slid open.
How to get it: A pocket door conversion requires removing the existing door frame, installing a pocket door frame kit inside the wall cavity (the wall must be non-load-bearing for a standard pocket door kit), and refinishing the wall surface. Johnson Hardware and Hafele produce reliable pocket door frame kits for standard door sizes. Total installed cost for a DIY conversion: $200–$400 in materials plus one weekend.
Shop The Look
| Product |
| Pocket door frame kit 28 inch interior |
| Pocket door hardware set flush pull |
| Barn door kit interior hardware bypass |
| Pocket door flush pull matte black |
| Interior pocket door solid core white |
8. Vertical Storage Tower: Floor-to-Ceiling Shelving
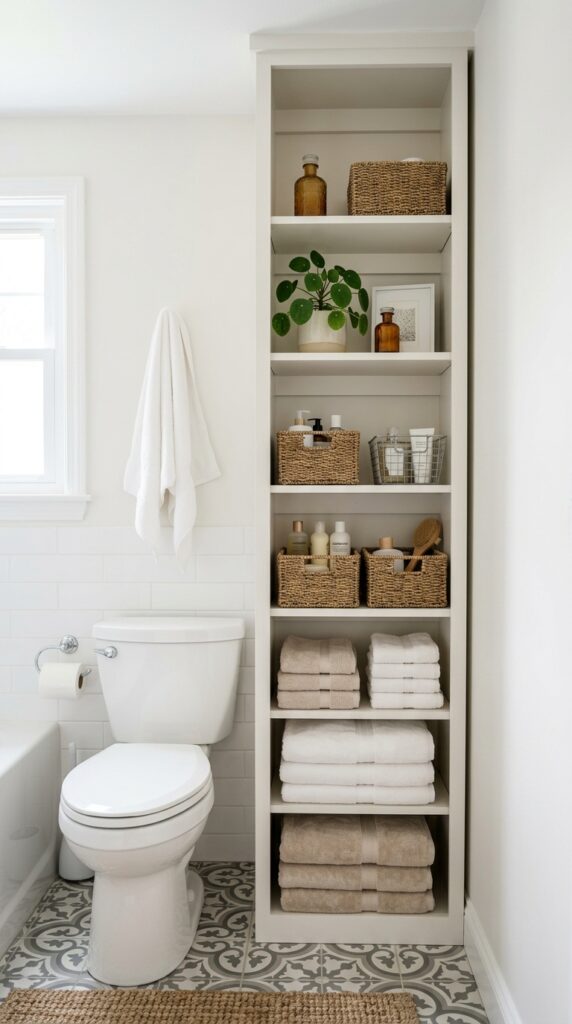
Vibe: Organized — a room that grew upward instead of outward.
Why it works: Vertical storage towers exploit the most consistently wasted real estate in tiny bathrooms: the wall height above 48 inches. Standard storage thinking stops at eye level; vertical thinking extends storage to the ceiling, multiplying the storage capacity of a 12×18-inch wall footprint by a factor of three or four without consuming any additional floor area. The design principle is vertical volume utilization: in a space where floor area is limited, height becomes the primary storage resource, and using it fully changes the bathroom’s functional capacity entirely.
How to get it: A slim 12-inch-deep shelving unit beside or over the toilet is the most space-efficient placement — the over-toilet zone is typically unused dead space in small bathrooms. IKEA’s ENHET or GODMORGON wall cabinet systems stack to ceiling height and are specifically proportioned for bathroom use. Keep the bottom two shelves (below 48 inches) for frequently used items; top shelves for seasonal or backup storage.
Shop The Look
| Product |
| Floor to ceiling bathroom shelving tower slim |
| Over toilet storage cabinet tower white |
| Bathroom shelf unit narrow 12 inch depth |
| Wicker basket set small bathroom shelf |
| Open shelf tower bathroom freestanding |
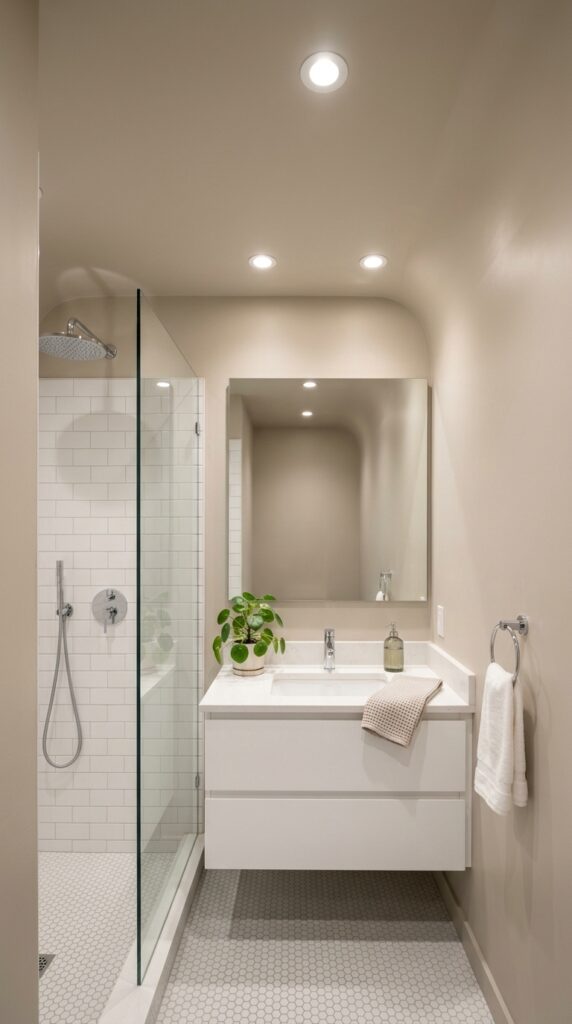
9. Frameless Glass Shower Enclosure
Vibe: Open — the shower that doesn’t end the room, it extends it.
Why it works: A frameless glass shower enclosure is the most important single fixture choice in a tiny bathroom renovation because it allows visual sightlines to pass through the shower wall to the tile and space beyond, making the bathroom read as one continuous room rather than a divided space. The design principle is transparent boundary: a glass partition that the eye reads through rather than stopping at creates the perception of double the room’s actual depth. An aluminum-framed shower enclosure, by contrast, creates visible structural lines that terminate the sightline and divide the room.
How to get it: Low-iron (Starphire or Ultra-Clear) glass with no green tint is essential — standard tempered glass has a slight green cast that becomes visible at the shower glass edge and reduces the transparency effect. Specify 3/8-inch minimum thickness for a hinged door. All hardware in matte black or brushed nickel should match the bathroom’s existing fixture finish. A simple single fixed panel plus door is the cleanest option for a tiny shower — avoid multiple panel configurations that create more frame lines.
Shop The Look
| Product |
| Frameless shower door 36 inch matte black |
| Low iron tempered glass shower panel |
| Frameless shower enclosure corner kit |
| Matte black shower door handle bar |
| Glass shower door hinge matte black pair |
10. Light Color Palette: Warm White Throughout
Vibe: Bright — a room that amplifies rather than absorbs its light.
Why it works: A warm white palette is the most reliable space-expanding color strategy for a tiny bathroom because light surfaces reflect rather than absorb the available light, making the room feel simultaneously brighter and larger. The critical distinction is warm white versus stark or cool white: warm whites (with yellow or cream undertones) read as natural and organic; cool whites (with blue or grey undertones) can read as clinical and actually make surfaces feel harder and closer. Benjamin Moore “White Dove” and Sherwin-Williams “Alabaster” are the two most consistently flattering warm whites for small bathrooms.
How to get it: Use the same warm white tone on walls, ceiling, and trim — eliminating the ceiling-wall color distinction by painting them identically removes the visual horizon line at the top of the wall, which makes the ceiling read as higher. Keep a single accent (matte black hardware, or a warm wood vanity) as the sole non-white element; a monochromatic white palette with one deliberate accent reads as curated rather than unfinished.
Shop The Look
| Product |
| Warm white bathroom wall paint low VOC matte |
| White ceramic undermount sink small |
| Warm white large format porcelain tile |
| Matte white bathroom vanity light bar |
| White oak vanity cabinet 24 inch floating |
11. Wet Room: Remove the Shower Enclosure Entirely
Vibe: Spa-like — the room is the shower.
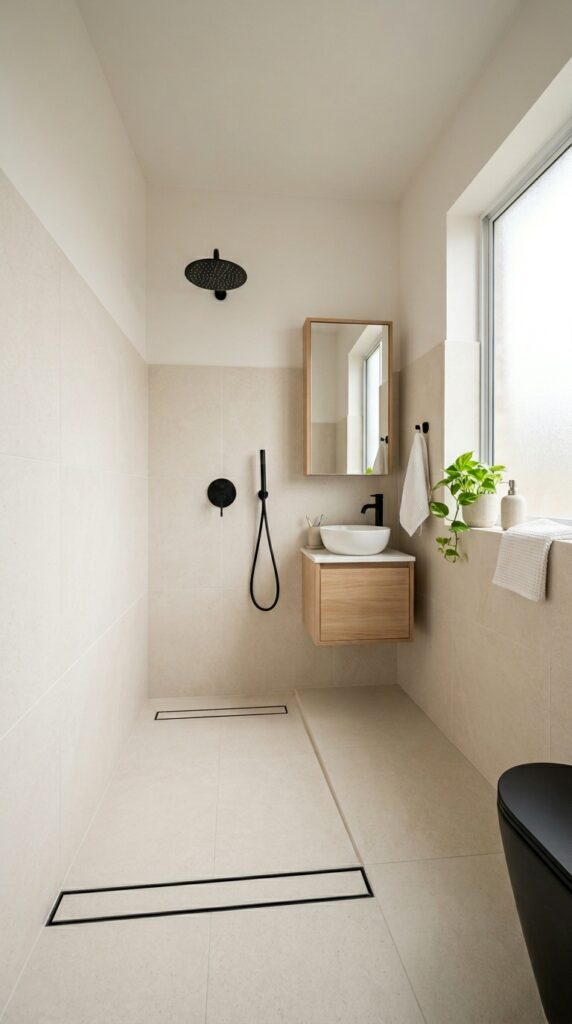
Why it works: Converting a tiny bathroom to a wet room — waterproofing the entire floor and eliminating the shower enclosure entirely — is the single most radical space-gain strategy available, and it is specifically suited to very small bathrooms (under 35 square feet) where a separate shower enclosure consumes a disproportionate fraction of the floor area. Without a shower enclosure, the bathroom reads as one unified space rather than a divided one, and the full floor area is perceptually available even when the shower is in use. The design principle is enclosure elimination: the boundary between shower zone and bathroom zone is removed, and the entire floor becomes the shower floor.
How to get it: A wet room requires a comprehensive waterproofing membrane system (Schluter Kerdi or Wedi board) beneath all floor and lower wall tile, a floor sloped at 1/4 inch per foot toward a linear drain, and a shower-rated exhaust fan with sufficient CFM to manage the moisture load of the full bathroom. This is a complete renovation task — not a retrofit — and costs $3,000–$8,000 fully installed.
Shop The Look
| Product |
| Linear drain 36 inch matte black wet room |
| Waterproofing membrane kit shower wet room |
| Wet room floor tile non-slip rated |
| Shower wall panel waterproof wet room |
| Wet room drain cover matte black |
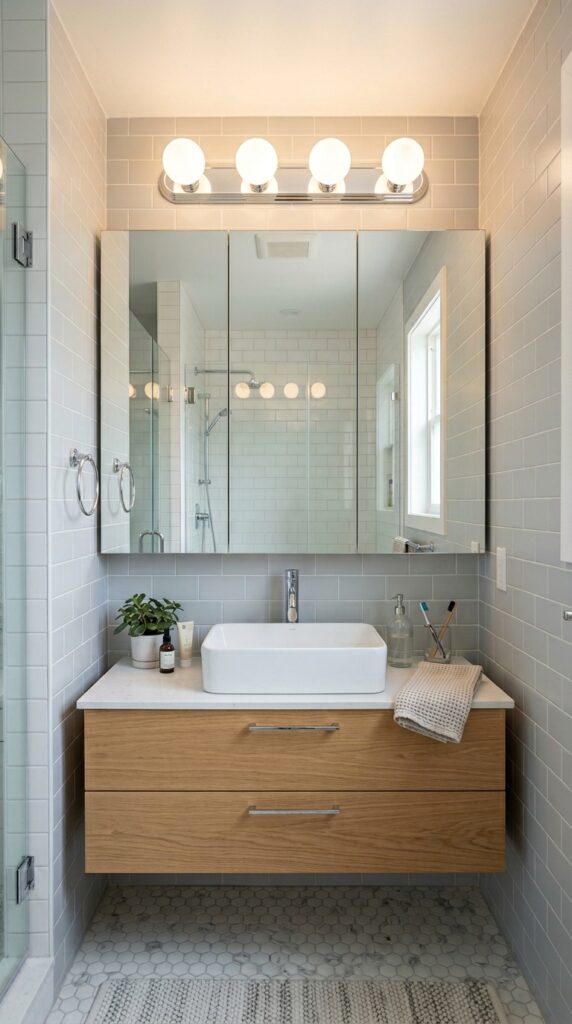
12. Mirrored Cabinet Across Full Vanity Width
Vibe: Bright — storage that also doubled the room.
Why it works: A full-width mirrored cabinet combines two of the tiny bathroom’s most powerful tools — the full-wall mirror illusion and recessed storage — in a single installation. When the cabinet doors are closed, the mirrored surface reads as a large mirror wall, visually expanding the room; when open, the interior shelving provides bathroom storage without any wall projection. The design principle is dual-function surface: every element in a tiny bathroom should serve at least two purposes, and a mirrored storage cabinet serves three — mirror, storage, and light-reflective surface.
How to get it: Measure the vanity wall from corner to corner and order a custom-width mirrored medicine cabinet from suppliers like Robern or Kohler — most manufacturers offer custom widths in 2-inch increments. The cabinet depth should match standard stud bay depth (3.5 inches) for a fully recessed installation. If partial recess is only possible (1.5-inch recess due to insulation or structural), the remaining 2-inch projection is far less intrusive than a surface-mount cabinet.
Shop The Look
| Product |
| Mirrored medicine cabinet double door recessed |
| Full width vanity mirror cabinet 48 inch |
| Recessed mirrored cabinet frameless pair |
| Bathroom vanity light bar matte black |
| Mirrored cabinet door hinge soft close |
13. Compact Soaking Tub: Deep and Narrow
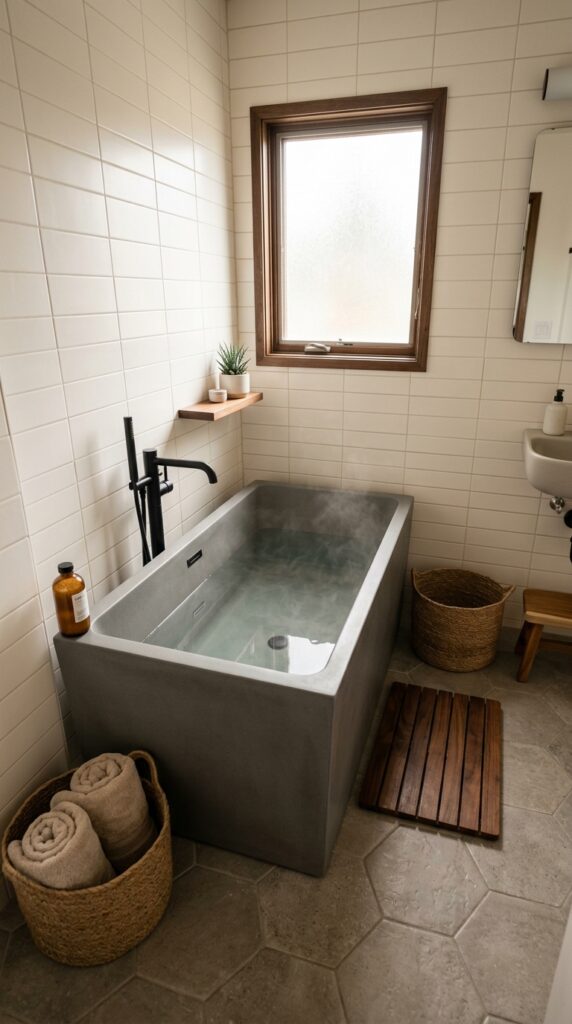
Vibe: Spa-like — a tub that chose depth over length and was absolutely right.
Why it works: A Japanese soaking tub (ofuro) fits a tub into the footprint of a shower stall — typically 47×28 inches — by orienting the bathing experience vertically (deep immersion seated) rather than horizontally (reclined at full body length). This design philosophy trades the 60-inch standard tub length for 24 inches of extra floor space while delivering a more immersive bathing experience. The design principle is volume reorientation: the same water volume that fills a long shallow tub fills a short deep tub, but the spatial footprint difference is dramatic.
How to get it: Japanese soaking tubs require a drain in the floor or a raised platform to accommodate their depth — the drain outlet sits lower than in a standard tub. Most freestanding soaking tubs use a floor-mount or freestanding tub faucet. American Standard’s Clean soaking tub and MTI Baths both produce quality compact soaking tubs in the 47-inch range at $800–$2,500.
Shop The Look
| Product |
| Japanese soaking tub compact freestanding 47 inch |
| Deep soaking tub small bathroom 48 inch |
| Floor mount tub faucet matte black |
| Soaking tub bath pillow support |
| Compact bathtub overflow drain kit |
14. Open Shelf Under Floating Vanity
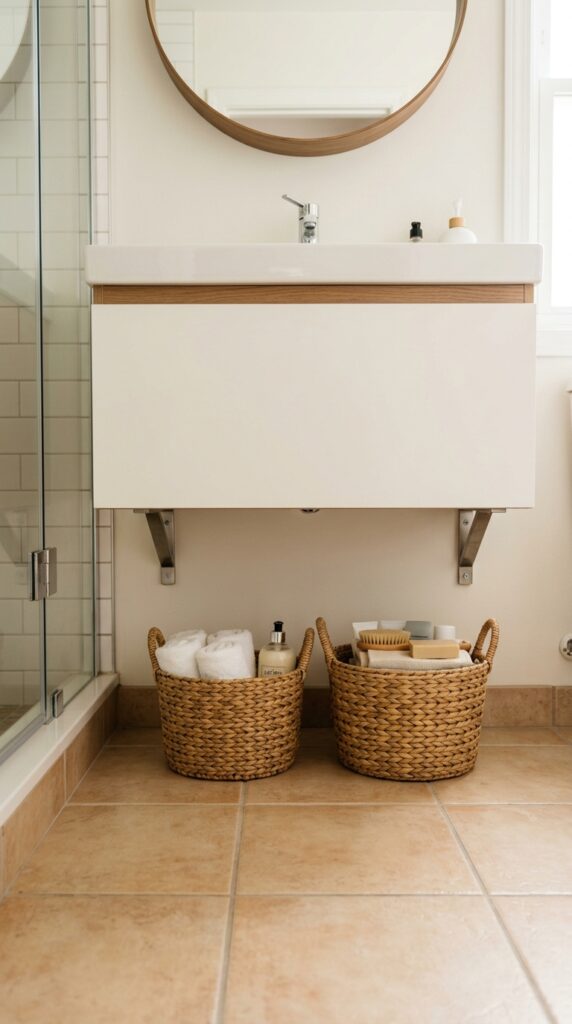
Vibe: Organized — open storage that works harder than a closed cabinet.
Why it works: The floor space beneath a floating vanity is a storage zone that most tiny bathrooms treat as visual dead space — the floating effect is preserved and the space goes unused. Two or three small woven baskets on the floor beneath the vanity provide organized storage for spare towels, toilet paper, or cleaning supplies while maintaining the floating aesthetic at eye level. The design principle is layered zone storage: by organizing items in contained baskets rather than leaving them loose, the under-vanity zone reads as intentional storage rather than clutter, and the eye accepts it as part of the room’s organization system.
How to get it: Use baskets no taller than 80% of the vanity clearance height (if the vanity bottom is 16 inches from the floor, use baskets no more than 13 inches tall). Identical baskets in a natural woven material (seagrass or jute) read as organized; mixed baskets of different materials and sizes read as accumulated clutter. Two baskets maximum — three crowds the under-vanity zone and undermines the floating effect.
Shop The Look
| Product |
| Seagrass storage basket small set 2 bathroom |
| Wicker bathroom basket with lid small |
| Woven storage basket under vanity set |
| Jute bin basket rectangular small |
| Rattan basket set bathroom natural |
15. Penny Tile Floor with Light Grout: Texture Without Pattern Noise
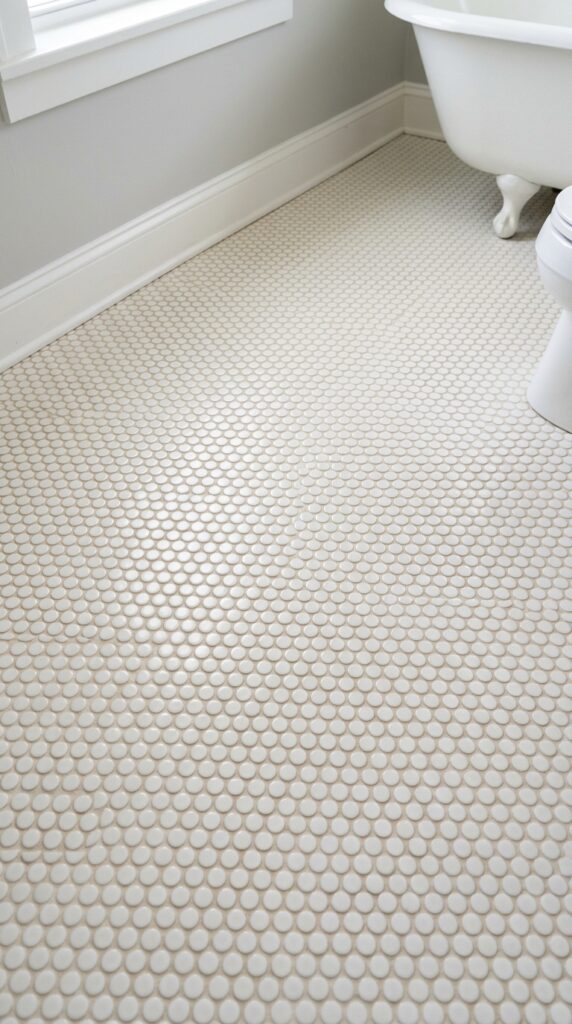
Vibe: Light — texture that brightens rather than divides.
Why it works: White or cream penny tile with a matching light grout creates a floor surface that has the slip-resistance and tactile interest of small-format tile while reading as a single light, reflective plane rather than a divided grid. The key is the grout color match: white penny tile with white grout creates a continuous luminous field; white penny tile with dark grout creates a high-contrast polka-dot pattern that divides the floor visually and makes the space feel smaller. The design principle is texture without contrast: surface interest is achieved through dimensional variation rather than color opposition.
How to get it: Specify a grout color one shade lighter than the tile, not matching exactly — a precisely matching grout blends too completely and the tile surface loses its texture; a slightly lighter grout creates just enough visible joint definition to register as texture without registering as pattern. Use epoxy grout in white or cream to maintain color over time — cement grout in light colors discolors in wet environments.
💡 Quick Win: White penny tile with white grout is available as a peel-and-stick tile panel (approximately $3–$6 per square foot) that can be applied over existing floor tile without a substrate change — a legitimate temporary small bathroom floor upgrade for renters.
Shop The Look
| Product |
| White penny round tile 1 inch mosaic sheet |
| Cream white epoxy grout bathroom floor |
| Penny tile bathroom floor kit |
| Non-slip bathroom floor mat clear grip |
| White mosaic tile small format floor |
16. In-Wall Toilet Paper and Accessory Niches
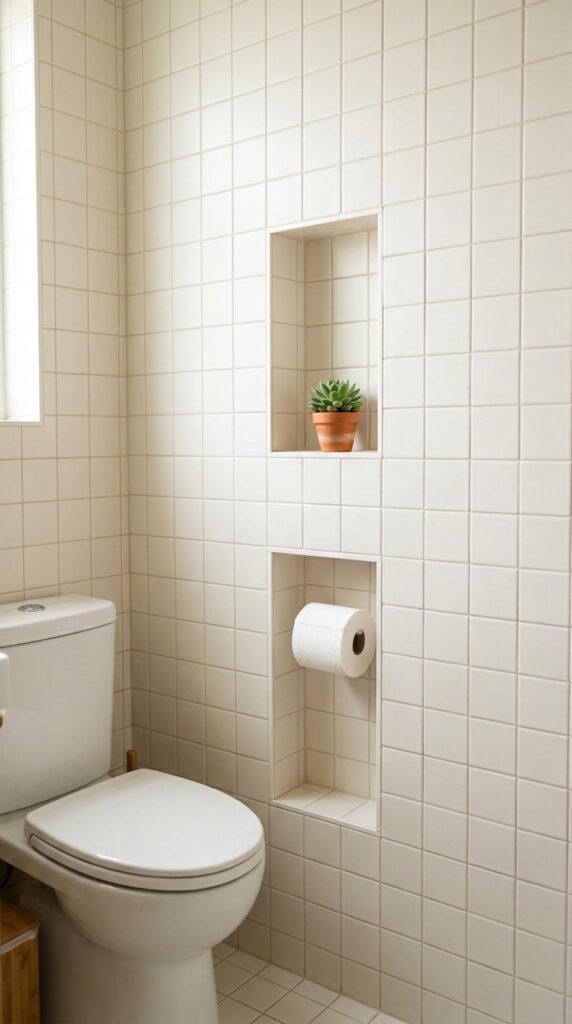
Vibe: Clean — a wall with nothing on it, except everything it needs.
Why it works: Recessed wall niches for toilet accessories eliminate every piece of surface-mount hardware — the toilet paper holder, the spare roll shelf, the small decorative object — from the wall plane, returning those wall surfaces to uninterrupted flatness. In a tiny bathroom where the wall area beside the toilet is typically the most visually cluttered zone (toilet paper holder, spare rolls stacked, air freshener), removing all hardware from the wall face reduces visual noise dramatically. The design principle is hardware recessing: moving function behind the wall plane preserves the visual cleanliness of the room without sacrificing the function.
How to get it: Small recessed niches between studs (3.5 inches deep) are simple carpentry tasks during renovation. A toilet paper niche needs to be approximately 6×6 inches — sized for a standard roll — at 26 inches from the floor. Tile the interior to match the surrounding wall. For retrofitting, a recessed toilet paper holder (surface-mount but with a shallow 1.5-inch projection) is the next best option.
Shop The Look
| Product |
| Recessed toilet paper holder niche wall mount |
| In-wall recessed niche small bathroom 6×6 |
| Recessed toilet roll holder stainless |
| Small wall niche shelf bathroom tile |
| Recessed wall niche insert stainless |
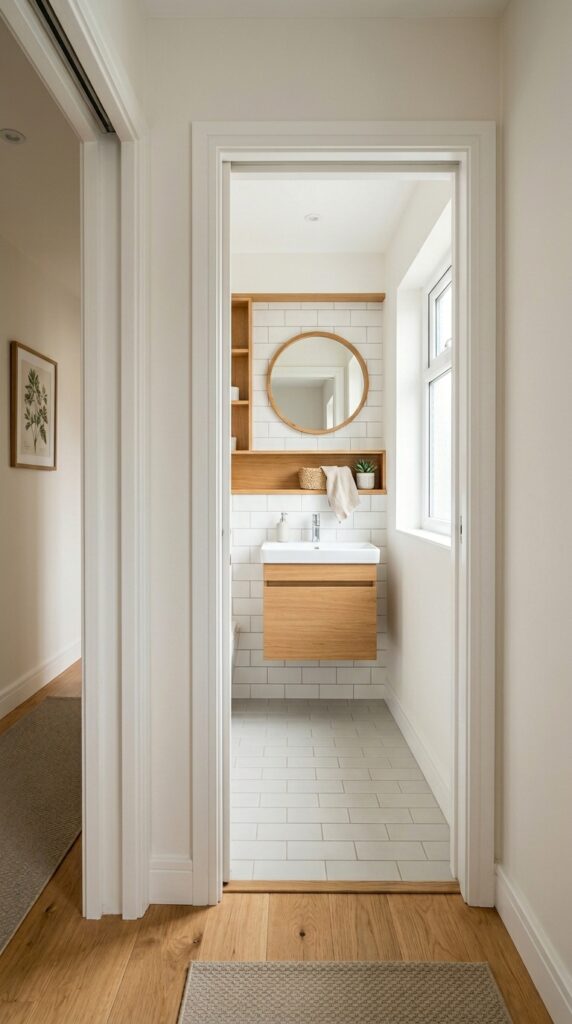
17. Extend Tile Into Adjacent Space for Visual Flow
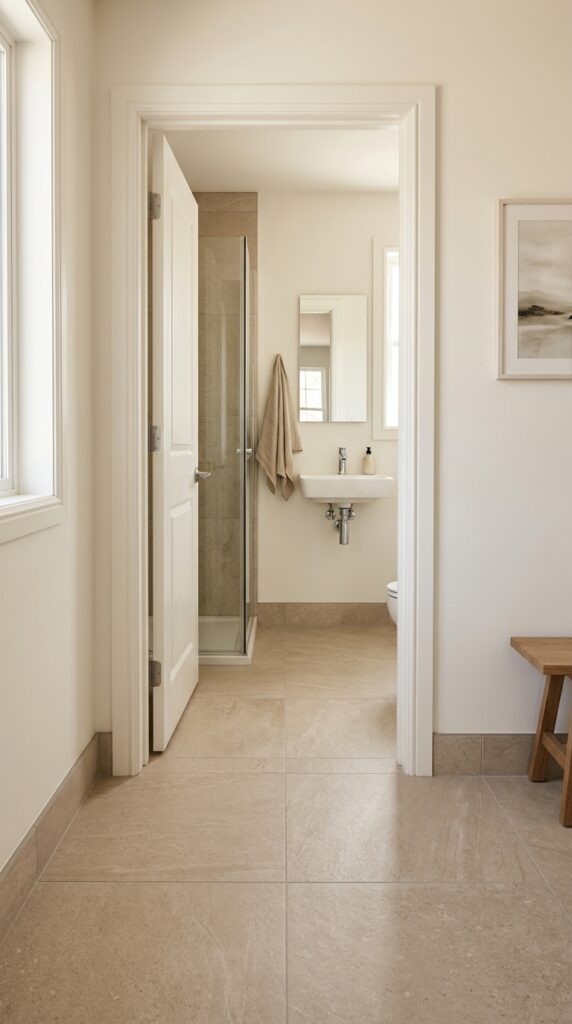
Vibe: Connected — the bathroom and the hallway agreed to share the same floor.
Why it works: Extending the bathroom floor tile beyond the doorway threshold into the adjacent hallway or bedroom creates a visual floor plane that the eye follows beyond the bathroom walls — the brain perceives the extended floor as evidence that the space continues, making the bathroom feel larger than its enclosed footprint. The design principle is boundary dissolution through continuity: when the floor material crosses the threshold without interruption, the doorway reads as a frame rather than a wall, and the adjacent space is borrowed visually. This technique costs nothing in a renovation where floors are being replaced simultaneously.
How to get it: Specify the bathroom tile to extend at least 18–24 inches into the adjacent corridor at the doorway. Eliminate the threshold bar entirely — a continuous floor with no threshold reads as one connected space; a threshold bar is a visual full-stop that terminates the sightline. This works best when the adjacent floor is also being renovated, allowing a true continuous installation.
Shop The Look
| Product |
| Large format tile 12×24 hallway bathroom continuous |
| Tile transition strip flush threshold |
| Floor leveling compound smooth transition |
| Porcelain tile continuous floor kit |
| Tile grout matching hallway bathroom |
18. Dramatic Dark Accent: One Wall in Deep Tone
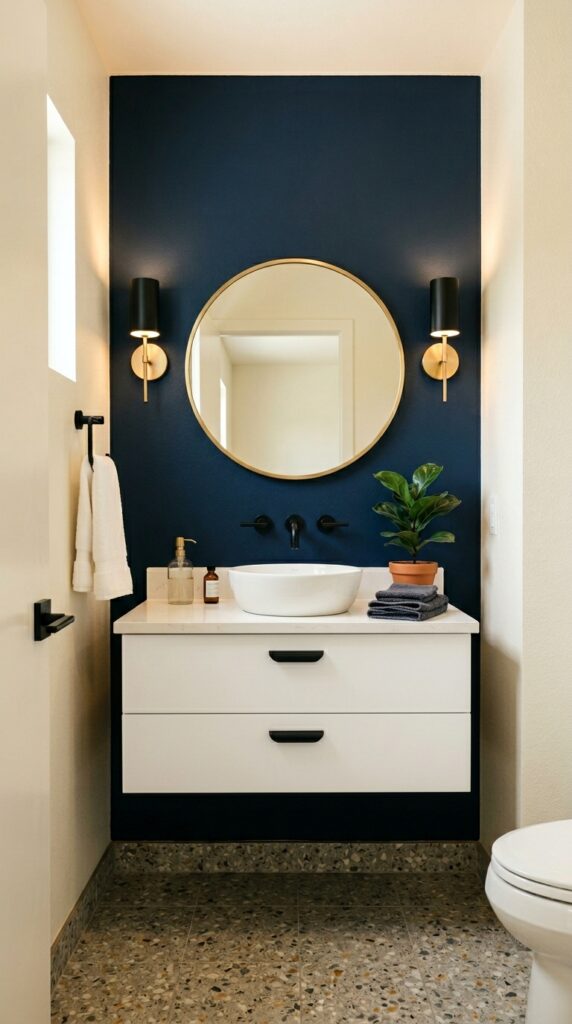
Vibe: Dramatic — a small room that chose confidence over caution.
Why it works: A single dark accent wall in a tiny bathroom works against every intuition about small space design — and works precisely because of that counter-intuition. A deep, saturated wall behind the vanity creates a dramatic depth effect: the dark surface recedes visually while the white fixtures and vanity advance, creating the perception of greater room depth than actually exists. The design principle is controlled recession: a dark surface behind objects makes those objects appear to stand further from the wall, creating a three-dimensional quality that flat-light white-on-white rooms cannot achieve.
How to get it: Use a flat or matte finish on the dark wall specifically — any sheen on a deep color in a small bathroom creates reflective inconsistency that works against the recession effect. The dark wall should be the wall directly facing the entry door or behind the vanity — not a side wall, which would narrow the room rather than deepen it. Farrow & Ball “Hague Blue” (No. 30) and Benjamin Moore “Newburyport Blue” (HC-155) are the most reliably sophisticated choices for a tiny bathroom accent wall.
Shop The Look
| Product |
| Deep navy bathroom paint matte finish |
| Dark charcoal bathroom wall paint flat |
| Forest green bathroom wall paint matte |
| Bathroom paint mildew resistant deep tone |
| Accent wall paint sample dark navy |
19. Heated Towel Rail Instead of Towel Bar
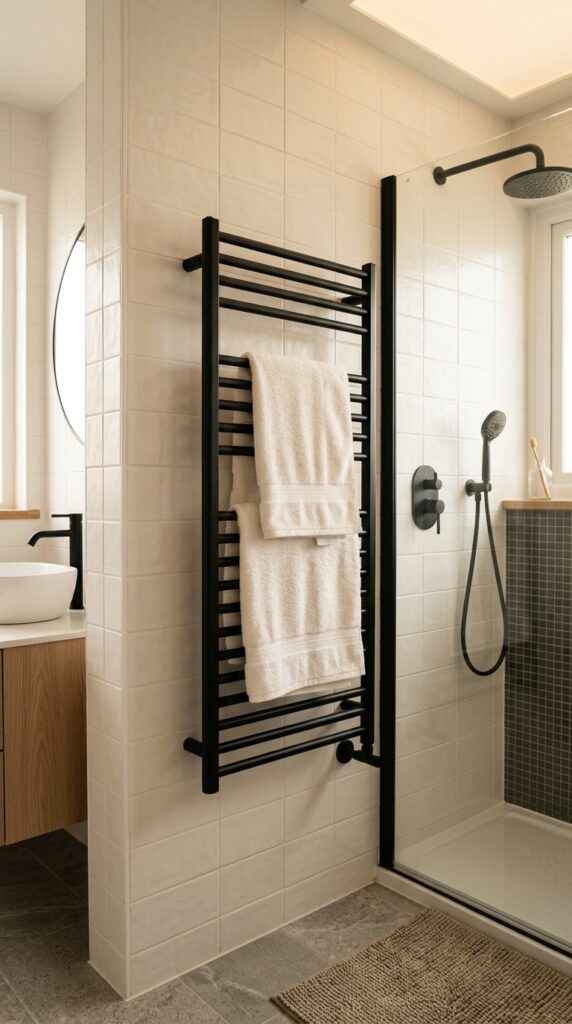
Vibe: Spa-like — a towel warmer that replaced both the towel bar and the bathroom heater.
Why it works: A heated towel rail serves three functions in a tiny bathroom: towel storage, towel drying, and supplemental room heating — replacing at minimum two separate fixtures (a towel bar and potentially a supplemental heater) with a single, slim wall-mounted unit. In a tiny bathroom where every piece of hardware on the wall is a visual interruption, consolidating function into fewer, better fixtures reduces wall clutter while improving daily utility. The ladder-style form also allows multiple towels to be stored and dried simultaneously in a compact footprint.
How to get it: Electric plug-in heated towel rails require no plumbing — they plug into a standard outlet and mount to the wall with two brackets. Hardwired models connect to a dedicated circuit and should be installed by an electrician. Position the rail at a height where the lowest rung is approximately 24 inches from the floor — this allows full-length towel display without the bottom draping on the floor. Jeeves, Runtal, and WarmlyYours all produce quality electric towel rails at $150–$500.
Shop The Look
| Product |
| Electric heated towel rail ladder style matte |
| Towel warmer ladder matte black wall mount |
| Heated towel rack plug in bathroom |
| Slim towel rail matte white bathroom |
| Electric towel warmer hardwire install kit |
20. Window in Shower: Natural Light Hack
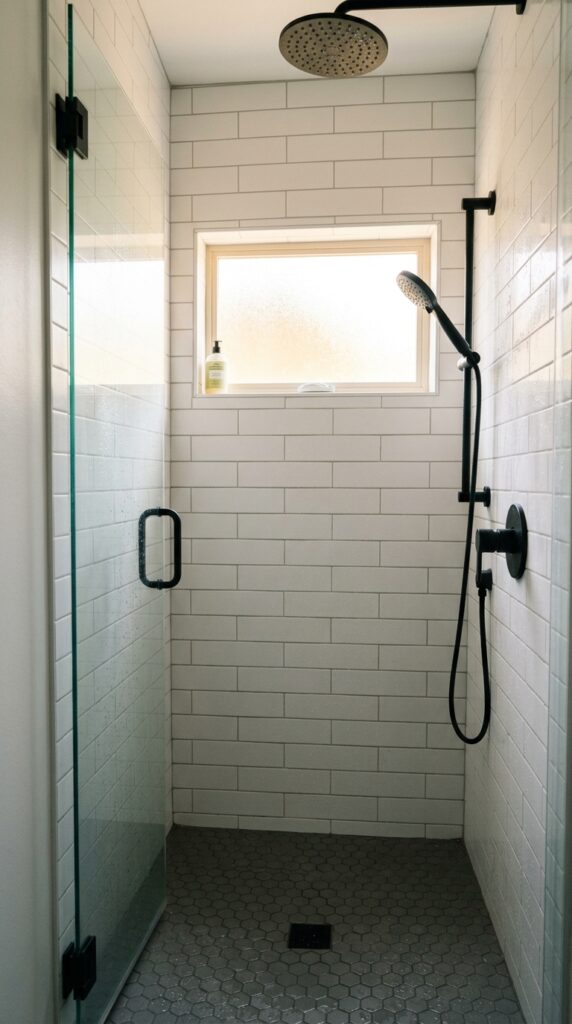
Vibe: Bright — a shower lit by the outside world.
Why it works: A window within the shower zone is one of the most effective natural light strategies for a tiny interior bathroom — it brings daylight directly into the darkest, most enclosed corner of the room and eliminates the need for the shower-zone artificial lighting that most small bathrooms rely on throughout the day. Frosted or textured glass maintains privacy while allowing the full light value of the outdoor source to enter. The design principle is light source proximity: placing the natural light source inside the room’s most enclosed zone brightens the entire room from its darkest point outward.
How to get it: Shower windows must use tempered, safety-rated glass in an aluminum or composite (not wood) frame — standard wood windows will deteriorate rapidly in a wet shower environment. Velux produces shower-rated roof windows; for wall windows, specify an aluminum-framed double-pane unit with obscure glass. The window should be positioned high in the shower wall (above eye level for privacy) and the frame sealed with 100% silicone waterproof caulk on the interior.
💡 Quick Win: A solar tube skylight (Velux Sun Tunnel, $200–$400 including installation materials) brings bright natural light into a bathroom with no exterior wall access — the reflective tube routes light from the roof to the ceiling, eliminating the need for daytime artificial lighting entirely.
Shop The Look
| Product |
| Frosted glass bathroom window aluminum frame |
| Solar tube skylight kit 10 inch bathroom |
| Obscure privacy glass window small bathroom |
| Tubular skylight small bathroom kit |
| Frosted window film privacy bathroom |
21. Magnetic or Hidden Razor and Accessory Storage
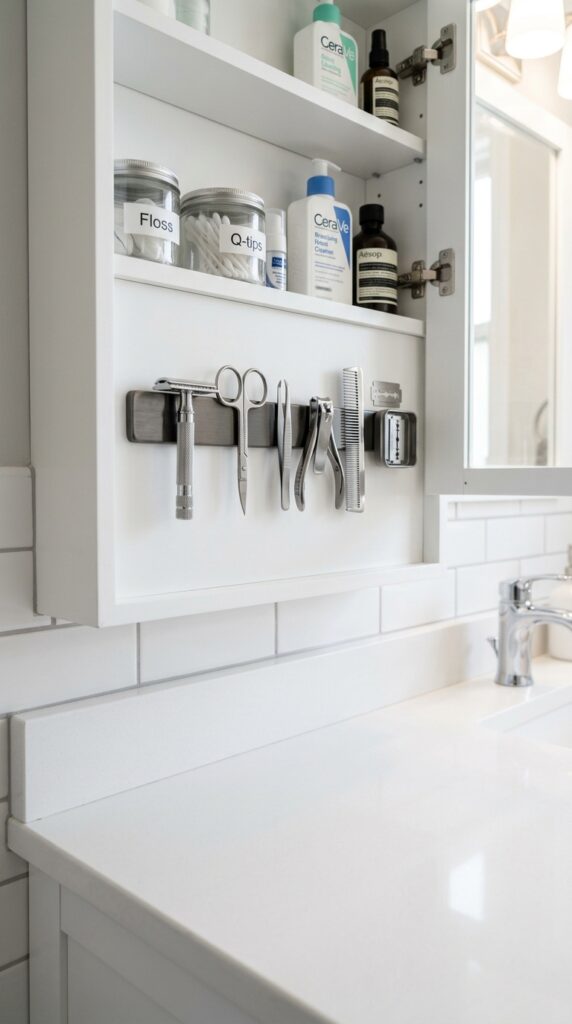
Vibe: Organized — the counter that finally has nothing on it.
Why it works: Counter surface clutter is the defining visual problem in a tiny bathroom — a single razor, a tube of toothpaste, and a soap dish occupy roughly 15% of the available counter surface in a 24-inch vanity, making an already small counter feel completely consumed. Magnetic strips mounted inside the medicine cabinet door or on a wall-mounted strip move metal accessories off the counter entirely, returning 100% of the counter surface to clear space. The design principle is vertical redistribution: moving objects from horizontal counter surfaces to vertical wall surfaces is the fastest and cheapest space-expansion technique available in any bathroom.
How to get it: A magnetic strip (knife-strip style, available at kitchen supply stores for $10–$25) can be mounted inside a medicine cabinet door or on the inside face of a cabinet panel using double-sided mounting tape — no drilling required. Metal bathroom accessories (most razors, nail scissors, tweezers) adhere with sufficient holding power for daily use. For non-metal items, small adhesive wall hooks inside the cabinet door serve the same function.
Shop The Look
| Product |
| Magnetic strip storage bathroom razor knife |
| Adhesive wall hook set inside cabinet |
| Magnetic organizer strip bathroom accessories |
| Inside cabinet door organizer adhesive |
| Magnetic bathroom organizer set |
22. Sconce Lighting Beside Mirror Instead of Overhead Bar
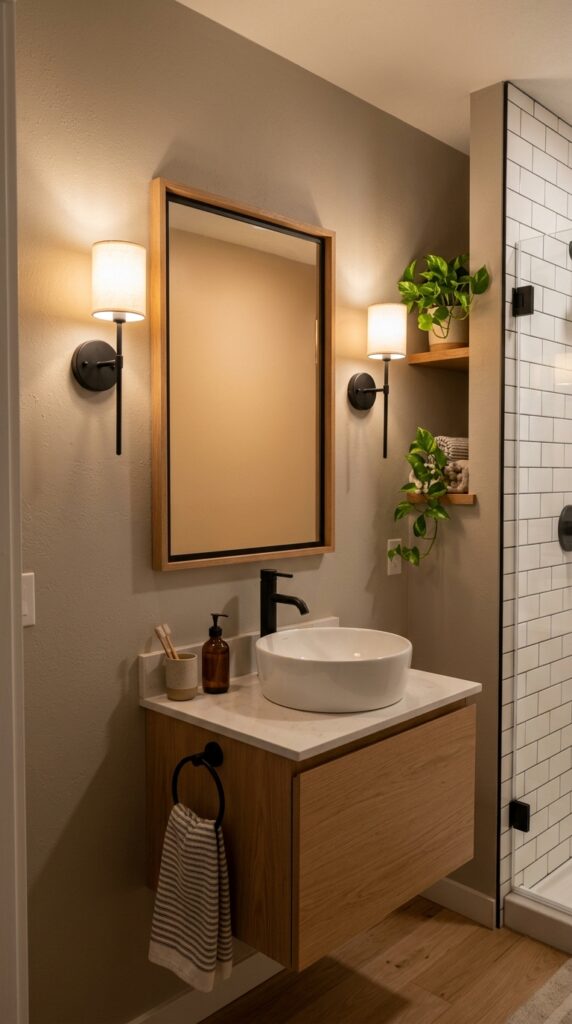
Vibe: Warm — light that does something kind for the person standing in it.
Why it works: Side-mount sconces at face level provide the most flattering and functionally superior bathroom lighting because they illuminate the face from both sides simultaneously, eliminating the shadow cast by overhead vanity bars that are responsible for the unflattering lighting of virtually every standard bathroom. In a tiny bathroom, side sconces also free the wall above the mirror entirely — no light bar mounting, no electrical rough-in above the mirror — which allows the mirror to extend higher on the wall, gaining visual height in the room. The design principle is task light positioning: the light source should be at the same level as the task it serves.
How to get it: Mount sconces at 60 inches from the floor (center of the shade) and position them 30–36 inches apart — the standard face width — on either side of the mirror. If the existing electrical is only above the mirror, a licensed electrician can relocate the junction boxes to the side positions in a half-day. Alternatively, plug-in sconces on cord covers work as a no-rough-in alternative for renters.
Shop The Look
| Product |
| Matte black wall sconce bathroom pair |
| Plug in wall sconce bathroom pair |
| Bathroom sconce light glass shade |
| Linen shade wall sconce small |
| Vanity side sconce light matte black set |
23. Glass Shelf Instead of Bulky Shelving
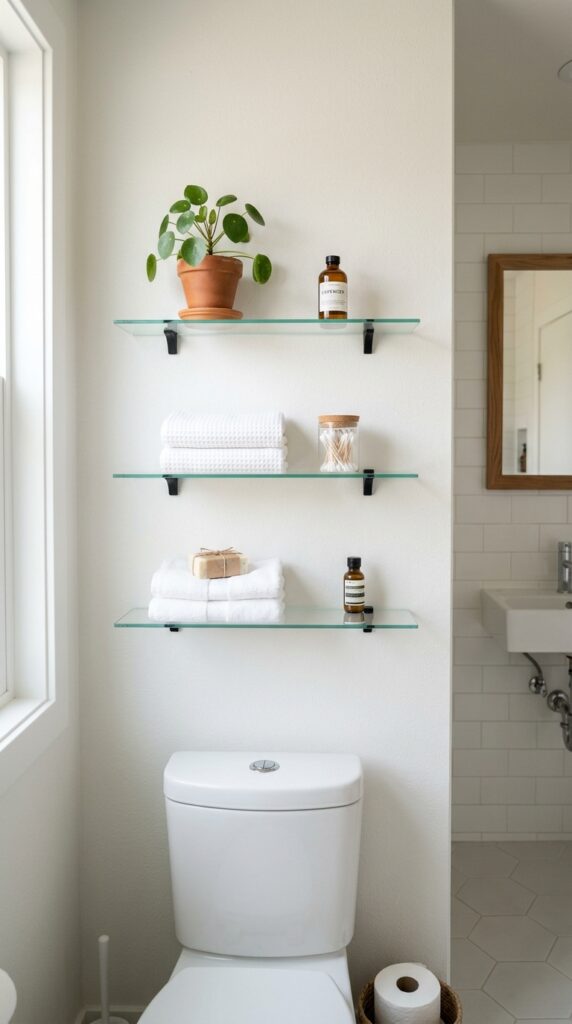
Vibe: Light — shelves that hover without imposing.
Why it works: Tempered glass shelves are the lightest-weight visual storage solution in a tiny bathroom because the glass material is transparent — the wall reads through the shelf surface rather than terminating at it, making the shelf nearly invisible from most angles. Compared to a wood or laminate shelf of identical dimensions, a glass shelf adds zero visual bulk to the wall. The design principle is transparent mass: storage objects placed on a glass shelf appear to float against the wall independently, creating a lighter, more open visual effect than opaque shelving.
How to get it: Use 3/8-inch thick tempered glass for shelves up to 24 inches long — longer spans require 1/2-inch glass to prevent visible deflection under load. Polished edges (not beveled) maintain the clean, minimal look. Standard glass shelf brackets in chrome or matte black cost $8–$20 per pair and require only two wall anchors per shelf. Install into studs or use appropriate hollow wall anchors for the expected load.
Shop The Look
| Product |
| Tempered glass shelf bathroom 3/8 inch |
| Glass shelf bracket set matte black pair |
| Chrome glass shelf bracket bathroom set |
| Clear tempered glass wall shelf 18 inch |
| Glass shelf bathroom organizer floating |
24. Ceiling Paint Trick: Same Color as Walls
Vibe: Expansive — the room that forgot it had a ceiling.
Why it works: Painting the ceiling the same color as the walls is the cheapest spatial expansion technique in a tiny bathroom — it costs the price of paint and a brush. Standard practice is to paint ceilings bright white, creating a visible horizon line at the wall-ceiling junction that defines the top boundary of the room and makes it feel lower and more enclosed. Eliminating that color break by painting both surfaces identically removes the visual ceiling, and the eye reads the space as taller and more open. The design principle is boundary line elimination: any visible line that defines the room’s perimeter — baseboard, ceiling break, tile border — is a reminder of the room’s limits.
How to get it: Use the exact same paint color and finish on walls and ceiling — not “close” or “a shade lighter” but identical. Flat or matte finish throughout; a sheen difference between wall and ceiling paint is visible even when the colors match and creates a different version of the ceiling-break visual. Also eliminate or paint the crown molding (if present) in the same color — molding in a different color or finish creates the same boundary line.
Shop The Look
| Product |
| Ceiling paint warm white matte bathroom |
| Wall and ceiling paint same color combo |
| Bathroom paint kit primer top coat |
| Low VOC bathroom paint matte warm white |
| Paint roller kit bathroom ceiling wall |
25. Smart Mirror: Light, Storage, and Technology in One
Vibe: Modern — a fixture that replaced four others without taking up any more space.
Why it works: A smart LED backlit mirror combines the vanity mirror, the vanity light fixture, and the anti-fog surface into one thin wall-mounted unit with zero additional wall projection beyond the mirror itself — consolidating three separate hardware elements into one. In a tiny bathroom where every protruding fixture reduces navigable space, replacing a mirror plus a light bar (approximately 8 inches of projection combined) with a single 1.5-inch-deep backlit mirror unit eliminates 6.5 inches of wall projection while improving light quality. The backlit halo also provides softer, more even facial illumination than a top-mounted bar.
How to get it: LED backlit mirrors require a single electrical connection (usually hardwired to an existing vanity light circuit or plug-in to a GFCI outlet inside the medicine cabinet). Specify a mirror with a color temperature control (typically 3000K–6000K adjustable) and dimming function — the ability to shift between warm evening light and bright daytime light from the same fixture eliminates the need for separate lighting circuits. Kohler Verdera Voice Mirror and NEUTYPE LED mirrors are the most reliable mid-market options.
💡 Quick Win: A plug-in LED backlit mirror ($80–$180 at most home goods stores) requires no electrical work — it plugs into the GFCI outlet already present in most bathrooms and immediately upgrades both lighting and mirror function simultaneously.
Shop The Look
| Product |
| LED backlit mirror large bathroom anti fog |
| Smart mirror LED vanity backlit frameless |
| Backlit bathroom mirror dimmable warm white |
| LED mirror plug in bathroom vanity |
| Anti fog mirror film bathroom adhesive |
How to Start Your Tiny Bathroom Transformation
The single most impactful first move that requires no renovation, no plumber, and no contractor is painting the walls and ceiling the exact same warm white color in a flat or matte finish — specifically Benjamin Moore “White Dove” OC-17 or Sherwin-Williams “Alabaster” SW 7008 — eliminating the ceiling break line entirely and installing 2700K warm white bulbs in every existing fixture. These two changes together — ceiling color continuity and warm light temperature — transform the perceived size and atmosphere of a tiny bathroom for under $60 in materials and one afternoon of work, and they form the correct foundation for every subsequent improvement.
The most common mistake in tiny bathroom renovations is choosing small-scale tile in the belief that it will look “proportional” to the small space. Small mosaic or subway tile in a tiny bathroom creates a busy, high-frequency grid of grout lines across every surface that makes the eye measure the space in small increments — and the room feels precisely as small as those increments suggest. Large-format tile (12×24 or 24×24) with minimal matching grout lines does the opposite: the eye reads the floor and walls as continuous planes with few interruptions, and the space feels significantly larger. Always go larger with tile than your instinct suggests.
Three specific items under $50 for immediate tiny bathroom impact: a frameless adhesive mirror panel ($20–$40 from a hardware store) added beside your existing medicine cabinet to expand the mirror surface and reflect more light; a set of two identical seagrass baskets ($15–$25) placed under the floating vanity for organized under-sink storage; and a magnetic strip mounted inside the medicine cabinet door ($10–$18) that clears the counter surface of razors, scissors, and metal accessories entirely.
A starter tiny bathroom refresh — paint, new bulbs, organization systems, and mirror additions — runs $100–$250 and takes a weekend. A mid-level update adding a floating vanity, new fixtures, and frameless shower glass runs $2,000–$5,000 with professional installation. A complete wet room renovation with wall-hung toilet, large-format continuous tile, and custom glass costs $8,000–$18,000 depending on market and specification. The return on investment for a well-executed tiny bathroom renovation is consistently among the highest in residential real estate — small bathrooms benefit disproportionately from quality improvements because the material cost is lower while the visual impact is comparable to a full-size renovation.
Frequently Asked Questions About Tiny Bathrooms
What is the most effective way to make a tiny bathroom look bigger?
The three highest-impact techniques, in order of effectiveness: first, use large-format tile (12×24 or larger) in a light warm tone with matching grout color on both floor and walls — this eliminates the most visual noise in the room. Second, install a full-width frameless mirror or cover the entire vanity wall with a mirrored cabinet — the reflected room doubles perceived depth. Third, paint the walls and ceiling the identical warm white color with no break line at the junction — the room reads as a continuous shell rather than a box. Together, these three changes transform a 35-square-foot bathroom into a space that reads as 50 square feet or more.
What color should I paint a tiny bathroom?
Warm white is consistently the best performing color in a tiny bathroom — specifically tones with cream or yellow undertones rather than grey or blue undertones. Benjamin Moore “White Dove,” Farrow & Ball “Pointing,” and Sherwin-Williams “Alabaster” are the three most reliable choices. The single most important rule: paint the ceiling the exact same color as the walls. The second most important rule: use a flat or matte finish rather than eggshell or satin — the lack of reflective sheen on a matte white wall in a bright bathroom reads as softer and more spacious than a sheen finish that creates highlight and shadow inconsistencies across the surface.
How do I add storage to a tiny bathroom without making it feel cluttered?
The key is recessed-first thinking: every storage addition should be evaluated for whether it can go into the wall rather than onto it. Recessed medicine cabinet (instead of surface-mount), recessed toilet paper niches (instead of wall-mount holders), and recessed shower niches (instead of caddy shelves) move storage mass behind the wall plane and preserve the room’s navigable space. When recessing isn’t possible, go vertical rather than horizontal — a floor-to-ceiling shelf tower beside the toilet exploits unused height without consuming additional floor space. The rule: never add a storage object that projects more than 4 inches from the wall unless it is the only storage option.
Can a tiny bathroom have a bathtub?
Yes, with the right tub format. A Japanese soaking tub (typically 47×28 inches versus a standard tub’s 60×30 inches) fits in the footprint of a large shower stall while delivering a genuine bathing experience. Alternatively, a shower-tub combo using a 32×60 inch alcove tub preserves the bathing function in a space-efficient format. The tub to avoid in a tiny bathroom is the freestanding soaking tub — despite its design appeal, its footprint plus the required clearance on all sides consumes so much floor space in a bathroom under 50 square feet that the room becomes essentially non-functional. Reserve freestanding tubs for bathrooms 60 square feet and larger.
What flooring makes a tiny bathroom look larger?
Large-format porcelain tile in a light warm tone (12×24 or 24×24 minimum) with matching grout is the most reliable floor choice for tiny bathroom visual expansion. The size matters more than the color: large tile creates fewer grout lines per square foot, and grout lines are the primary way the eye measures a floor’s scale. A 12×24 tile installed lengthwise in the direction of the room’s longest dimension creates the most aggressive visual elongation effect. Avoid small-format tile (3×6 subway, 4×4 ceramic) for the floor — it creates a high-frequency grid that makes the room feel measurably small. Luxury vinyl plank in a light warm tone is a legitimate alternative to tile with similar visual performance and significantly lower installation cost.
Ready to Create Your Dream Tiny Bathroom?
These 25 ideas have covered the complete toolkit of tiny bathroom design — from foundational moves like continuous tile, floating fixtures, and full-wall mirrors, to the precision hacks of magnetic cabinet storage, same-tone ceiling paint, and recessed niches that return every borrowed inch to the room. The smallest bathroom is the room where design intelligence earns its greatest return: one right decision compounds into a space that feels twice its size. Start today by standing in your bathroom and identifying the single most visually cluttered surface — the counter, the wall beside the toilet, the floor in front of the vanity — and addressing just that one surface first. When the full transformation is done, the room will do the thing that well-designed tiny bathrooms always do: make every person who walks in ask how you made it feel so much bigger than it is. Pin the ideas that solve your specific constraints — and trust that in a tiny bathroom, precision always beats square footage.