A tiny bathroom organization system is the deliberate application of spatial strategy, vertical thinking, and material discipline to transform a small bathroom — typically under 50 square feet — into a space that functions as efficiently as one twice its size. This guide delivers 24 specific organization tips spanning storage solutions, layout strategies, product choices, lighting, materials, accessories, and small-space illusion techniques.
There is a particular satisfaction in a small bathroom that works — where every surface is clear, every item has a home, and the morning routine runs without the low-grade friction of searching, shuffling, and stacking. It is a space that rewards precision. The right hook in the right place, a drawer divided correctly, a shelf mounted six inches higher than expected — these small decisions compound into something that feels genuinely spacious despite its footprint. Here are 24 tips worth saving — and stealing.
Why Tiny Bathroom Organization Works So Well
Tiny bathroom organization draws from the same design traditions that inform ship cabin design, Japanese kura storage architecture, and the European studio apartment — all contexts where the pressure of limited space has produced extraordinarily inventive spatial thinking over centuries. What distinguishes genuinely organized small bathrooms from merely tidy ones is the application of design principles: visual hierarchy, material continuity, vertical zoning, and the deliberate use of negative space as a design element rather than wasted area. Organization in a small bathroom is not the absence of things — it is the precise placement of the right things.
The material language of well-organized small bathrooms is specific and consistent. Matte white, warm linen, natural oak, brushed brass, and matte black are the finishes that read as intentional and calm in tight spaces — they avoid the visual noise of mixed metals, competing colors, and glossy surfaces that reflect clutter back from every angle. Baskets in seagrass or rattan, ceramic canisters in matte glaze, glass apothecary jars, and slotted bamboo drawer organizers all perform organization functions while contributing to a consistent material narrative that makes the space read as designed rather than improvised.
The cultural moment for tiny bathroom organization has never been stronger. The rise of ADU living, urban micro-apartments, and the tiny house movement has made small-bathroom problem-solving a mainstream design preoccupation rather than a niche concern. The organization product category has responded with an explosion of genuinely well-designed solutions — magnetic wall systems, tension rod shelf inserts, over-door organizers, and under-sink stackable drawer units — that have made professional-level organization achievable at any budget. Pinterest’s “small bathroom storage” and “tiny bathroom organization” categories consistently rank among the platform’s highest-engagement home content verticals.
Small bathrooms reward a single organizational principle above all others: vertical thinking. Floor space in a tiny bathroom is permanently constrained; wall space above the standard 60-inch horizon line is almost always underutilized. Every organization solution in a small bathroom should be evaluated first by whether it removes something from a horizontal surface and places it on a vertical one — that single reframing of the problem unlocks more usable space than any product purchase.
Style at a Glance
| Element | Core Trait 1 | Core Trait 2 |
| Philosophy | Vertical thinking, surface discipline | Every item has a designated home |
| Materials | Matte white, natural oak, seagrass | Brushed brass, ceramic, bamboo |
| Color palette | Warm white, warm linen, natural wood | Matte black, soft gray, sage green |
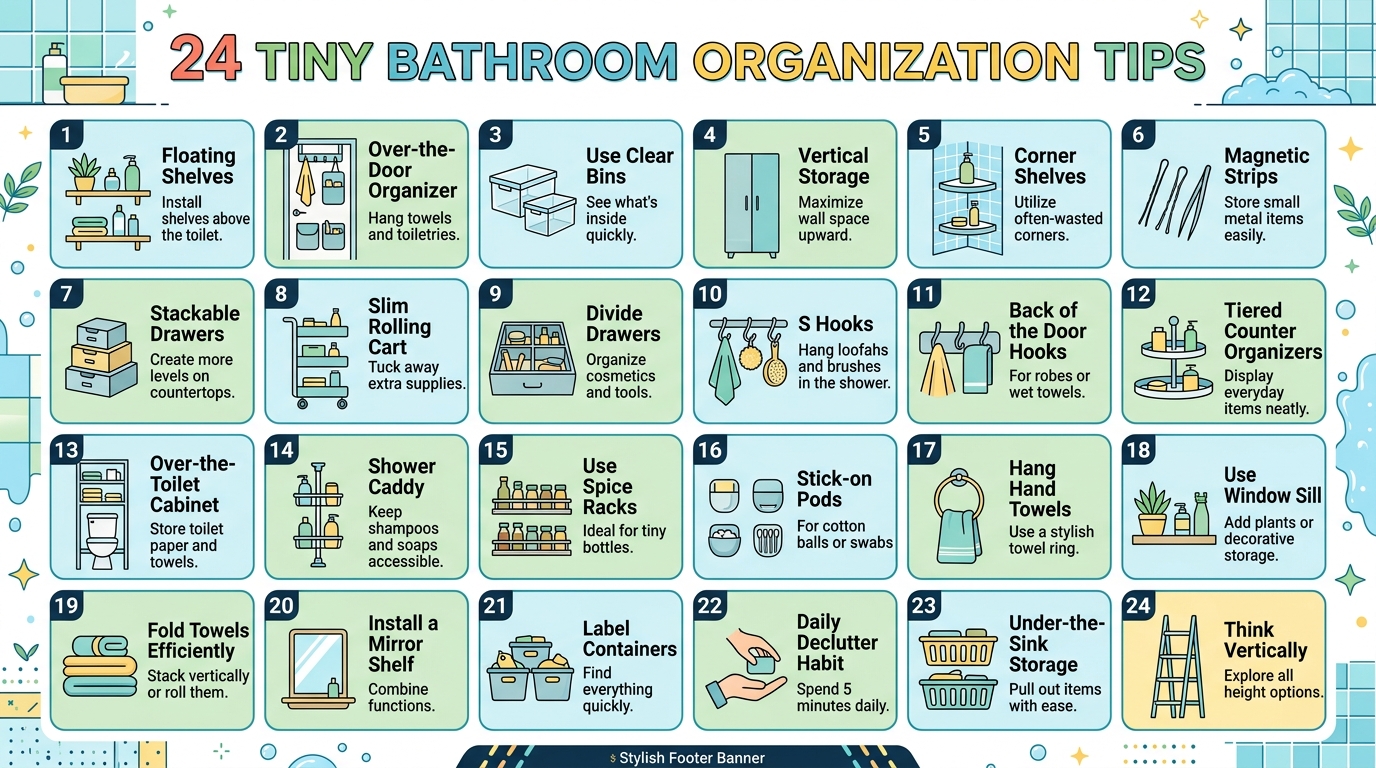
24 Tiny Bathroom Organization Tips
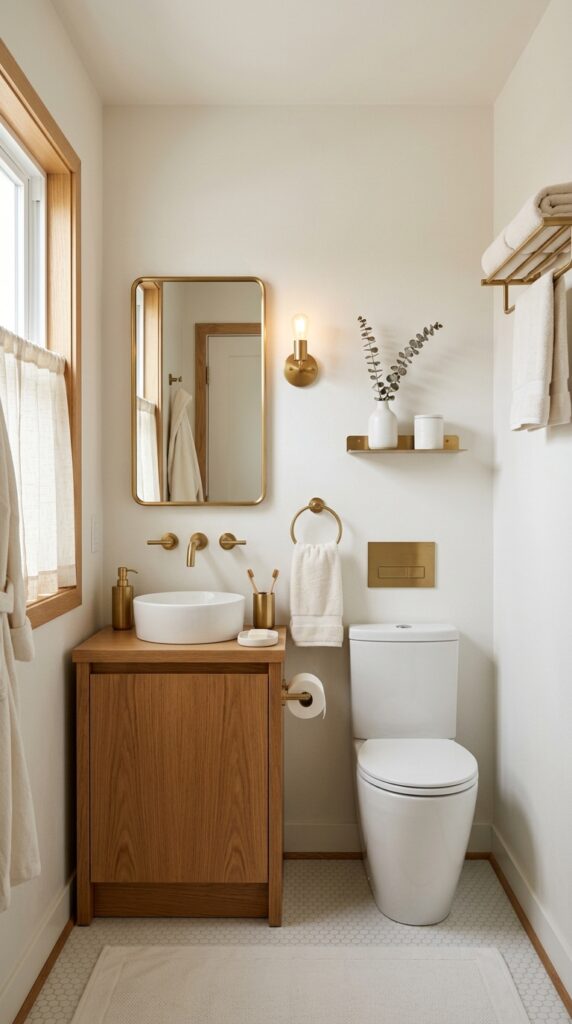
1. Install a Floating Vanity to Reclaim Floor Space Below
Vibe: Airy and deliberate — a vanity that gives back more than it takes.
Why it works: A wall-mounted floating vanity creates two organizational gains simultaneously: the cabinet itself provides enclosed storage for everyday items, and the floor space beneath becomes a usable zone — typically 18 inches of clearance — that accommodates baskets, a small stool, or simply remains open to create the visual impression of a larger floor plan. In a bathroom under 50 square feet, that 18-inch clearance beneath the vanity is the single largest reclamation of perceived floor space available without structural modification. The open floor also allows natural light to travel beneath the vanity and back, which prevents the visual heaviness that a floor-to-ground vanity creates in tight spaces.
How to get it: Mount the floating vanity at 18–20 inches from the finished floor rather than the standard 32-inch counter height — this lower mounting maximizes the clearance beneath while maintaining a comfortable working height. Use a French cleat or cabinet-specific wall bracket rated for the vanity’s loaded weight; mounting into studs is non-negotiable for a wall-hung vanity carrying a stone or ceramic countertop.
💡 Quick Win: Two large seagrass baskets (under $22 each) slid beneath an existing floating vanity immediately convert dead floor space into towel or cleaning supply storage — no installation required.
Shop The Look
| Product |
| Floating wall mount bathroom vanity white oak 24 inch |
| Seagrass storage basket with handles large set of 2 |
| Wall mount vanity bracket heavy duty French cleat |
| Matte black vanity cabinet hardware pull set |
| Woven rattan basket bathroom floor organizer |
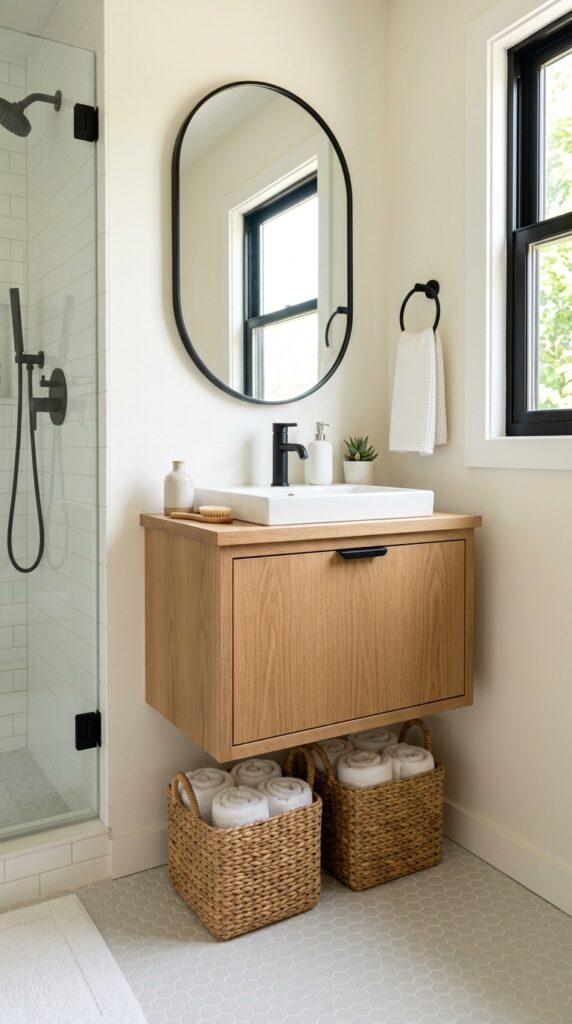
2. Use a Tension Rod Under the Sink to Double Hanging Storage
Vibe: Efficient and precise — storage that uses the dimension nobody thinks about.
Why it works: The interior of most under-sink cabinets is organized as a single floor-level zone — items are placed on the cabinet base and stacked upward, which wastes the entire upper half of the cabinet interior. A tension rod mounted across the cabinet width at mid-height creates an instant hanging rail that converts the upper half into a dedicated zone for spray bottles, cleaning tools, and bag hooks, while the lower half remains organized with stackable bins. This doubles the effective storage capacity of the under-sink cabinet without any drilling, adhesive, or permanent modification — a critical advantage in rental bathrooms.
How to get it: Measure the interior width of the under-sink cabinet and purchase a tension rod 2 inches longer than that measurement — the spring tension holds it in place against the cabinet walls. Position the rod at a height that allows the tallest hanging item (typically a spray bottle with the trigger facing down) to clear the cabinet floor by at least 2 inches. Use matte black S-hooks rather than chrome for a more intentional finish; S-hooks rated for 5 lbs each are sufficient for any cleaning product.
Shop The Look
| Product |
| Tension rod adjustable chrome under sink |
| Matte black S-hook set of 12 |
| Hanging spray bottle holder hook organizer |
| White stackable under sink storage bins |
| Under sink wire hanging basket organizer |
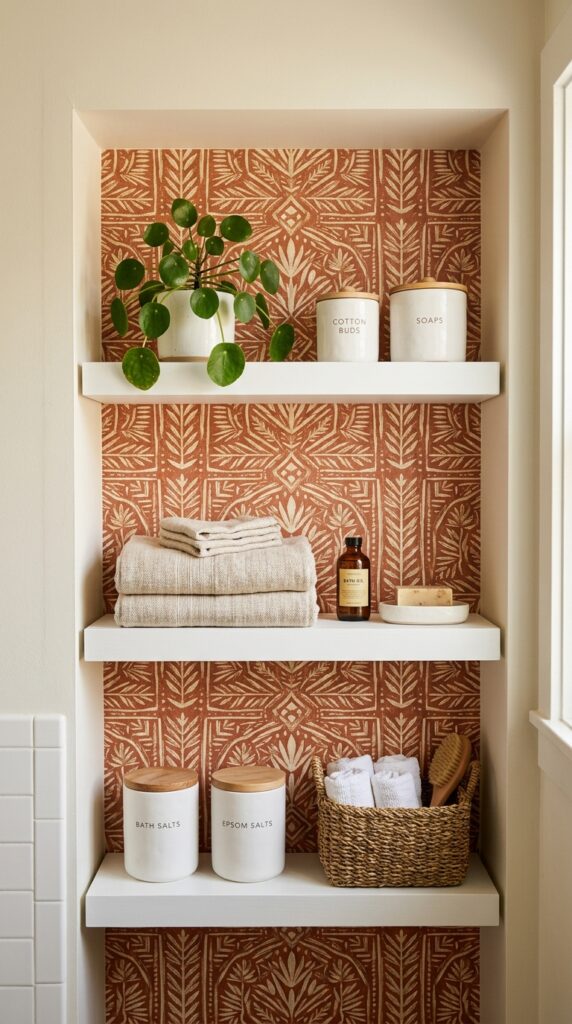
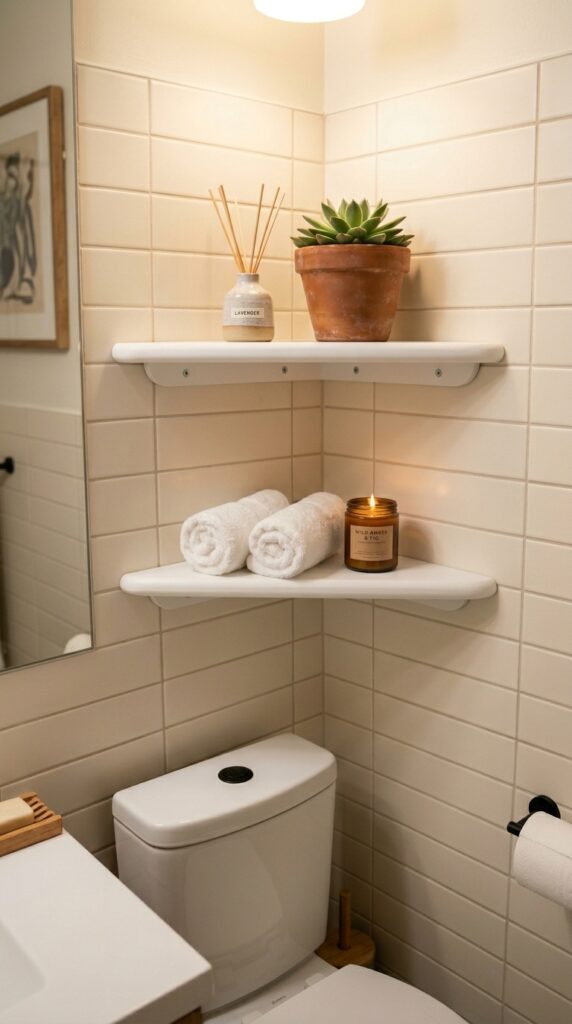
3. Mount Shelves Above the Toilet for Vertical Storage
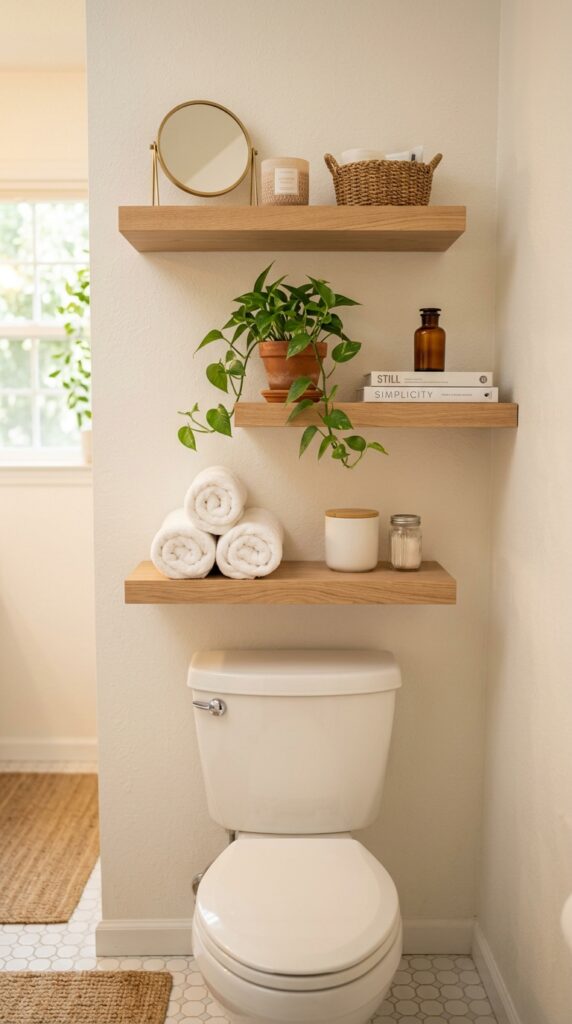
Vibe: Warm and purposeful — a wall that earns every inch above the waterline.
Why it works: The wall above a toilet is the most consistently underused vertical surface in a small bathroom: it typically spans 30–36 inches of width and 48–60 inches of height between the toilet tank and the ceiling, yet most bathrooms leave it entirely bare. Three shelves in this zone — mounted at 8 inches above the tank, then at 12-inch intervals above that — introduce three distinct storage planes without occupying any floor space. The staggered width approach (widest shelf at bottom, narrowest at top) creates visual interest and proportional logic: heavier, more frequently accessed items sit lower and wider, while decorative and occasional-use items sit higher and narrower.
How to get it: Mount the lowest shelf with its bottom edge at 8 inches above the toilet tank lid — this provides enough clearance to lift the tank lid when necessary without removing the shelf. Use floating shelf brackets that mount into wall studs; above a toilet, the studs are typically at the standard 16-inch spacing and the wall is accessible without obstruction.
💡 Quick Win: A single over-toilet shelf unit (freestanding, no drilling required) in matte white costs $45–$85 and installs in 20 minutes — the fastest complete above-toilet storage solution for renters.
Shop The Look
| Product |
| White oak floating shelf set 3 piece bathroom |
| Over toilet storage shelf freestanding matte white |
| Matte white ceramic canister set bathroom |
| Small terracotta pot trailing pothos plant |
| Floating shelf wall bracket concealed set |
4. Replace a Medicine Cabinet with a Deep-Recessed Mirror Cabinet
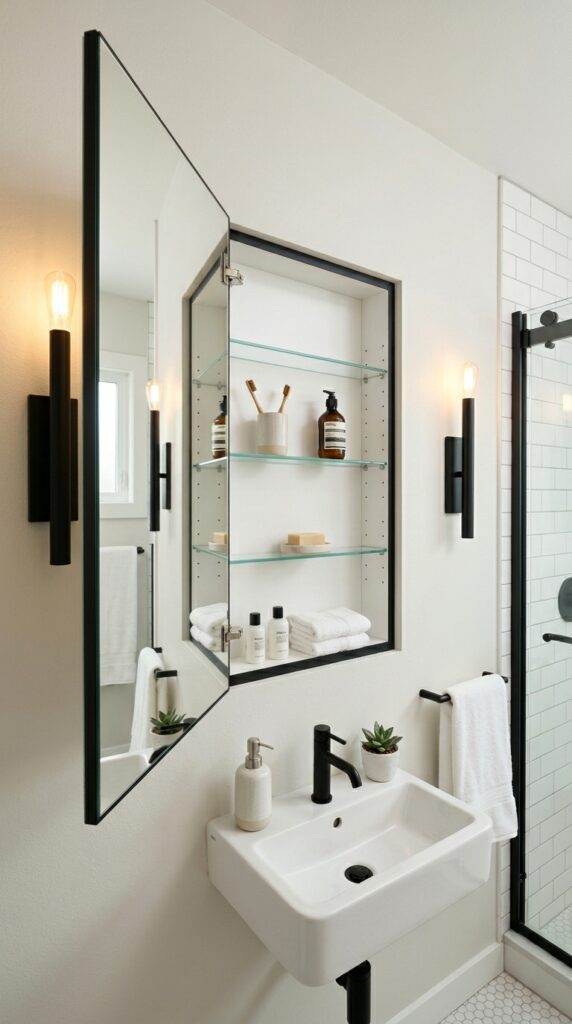
Vibe: Clean and considered — storage that hides entirely behind a mirror.
Why it works: A standard surface-mount medicine cabinet projects 4–6 inches from the wall into the already tight space of a small bathroom, creating a visual obstacle and a physical hazard at face level. A recessed mirror cabinet, by contrast, occupies the wall cavity between studs — typically 3.5 inches deep — and presents a completely flush mirror surface to the room, reclaiming the projection space entirely. The interior depth of 3.5 inches is sufficient for most personal care items: toothbrushes, medications, contact lens supplies, and cosmetics all fit on standard 3-inch-deep internal shelves. The flush-mount installation also allows the mirror to be sized larger than a standard medicine cabinet, amplifying its light-reflecting function in a small space.
How to get it: Recessed mirror cabinet installation requires cutting a stud bay opening — locate studs with a stud finder first, as the cabinet must fit between two studs at standard 16-inch spacing, limiting the interior width to approximately 14 inches. For wider cabinets (24+ inches), a header must be installed across the cut stud, which requires a permit in most jurisdictions. Specify a cabinet with adjustable interior shelves rather than fixed shelves to accommodate items of varying heights.
Shop The Look
| Product |
| Recessed medicine cabinet flush mount matte black |
| Recessed mirror cabinet adjustable shelves 24 inch |
| Stud finder wall scanner bathroom |
| Adjustable glass shelf set medicine cabinet |
| Mirror cabinet door hinge replacement set |
5. Use Drawer Dividers for Precision Vanity Organization
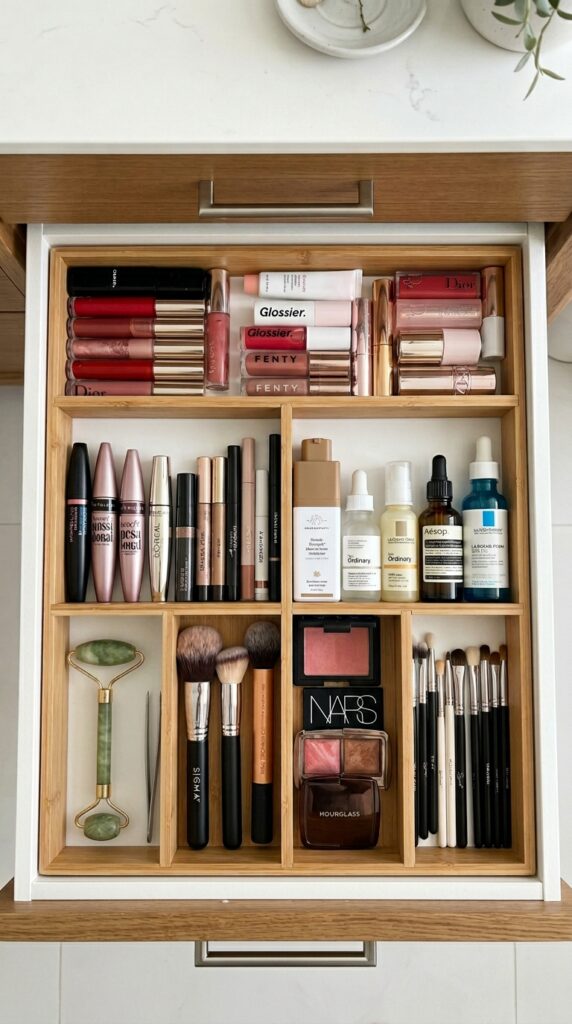
Vibe: Precise and calm — the morning routine that runs itself.
Why it works: An unorganized vanity drawer operates at approximately 40% of its theoretical storage capacity — items shift during opening and closing, categories mix, and retrieval requires searching rather than knowing. An adjustable bamboo divider grid converts the same drawer volume into a fixed-address system: every item has a permanent location, retrieval is immediate and reliable, and the drawer’s full depth is utilized because items are arranged vertically (standing upright) rather than laid flat and stacked. The bamboo material resists humidity, does not absorb cosmetic product spills, and wipes clean without staining — critical properties for a bathroom drawer organizer.
How to get it: Measure the interior dimensions of each drawer before purchasing dividers — internal drawer dimensions vary significantly between vanity manufacturers and the dividers must fit within the specific width and depth without gaps that allow shifting. Choose adjustable dividers with interlocking cross-pieces rather than fixed-width inserts, which lock you into a single configuration that rarely matches the specific items you need to store.
Shop The Look
| Product |
| Bamboo adjustable drawer divider organizer bathroom |
| Acrylic cosmetic organizer drawer insert |
| Bamboo drawer organizer tray 6 section |
| Makeup brush holder bamboo upright |
| Clear acrylic lipstick organizer drawer |
6. Install a Magnetic Strip for Metal Tool Storage

Vibe: Clever and organized — the tools you always lose are now the ones you always find.
Why it works: Small metal bathroom tools — nail clippers, scissors, tweezers, eyelash curlers, bobby pins — share two organizational problems: they are small enough to disappear in a drawer and too individually small to justify dedicated storage containers. A magnetic strip solves both by presenting each item in a single visible, accessible line on any flat surface — the inside of a cabinet door being the most space-efficient location, as it converts a previously unused vertical surface into dedicated storage without occupying shelf or drawer space. The magnetic strip also prevents the damage and dulling that comes from small sharp tools loose-stored in a drawer where they contact each other.
How to get it: Use a magnetic strip with a minimum pull strength of 2 lbs per inch — weaker strips will not reliably hold a nail clipper or scissors against the vibration of a closing cabinet door. Mount on the interior face of the cabinet door rather than the wall, using the included screws rather than adhesive backing alone — adhesive-only magnetic strips fail within 6–12 months in bathroom humidity conditions.
💡 Quick Win: A 12-inch matte black magnetic knife strip repurposed as a bathroom tool organizer costs under $16 and mounts to any surface in under 5 minutes — the same product used in kitchens works identically in bathrooms with stronger pull strength per inch than dedicated cosmetic magnetic strips.
Shop The Look
| Product |
| Magnetic strip wall mount matte black 12 inch |
| Magnetic bathroom tool organizer strip |
| Small magnetic tin container bobby pin storage |
| Matte black small scissors nail kit |
| Cabinet door magnetic mount adhesive strip |
7. Decant Products into Uniform Containers for Visual Calm
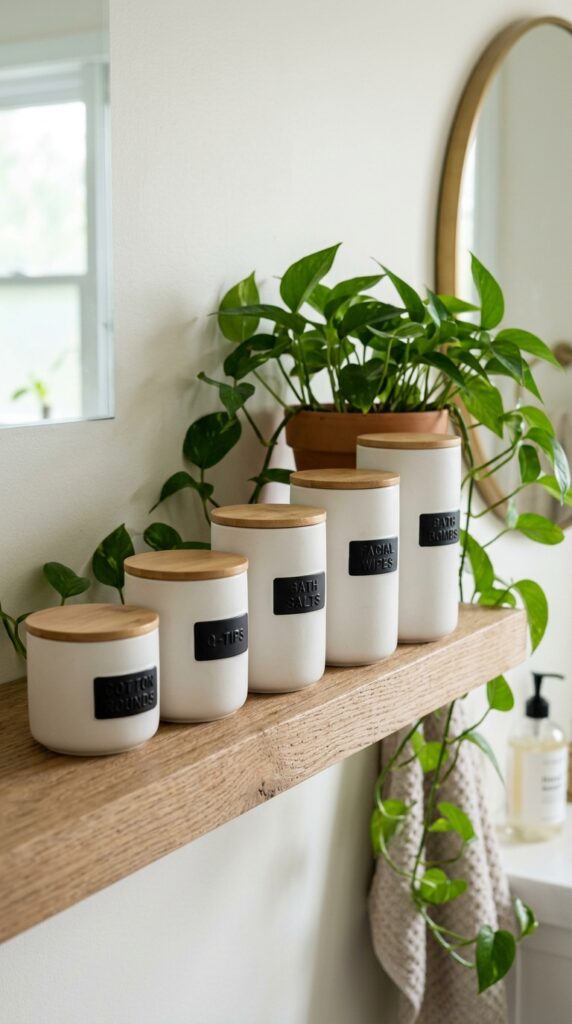
Vibe: Serene and considered — a shelf that looks designed, not stocked.
Why it works: The visual chaos of a small bathroom is created almost entirely by the competing packaging of commercial personal care products — every brand uses a different shape, color, typeface, and finish, and the cumulative effect of 15–20 different product packages on a shelf is overwhelming regardless of how neatly they are arranged. Decanting into uniform containers removes all branding noise and replaces it with a single consistent material language: the shelf reads as one composed object rather than an assemblage of commercial packaging. The functional benefit is secondary but real — uniform containers stack, nest, and fit shelf depths far more efficiently than the irregular shapes of commercial packaging.
How to get it: Decant only the products you use daily — decanting the entire bathroom into matching containers at once is the organizing project that never gets finished. Start with the most visually prominent surface (the vanity top or the main shelf) and decant the three to five products that live there permanently. Use a fine-tip paint marker or an embossed label maker for container labeling — printed label tape reads as corporate and undercuts the calm material aesthetic of the containers themselves.
Shop The Look
| Product |
| Matte white ceramic canister set bamboo lid bathroom |
| Small bathroom canister set refillable white |
| Label maker embossed black on white tape |
| Bamboo lid glass jar set bathroom counter |
| Clear apothecary jar set with cork lid |
8. Add a Slim Rolling Cart Between the Toilet and Wall
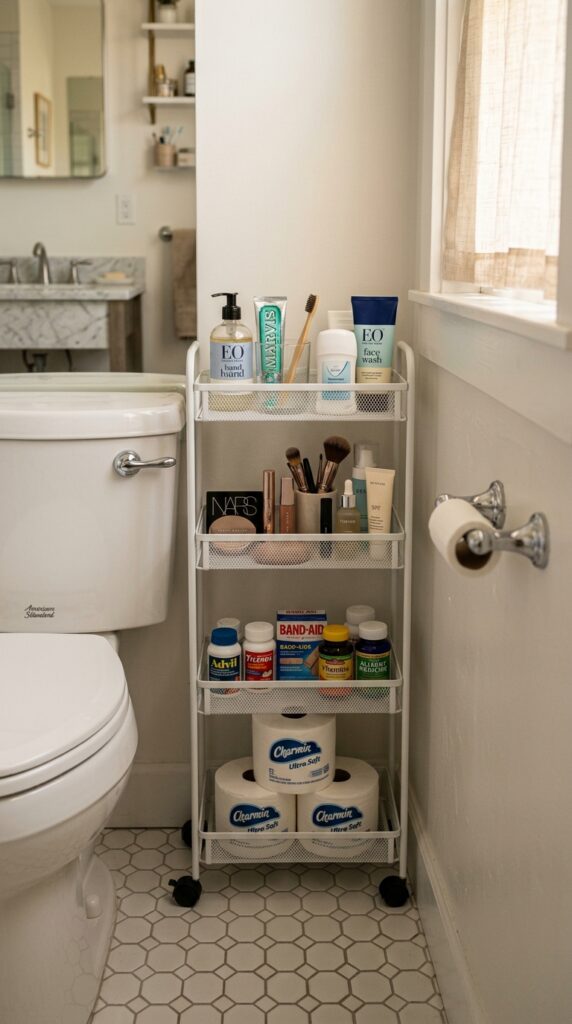
Vibe: Efficient and clean — the gap that was wasted is now the best storage in the room.
Why it works: The narrow gap between a toilet and an adjacent wall — typically 6–12 inches — is the most universally wasted space in a small bathroom. A slim rolling cart (available in 4-inch and 6-inch widths) converts this gap into a four-tier storage column that holds the equivalent of an additional small cabinet’s worth of product. The rolling function allows the cart to slide out fully for access to back-of-shelf items and to provide complete access to the area beside and behind the toilet for cleaning. The multi-tier format also enforces category organization by zone: each tier becomes a dedicated category (daily toiletries, cosmetics, medications, spare supplies), which makes restocking and retrieval intuitive without labeling.
How to get it: Measure the actual clear gap between your toilet and the nearest wall or vanity before purchasing — measure at both floor level and at the widest point of the toilet tank, which is typically 2–4 inches wider than the toilet base. The cart must fit the narrowest dimension of the gap at every height to roll freely in and out. Most narrow bathroom carts are available in 4-inch and 6-inch widths; 6-inch is the more functional size if the gap allows it.
Shop The Look
| Product |
| Slim rolling bathroom cart 4 tier white narrow |
| Narrow bathroom storage cart rolling 6 inch |
| Wire mesh rolling cart bathroom organizer white |
| Rolling cart bathroom small caster wheel |
| Slim pull-out bathroom storage tower |
9. Hang a Ladder Shelf Instead of a Traditional Towel Bar
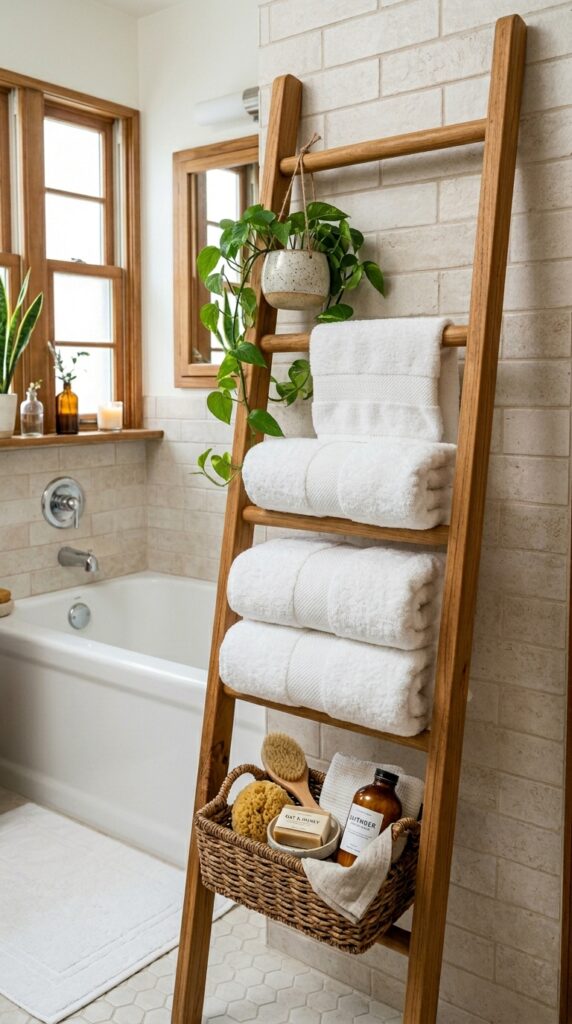
Vibe: Warm and layered — a towel rack that doubles as a piece of furniture.
Why it works: A ladder shelf provides more towel-hanging capacity than a standard double towel bar (five rungs versus two bars) while occupying a significantly smaller wall footprint — the ladder’s angled lean means it contacts the wall at only the top two inches rather than requiring two bracket mounting points spread across 24 inches. The vertical format also allows towels to be displayed and dried simultaneously at multiple heights, which reduces the mildew-development problem of towels stored flat in a humid bathroom. The bottom rung and floor space beneath the ladder provide additional storage dimensions — a basket at the base, a small plant on the top rung — that a towel bar cannot accommodate.
How to get it: Position the ladder so it leans at 70–75 degrees from the floor — steeper than that and the ladder slips; shallower and it projects too far into the room. For non-slip stability on tile floors, add rubber feet to the bottom of each upright; for wall protection, add a small rubber bumper to each point where the top of the ladder contacts the wall.
Shop The Look
| Product |
| Teak bathroom ladder shelf 5 rung leaning |
| Bamboo ladder shelf bathroom towel holder |
| White bath towel set folded display |
| Small hanging ceramic pot plant bathroom |
| Woven basket bathroom supplies storage |
10. Use the Inside of Cabinet Doors for Flat Organizers
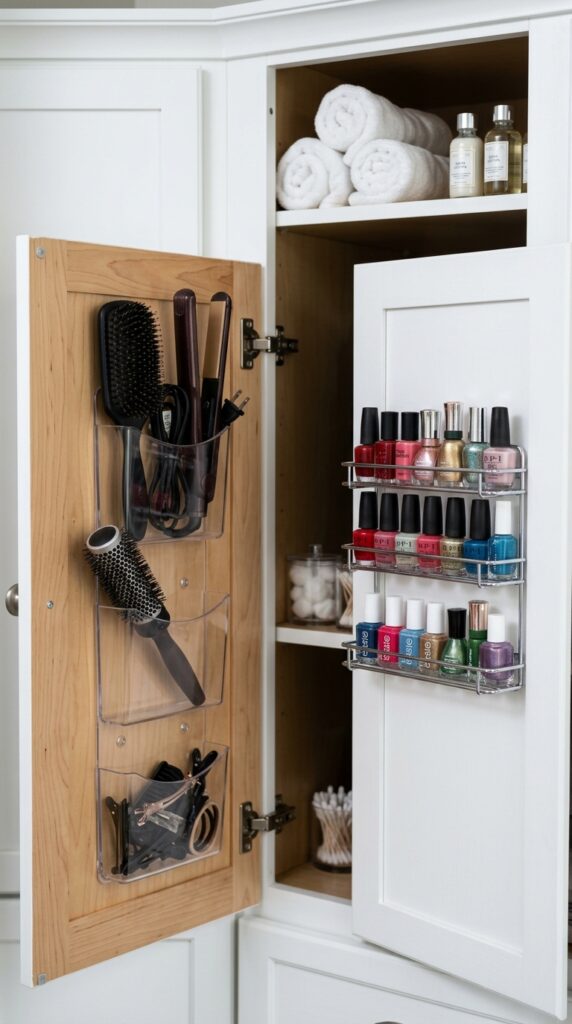
Vibe: Inventive and organized — the most overlooked storage real estate in the bathroom.
Why it works: The inside face of a vanity cabinet door is a flat, vertical surface averaging 16×18 inches per door that most bathrooms leave completely unused. A single door can accommodate a 3-pocket flat organizer that holds a hair dryer, a flat iron, and a wide-tooth comb — items that typically occupy significant counter or shelf space — while the other door accommodates an adhesive spice rack that holds 8–10 nail polish bottles upright in a single organized row rather than loose in a drawer. The key is using organizers specifically designed for door mounting: shallow projection (under 3 inches) to ensure the cabinet closes fully, and sufficient weight rating for the intended contents.
How to get it: Before mounting any door organizer, check that the organizer’s projection (depth from door face to the front edge of the organizer) is less than the clearance between the door and the nearest shelf inside the cabinet. A projection that exceeds this clearance prevents the cabinet door from closing fully. Use command-style adhesive strips rated for the combined weight of the organizer plus its contents for zero-damage mounting.
💡 Quick Win: A set of three clear adhesive door pockets (under $14) mounted on the inside of a bathroom cabinet door converts the door into a complete hair tool storage station without using a single inch of shelf or counter space.
Shop The Look
| Product |
| Over door clear acrylic pocket organizer bathroom |
| Adhesive door mount wire rack spice holder |
| Command adhesive strips heavy duty removable |
| Clear acrylic nail polish door organizer |
| Hair tool door organizer heat-resistant pocket |
11. Mount a Fold-Down Wall Shelf for Temporary Counter Space
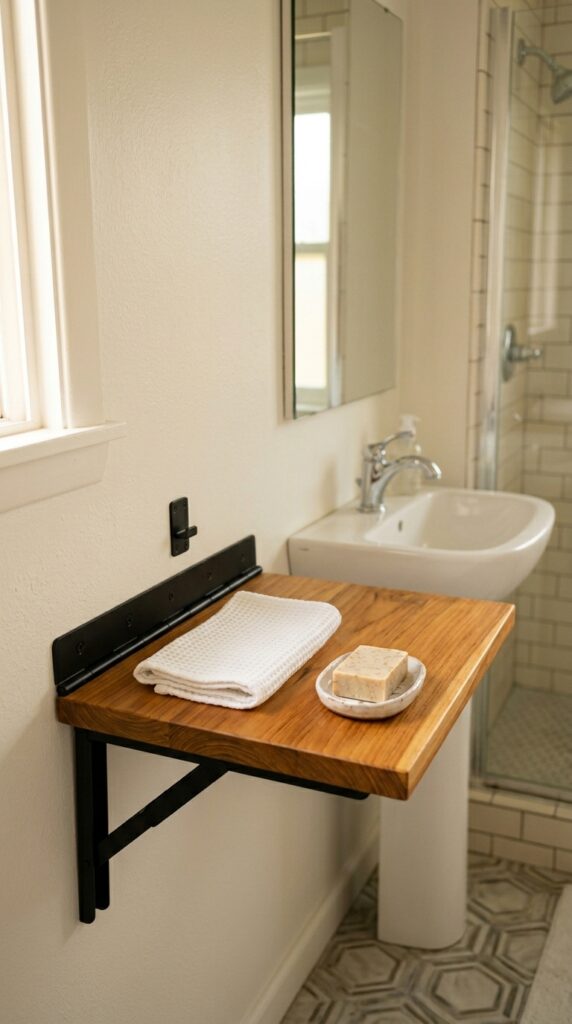
Vibe: Considered and clever — counter space that appears when needed and disappears when it is not.
Why it works: A fold-down wall shelf is the spatial equivalent of a Murphy bed applied to a bathroom counter: it provides a full working surface (10–12 inches deep, 18–24 inches wide) when deployed and returns to a 1-inch wall projection when folded — reclaiming every inch of the floor plan below it. In tiny bathrooms where counter space is permanently scarce, a fold-down shelf adjacent to the sink provides a staging area for the morning routine that disappears after use, maintaining the open feel of the space. The application is especially valuable in bathrooms where two people share the space and need temporary counter territory simultaneously.
How to get it: Mount the fold-down shelf bracket into a stud or with wall anchors rated for the combined weight of the shelf plus a loaded countertop (minimum 30 lbs). Position it at the same height as the vanity counter — typically 33–36 inches from the finished floor — so items can slide between the two surfaces without height differential. Use a piano hinge (continuous hinge) rather than a standard door hinge for maximum weight distribution across the shelf’s full width.
Shop The Look
| Product |
| Fold-down wall mount shelf bracket matte black |
| Teak fold-down wall shelf kit |
| Piano hinge continuous stainless steel |
| Wall anchor heavy duty drywall toggle bolt |
| Fold-down shelf support arm collapsible |
12. Store Towels Rolled in a Basket Rather Than Folded on a Shelf
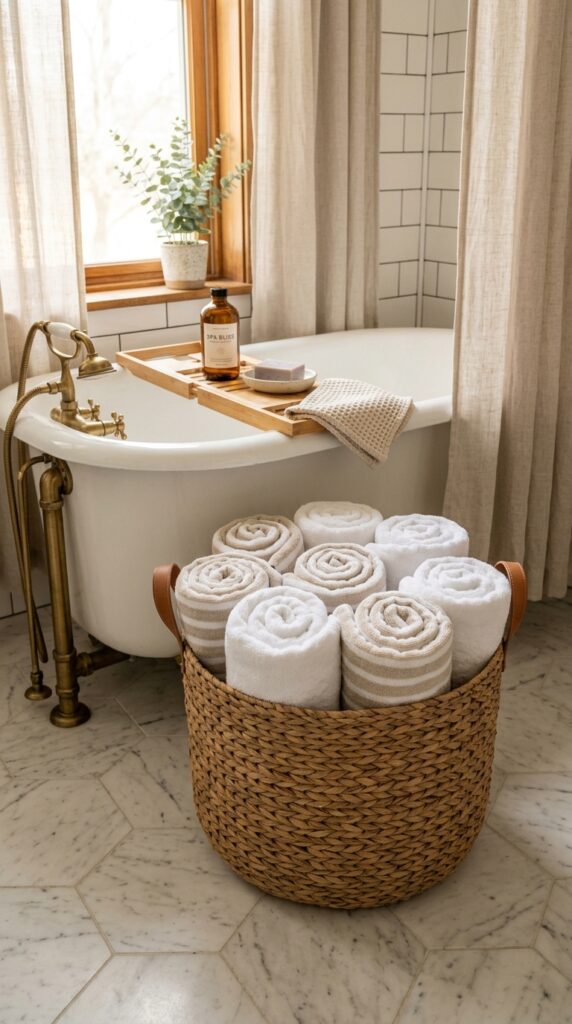
Vibe: Warm and spa-like — a basket of rolled towels that makes you feel like you checked in somewhere nice.
Why it works: Rolling towels and storing them upright in a basket increases the storage density compared to flat-folded towels on a shelf by approximately 40% — a rolled standard bath towel occupies a 4-inch diameter cylinder, while a flat-folded towel requires 4 inches of shelf depth and 12 inches of shelf width per towel. The upright roll display also allows all towels to be individually visible and accessible without disturbing the others — a flat-folded stack requires removing the top towels to reach the ones below. The basket itself eliminates the need for a shelf entirely in some configurations, reducing hardware installation requirements to zero.
How to get it: Roll towels tightly from the hem end toward the hanging loop, maintaining consistent pressure throughout the roll to achieve a uniform cylinder diameter. Stand rolls with the spiral end facing upward in the basket — this orientation shows the most visually organized face and also airs the towel interior rather than trapping humidity between the roll and the basket surface.
Shop The Look
| Product |
| Large round seagrass basket bathroom towel storage |
| White bath towel set 100 percent cotton |
| Woven rattan round basket large floor storage |
| Natural stripe Turkish cotton towel set |
| Seagrass storage basket with lid large |
13. Apply Peel-and-Stick Wallpaper to the Inside of Open Shelves
Vibe: Warm and designed — the back of a shelf that makes the whole wall feel intentional.
Why it works: Applying peel-and-stick wallpaper to the back wall of an open shelving alcove creates a visual backdrop that transforms the shelf from a storage surface into a display zone — the pattern behind the objects makes even functional items (ceramic canisters, folded towels) read as curated. This technique also visually deepens the alcove, as the pattern creates a recession effect that makes the shelf appear to recede further into the wall than its actual depth. Peel-and-stick application is ideal for bathroom shelving alcoves because it can be removed without damaging the substrate if the pattern needs to be updated seasonally or when moving.
How to get it: Clean and dry the alcove back wall thoroughly before application — any moisture or residue prevents adhesion in the first season. Cut the peel-and-stick wallpaper panel to the exact alcove dimensions before removing the backing, and start the application from the top center point, smoothing outward and downward to prevent bubbles. A rubber squeegee or a credit card edge creates a tighter bond than fingertip pressure alone.
💡 Quick Win: A single 24×48-inch peel-and-stick wallpaper panel (available for $18–$35) applied to the back of one open shelf alcove immediately elevates the perceived design quality of the entire bathroom without touching a single item on the shelf.
Shop The Look
| Product |
| Peel and stick wallpaper terracotta abstract pattern |
| Removable wallpaper bathroom safe adhesive |
| Wallpaper smoothing tool squeegee |
| Peel and stick tile backsplash neutral pattern |
| Removable wallpaper sample kit bathroom |
14. Use a Suction-Mount Shower Caddy with Drainage Holes
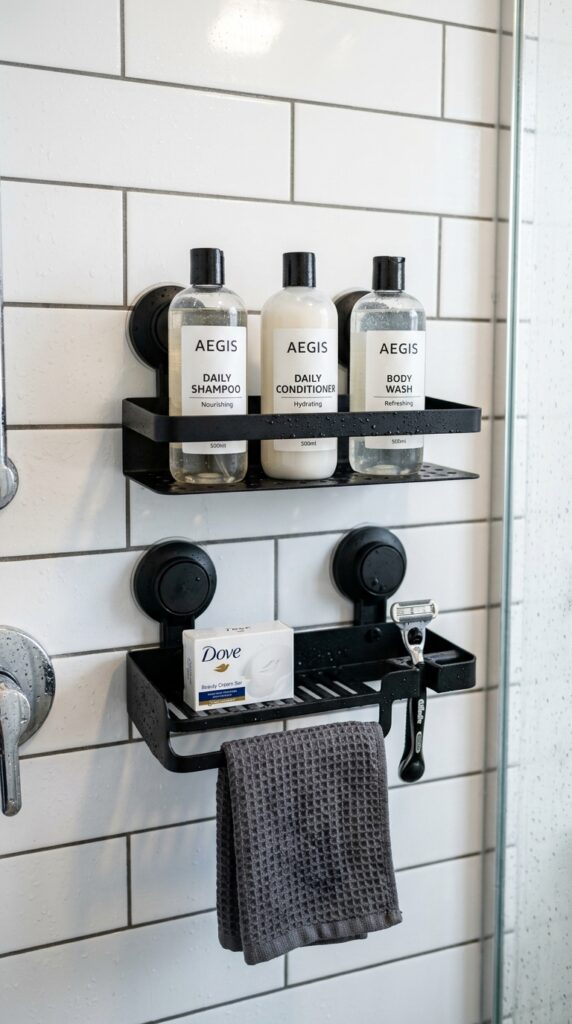
Vibe: Functional and clean — a shower that does not ask you to hunt for shampoo.
Why it works: Shower products stored on a tub ledge or shower floor create both a safety hazard (slipping risk) and a mold-accumulation problem (product bases sitting in standing water). A suction-mount shower caddy elevates all products to wall height, where they drain freely and remain accessible without bending. Drainage holes on each shelf tier are the non-negotiable feature: caddy shelves without drainage holes accumulate standing water that causes mold, soap scum, and product contamination. The matte black finish is the organizational aesthetic choice — it reads as intentional and does not show water spotting to the same degree as chrome finishes in hard-water areas.
How to get it: Apply suction cups to clean, dry, non-textured tile only — suction mounts do not adhere reliably to textured stone, rough grout lines, or dirty surfaces. Press each suction cup firmly, twist to lock, and test by pulling the caddy outward with a full product load before trusting it daily. Re-test adhesion every 3 months and clean the suction cups with isopropyl alcohol to restore full vacuum every 6 months.
Shop The Look
| Product |
| Matte black shower caddy suction mount 2 tier |
| Aluminum shower shelf drainage holes wall mount |
| Shower caddy corner mount no drilling |
| Rust proof shower caddy matte black |
| Shower razor holder magnetic wall mount |
15. Hang a Pegboard Panel for Flexible Wall Organization
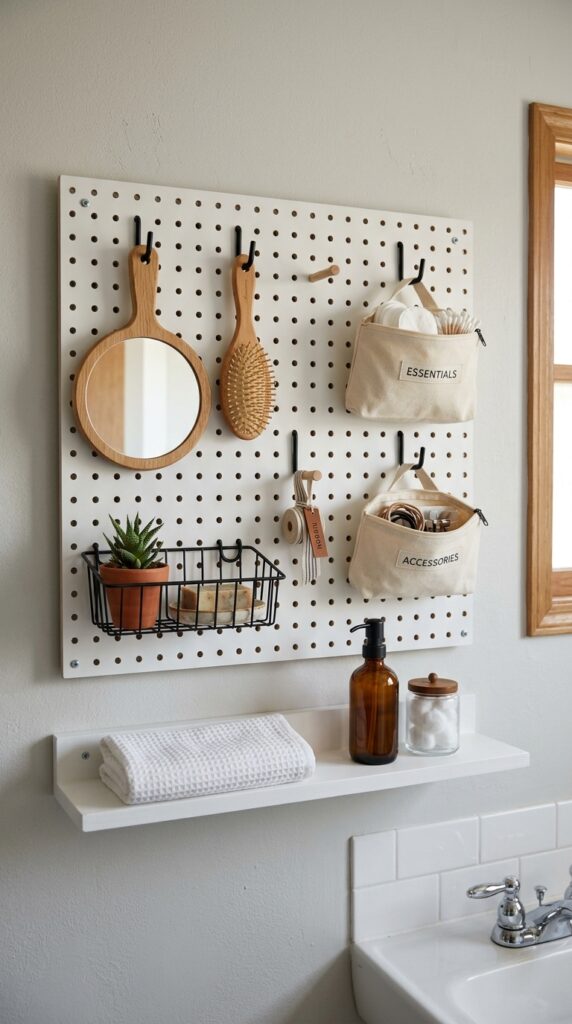
Vibe: Creative and organized — a wall that can be reconfigured every time the routine changes.
Why it works: A pegboard panel is the only wall organization system that is infinitely reconfigurable without tools, wall damage, or new hardware — hooks, baskets, and shelves slide in and out of the 1-inch hole grid in seconds. This adaptability makes it uniquely valuable in a bathroom where storage needs change with seasons, products, and routines. A 24×24-inch pegboard panel provides approximately 576 potential anchor points, giving it the storage flexibility of a custom built-in at a fraction of the cost and with zero permanence. Painting the pegboard the same color as the surrounding wall reduces its visual impact while maintaining full functionality.
How to get it: Mount the pegboard panel on 1/2-inch standoffs between the board and the wall — without standoffs, there is no clearance behind the board for the hook anchors to catch, making the pegboard non-functional. Standoffs also allow the board to breathe, preventing moisture accumulation behind it in a bathroom environment. Use matte black or brass pegboard hardware rather than the default bare metal for a finished appearance.
Shop The Look
| Product |
| White pegboard panel 24×24 bathroom wall organizer |
| Matte black pegboard hook set assorted |
| Pegboard standoff mounting kit 1/2 inch |
| Small wire basket pegboard insert |
| Pegboard shelf bracket matte black |
16. Optimize Mirror Placement to Double Perceived Space
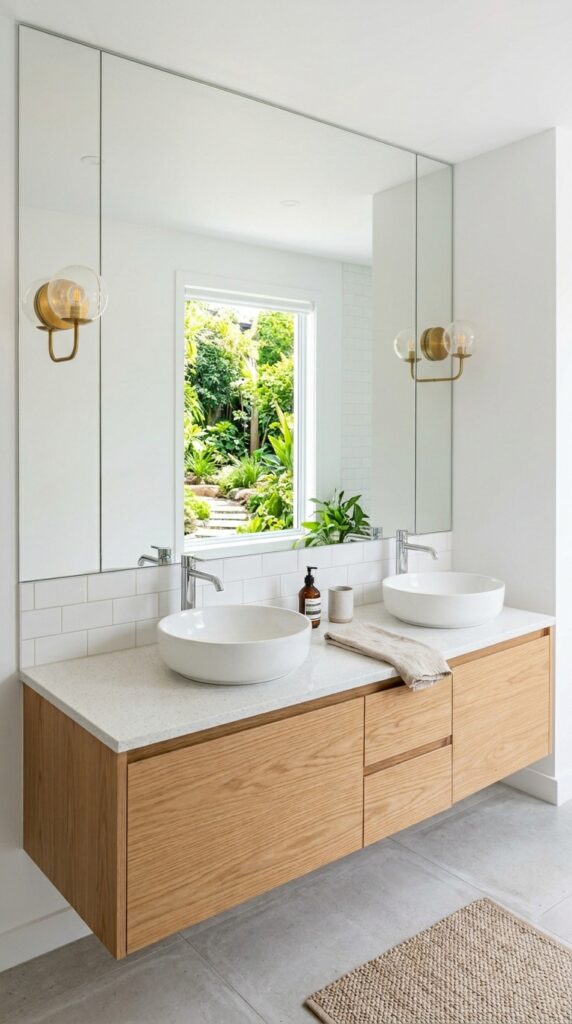
Vibe: Spacious and luminous — a wall that opens the room by pretending to be something else.
Why it works: A full-width mirror — one that spans the entire width of the vanity wall rather than being centered above the sink — creates the visual illusion of a room that continues beyond the mirror’s surface. The absence of a visible frame is critical: a framed mirror presents itself as an object on the wall, which the eye correctly reads as a boundary; a frameless mirror presents itself as a window, which the eye interprets as space. In a bathroom under 50 square feet, a full-width frameless mirror can visually double the apparent floor area by reflecting the opposite wall, window, or garden view — effectively borrowing the perceived depth of whatever is reflected in it.
How to get it: Order a frameless mirror cut to the exact width of the vanity wall (minus 1/4 inch per side for clearance) from a local glass shop — a custom-cut frameless mirror is typically $3–$8 per square foot for standard clear glass, making a 24×36-inch frameless mirror approximately $18–$48, significantly less expensive than a framed mirror of equivalent size. Mount with mirror mastic adhesive and J-channel clips at the base.
Shop The Look
| Product |
| Frameless bathroom mirror large wall mount |
| Mirror mastic adhesive bathroom |
| J-channel mirror mounting clip set |
| Full wall mirror cut to size kit |
| Vanity mirror wall mount frameless 36 inch |
17. Add Corner Shelves to Every Unused Corner
Vibe: Warm and tidy — storage that fits where nothing else does.
Why it works: Corner spaces in small bathrooms occupy the most structurally stable wall intersection available (two walls meeting at 90 degrees) but are almost never used because standard rectangular shelves cannot fit a corner without protruding into the room. Triangular corner shelves fit the corner precisely, project only 9–12 inches from the corner vertex into the room, and provide a mounting surface at the most structurally secure point on any wall — the corner stud. A pair of staggered corner shelves (upper and lower, offset by 12 inches in height) provides the equivalent storage area of a standard single shelf while occupying only the corner volume that previously contributed nothing.
How to get it: Corner shelves must be mounted into the corner stud — the doubled framing member at every interior corner — which provides the most solid anchor point in any wall. Use a level to establish both shelves are perfectly horizontal before marking and drilling; corner walls are frequently slightly out of plumb due to settling, and a visually level shelf reads as intentionally placed rather than casually installed.
💡 Quick Win: A set of two adhesive-mount corner shelves in matte white (available for under $25) installs in under 10 minutes with no drilling — rated for up to 11 lbs per shelf, sufficient for ceramic canisters, plants, and personal care items.
Shop The Look
| Product |
| Corner floating shelf bathroom matte white set of 2 |
| Triangular corner shelf wall mount white |
| Adhesive corner shelf bathroom no drill |
| Small ceramic essential oil diffuser |
| Terracotta mini planter pot bathroom |
18. Hang Hooks at Multiple Heights for Layered Towel Storage
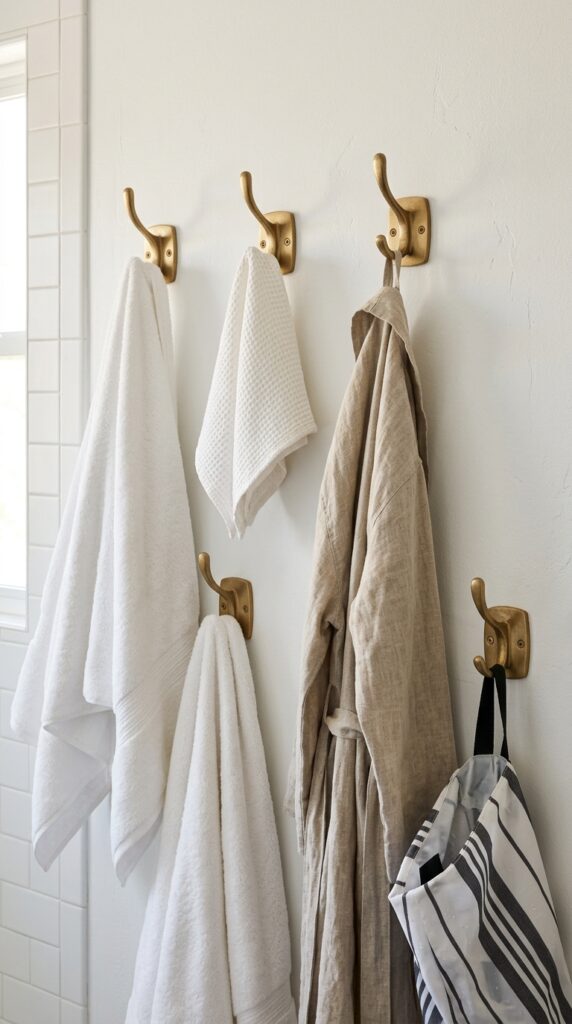
Vibe: Warm and functional — a wall of hooks that makes the bathroom feel like a boutique hotel.
Why it works: Standard towel hook installations position all hooks at a single height — typically 60 inches from the floor — which creates a flat, single-plane storage arrangement where all items hang at the same level and compete visually. Staggering hooks at two heights (60 inches for bath towels and robes, 48 inches for hand towels and wet bags) creates vertical dimension on a flat wall and allows different item types to be distinguished by position rather than by label. The double-prong hook design is the critical specification: double prongs allow a towel to be hung by its loop and its hem simultaneously, presenting a fuller, drier hang than a single prong where the towel folds in half and traps moisture.
How to get it: Mount hooks at stud locations whenever possible — a bath towel with a wet robe can exert 15–20 lbs of pull load on a single hook, which exceeds the capacity of a standard drywall anchor. Space hooks a minimum of 9 inches apart horizontally to allow hanging items to dry without overlapping each other and trapping moisture between them.
Shop The Look
| Product |
| Brushed brass double prong coat hook bathroom |
| Matte black double towel hook wall mount |
| Brushed nickel robe hook heavy duty |
| Hook rail bathroom multi hook bar |
| Decorative wall hook set 5 piece bathroom |
19. Organize the Medicine Cabinet with Tiered Shelf Inserts
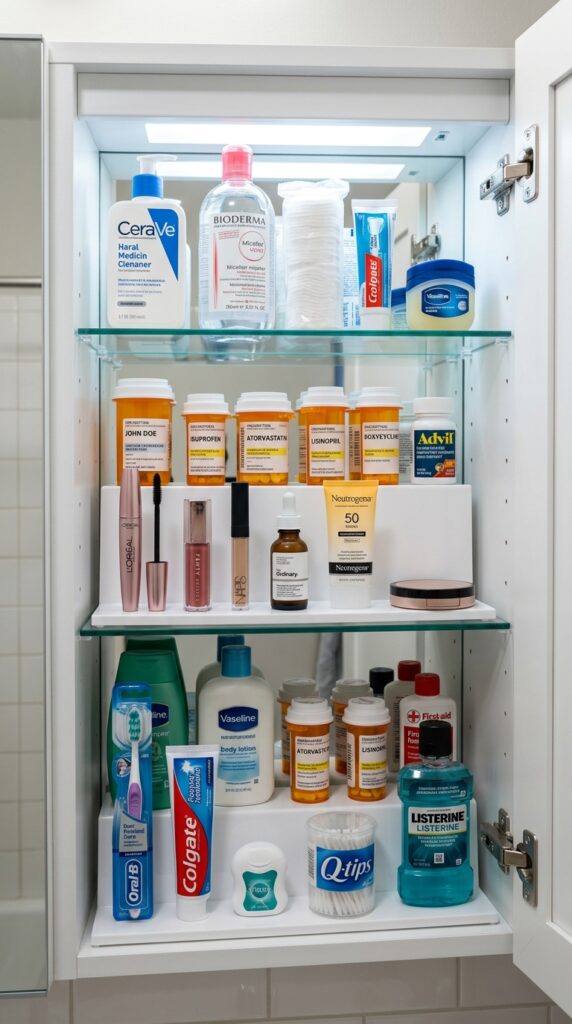
Vibe: Efficient and precise — a medicine cabinet that shows you everything at once.
Why it works: A standard medicine cabinet shelf places items in a single horizontal row at each level, with taller items at the back invisibly blocking shorter items at the front. A tiered shelf riser within each cabinet shelf creates a front row and a back row at different heights — every item is simultaneously visible and accessible without moving anything. This transforms the functional capacity of a 3-shelf medicine cabinet into the equivalent of a 5–6-shelf cabinet within the identical physical volume. The organizational improvement is proportional to the number of small-item categories being stored: medications, vitamins, contact lens supplies, and small cosmetics all benefit from front-and-back visibility.
How to get it: Measure the interior depth and width of the medicine cabinet shelves before purchasing tiered risers — medicine cabinet depths vary significantly between manufacturers, from 3.5 to 6 inches, and a riser that does not fit the depth will either block the door from closing or provide insufficient front-row clearance. Choose acrylic rather than wire risers for bathroom applications — acrylic surfaces wipe clean without rusting and do not trap small items in the wire grid.
Shop The Look
| Product |
| Clear acrylic tiered shelf riser medicine cabinet |
| Medicine cabinet shelf riser organizer white |
| Bathroom medicine cabinet insert organizer |
| Clear acrylic small item organizer tray |
| Medicine cabinet expandable shelf organizer |
20. Use a Shower Niche as a Display and Storage Dual Zone
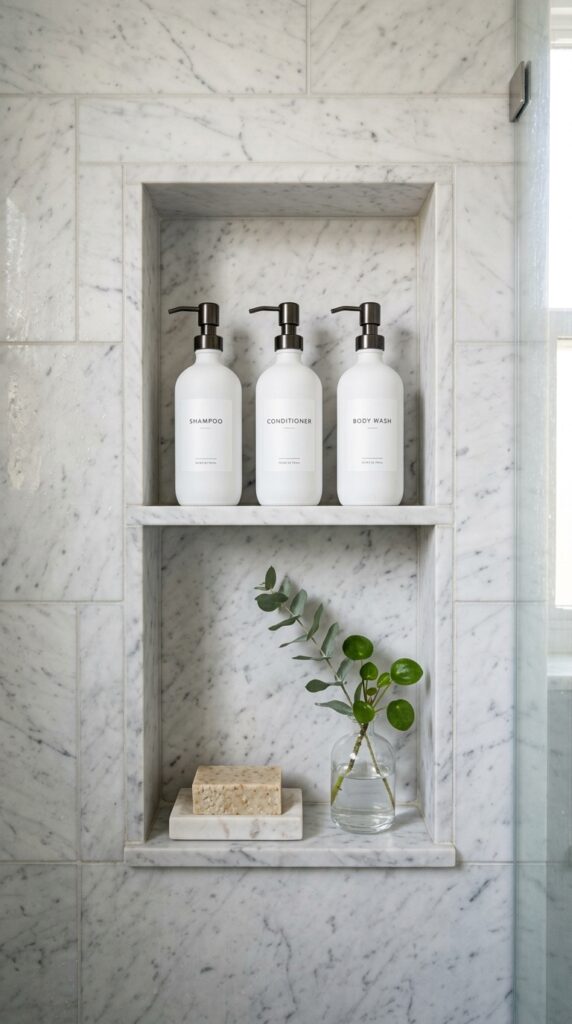
Vibe: Spa-like and organized — a niche that makes the shower feel like a curated experience.
Why it works: A shower niche built into the wall performs its primary storage function — housing shower products at a reachable height without a freestanding caddy — but the design opportunity within the niche extends significantly further. Treating the niche as a dual zone (utility at the top, aesthetic at the bottom) transforms it from a purely functional pocket into a designed vignette that is visible from the bathroom whenever the shower door is open. A small plant cutting in a bud vase at the niche’s lower section is particularly effective: many plant cuttings (pothos, tradescantia, heartleaf philodendron) thrive in the high-humidity, indirect-light conditions of a shower niche and need no soil — just water in the vase itself.
How to get it: Install a niche with a pitched floor — a 2-degree forward slope toward the shower side — so standing water drains toward the shower rather than pooling in the niche and creating mold. Line the niche interior with a single continuous stone slab (Carrara marble, limestone, or travertine cut to size) rather than small tiles, which accumulate grout lines that discolor quickly in a wet shower environment.
Shop The Look
| Product |
| Shower niche insert stainless steel recessed |
| Honed marble shower niche liner slab |
| Glass bud vase small for shower |
| Matching shampoo conditioner bottle set white |
| Shower niche soap ledge marble insert |
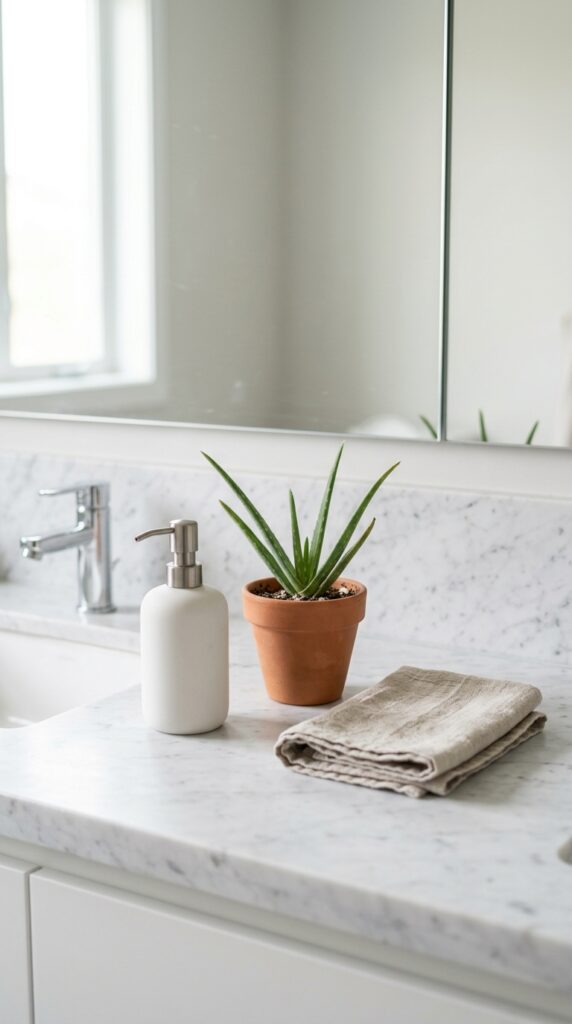
21. Declutter Countertops to Three Items Maximum
Vibe: Serene and spacious — a counter that makes the room feel twice its size.
Why it works: Counter clutter is the primary visual source of perceived smallness in a tiny bathroom — a surface covered with 12–15 products of varying heights, colors, and shapes presents the eye with 12–15 competing focal points simultaneously, which reads as chaotic regardless of how neatly the items are arranged. The three-item rule creates a counter surface where the eye can rest, perceive the actual counter material (marble, stone, or tile), and experience the space as open rather than occupied. The three items should each represent a different scale: one tall (soap dispenser), one low (a small plant), one flat (a folded hand towel) — this height variation creates a composition rather than a lineup.
How to get it: Audit everything currently on the bathroom counter and sort into three categories: items used every single day (keep countertop access), items used several times per week (move to a drawer or cabinet), items used occasionally (move to under-sink storage). In most bathrooms, this audit reduces the counter item count from 15–20 to 4–6, requiring only one additional round of editing to reach three.
💡 Quick Win: Removing every item from the bathroom counter and replacing with only three chosen items takes under five minutes and has the single largest immediate impact on a small bathroom’s perceived spaciousness of any organizational action available.
Shop The Look
| Product |
| Matte white ceramic soap dispenser pump |
| Small aloe vera plant terracotta pot 4 inch |
| Linen hand towel set natural unbleached |
| Marble tray counter organizer small |
| White ceramic toothbrush holder countertop |
22. Install a Recessed Toilet Paper Holder with a Shelf Above
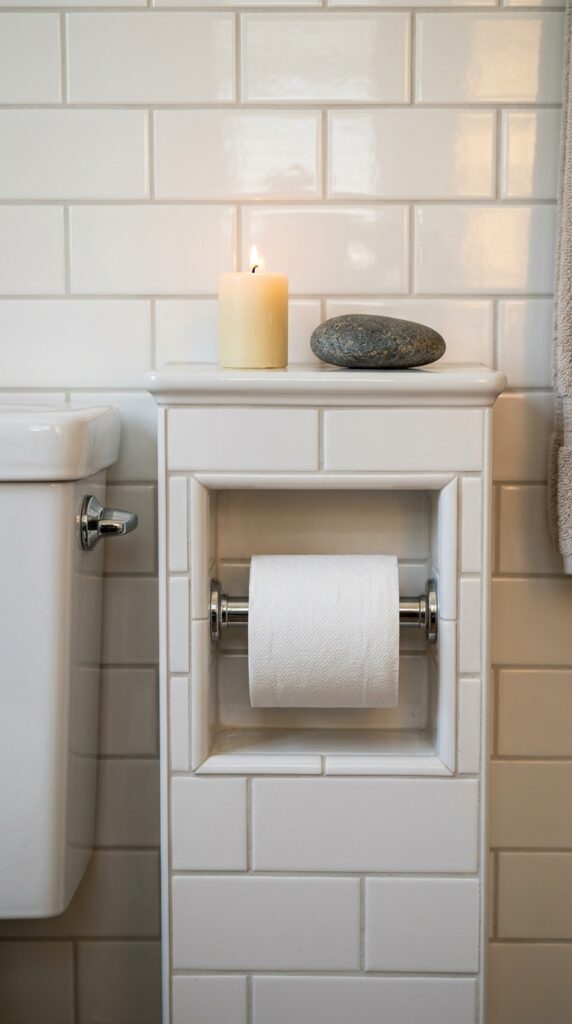
Vibe: Considered and clean — a detail that makes the wall work harder.
Why it works: A standard toilet paper holder projects 3–5 inches from the wall into a bathroom where every inch of clearance matters — between the toilet and a wall or vanity, this projection can create a physical pinch point that makes the toilet zone feel cramped. A recessed toilet paper holder occupies the wall cavity and presents a flush face to the room, recovering the 3–5 inch projection into usable clearance space. The integral shelf above the recessed unit adds a small display or utility surface — sufficient for a single candle, a small plant, or a spare roll — without requiring any additional wall hardware or shelf installation.
How to get it: Recessed toilet paper holders require a wall cavity of at least 3.5 inches — standard stud-framed walls provide this. Position the unit with its center at 26 inches from the finished floor (the ADA-compliant height that also happens to be the most ergonomically natural reach position from seated) and centered at 8–12 inches from the front of the toilet to the side wall.
Shop The Look
| Product |
| Recessed toilet paper holder with shelf chrome |
| Recessed wall mount toilet paper holder matte black |
| Small pillar candle set unscented ivory |
| Smooth river stone decorative gray |
| Recessed toilet paper holder brushed nickel |
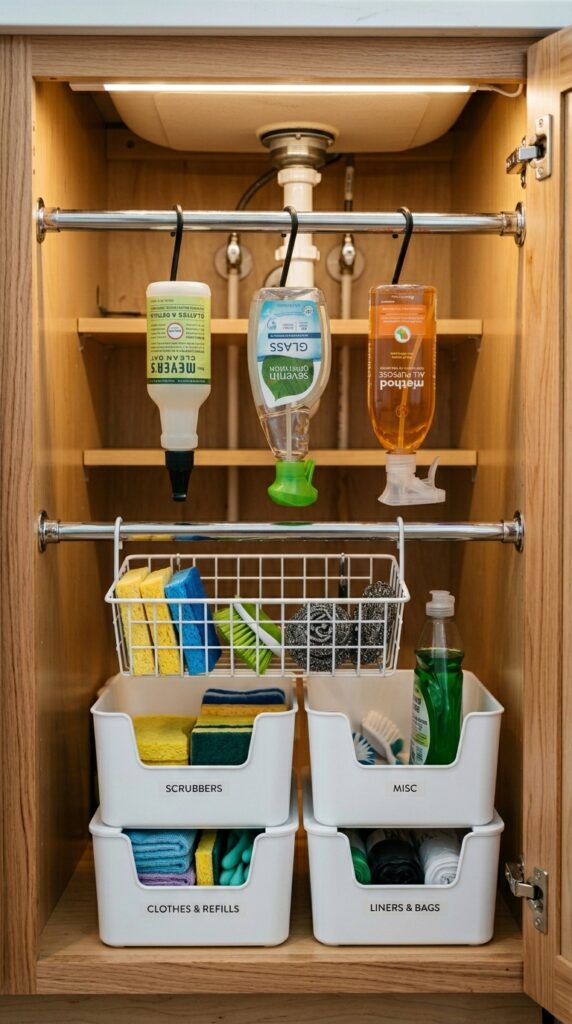
23. Use Stackable Clear Bins Inside Every Cabinet
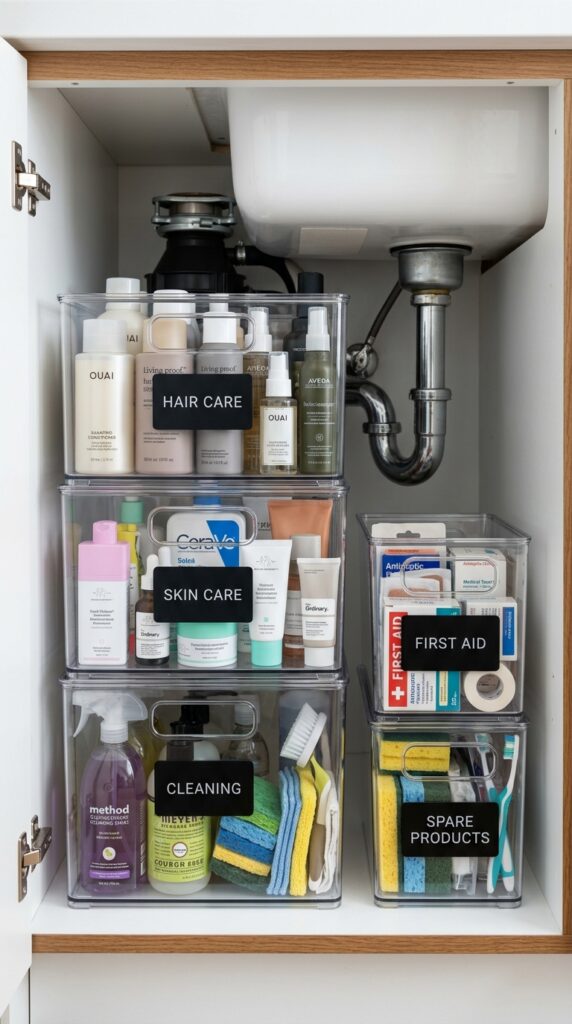
Vibe: Precise and calm — a cabinet that knows where everything is even when you have forgotten.
Why it works: Open-front stackable bins are the most effective under-sink cabinet organizer for a specific reason: they allow the bin to be pulled out like a drawer rather than requiring you to reach to the back of the cabinet, which is the fundamental access problem with cabinet storage in tight spaces. Stacking bins vertically doubles the storage capacity of a cabinet interior by using the full height of the cabinet rather than only the floor level. Clear bins are the correct specification for bathroom product storage: the contents are visible without opening or labeling, which eliminates the search behavior that makes disorganized storage frustrating to use.
How to get it: Measure cabinet interior height, width, and depth before purchasing stackable bins — the most common organization error is purchasing bins that don’t stack cleanly in the available height or that don’t pull out fully without catching on the cabinet frame. Leave 1/2 inch of clearance between the top of the stack and the cabinet shelf above for comfortable bin removal.
Shop The Look
| Product |
| Clear stackable open-front bins under sink set |
| Clear acrylic pull-out cabinet organizer bin |
| Under sink stackable organizer clear 3 piece |
| Matte black label holder set cabinet |
| Clear bin cabinet organizer bathroom set of 6 |
24. Create a Unified Color Scheme for All Visible Accessories
Vibe: Cohesive and calm — a bathroom where every detail agrees with every other detail.
Why it works: In a tiny bathroom where every surface, fixture, and accessory is visible simultaneously from any point in the room, visual coherence between accessories has an outsized impact on the perceived quality and spaciousness of the space. Mixed metal finishes — chrome soap dispenser, brushed nickel towel ring, polished brass toilet paper holder — create low-grade visual noise that reads as incomplete even when everything is technically organized and clean. Committing to a single hardware finish (brushed brass, matte black, or brushed nickel) and a single textile color (warm white or natural linen) eliminates this noise entirely, allowing the eye to read the space as a cohesive whole rather than a collection of individually chosen pieces.
How to get it: Replace hardware accessories one at a time rather than all at once — starting with the most visible piece (the towel ring or soap dispenser) and progressively unifying the hardware finish over 6–12 months distributes the cost without requiring a single large purchase. Even replacing 60% of hardware to a single finish creates a dramatic improvement in perceived cohesion.
💡 Quick Win: A matching three-piece brushed brass bathroom accessory set (soap dispenser, toothbrush holder, and cotton ball jar) costs $35–$65 and unifies the most visible counter zone in a single purchase — the fastest route to accessory cohesion in any small bathroom.
Shop The Look
| Product |
| Brushed brass bathroom accessory set 3 piece |
| Matte black bathroom accessory set complete |
| Brushed nickel bathroom hardware set 5 piece |
| White cotton waffle hand towel set |
| Brushed brass towel ring wall mount |
How to Start Your Tiny Bathroom Organization Transformation
The single most effective first move is clearing every item off the vanity counter and placing them all in a box outside the bathroom. Then return only the items used every single day — not every week, not occasionally, every single day. In most bathrooms, this reduces the counter population from 15–20 items to 3–5. Everything that doesn’t make it back to the counter goes into a drawer, cabinet, or under-sink bin with a specific designated location. This one edit, before purchasing a single organizer or installing a single hook, delivers the largest immediate improvement in perceived space and organization of any action in this guide.
The most common mistake is buying organization products before auditing what needs to be organized. The result is a collection of baskets, bins, and dividers purchased in the optimistic belief that more containers equal more organization — which is the opposite of the truth. The fix is a full bathroom audit first: remove everything, categorize what remains (daily use, weekly use, occasional use, expired/unused), and only then identify the specific storage gaps that products need to fill. Buying a bin for a specific defined purpose is entirely different from buying a bin in the hope that it will organize something.
Three specific items under $50 for immediate tiny bathroom impact: a set of two large seagrass baskets for under-vanity towel storage ($22 each), a five-piece matching brushed brass counter accessory set to unify the vanity zone ($45–$65), and a tension rod for the under-sink cabinet with four S-hooks for hanging spray bottles ($12 combined).
Realistically, a complete tiny bathroom organization overhaul — new under-sink bins, drawer dividers, counter accessories, towel storage, and shower caddy — costs $150–$400 in products and can be completed in a single weekend. More significant upgrades involving a recessed mirror cabinet, floating vanity, or recessed niche require contractor involvement and run $600–$3,000, staged over 4–8 weeks depending on permitting and contractor availability. The counter-clear and basket-placement approach achieves 70% of the visual improvement for under $50 and under two hours.
Frequently Asked Questions About Tiny Bathroom Organization
What is the most important rule for organizing a tiny bathroom?
The most important rule is to prioritize vertical storage over horizontal storage in every decision. Floor space in a tiny bathroom is finite and cannot be expanded; wall space above the standard 60-inch horizon line is almost always underutilized and available for shelves, hooks, pegboards, and cabinet door organizers. Before purchasing any organization product, ask whether it removes something from a horizontal surface and places it on a vertical one — if yes, it is the correct direction. Specifically, mounting shelves above the toilet (a zone that adds 3–5 square feet of shelf space to most bathrooms), using the inside of cabinet doors, and installing floating vanities that free the floor below are the three vertical-thinking moves with the highest return in a bathroom under 50 square feet.
What storage solutions work best for a rented bathroom with no drilling allowed?
The best no-drill storage solutions for rented bathrooms are tension rods (for under-sink hanging storage and shower caddies), suction-mount shower caddies rated for at least 10 lbs, adhesive-mount corner shelves with removable strips, over-door organizers, and freestanding ladder shelves and rolling carts. Command Brand removable adhesive strips rated for 5–16 lbs handle most bathroom hook and small shelf applications without damaging paint or tile. The combination of an over-toilet freestanding shelf unit ($45–$85), a slim rolling cart for the toilet gap ($35–$65), and a tension rod under-sink organizer ($12) covers the three most critical storage zones in a rental bathroom for under $175 with zero wall damage.
How do you make a tiny bathroom look bigger through organization?
Three organizational choices have the most significant impact on perceived size: first, clear the countertop to three items maximum — a cluttered counter is the primary visual source of smallness regardless of the room’s actual dimensions. Second, install a full-width frameless mirror that spans the vanity wall completely — a frameless mirror that reflects the opposite wall, window, or garden view visually doubles the apparent depth of the room. Third, use a single color for all visible textiles (warm white or natural linen) and a single metal finish for all hardware (brushed brass or matte black) — visual coherence between accessories reduces the number of competing focal points the eye must process, which makes the room read as calmer and more spacious.
How much does a complete tiny bathroom organization overhaul cost?
A purely product-based organization overhaul — new drawer dividers, under-sink bins, shower caddy, towel storage, counter accessories, and door organizers — costs $150–$400 for a complete small bathroom treatment and requires no professional installation. Mid-level upgrades adding a floating ladder shelf, pegboard, and matching accessory set in a premium finish run $400–$700. Structural upgrades — a recessed mirror cabinet ($200–$600 for the unit plus $300–$800 installation), a floating vanity ($400–$1,200 plus installation), or a built-in shower niche ($200–$600 in materials plus tiling labor) — run $600–$3,000 per element and require a licensed contractor in most jurisdictions. The 80/20 rule applies reliably: 80% of the organizational improvement comes from the $150 product-based approach; the remaining 20% requires structural intervention.
What are the best containers for decanting bathroom products?
The best containers for decanting bathroom products combine three properties: a tight-sealing lid to prevent evaporation of liquid products, a smooth interior surface that allows full dispensing without residue accumulation, and material resistance to the humidity and temperature fluctuations of a bathroom environment. Matte white ceramic canisters with bamboo push-fit lids are the best all-purpose option: the ceramic is non-porous, the bamboo lid seals adequately for dry and semi-dry products, and the matte finish does not show water spotting. For liquid products (shampoo, conditioner, body wash), a pump-top glass or ceramic dispenser with a silicone pump seal is the most reliable decanting format — look for a pump mechanism with a lock-down position to prevent accidental dispensing. Clear glass apothecary jars with cork lids are ideal for cotton balls, cotton swabs, and bath salts; they provide visual transparency while keeping contents dry and contained.
Ready to Create Your Dream Tiny Bathroom Organization System?
These 24 tips span the full range of what tiny bathroom organization can accomplish — from the structural clarity of a floating vanity and a full-width frameless mirror, to the precise daily-use logic of drawer dividers, decanted containers, and a three-item counter rule. Every organized bathroom begins with a single edit rather than a single purchase: clear one surface completely, return only what belongs there daily, and experience the immediate spatial relief of negative space working in your favor. Today, take everything off your bathroom counter, place it in a box, and spend three minutes deciding what comes back — because that three-minute decision will change how the bathroom feels every morning from this point forward. When a tiny bathroom is well organized, it delivers the particular satisfaction of a space that is exactly sufficient — nothing missing, nothing excess, every inch accounted for and earning its place. Pin the ideas that made you want to immediately go reorganize something — especially the ones involving vertical storage, unified finishes, and the therapeutic simplicity of three items on a clean counter — because those are the habits that hold up long after the motivation of a fresh organizing session has faded.