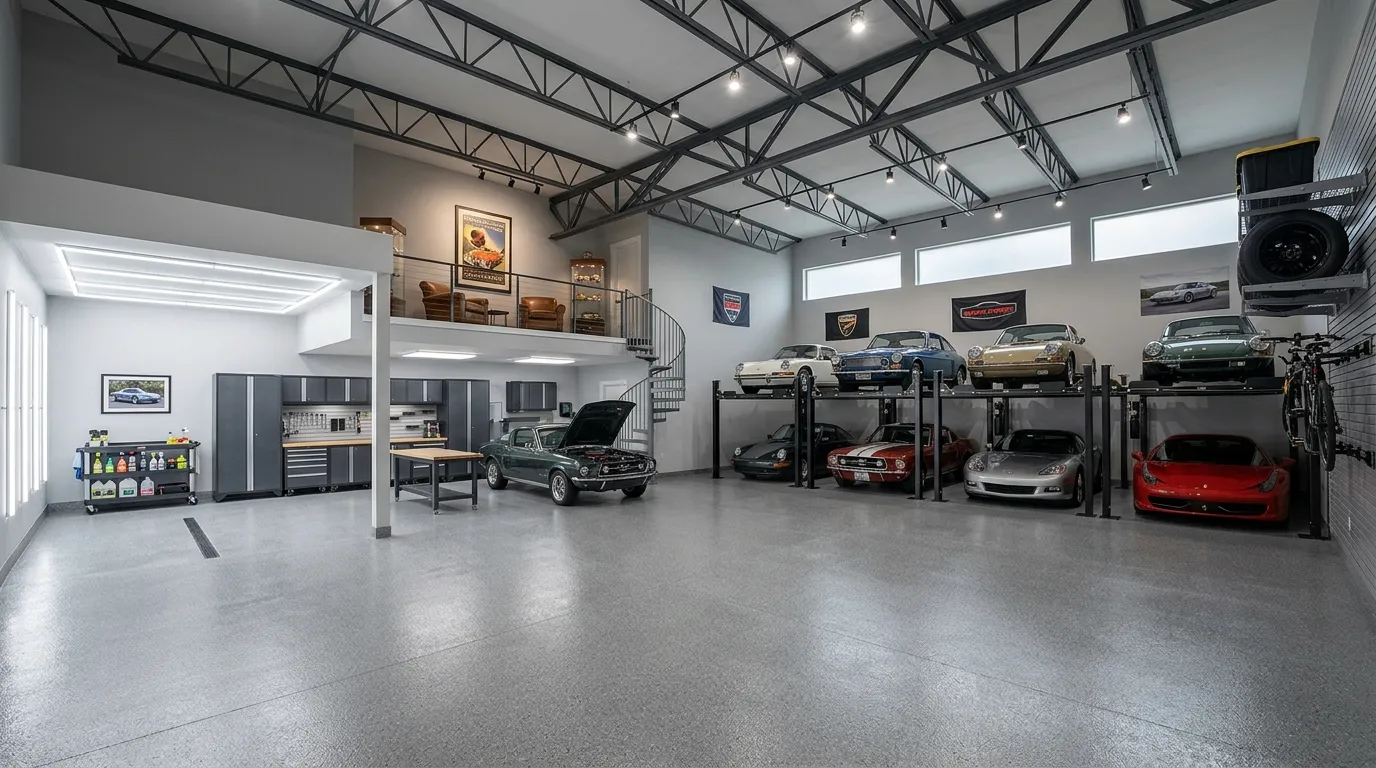
A car garage design is the deliberate organization of a working space — one that balances vehicle storage, tool access, workshop function, and everyday livability within a single concrete-floored footprint. These 24 car garage design ideas cover floor treatments, cabinet systems, lighting strategies, layout planning, storage solutions, and small-space adaptations — with specific, actionable techniques for every budget.
A well-designed garage doesn’t feel like a storage unit with a car in it. It feels like a room that knows what it’s for — clean lines on the floor, every tool exactly where your hand expects it, lighting that makes work feel possible rather than provisional. It’s the space where ambition and organization finally occupy the same square footage. Here are 24 ideas worth saving — and stealing.
Why Car Garage Design Works So Well
Car garage design as a dedicated discipline emerged from the hot rod and custom car culture of 1950s California, where enthusiasts began treating their garage spaces with the same intentionality they applied to their vehicles — organized, purposeful, visually considered. Over the following decades the practice broadened from enthusiast culture into mainstream home improvement, reaching its current form as a hybrid between workshop design, residential storage architecture, and home extension space. What distinguishes a genuinely designed garage from a standard one is the same thing that distinguishes any well-considered room: every element has an assigned position and a reason for being there.
The core material palette for car garage design runs from polished or epoxy-coated concrete floors in slate gray, charcoal, or warm white to steel and powder-coated aluminum in cabinet systems, slatwall panels, and pegboard. Flooring materials include interlocking rubber or PVC tiles, quartz-broadcast epoxy, and diamond-plate steel accents at workbench bases. Wall systems favor steel slatwall and plywood backer panels for their load-bearing capacity. Hardware finishes trend toward matte black, brushed nickel, and industrial zinc — finishes that hold up under grease and dust without showing wear.
The car garage design movement accelerated sharply post-2020, when the shift to remote work transformed garages from vehicle storage into full-time home office, workshop, gym, and creative studio spaces. Pinterest searches for “garage organization” and “garage workshop” increased over 220% between 2020 and 2023 — tracking directly to the reality that millions of households were renegotiating how their garage square footage served daily life. The detached or attached garage became the most flexible room in the house: its hard surfaces, height, and separation from living quarters made it uniquely adaptable.
Even a standard single-car garage (12×22 feet) achieves full car garage design impact when vertical space is fully utilized from floor to ceiling. The critical first decision in a constrained footprint is always the floor plan: park the car, then design around the clearances. Minimum 24 inches of side clearance from the vehicle to any fixed storage wall allows comfortable door opening. Everything above 7 feet of ceiling height is bonus storage space most garages currently waste entirely.
Style at a Glance
| Element | Functional Core | Design Finish |
| Philosophy | Every item has a system | Every surface is intentional |
| Materials | Epoxy concrete, steel slatwall, powder-coat aluminum | Matte black hardware, rubber tile, plywood backer |
| Color Palette | Slate gray, warm white, charcoal | Navy accent, brushed nickel, industrial zinc |
24 Car Garage Design Ideas
1. Crisp White Walls + Slate Gray Epoxy Floor Palette
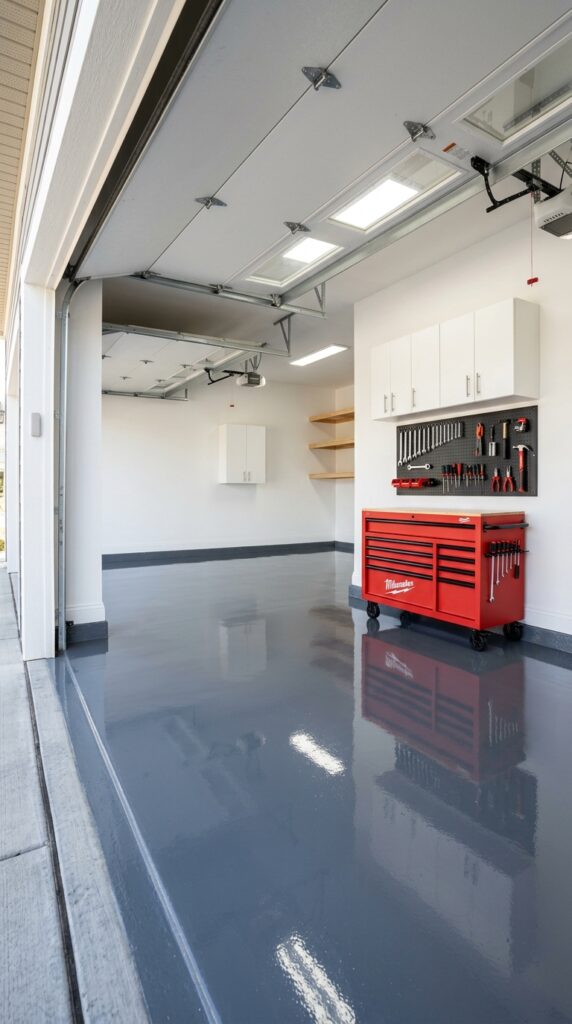
Vibe: Clean — the organized authority of a garage that takes itself seriously.
Why it works: The white wall and slate gray floor pairing is the single most effective foundational palette in car garage design because it maximizes light reflection from every surface — white walls return approximately 85% of light back into the space, and a high-gloss epoxy floor acts as a secondary reflective surface that bounces that light back upward. The result is a garage that reads as significantly brighter and larger than its actual dimensions. Slate gray floor (rather than pure charcoal) is the correct tone: dark enough to hide oil drips and tire marks, light enough to prevent the floor from absorbing the wall’s reflected brightness.
How to get it: Apply a water-based epoxy floor coating system in two-part format — primer coat, broadcast coat with quartz chips if desired, and a clear topcoat sealer. The quartz broadcast hides surface imperfections and adds slip resistance simultaneously. For walls, use an exterior-grade semi-gloss latex in pure white — the semi-gloss finish resists grease smear and wipes clean without affecting the sheen, unlike flat paint which absorbs stains permanently.
💡 Quick Win: A single quart of semi-gloss white applied to just the wall behind your main workbench immediately shows you how dramatically the palette shift affects the perceived brightness — test one wall before committing to the full space.
Shop The Look
| Product |
| Slate gray two-part epoxy garage floor coating kit |
| Semi-gloss white interior exterior wall paint gallon |
| Quartz chip broadcast for epoxy floor anti-slip |
| Matte black pegboard kit with assorted hooks |
| Garage floor squeegee applicator kit epoxy |
2. Polished Epoxy Floor with Full-Flake Quartz Broadcast
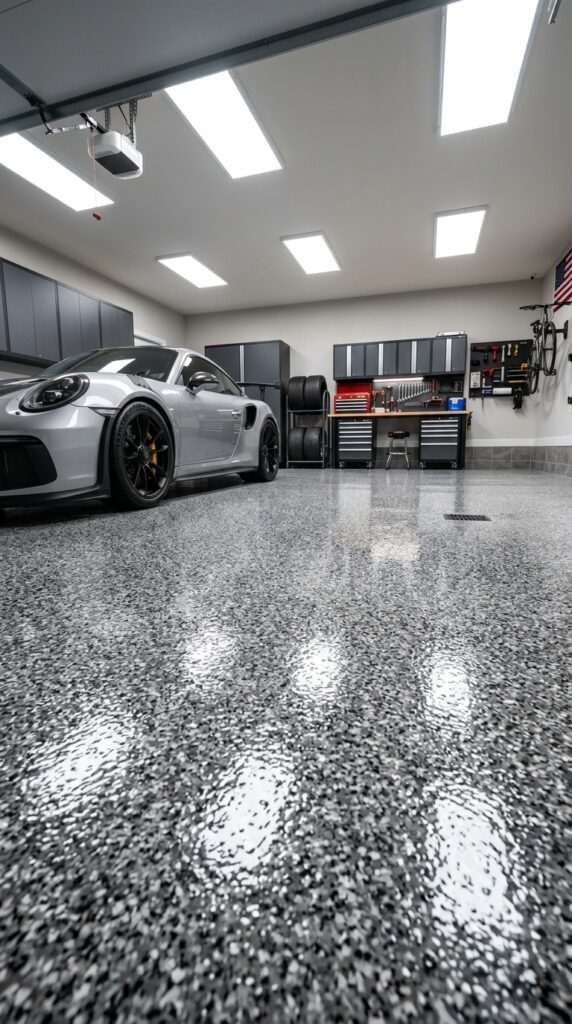
Vibe: Showroom — the floor that makes a garage feel like the car belongs there by choice.
Why it works: Full-flake quartz broadcast epoxy — where colored chips are scattered at 100% density across the entire floor before the topcoat is applied — creates the most durable and visually sophisticated car garage floor available at the residential scale. The full chip density completely conceals the original concrete slab beneath it, meaning surface cracks, discoloration, and patched areas become entirely invisible. The multicolor chip blend (typically a gray-white-black or tan-brown-cream combination) breaks up the floor’s tonal uniformity in a way that hides fresh drips and dried tire marks equally well throughout the floor’s lifetime.
How to get it: The full-flake system requires three distinct applications: the colored base coat (usually a gray pigmented epoxy), the flake broadcast at wet-stage saturation, and a double clear urethane topcoat after scraping the loose chips. Professional application runs $4–7 per square foot for a two-car garage; a high-quality DIY kit runs $180–350 and achieves comparable results with proper surface preparation — the most common failure is insufficient acid etching before the first coat.
Shop The Look
| Product |
| Full flake epoxy floor kit garage multicolor chip broadcast |
| Concrete etching solution acid prep before epoxy |
| Urethane clear topcoat floor sealer garage epoxy |
| Chip scraper floor tool plastic garage epoxy |
| Garage floor squeegee roller applicator set |
3. LED Shop Light Grid for Full Workshop Illumination
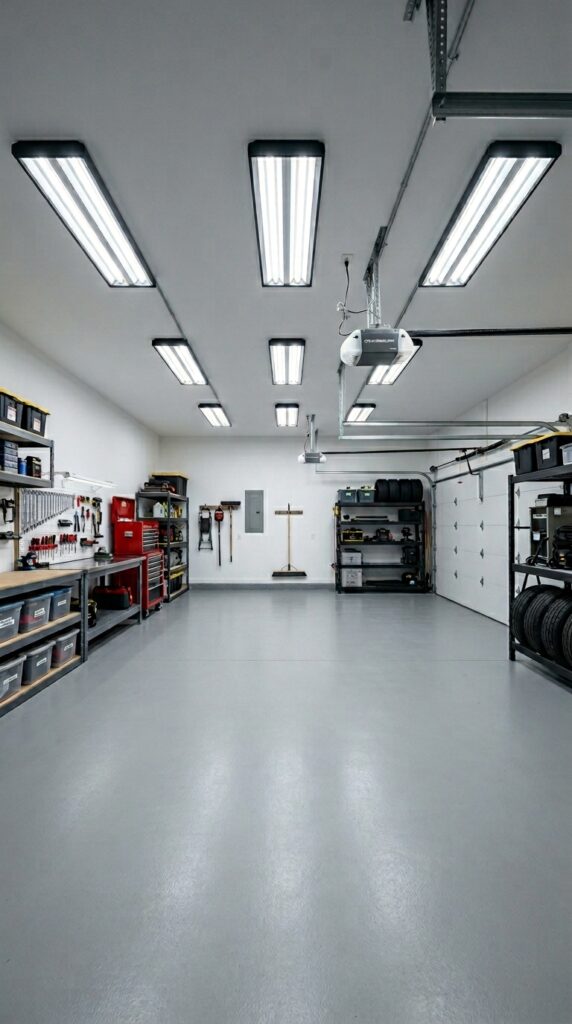
Vibe: Purposeful — the bright clarity of a space that refuses to hide any detail.
Why it works: The standard builder-installed garage light — a single 60-watt incandescent or basic fluorescent fixture — illuminates roughly 40% of a two-car garage at adequate working brightness, leaving all four corners and the workbench zone in insufficient task light. A gridded LED shop light system addresses this through zone coverage planning: two rows of three 4-foot, 5000K LED fixtures provide approximately 20,000 combined lumens across a 20×20-foot garage, meeting the 50-foot-candle minimum for workshop tasks at every point on the floor. The 5000K color temperature renders paint colors, oil leaks, and part finishes accurately — the daylight-equivalent spectrum is the correct choice for diagnostic work.
How to get it: Daisy-chain LED shop light fixtures using their built-in linking connectors — up to six units per circuit from a single power connection, eliminating the need for individual wiring runs to each fixture. Mount at 8–10 feet above the floor for maximum spread; fixtures mounted at ceiling height in a standard 8-foot garage produce uneven light with brighter centers and darker edges.
Shop The Look
| Product |
| 4-foot LED shop light 5000K linkable garage 6500 lumen |
| Ceiling mount hook kit for shop light hanging |
| Extension cord shop light linking cable set |
| LED motion sensor add-on for shop light activation |
| Garage ceiling light mounting bracket adjustable |
4. Wall-Mounted Steel Workbench with Lower Shelf
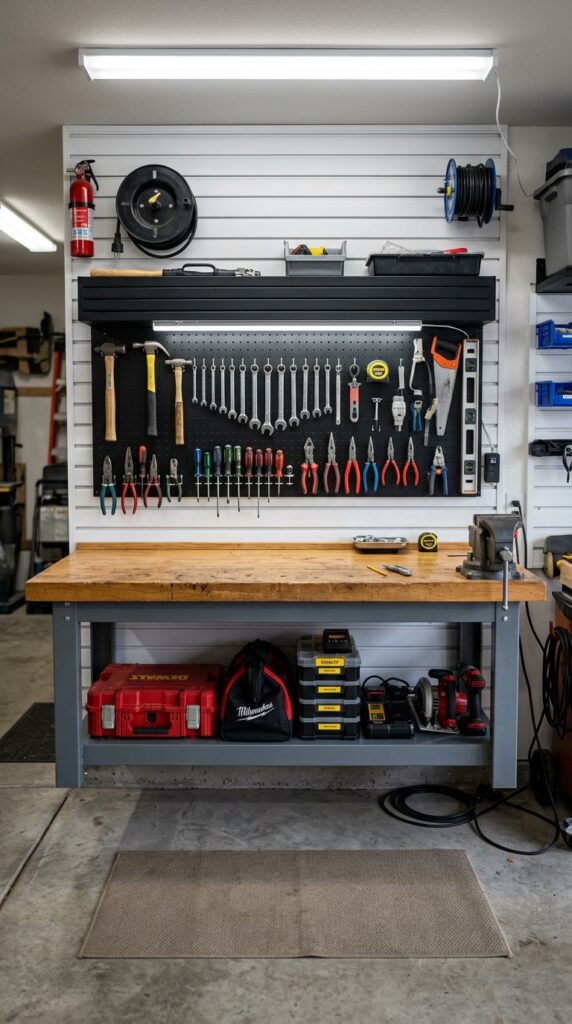
Vibe: Purposeful — the anchor of every serious garage, fixed and ready.
Why it works: A wall-mounted workbench — supported by steel brackets bolted directly into wall studs rather than by freestanding legs — keeps the floor beneath it completely clear. This floor clearance is the primary functional advantage: garages accumulate debris and liquid at floor level, and a clear floor beneath the bench is sweepable, washable, and doesn’t trap oil or grit in corners created by fixed legs. Steel tubular brackets at 24-inch spacing support a minimum 400-pound distributed load on the bench top — sufficient for automotive work, press operations, and stored equipment simultaneously. A hardwood bench top (1.5-inch solid maple or Douglas fir) provides the correct combination of hardness and workability: harder than a pine top, softer than steel, allowing vise mounting, clamping, and surface marking without damage to tools.
How to get it: Mount wall brackets into wall studs — not drywall anchors — at 24-inch spacing for structural integrity. Specify 34-inch finished height for a standing work surface that aligns with most people’s elbow height when arms are at the side; this prevents back strain during extended work sessions.
Shop The Look
| Product |
| Wall-mounted steel workbench bracket kit heavy duty |
| Solid maple butcher block workbench top 72 inch |
| Steel lower shelf bracket kit workbench |
| Under-cabinet LED task light plug-in strip |
| Heavy-duty bench vise swivel jaw 4 inch |
5. Pegboard Tool Organization Wall System
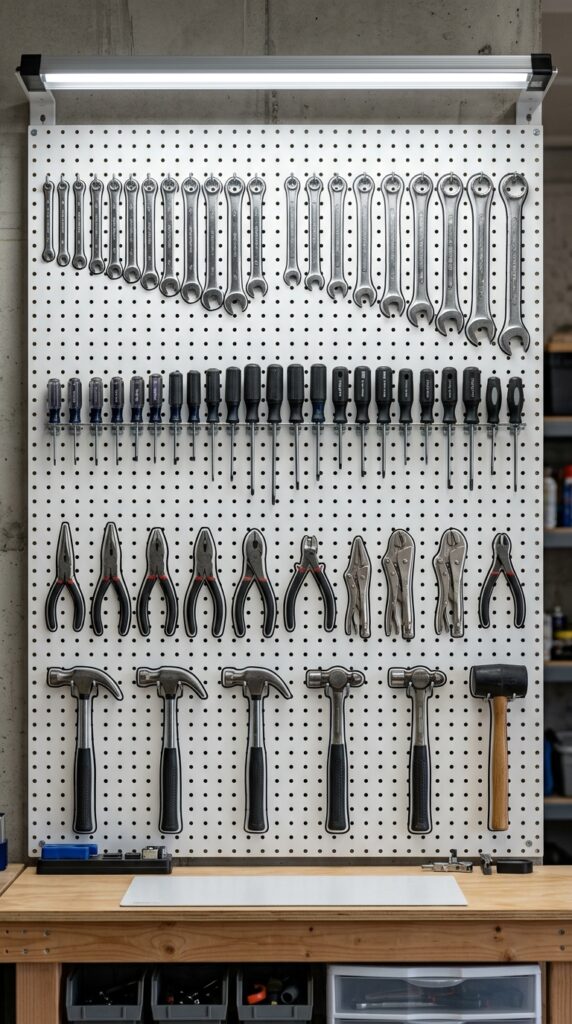
Vibe: Organized — the satisfaction of a system that makes every tool findable in the dark.
Why it works: Pegboard with shadow boarding — tracing the outline of each tool’s position directly onto the board in black marker — converts a passive storage surface into an active inventory system. The outline immediately shows which tool is missing, eliminating the search process that costs time on every project. The 1/4-inch hole pattern of standard pegboard accepts hooks in over 40 different configurations, allowing customization to any tool size from a needle-nose plier to a circular saw. Mounting the board on 1/2-inch standoff spacers rather than flush to the wall provides the clearance needed for standard hook depth — without this standoff, hooks tilt outward and tools fall.
How to get it: Cut 1/2-inch plywood backing panels and mount them between studs first — then screw the pegboard face directly to the plywood. This creates a solid substrate that accepts hooks at any position, not just at stud locations. Use metal hooks only — plastic pegboard hooks flex under heavier tools and fail unpredictably.
💡 Quick Win: A 2×4-foot pegboard section with a starter hook kit ($25–40) above an existing workbench organizes hand tools immediately and demonstrates the shadow-board method before committing to a full wall.
Shop The Look
| Product |
| White pegboard panel 4×8 foot matte finish |
| Metal pegboard hook assortment kit 50 piece |
| Pegboard standoff spacer mounting kit 1/2 inch |
| Pegboard bin set plastic small parts garage |
| Black paint marker fine tip shadow board outlines |
6. Defined Three-Zone Garage Layout: Park, Work, Store
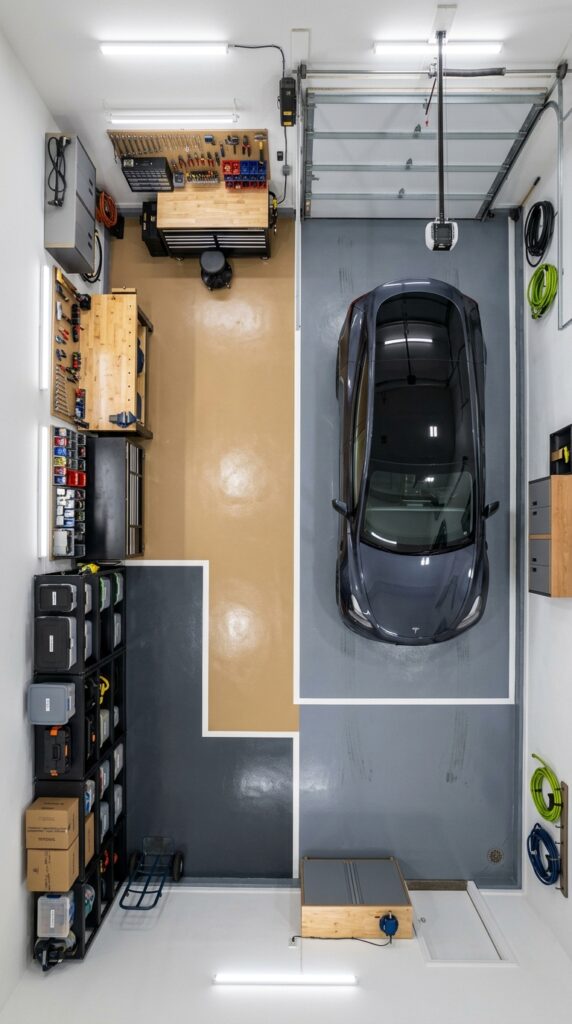
Vibe: Architectural — a room that solved itself before anything went into it.
Why it works: Zone-defining a garage through floor color variation or painted lines applies the same design principle used in open-plan loft design: implied boundaries create psychological zone identities without physical partition. In a two-car garage, the standard layout wastes the rear 6–8 feet behind the parked cars — this area, often occupied by random stacks, is the natural workshop zone when properly defined with its own flooring treatment, dedicated lighting, and fixed workbench. Separating the parking zone (front two-thirds) from the work zone (rear third) also prevents car exhaust contamination of tool storage and projects left on the bench.
How to get it: Mark zone boundaries using 2-inch-wide contrasting epoxy tape before applying floor coating — the tape creates a clean edge where two epoxy colors meet. Alternatively, a 4-inch painted floor line in a contrasting color creates the zone boundary at minimal cost. The parking zone boundary should align with the rear bumper position of the parked vehicle, with a minimum 18-inch buffer.
Shop The Look
| Product |
| Contrasting epoxy floor stripe kit garage zone marking |
| Floor zone marking tape heavy duty vinyl 2 inch |
| Garage zone divider mat parking car stop set |
| Overhead zone light separate circuit switch kit |
| Garage floor plan layout template kit |
7. Charcoal Gray Cabinets + Matte Black Hardware Palette
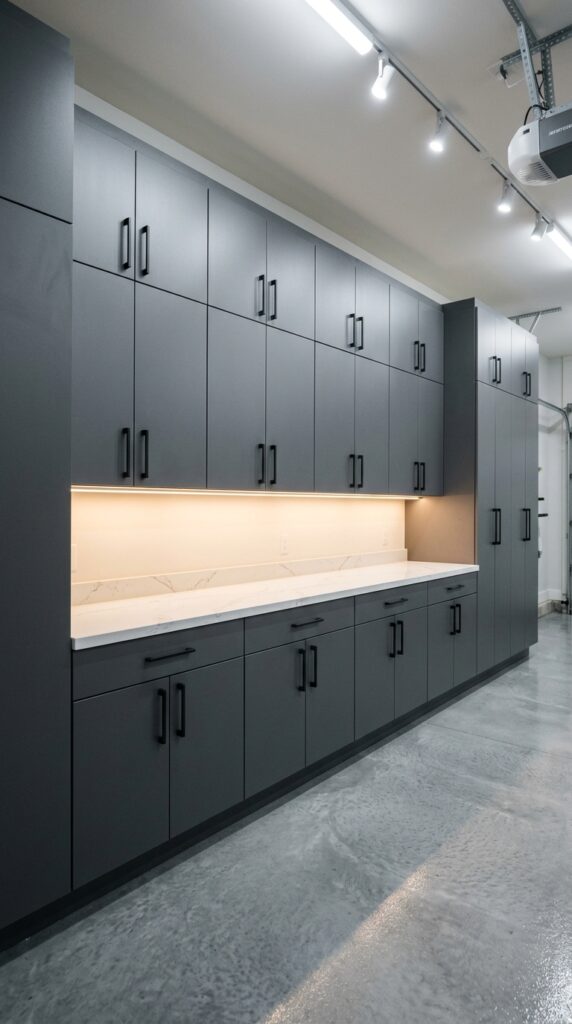
Vibe: Considered — a garage that made deliberate decisions about what it wanted to be.
Why it works: Charcoal gray cabinetry in a garage applies the same visual principle as dark kitchen cabinetry: the deep tone recedes visually, making the cabinet wall read as a continuous mass rather than individual units, which creates a more resolved, architectural appearance than mismatched storage. Matte black bar pulls (5-inch or 8-inch length) add graphic consistency across the full wall without adding visual complexity. The critical specification detail is a powder-coat finish on the cabinet face — not paint, which chips under the regular contact and impact that garage cabinet doors receive. Two-part powder coat adds 1–2mm of protective thickness and withstands chemical splash from cleaning products.
How to get it: Specify charcoal gray cabinets with a powder-coat or thermofoil face for durability — not painted MDF, which swells and peels in garages with temperature fluctuation. Mount the base cabinet run at 36 inches finished height for a standard work surface. Install upper cabinets beginning at 54 inches from the floor to allow 18 inches of backsplash or pegboard between the countertop and upper cabinet base — this is the correct proportion for wall-to-work-surface ergonomics.
Shop The Look
| Product |
| Charcoal gray garage cabinet system wall and base set |
| Matte black bar pull cabinet handle 8 inch set of 10 |
| White quartz look laminate countertop sheet |
| Powder coat touch-up paint spray charcoal gray |
| Cabinet door bumper pad adhesive set clear |
8. Steel Slatwall Panel Storage System
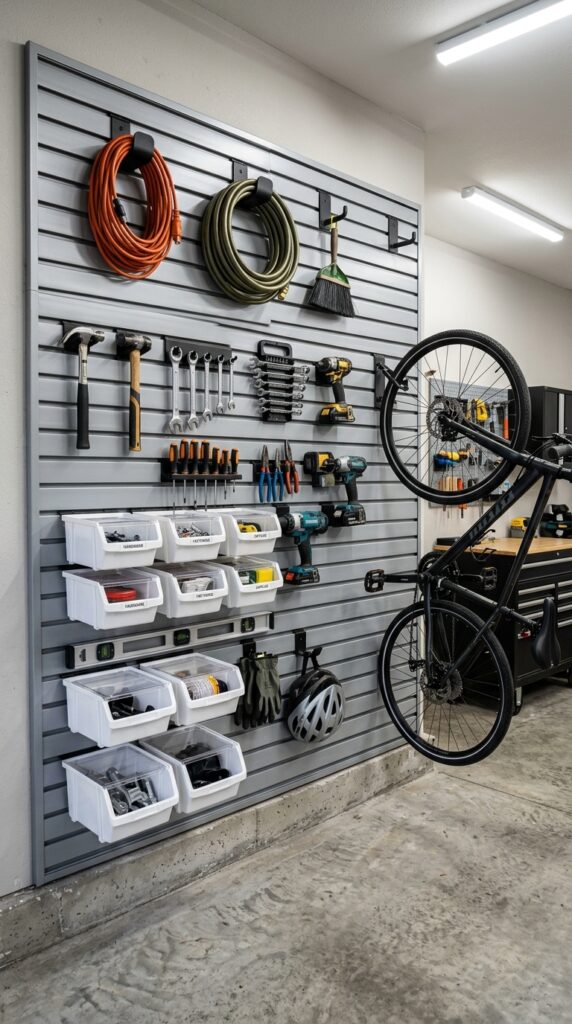
Vibe: Industrial — storage that looks like it means business because it does.
Why it works: Steel slatwall outperforms plywood, drywall-mounted pegboard, and wire grid systems in a garage environment because of its load-bearing capacity per linear foot: steel slatwall accepts up to 75 pounds per hook or accessory — compared to 25–35 pounds per hook for standard plastic-channel slatwall used in retail environments. This load capacity supports automotive equipment (jack stands, air compressor hoses, floor jack accessories) that lighter wall systems cannot. The reconfigurability is the second advantage: every hook, bin, and shelf repositions in seconds without tools, allowing the wall to adapt as storage needs change seasonally or project-by-project.
How to get it: Mount steel slatwall panels to wall studs using the panel’s pre-punched mounting holes — stagger each panel’s top edge by 2 inches so the horizontal channels align across adjacent panels and accessories span panel joints without disruption. Leave 1/2-inch gaps between panels for thermal expansion in temperature-variable garage environments.
💡 Quick Win: A single 4×8-foot steel slatwall panel with a starter kit of 10 mixed hooks ($65–90 total) replaces a full season’s worth of floor-level pile-up on the wall beside your garage door — the immediate floor clearance is the reward.
Shop The Look
| Product |
| Steel slatwall panel garage storage 4×8 gray |
| Slatwall hook assortment kit heavy duty steel |
| Slatwall shelf attachment bracket 12 inch pair |
| Slatwall bin attachment set 6 pack varied size |
| Slatwall panel mounting screw kit stud application |
9. Pendant Task Light Over the Workbench Zone
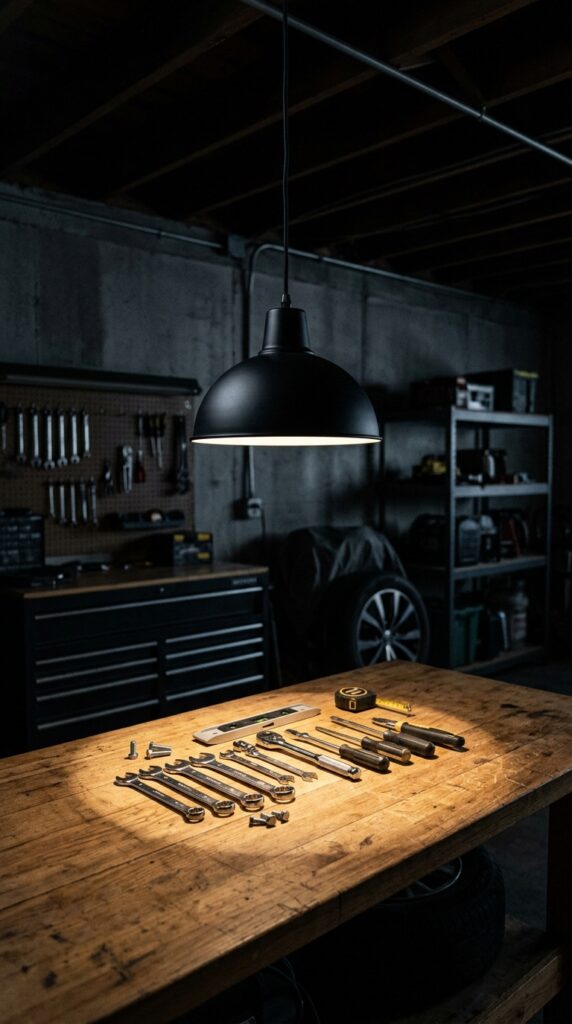
Vibe: Focused — the discipline of a light that knows exactly where it’s needed.
Why it works: A dedicated pendant task light over the workbench solves the most consistent complaint in garage lighting design: overhead shop lights illuminate the floor and general space well but create shadows directly on the work surface when the operator’s body blocks the overhead source. A hanging dome pendant positioned 24–30 inches above the bench top delivers focused downward light from a point directly above the work area, eliminating body-cast shadow regardless of the operator’s position. A matte black dome shade ensures all lumen output is directed downward — no light is wasted illuminating the ceiling above, making the effective task illuminance per watt significantly higher than a bare bulb.
How to get it: Install a surface-mount junction box on the ceiling directly above the bench center point before running the pendant cord. For non-hardwired applications, a ceiling hook and plug-in pendant cord achieves the same position without electrical work. Specify a 100-watt-equivalent LED A21 bulb at 4000K (cool white) inside the dome for accurate color rendering of part finishes and marking ink on materials.
Shop The Look
| Product |
| Industrial dome pendant light matte black 14 inch |
| Pendant light plug-in cord kit with ceiling hook |
| LED A21 bulb 4000K 100W equivalent workbench task |
| Surface mount junction box ceiling standard |
| Pendant light height adjuster cord shortener clip |
10. Modular Wall Cabinet System in Gloss White
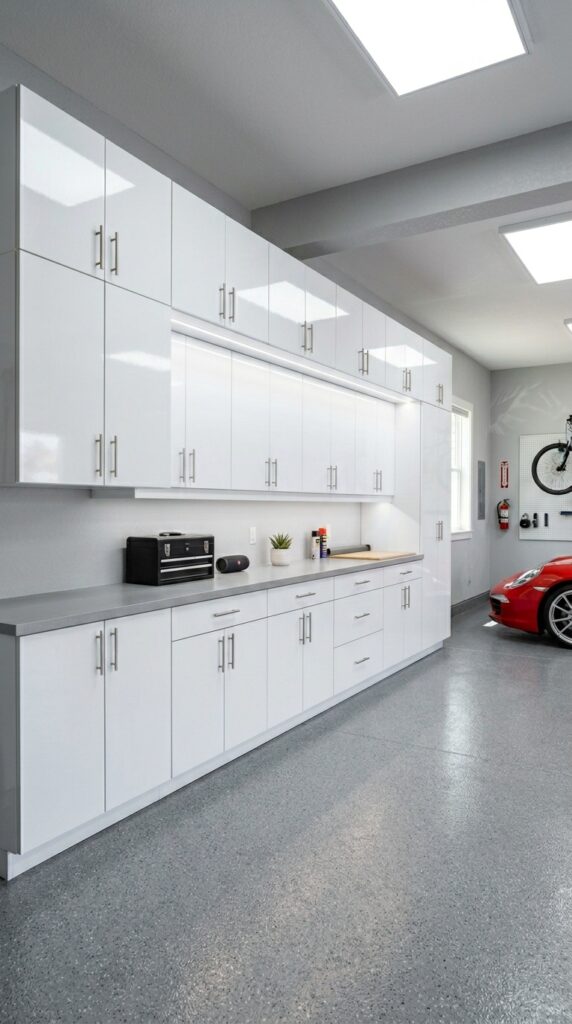
Vibe: Clean — a garage that refuses to look like one.
Why it works: A modular cabinet system in gloss white operates on the design principle of surface unification: when all storage units share the same color, sheen, and hardware finish, the eye reads the entire wall as a single organized surface rather than a collection of individual boxes. This visual simplification makes even a fully loaded storage wall appear calm and ordered — the opposite of open shelving, where every stored object contributes to the visual noise. Gloss white specifically amplifies this effect because the reflective surface bounces light forward into the garage, functioning as a passive light-boosting surface on what is typically the darkest wall in the space.
How to get it: Build the system from the floor anchor first — base cabinets on leveling feet (not directly on the floor slab) allow shimming for an unlevel surface and keep cabinet bases above water intrusion from floor washing. Secure wall-hung units to studs through the cabinet back panel at every stud intersection. Fill gaps between the cabinet run and adjacent walls with a filler panel cut from a matching cabinet side panel for a built-in appearance.
Shop The Look
| Product |
| Modular garage cabinet system gloss white tall base wall |
| Brushed nickel cabinet pull 5 inch set of 20 |
| Cabinet leveling foot adjustable furniture leg set |
| LED strip cabinet undercabinet light plug-in kit |
| Cabinet filler panel white 3 inch trim kit |
11. Rolling Tool Chest in Signal Red
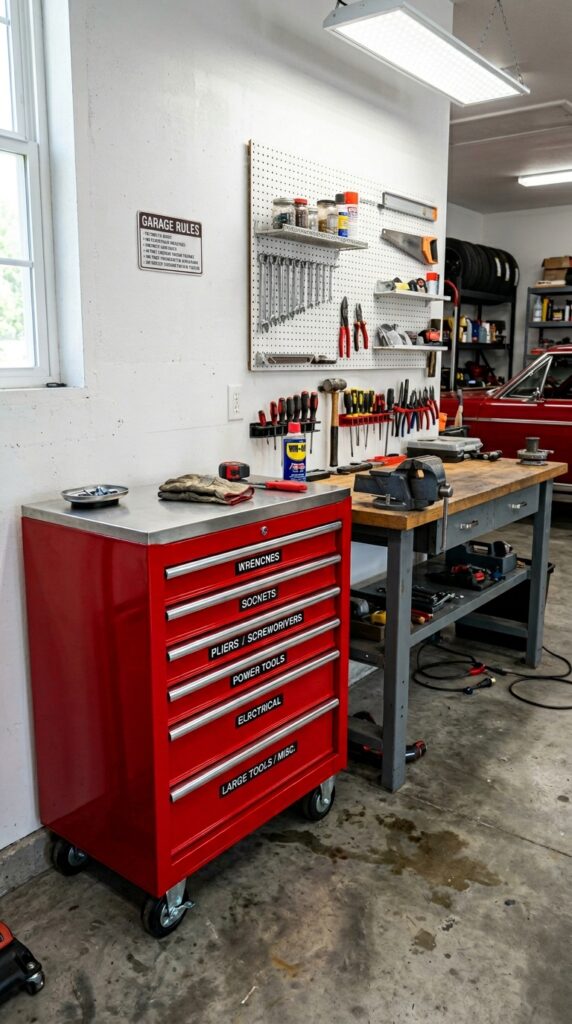
Vibe: Industrial — the specific confidence of a tool collection that has earned its cabinet.
Why it works: A rolling tool chest introduces a movable second workstation into the car garage design — one that can be positioned alongside either vehicle bay during work and rolled to the wall when parking. The signal red finish serves a functional purpose beyond aesthetics: a bold, single-color focal point in an otherwise neutral gray and white palette creates a visual anchor for the workshop zone that the eye returns to naturally — in practice, this means tools are returned to the chest more consistently than to a plain gray or black cabinet that blends into the wall. The top cap acts as a secondary horizontal surface for staging small parts during disassembly, a function distinct from the main workbench.
How to get it: Specify a chest with a minimum 100-pound drawer capacity rating and full-extension ball-bearing slides — drawers that extend to 75% or less of their depth make retrieving items at the back difficult and undermine the organizational system. Organize drawers by task category rather than tool type: one drawer for engine work, one for electrical, one for body work — this reduces drawer cycling during a single job.
Shop The Look
| Product |
| Rolling tool chest 7 drawer red steel ball bearing |
| Tool chest liner drawer mat non-slip set |
| Drawer label set magnetic garage tool chest |
| Tool chest locking bar kit security |
| Portable parts tray magnetic top for tool chest |
12. Single-Car Garage Vertical Wall Maximization
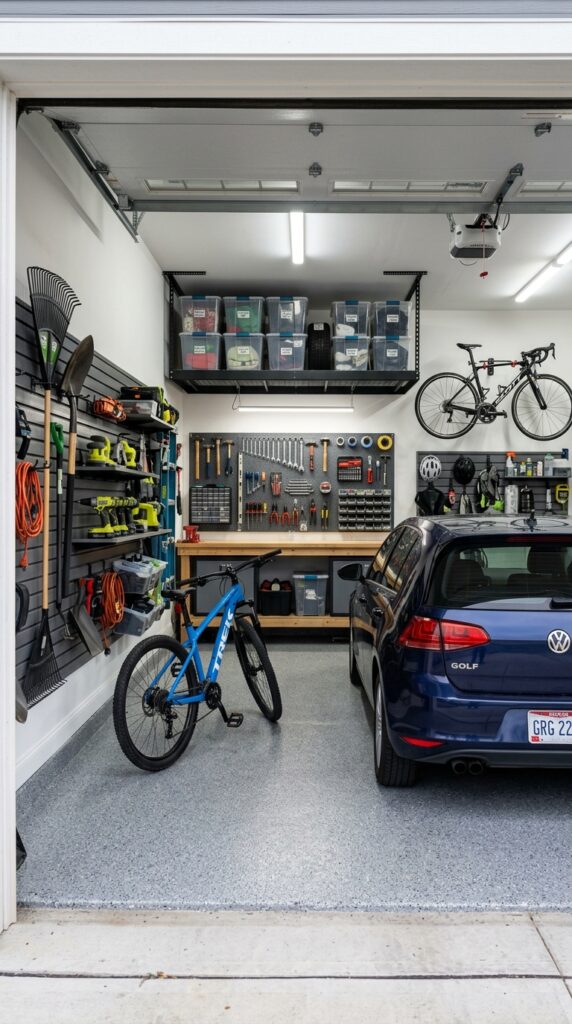
Vibe: Efficient — a room that found more of itself by looking up.
Why it works: The single-car garage design challenge is pure zone compression: a 12×22-foot footprint must accommodate a full-size vehicle (roughly 7×18 feet of floor), a storage wall, a work zone, and functional circulation. The only solution is vertical: every square foot of wall above 6 feet of height is available storage that consumes zero floor area. In a standard single-car garage, this means approximately 200–250 square feet of usable vertical storage surface that most garages never activate. A ceiling-mounted overhead rack above the parking zone alone provides 32–48 cubic feet of storage for lightweight seasonal items (holiday boxes, camping gear, roof racks) — equivalent to a small storage unit that most families rent off-site.
How to get it: Prioritize the ceiling rack installation first in a small garage — it claims the space above the car that no wall system can reach. Mount overhead racks to ceiling joists at 48-inch spacing using lag bolts, not toggle anchors. The rack should sit 12 inches below the closed garage door travel path and 3 inches above the vehicle’s highest point to allow safe loading without moving the car.
Shop The Look
| Product |
| Overhead garage ceiling storage rack 4×8 foot adjustable |
| Single-car garage slatwall starter kit compact |
| Ceiling joist lag bolt kit garage rack mounting |
| Stackable plastic storage bin set garage lid 6 pack |
| Single-car garage floor plan layout kit |
13. Navy Accent Wall Behind the Workbench
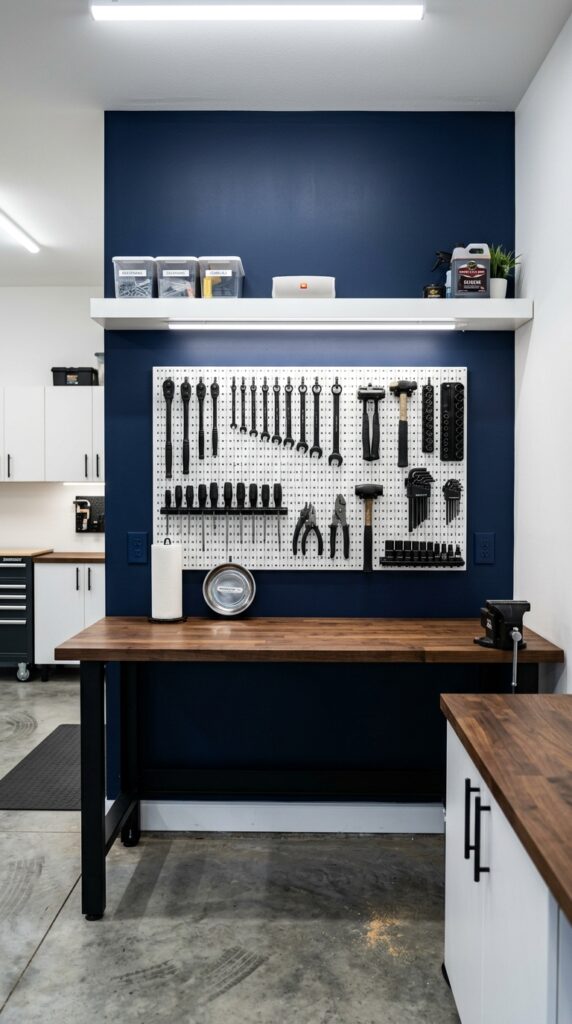
Vibe: Confident — one decision that makes the rest of the room make sense.
Why it works: Painting a single accent wall in deep navy behind the workbench designates that wall as the primary zone — it becomes the visual destination the eye moves to immediately upon entering, which psychologically reinforces its function as the working heart of the garage. White pegboard on a navy wall creates a high-contrast material combination that makes both elements more visible: the white board structure is more legible against navy than against white, and the navy wall commands more authority than it would in an all-white space. Benjamin Moore “Hale Navy” HC-154 or Sherwin-Williams “Naval” SW6244 both carry a warm-green undertone that prevents the dark blue from reading cold under LED light.
How to get it: Apply navy in semi-gloss finish on the workbench accent wall only — semi-gloss resists the oil, grease, and marking that a workbench wall inevitably receives. Keep all other walls in flat white to maximize the tonal contrast. Mount the white pegboard on 1/2-inch standoffs before painting — paint the wall first, then mount the board; this prevents paint seeping behind the board.
Shop The Look
| Product |
| Deep navy semi-gloss interior paint dark blue gallon |
| White pegboard 4×4 foot panel standoff kit |
| Floating white shelf garage wall mount 36 inch |
| Matte black utility hook set heavy duty wall |
| Under-shelf plug-in LED task strip warm white |
14. Interlocking Rubber Tile Floor Over Concrete
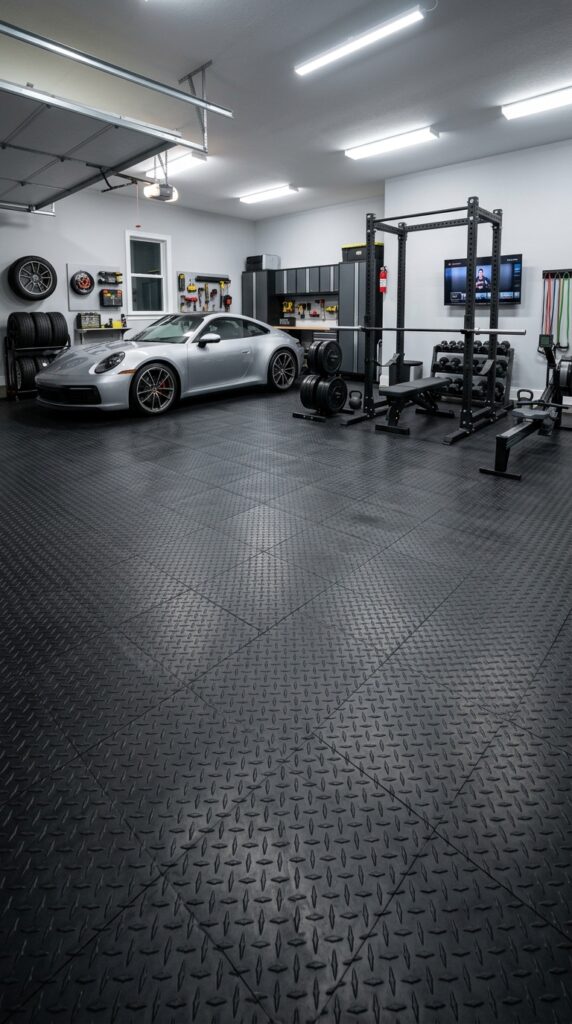
Vibe: Grounded — a floor that works as hard as everything happening on it.
Why it works: Interlocking rubber tiles are the lowest-commitment, highest-functionality floor upgrade in car garage design: they install over any existing concrete slab with no adhesive, no acid prep, and no curing time — and they uninstall and reinstall in a new home. The rubber surface provides genuine advantages over bare concrete and even epoxy: it absorbs impact and standing fatigue, eliminates the cold-knee problem of working on concrete, resists oil penetration without sealing, and provides traction under wet conditions. Diamond-plate surface texture adds the visual vocabulary of industrial flooring and mirrors the aesthetic of the tool chests and slatwall accessories in the space.
How to get it: Begin tile installation from the center of the garage floor outward — this ensures cut tiles at the perimeter edges are symmetrically sized rather than leaving one side with very narrow strips. Use a straight-edge table saw for perimeter cuts; a jigsaw works but produces a less precise edge. Tap each tile connection with a rubber mallet to fully seat the interlocking tabs.
Shop The Look
| Product |
| Interlocking rubber garage floor tile diamond plate black |
| Rubber mallet installation tool floor tile |
| Straight edge trim piece rubber floor tile border |
| Floor tile transition strip garage door threshold |
| Rubber floor tile cutter scoring knife set |
15. Motion-Sensor LED Strip Under All Cabinets
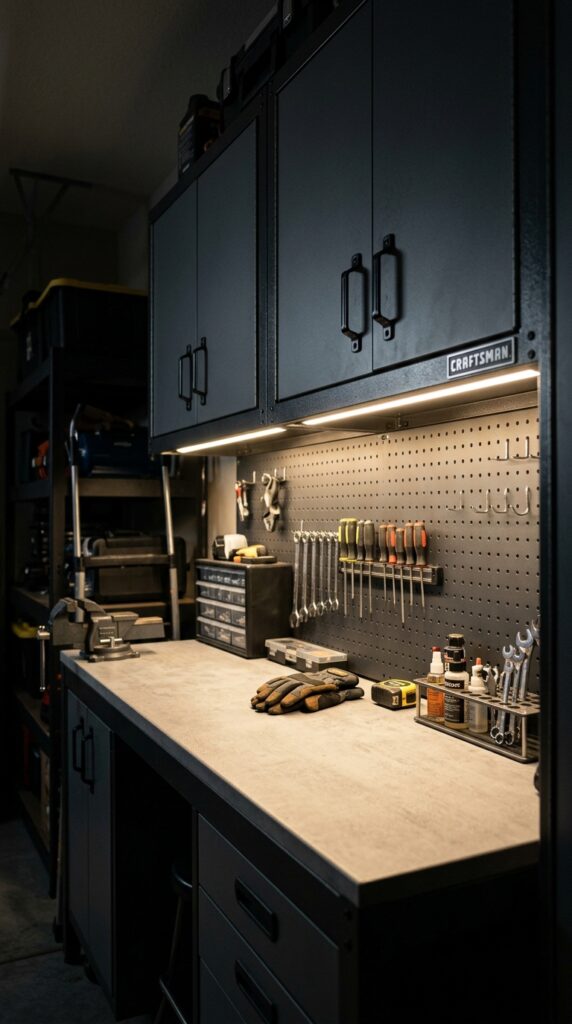
Vibe: Functional — the specific satisfaction of a light that knows when you need it.
Why it works: Motion-sensor undercabinet LED lighting solves the most frustrating gap in standard garage lighting design: the countertop and workbench zone directly beneath wall-hung cabinets is the most shadow-prone surface in the room, as the cabinet bodies block overhead light from reaching the back 6–8 inches of countertop depth. A continuous LED strip mounted at the front inside edge of each wall cabinet unit delivers horizontal light that reaches the full counter depth from front to back. Motion activation means the task light turns on the moment hands appear near the surface — no switch reaching required during work.
How to get it: Choose a 4000K undercabinet strip (not 2700K warm white, which makes it harder to read part markings and measure accurately) with a minimum 450 lumens per foot output. Route the strip power wire up through the cabinet interior to an outlet inside the cabinet — this conceals all wiring without visible cord runs. Specify a PIR motion sensor with a 30-second off-delay to prevent the light cycling off during brief pauses in work.
💡 Quick Win: A single plug-in motion-sensing LED bar mounted under an existing cabinet shelf costs $18–28 and demonstrates the undercabinet light difference immediately — test one before wiring a full cabinet run.
Shop The Look
| Product |
| LED undercabinet strip light motion sensor 4000K |
| Undercabinet light wire channel concealment kit |
| PIR motion sensor switch plug-in 30 second delay |
| LED strip connector corner kit cabinet |
| Adhesive mounting tape LED strip strong hold |
16. Overhead Ceiling Storage Rack System
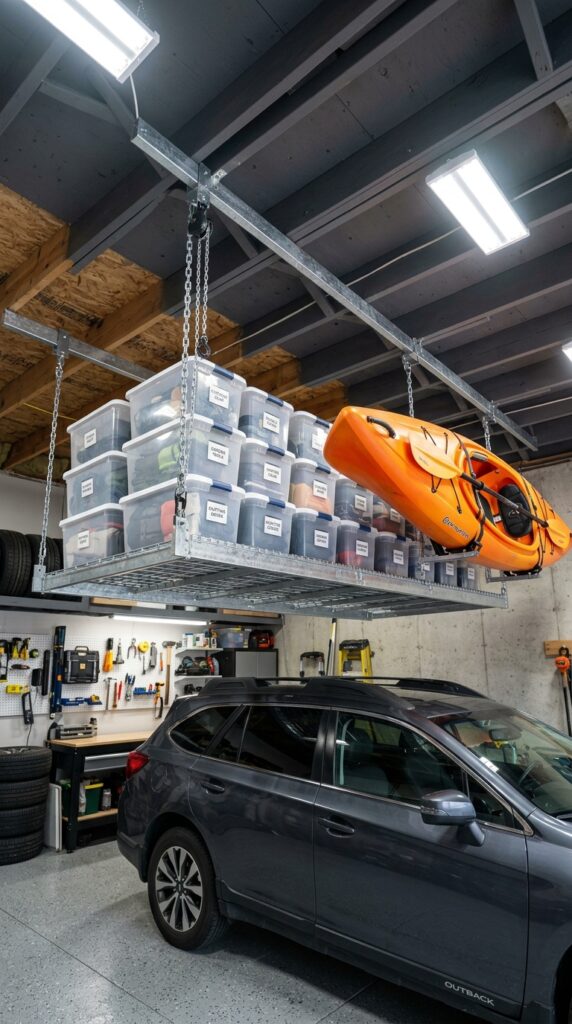
Vibe: Efficient — the overhead space most garages treat as emptiness, solved.
Why it works: The ceiling zone above a parked car — typically 6–8 feet wide and 10–14 feet long at heights between 5 and 9 feet — is the largest consistently wasted volume in residential garage design. A ceiling-mounted storage rack activates this zone for lightweight seasonal storage (holiday decorations, camping equipment, out-of-season sporting goods) without consuming any wall or floor area. The adjustable height design allows the rack to be positioned with a minimum 2-inch clearance above the tallest vehicle and still provide full depth of storage above — in most standard garages, this means 24–36 inches of rack depth that holds 12–18 large storage bins.
How to get it: Mount the rack’s ceiling hooks into joists — not drywall — using 5/16-inch lag bolts at 2-inch minimum penetration into solid wood. Use a stud finder to map joist locations before purchasing the rack, as joist spacing of 24 inches on-center requires a different mounting pattern than 16-inch spacing. The finished rack should have zero side-to-side movement when loaded; any lateral flex indicates insufficient joist engagement.
Shop The Look
| Product |
| Overhead ceiling garage storage rack adjustable 4×8 |
| Ceiling joist hook mounting kit 5/16 lag bolt set |
| Clear stackable storage bin with lid set 6 pack |
| Waterproof label maker storage bin garage |
| Kayak overhead storage mount ceiling hook strap |
17. Wall-Mounted Bike and Sports Equipment Station
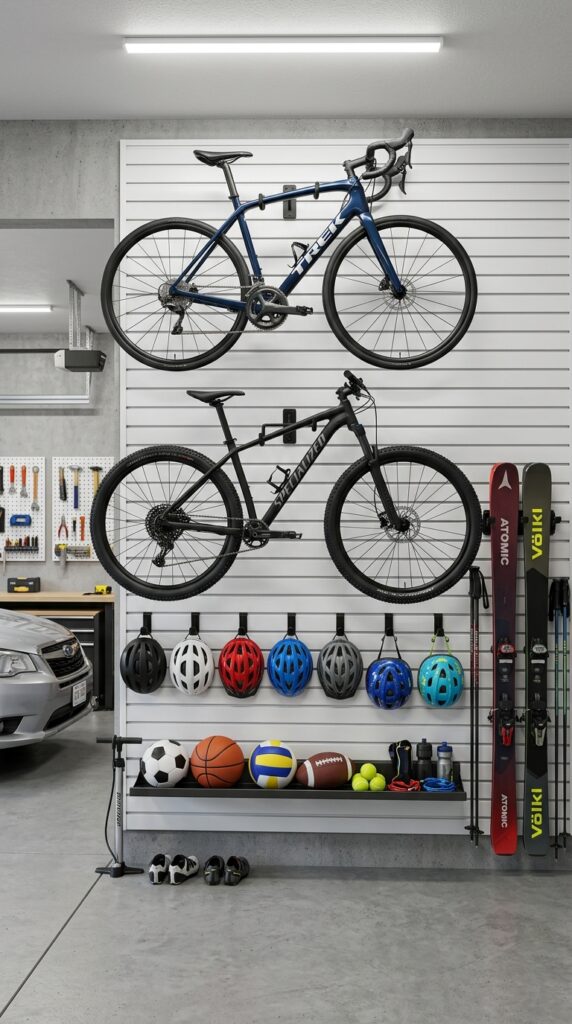
Vibe: Active — a wall that makes every hobby easier to start.
Why it works: A dedicated sports and bike storage station organizes the category of garage belongings most commonly responsible for floor chaos — bikes, helmets, bats, balls, skis — into a single defined wall zone. The horizontal bike mount (where the bike frame hangs parallel to the wall from a wheel hook) uses 12 inches of wall depth and 15 inches of horizontal spacing per bike — four bikes can be stored in 5 linear feet of wall. Mounting at head height (55–65 inches) keeps the wheel at a comfortable lifting height while clearing the floor beneath for bin storage or a floor mat. Grouping all sports equipment within a single wall zone creates a packing-and-departure station: gear is gathered from one place and returned to one place.
How to get it: Mount a two-bike section first on a 4-foot slatwall panel with heavy-duty wheel hooks rated at 50 pounds per hook. Add a 10-inch-deep shelf below at 36-inch height for helmets and balls — a shelf with a 1-inch lip front edge prevents round objects from rolling off. Test the mount with your specific bike wheel width before final installation; fat-tire bikes require a wider hook profile than road or hybrid tires.
Shop The Look
| Product |
| Horizontal bike wall mount hook heavy duty slatwall |
| Sports equipment wall shelf 36 inch with lip edge |
| Helmet wall hook set matte black 4 pack |
| Ski and snowboard vertical wall bag storage strap |
| Slatwall sports equipment starter kit assorted hooks |
18. Drive-Through Two-Car Tandem Bay Layout
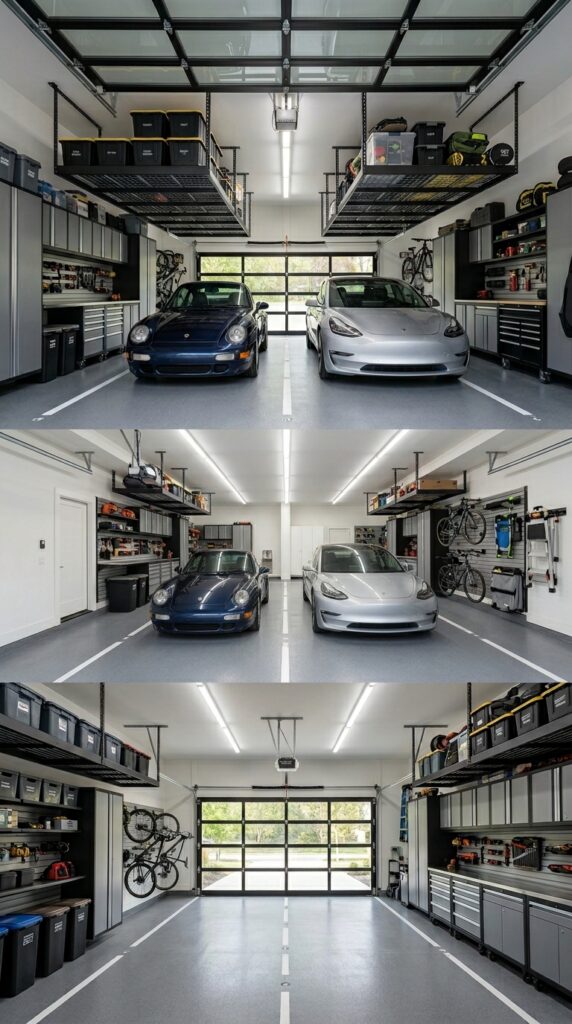
Vibe: Architectural — a floor plan that turned a constraint into its most interesting feature.
Why it works: The tandem garage layout — one vehicle behind the other rather than side by side — is most common in narrow urban lots or converted structures where width is limited. Its design challenge is the most complex in residential car garage planning: the front vehicle must move before the rear vehicle can exit, making the rear bay primarily suited for a vehicle used less frequently. Resolving this layout requires clear centerline planning: a minimum 9-foot clearance on each side of the center driving line for safe door opening, with storage walls set at exactly the correct depth to preserve this clearance without wasting wall space. LED shop lights run along the center line overhead at 24-inch intervals to maintain uniform illumination along the full depth.
How to get it: In a tandem garage, design the rear bay as the primary storage zone — overhead racks, a full workbench against the rear wall, and wall storage on both long sides. The front bay remains a clean vehicle bay with minimal wall storage to prevent obstruction of the front vehicle’s door swing. Epoxy stripe the centerline in a contrasting color as a driving guide for precise parking alignment.
Shop The Look
| Product |
| Tandem garage floor guide parking alignment strip |
| Long garage storage wall system modular extended run |
| Center-line LED shop light 8-foot strip linkable |
| Front vehicle bumper stop parking guide floor kit |
| Tandem garage overhead rack dual bay extended size |
19. Diamond-Plate Steel Backsplash Behind the Workbench
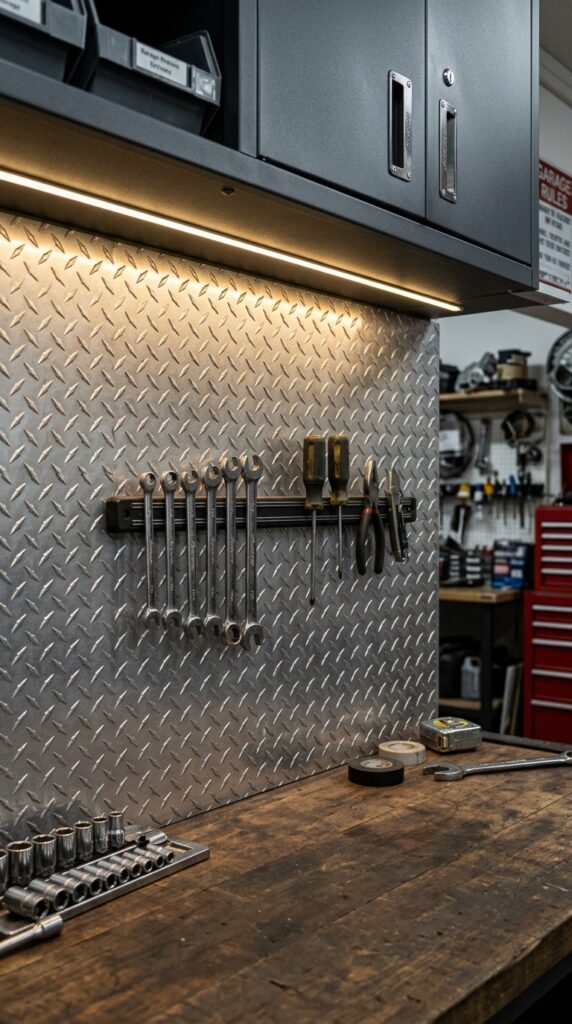
Vibe: Industrial — a material that makes every trade feel legitimate.
Why it works: Diamond-plate steel as a workbench backsplash brings one of the most recognizable industrial material signatures into the car garage design at the exact scale where it performs best — a 6–10-inch-tall strip between countertop and upper cabinet. At this scale, the raised pattern is legible and tactile without becoming visually overwhelming. More practically, the steel surface resists every form of workbench damage: grease, solvent, heat, and impact all leave diamond-plate unaffected, whereas tile, drywall, and painted wood behind a workbench all deteriorate within the first year of active use. A magnetic tool strip embedded flush into the steel provides knife-and-tool storage that uses the backsplash surface itself.
How to get it: Source 1/8-inch-thick aluminum diamond-plate sheets (aluminum is lighter and easier to cut than steel at this application) cut to the exact height of the backsplash zone. Adhere with construction adhesive applied in a zig-zag bead pattern on the back of the sheet — no visible fasteners. Cut corners and outlet cutouts with a jigsaw fitted with a metal-cutting blade.
Shop The Look
| Product |
| Aluminum diamond plate sheet 1/8 inch 12×48 inch |
| Magnetic tool strip holder wall mount stainless |
| Metal cutting jigsaw blade set fine tooth |
| Construction adhesive heavy duty panel bonding |
| Aluminum trim edge strip L-angle backsplash border |
20. Dedicated Car Care Station with Rolling Supply Cart
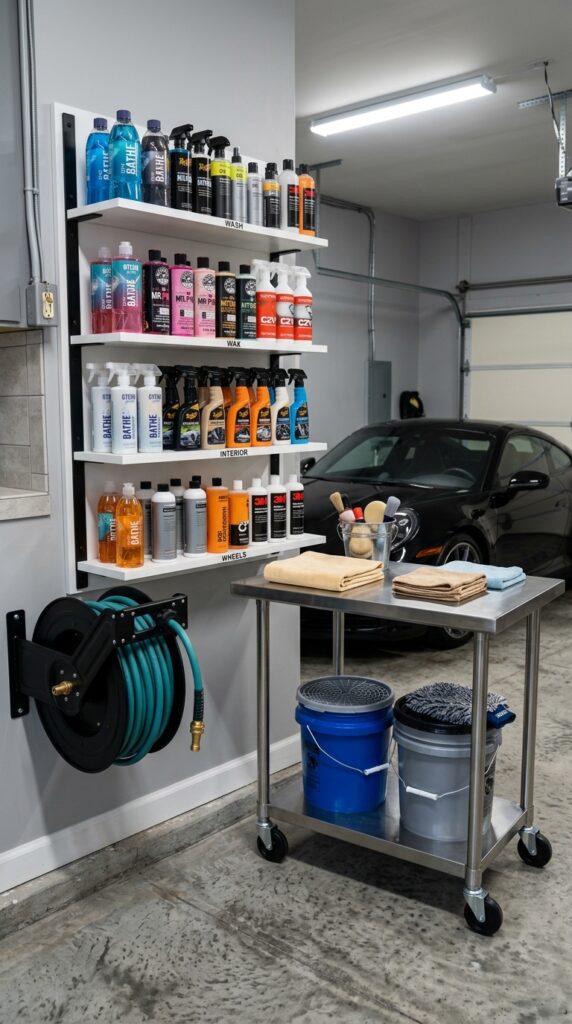
Vibe: Ready — a system that makes the reason for having a car feel like a pleasure.
Why it works: A dedicated car care station groups every detailing supply — wash products, microfiber towels, applicators, polishes, buckets — in a single defined zone that stays organized between washes because everything has a fixed position. The rolling stainless cart is the key operational element: it wheels to the vehicle’s location during washing rather than requiring repeated trips to the supply wall. This proximity principle — bringing the supplies to the task rather than the task to the supplies — is the same logic behind a rolling tool chest for mechanical work and reflects the same zone-function design thinking that makes professional detailing shops efficient.
How to get it: Mount a 4-shelf wire rack unit at the car care station wall — wire shelving allows wet towels to hang and dry on the wire surface without mold buildup that solid shelves create. Install a retractable hose reel at 60-inch height beside the station — this eliminates hose coiling effort and keeps the hose off the floor between uses.
💡 Quick Win: A $35 stainless rolling utility cart (three shelves, 12×24 inches) positioned beside an existing garage shelf organizes an entire car care kit in one afternoon and completely eliminates the scattered-product floor zone most garages develop.
Shop The Look
| Product |
| Stainless steel rolling utility cart 3 shelf garage |
| Wall-mounted retractable garden hose reel garage |
| Wire shelf rack unit wall mount 4 tier |
| Stackable detail bucket car wash 5 gallon set |
| Microfiber towel set car detailing 30 pack |
21. Two-Tone Charcoal and Tan Epoxy Flake Floor
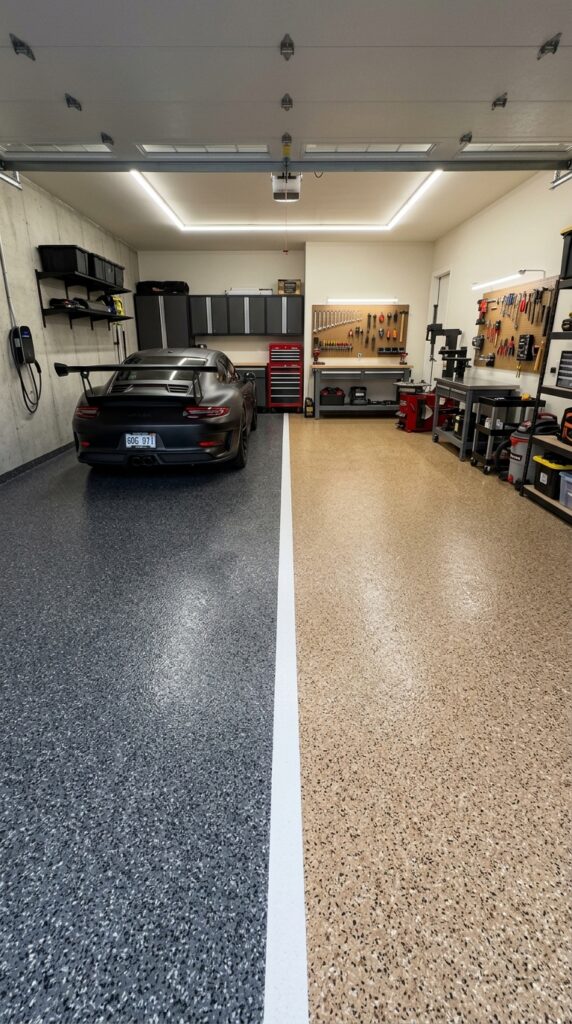
Vibe: Considered — a floor that explains the room before you’ve walked across it.
Why it works: A two-tone epoxy floor using different chip broadcast colors in the parking zone versus the workshop zone is the most permanent and most visually refined zone-definition technique in car garage design — more resolved than floor tape, more durable than painted lines, and more useful than the same color everywhere. The charcoal parking zone hides tire marks and oil drips most effectively, while the warmer tan workshop zone is easier on the eyes during extended work sessions and shows dropped fasteners and small parts more readily against its lighter surface. The design principle is function-driven color: the floor color in each zone is determined by what that zone demands visually.
How to get it: Apply each zone’s epoxy system separately using 3-inch-wide painter’s tape at the zone boundary line. Allow the first zone to cure to its no-track stage (typically 24 hours) before masking and applying the second zone color. Apply the same urethane clear topcoat across both zones in a single pass after both colored zones have fully cured — this creates one continuous seam-free surface despite the two-color foundation.
Shop The Look
| Product |
| Charcoal gray epoxy floor kit garage chip broadcast |
| Warm tan epoxy floor kit garage chip broadcast |
| Epoxy zone border tape 3 inch painters style |
| Urethane clear topcoat garage floor finish |
| Zone boundary paint line marker garage floor |
22. Solar Tube Skylight for Passive Garage Daylight
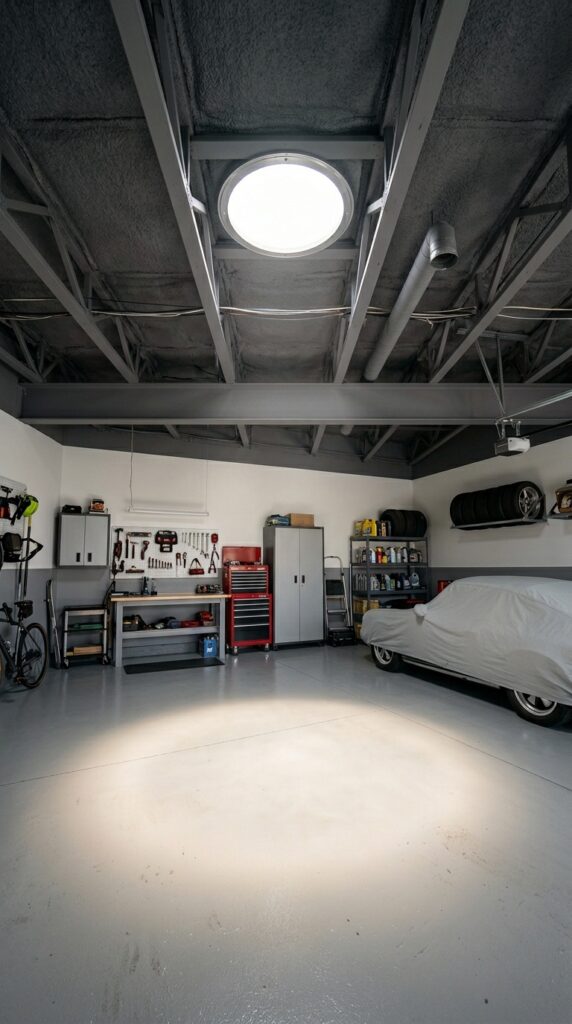
Vibe: Luminous — the rare clarity of a space where the light is free.
Why it works: A solar tube skylight (also called a tubular daylighting device or TDD) routes natural light from a rooftop dome through a highly reflective aluminum tube into a ceiling diffuser — delivering 98% reflective, daylight-spectrum natural light without any roof structural modification beyond a 10–14-inch circular cut. In a garage that receives inadequate natural light through standard windows or door glazing, a single 10-inch solar tube delivers approximately 300 watts of equivalent illumination during peak daylight hours — at zero ongoing energy cost. The daylight spectrum (5500–6500K) renders colors accurately, making it the most functional light source for paint color matching, part inspection, and any work where true-color rendering matters.
How to get it: Install a 10-inch solar tube in a roof section that receives unobstructed south or west exposure for maximum daylight collection. Standard installation (roof dome, flexible tube, ceiling diffuser, and trim ring) is achievable as a two-hour DIY project with basic roofing tools. Add a dimmer plate over the ceiling diffuser for adjustable natural light output.
Shop The Look
| Product |
| Solar tube skylight 10 inch tubular daylighting kit |
| Flexible solar tube extension kit 18 inch |
| Ceiling diffuser trim ring solar tube 10 inch |
| Solar tube dimmer slide plate kit |
| Roof flashing kit solar tube flat pitch |
23. Narrow Single-Bay Garage with Lofted Storage Above
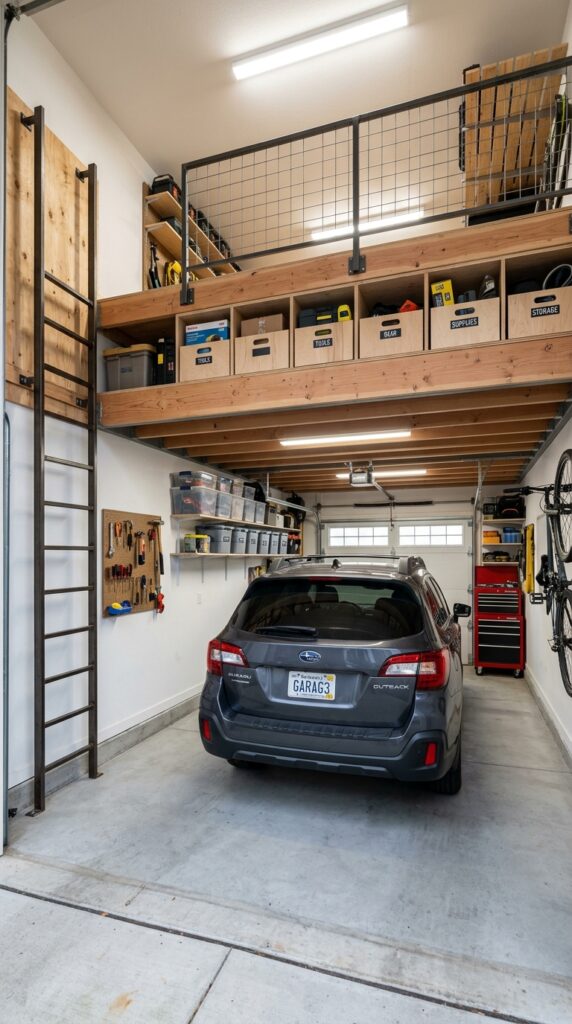
Vibe: Efficient — discovering that a one-car garage had a second floor all along.
Why it works: A lofted storage platform above the parking zone in a narrow single-bay garage is the small-space equivalent of a mezzanine — it converts dead ceiling volume into fully accessible storage without touching the floor plan below. In a garage with a ceiling height of 10 feet or more, a loft platform at 7.5 feet provides 2.5 feet of accessible storage depth above while maintaining adequate car clearance below (standard vehicle roofline at 5.5–6 feet, requiring 18-inch minimum clearance below the platform). A 10×10-foot platform in a single-car bay delivers 100 square feet of additional storage area — the equivalent of a mid-size storage shed.
How to get it: Frame the loft platform from doubled 2×8 joists at 16-inch spacing, supported by 4×4 posts anchored to the side walls rather than the floor — this keeps the floor below clear and avoids drilling into the concrete slab. Deck with 3/4-inch tongue-and-groove plywood for a smooth walking surface. Install a fixed steel ship’s ladder at 70-degree pitch for compact footprint access.
Shop The Look
| Product |
| Fixed steel ship ladder wall mount 7 foot |
| 2×8 structural lumber framing joist set |
| 3/4 inch tongue and groove plywood sheets |
| Loft platform edge safety rail kit steel |
| LED strip fixture 4 foot loft underside mount |
24. Freestanding Heavy-Duty Metal Shelving Wall
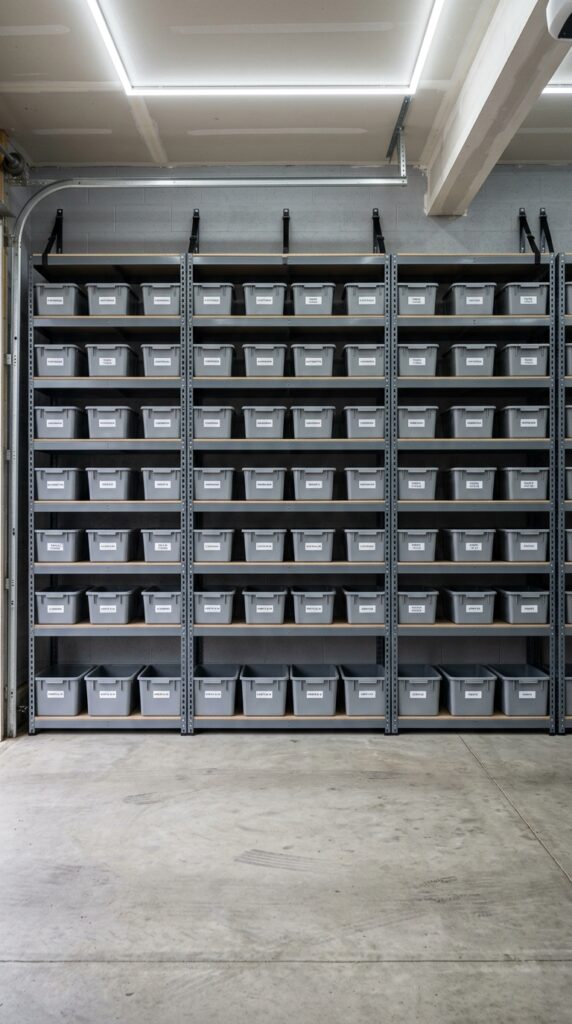
Vibe: Purposeful — the quiet authority of a storage system that expects to be used.
Why it works: Freestanding heavy-duty steel shelving — the same bolted-frame angle-iron system used in commercial warehouses — is the highest load-capacity, most cost-effective storage solution available in residential car garage design. A standard 48×18×72-inch unit with six adjustable shelves holds up to 4,000 pounds distributed load, accommodates any bin or container size at any shelf height, and costs $60–120 per unit. Running five to seven units across the rear wall of a two-car garage creates a continuous storage wall that holds every category of household overflow storage within a single organized system. The key design discipline: every shelf position receives uniform, labeled containers — the labels do more organizational work than any hardware selection.
How to get it: Bolt adjacent units together at the upright flanges using the included hardware — this creates a structurally integrated wall unit rather than individual standing shelves that can topple independently. Anti-tip straps from the top shelf to wall studs are non-negotiable for safety, particularly in earthquake-risk regions. Assign one shelf height per category (automotive, seasonal, hardware, sporting) and dedicate every bin on that shelf to that category exclusively.
💡 Quick Win: A single $75 heavy-duty steel shelving unit — fully loaded with labeled bins — relocated from the floor zone of your garage to the back wall frees more floor space than any other single purchase in car garage design.
Shop The Look
| Product |
| Heavy duty steel garage shelving unit 48x18x72 inch |
| Anti-tip wall anchor strap kit furniture safety |
| Gray storage bin with lid set 12 pack large |
| Label maker machine tape storage bin garage |
| Shelving unit connector bolt kit adjacent unit link |
How to Start Your Car Garage Design Transformation
Your single first move is to coat the floor. Not buy cabinets, not mount shelving — coat the floor. A properly applied epoxy floor system in slate gray or warm tan is the irreplaceable design foundation that makes every subsequent element — white cabinets, matte black hardware, red tool chest — read as intentional rather than accumulated. The floor is the only surface that every other element in the garage sits on, reflects from, or contrasts against; changing it first means you make every following decision with the finished room already partially visible, which eliminates the most common and most expensive mistake in garage renovation: buying a storage system in the wrong tone for the floor it will live above.
The most common mistake in car garage design is starting with storage systems before clearing and measuring the floor plan. Specifically: mounting wall cabinets or slatwall panels before painting, before knowing exact vehicle clearances, and before deciding where the workbench lives. This forces every subsequent decision into the constraint of work already done — cabinets in the wrong position, panels over unfinished walls. The fix is straightforward: empty the garage entirely, paint walls and ceiling first, apply floor coating, park the vehicle and tape its clearance boundary, then plan and install storage around the result.
Three specific items under $50 that create immediate car garage design impact: a set of six 2700-lumen LED shop light fixtures on sale at $28–35 (the lighting shift alone upgrades every other element in the space); a roll of 3-inch-wide high-contrast floor stripe tape in white on gray ($12–18) to mark parking zones and workbench boundaries before committing to epoxy; and a 25-piece metal pegboard hook assortment ($18–25) installed over existing drywall above a workbench — these three elements demonstrate the full design vocabulary of organized, well-lit, clearly zoned space before a single cabinet is purchased.
A single-car garage cosmetic transformation — floor coating, paint, LED lighting, and a starter storage wall — takes one committed weekend and runs $400–900 in materials. A full two-car garage design with modular cabinet systems, epoxy floor, custom workbench, and ceiling racks realistically takes three to six weekends and a budget of $3,500–$9,000 depending on cabinet quality and floor system specification. The version most homeowners find most satisfying: the $1,500 mid-tier approach — a quality epoxy floor kit, one wall of slatwall with accessories, an LED shop light grid, and a used rolling tool chest — achieves the organized, purposeful appearance of a professional garage in two weekends.
Frequently Asked Questions About Car Garage Design Ideas
What is the difference between a garage workshop and a car garage design — do they overlap?
A garage workshop prioritizes tool storage, workbench space, and fabrication capacity — often at the expense of vehicle parking. A car garage design prioritizes the vehicle as the primary occupant while building all storage, workbench, and organizational systems around the parking clearances and vehicle access. In practice, most residential garages need both: vehicle parking is primary, but a well-designed car garage always incorporates a workbench zone, organized tool storage, and a defined work area. The key design constraint that separates the two is minimum clearance: a car garage design must maintain 24-inch side clearances and 18-inch front-and-rear clearances around the parked vehicle at all times — no storage system can encroach on these zones.
What colors work best for a car garage design interior?
The highest-performing palette for a car garage design is white or warm white walls (Benjamin Moore “White Dove” OC-17 or “Chantilly Lace” OC-65 in exterior-grade semi-gloss), a neutral floor in slate gray or warm tan epoxy, and charcoal or navy on cabinet faces. The white wall specification is functional, not just aesthetic — semi-gloss white reflects approximately 85% of light back into the space, reducing the number of light fixtures needed for adequate working brightness. Avoid warm beige or yellow walls, which absorb light and make the garage feel dimmer; avoid pure black floors, which show dust and paw prints continuously.
How much does a car garage design renovation typically cost?
A cosmetic garage refresh (paint, LED lighting, and basic wall storage) runs $300–900 for a single-car bay and $600–1,500 for a two-car garage in materials and standard LED fixtures. Adding a quality epoxy floor system moves the single-car budget to $800–1,800 and the two-car budget to $1,500–3,500. A full transformation with modular cabinet systems, custom workbench, epoxy floor, and ceiling racks ranges from $4,000–$12,000 for a two-car garage. The single highest return-on-investment improvement at any budget level is the LED shop light upgrade: replacing builder-installed lights with a gridded LED system costs $150–300 in fixtures and returns the biggest visible transformation per dollar of any single category.
Can a two-car garage be designed to serve as both a workshop and full vehicle storage simultaneously?
Yes — the key is the rear-third rule: allocate the front two-thirds of the garage floor to vehicle parking and the rear third (typically 6–8 feet deep) to the workshop zone with workbench, tool storage, and pegboard. This division maintains full parking capacity for both vehicles while providing a dedicated workshop area that is far enough back to be protected from exhaust contamination and separate enough from the parking zone to be genuinely functional. Use a contrasting floor color or stripe to mark the boundary — this visual zone boundary prevents parking creep, where the second vehicle gradually parks deeper into the workshop zone until the workbench becomes inaccessible.
What type of flooring is best for a car garage that sees heavy vehicle traffic and fluid spills?
A 100% solids epoxy floor system with a polyurethane clear topcoat is the definitive answer for vehicle-traffic garage floors. The 100% solids specification (versus water-based or 50% solids systems) is critical: higher solids content produces a thicker dry film — 10 mils per coat versus 3–4 mils for water-based — that withstands tire scuffing, hot tire pickup (where heat from driven tires pulls adhesive coatings off the slab), and chemical resistance from oil, brake fluid, and transmission fluid. A quartz chip broadcast increases surface texture and slip resistance under wet conditions. Budget range: DIY 100% solids kit for a one-car garage runs $180–280; professional installation of a full chip-broadcast system in a two-car garage runs $900–1,800 and carries a 10–15-year performance warranty from most contractors.
Ready to Create Your Dream Car Garage Design?
These 24 car garage design ideas have covered the full operational spectrum — from two-tone epoxy floor systems and LED lighting grids to overhead ceiling racks, slatwall panels, dedicated car care stations, and small-space vertical maximization — giving you a specific decision framework for every square foot of your garage. Transformation doesn’t require a complete weekend renovation; the most organized and visually resolved garages are built system by system, each addition considered against what the space actually demands week to week. Start today by emptying one wall completely, measuring it floor to ceiling, and deciding what that single wall will do — every subsequent decision follows from that first committed choice. When it’s finished, you’ll have a space that makes both working and parking feel like the room was designed exactly for how you use it. Save the ideas that match your vehicle clearances and your weekend budget — in car garage design, the ideas that fit your actual floor plan are the only ones that matter.