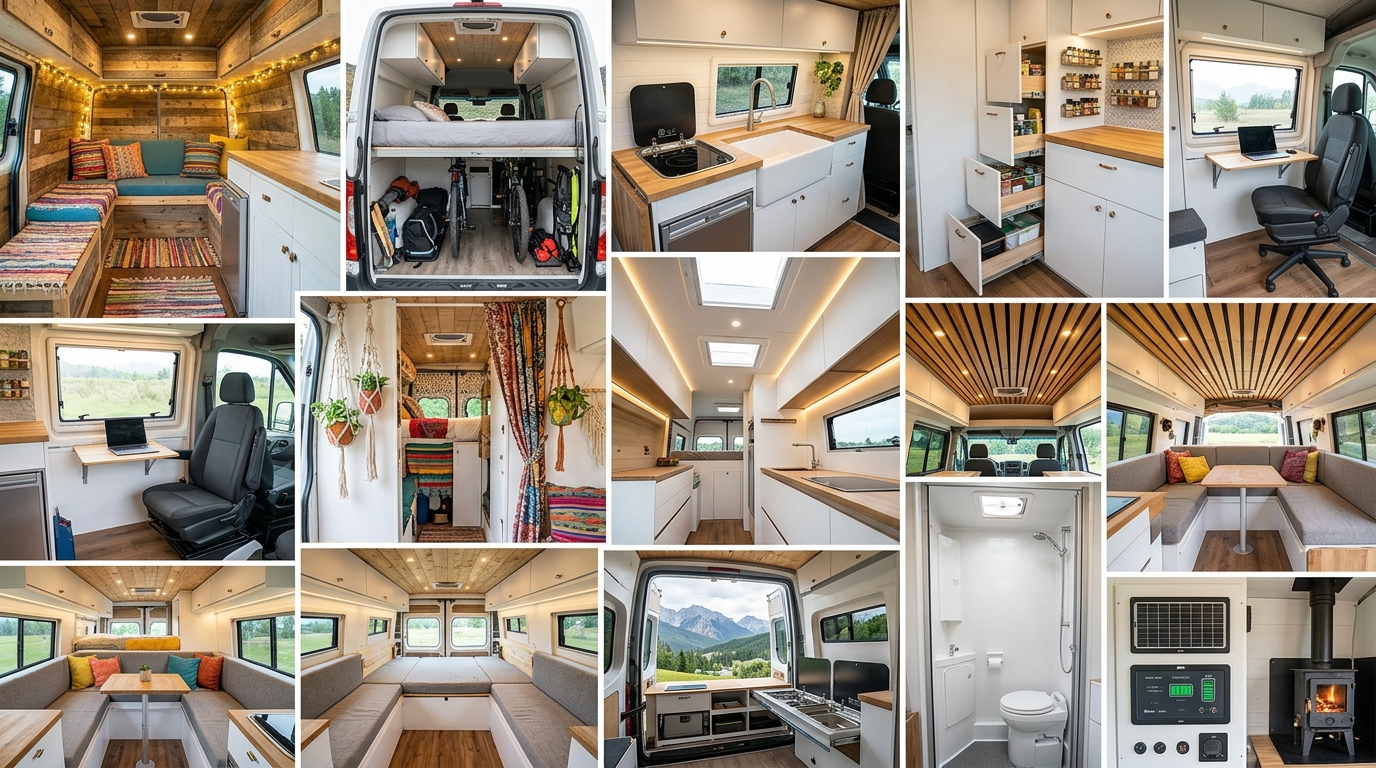
Campervan interior design is the discipline of creating a fully functional, beautiful living space within the constraints of a mobile vehicle — designing for sleep, cooking, storage, work, and comfort in an area that typically measures between 50 and 100 square feet. Here are 27 specific ideas, from spatial planning strategies to material choices and compact furniture solutions, to help you build a van interior that is both genuinely liveable and visually resolved.
There is a specific pleasure to a well-designed campervan interior — the way everything folds, stacks, and tucks with intention, the amber glow of a strip light against birch ply at dusk, the sound of rain on a steel roof while a small stove heats the space from cold. It is design under real constraint, and constraint — when taken seriously — produces a particular quality of clarity. Here are 27 ideas worth saving — and stealing.
Why Campervan Interior Design Works So Well
Campervan interior design sits at the intersection of naval architecture, tiny house philosophy, and contemporary interior design — it draws from the space-efficiency principles of yacht cabinetry, the material honesty of Scandinavian domestic design, and the constraint-driven ingenuity of Japanese micro-apartment culture. What distinguishes a genuinely well-designed van build from a functional camping fit-out is the same thing that distinguishes good architecture from adequate construction: every decision considers light, proportion, material, and the felt experience of the person living inside it.
The material vocabulary of the best van builds is deliberately narrow: birch plywood for cabinetry and wall lining (lightweight, workable, warm in tone), pine or oak for trim and accents, aluminium extrusion for structural framing, foam-backed vinyl or wool felt for wall panels, and natural linen or cotton canvas for soft furnishings. Colors run from warm white and pale birch through the spectrum of van life’s natural environments — dusty sage, ochre desert sand, forest green, and the warm grey of mountain stone. Warm LED strip lighting at 2700K is the defining light source: it transforms even a basic ply interior into something that reads as designed and intentional.
The van life movement has produced one of the most practically innovative design communities in contemporary living culture — builders sharing joinery techniques, electrical schematics, and space solutions across YouTube and social media have collectively advanced the craft of mobile living far beyond what any single designer would achieve working alone. The movement also connects directly to cultural shifts around remote work, the rejection of fixed address living, and a generation seeking experiential richness over property ownership.
Small vehicles achieve this style through ruthless spatial hierarchy — every square centimetre is assigned to a primary function and designed to serve a secondary function simultaneously. A bench seat that converts to a guest sleeping surface, a kitchen counter that doubles as a work desk, a roof vent that handles both ventilation and natural light — the quality of a van build is measured by the density of its functional intelligence.
| Element | Core Trait 1 | Core Trait 2 |
| Philosophy | Functional intelligence | Material honesty |
| Materials | Birch plywood, pine trim, aluminium framing | Wool felt, natural linen, foam-backed vinyl |
| Color palette | Warm birch, pale sage, warm white | Ochre, forest green, warm grey stone |
27 Campervan Interior Design Ideas
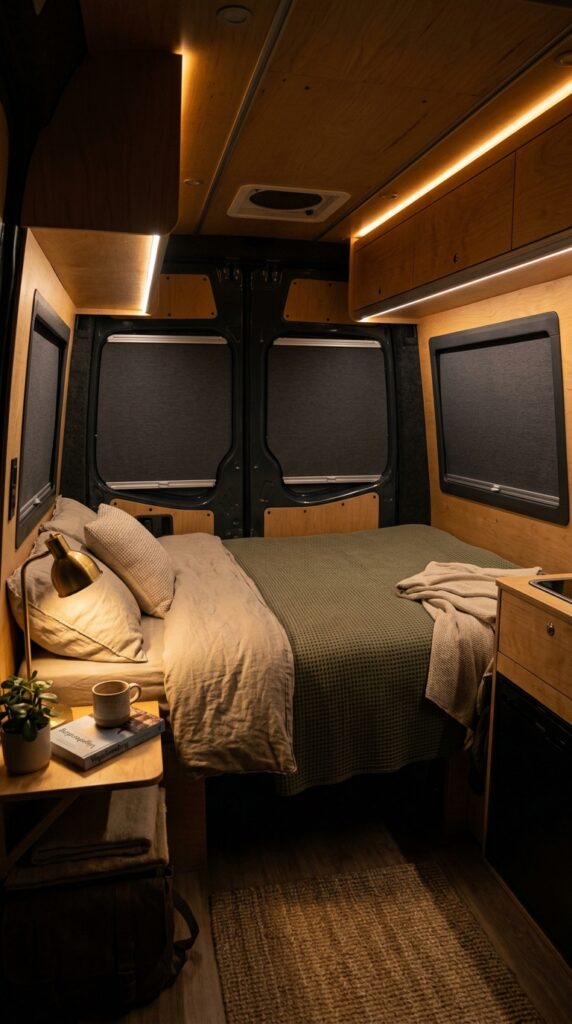
1. Fixed Rear Bed with Under-Bed Storage System
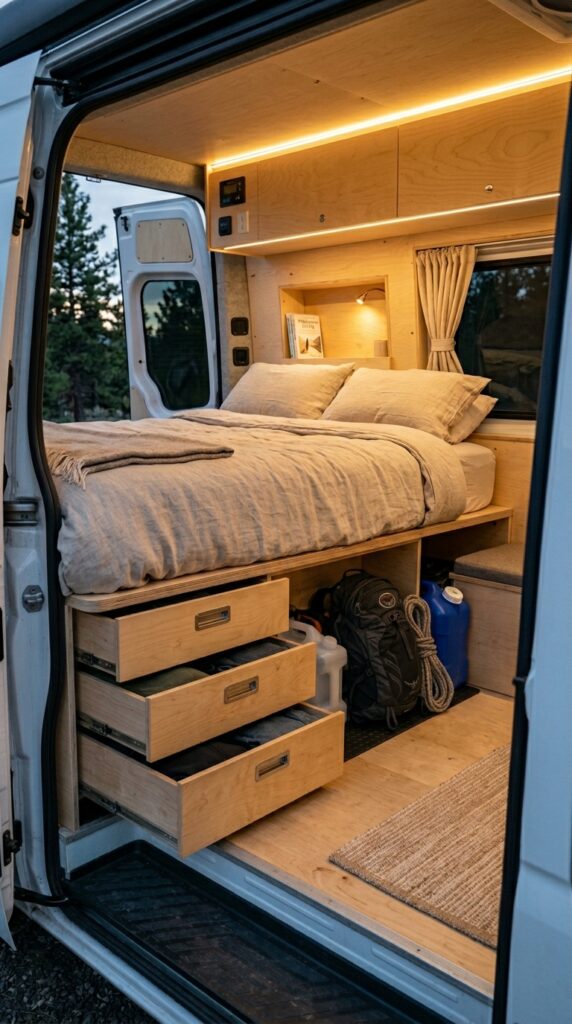
Vibe: Resolved — everything in this sleeping space has been thought about twice.
Why it works: A fixed transverse rear bed is the single most space-efficient sleeping configuration for a mid-size van because it allows the full van width (typically 170 to 190cm in a Sprinter or Transit) to be used as bed length while positioning the sleeping area at the back where head height is greatest at the rear crossmember. The under-bed zone — at a minimum 35cm clearance — is the van’s primary storage volume, and splitting it into a pull-drawer section (for frequently accessed items like clothing) and a full garage opening (for bikes, boards, and large gear) provides a functionally differentiated storage system that maximises the zone without creating a single cavernous space that is difficult to organise.
How to get it: Build the bed platform in 18mm birch ply on a subframe of 40×40mm aluminium extrusion — this keeps the platform weight under 18kg while providing structural rigidity for two adults. The garage door should open from the rear of the van (not the side) for access when the van is parked against a kerb; a piano hinge and gas strut combination provides a clean open-and-hold mechanism.
💡 Quick Win: A single 40-litre pull-out drawer under a fixed bed, built in 12mm birch ply on 35kg-rated undermount drawer runners, costs $45–$80 in materials and organises the clothing storage problem that causes more van living frustration than any other single issue.
Shop the Look
| Product |
| Undermount soft close drawer runner 500mm pair |
| Birch plywood sheet 18mm full size |
| Natural linen duvet cover set queen |
| Recessed flush pull handle steel minimal |
| LED strip light warm 2700K 5m roll |
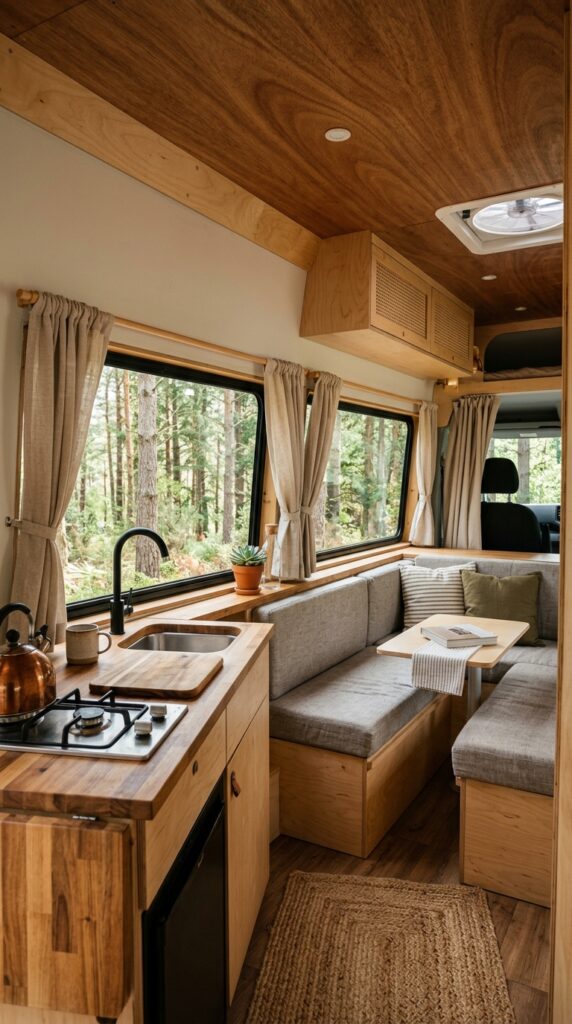
2. Birch Plywood Ceiling with LED Strip Lighting
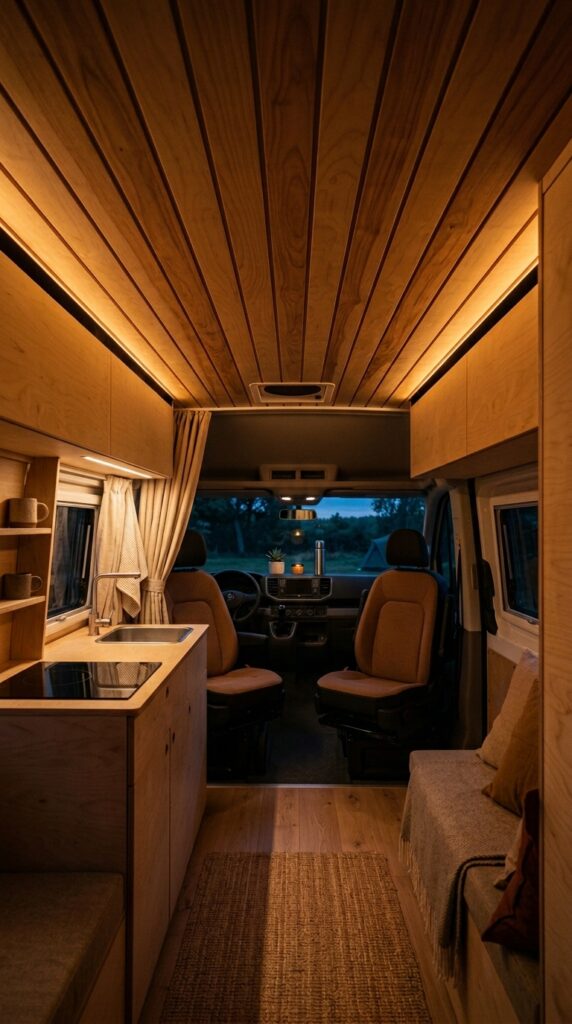
Vibe: Enveloping — a ceiling that makes the van feel like it glows from within.
Why it works: Birch plywood ceiling lining in thin longitudinal strips achieves the highest warmth-to-weight ratio of any ceiling treatment available to van builders — the 4mm thickness means a full ceiling lining adds less than 3kg to the vehicle while delivering the warm grain quality that transforms a metal box into a domestic space. Running strips longitudinally (parallel to the van’s length) creates a visual perspective that makes the interior read as longer and more spacious than transverse installation. LED strips recessed behind a shadow gap at the ceiling-cabinet junction provide indirect ambient light that eliminates point-source shadows and produces the warm, cave-like quality that makes evening in a van genuinely pleasant.
How to get it: Rip 4mm birch ply into 80mm strips on a table saw and install with a 5mm gap between strips using spacer cards — the gap prevents buckling as the wood acclimates to temperature changes inside the van. Adhere with contact adhesive to a foam-backed wall panel substrate already attached to the van’s ceiling ribs.
Shop the Look
| Product |
| 4mm birch plywood sheet flexible thin |
| LED strip light controller dimmer 12V |
| Contact adhesive spray foam substrate |
| Shadow gap trim aluminium extrusion |
| Foam backed wall panel van lining kit |
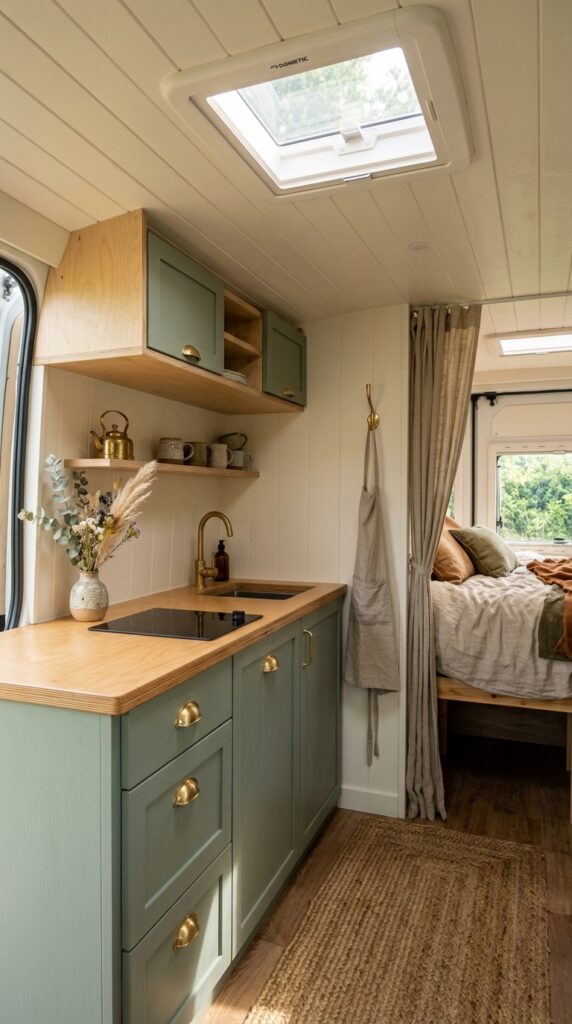
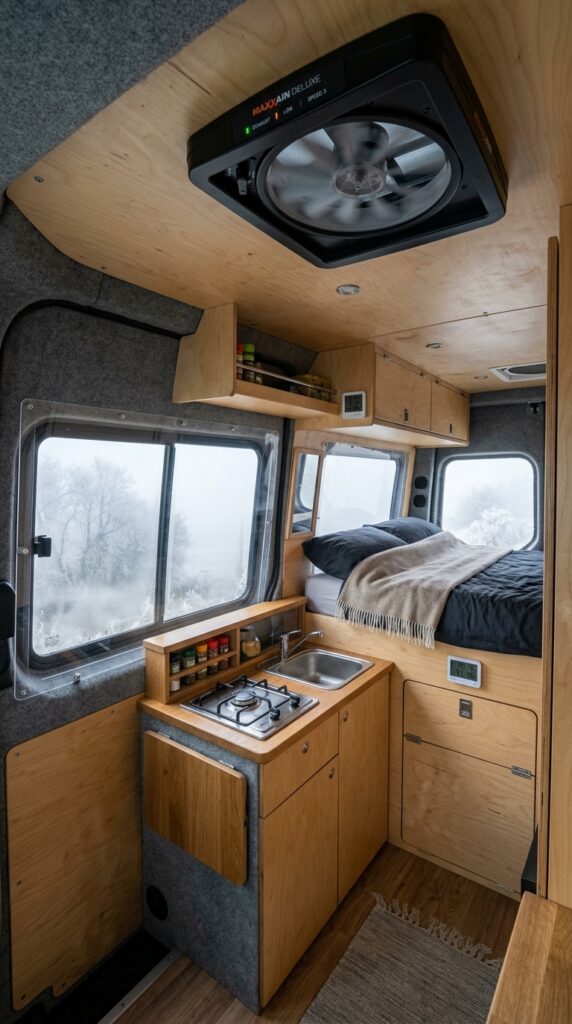
3. Full-Length Kitchen Galley on One Side
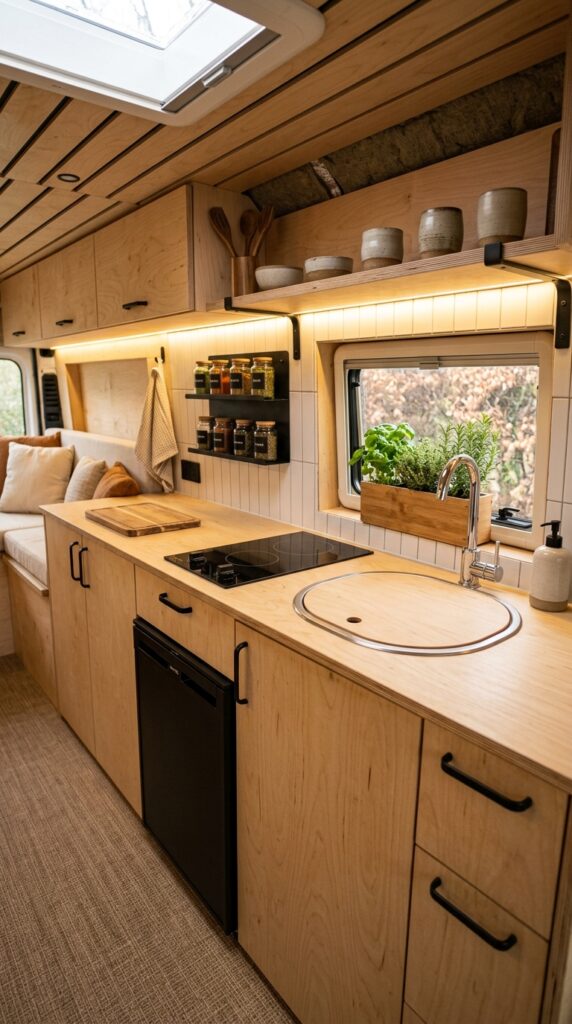
Vibe: Functional — a kitchen that takes cooking in a van seriously.
Why it works: A full-length galley kitchen running the entire side of a large van (Sprinter LWB, Transit LWB, or equivalent) provides the most linear working space of any van kitchen configuration — at 1800mm, it accommodates hob, sink, fridge, and preparation surface in a single uninterrupted workflow, which is how professional galley kitchens in boats and trains are designed. The standard 600mm counter height is critical: lower counters (common in rushed van builds) force a hunched working posture that makes cooking uncomfortable over time. Open shelving above the counter provides instant visual access to frequently used items without the weight and complexity of cabinet doors.
How to get it: Build the base cabinet carcase in 18mm birch ply with a 40mm solid oak nosing on the counter front edge — the solid wood edge protects the counter from the impact damage that ply edges sustain in daily van use. Install the induction hob flush in the counter top for a clean surface that doubles as preparation space when a silicone hob cover is in place.
Shop the Look
| Product |
| Portable induction hob two burner 12V |
| Oval stainless steel campervan sink small |
| Dometic 50L compressor fridge campervan |
| Black steel cabinet pull handle set |
| LED under cabinet light strip warm kitchen |
4. Fold-Down Work Desk from Cabinet Face
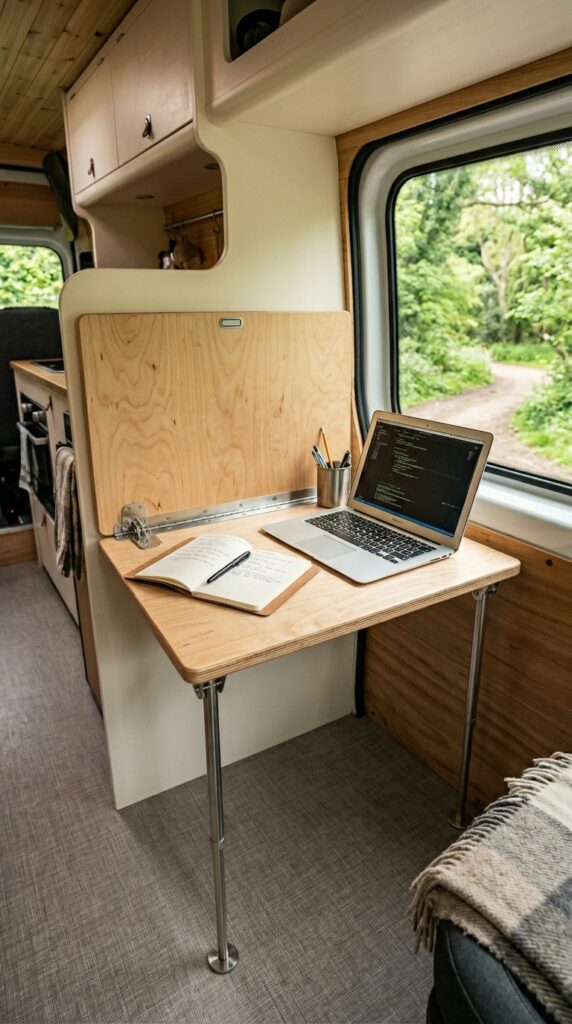
Vibe: Focused — a workspace that appears when needed and disappears completely.
Why it works: A fold-down desk hinged from a cabinet face is the highest-efficiency workspace solution in van design because it occupies zero floor space when folded and provides a genuine working surface when open — approximately 600×400mm, which is sufficient for a laptop and notebook. The folding-leg support system (two stainless kitchen counter supports at 300mm height) is more structurally stable than a single-arm bracket and allows the desk to support 15kg without flex. The magnetic catch on the cabinet face holds the desk flat against the cabinet when stowed, maintaining the clean plane of the joinery when the workspace is not in use.
How to get it: Mount the piano hinge at the cabinet face at desk-working height (720mm from the floor) so that when the desk is lowered to horizontal it sits at the correct working height without adjustment. Use a 3mm rubber foam strip as a soft-close buffer on the underside of the desk to prevent impact sound when lowering.
💡 Quick Win: A fold-down desk conversion of an existing flat cabinet face requires only a piano hinge ($12–$18), two folding metal shelf supports ($18–$28 for a pair), and a magnetic catch ($6–$10) — total materials under $60, installation under 2 hours.
Shop the Look
| Product |
| Piano hinge full length steel continuous |
| Folding shelf bracket support steel pair |
| Magnetic cabinet catch set |
| Birch plywood sheet 18mm offcut |
| Laptop stand portable minimal compact |
5. Sage Green Cabinet Colour Scheme
Vibe: Calm — a van interior that holds the quality of a forest clearing.
Why it works: Dusty sage green on van cabinetry works for a specific reason that goes beyond aesthetic preference: the grey-green tone references the natural environments that van life most frequently places a vehicle in — forest floors, alpine meadows, coastal scrub — creating a colour continuity between interior and exterior landscape that makes the van feel connected to its surroundings rather than contrasting with them. Farrow & Ball Mizzle, Benjamin Moore Rosemary, or Dulux Sage provide the right register: desaturated enough to recede rather than dominate, warm enough to avoid the clinical quality of blue-grey. Paired with birch ply counters and brushed brass hardware, the palette is resolved in three materials and three tones.
How to get it: Paint cabinet fronts in eggshell finish rather than satin for van interiors — eggshell is more scrubbable than flat but less reflective than satin, and its slight sheen prevents the colour from looking flat under the low-intensity light conditions typical of van interiors. Apply two coats over a shellac primer to prevent grain bleed-through on MDF.
Shop the Look
| Product |
| Dusty sage green interior paint eggshell finish |
| Brushed brass cup pull cabinet handle |
| Shellac primer spray can MDF sealer |
| Dried botanical arrangement small ceramic vase |
| Natural linen curtain panel van window |
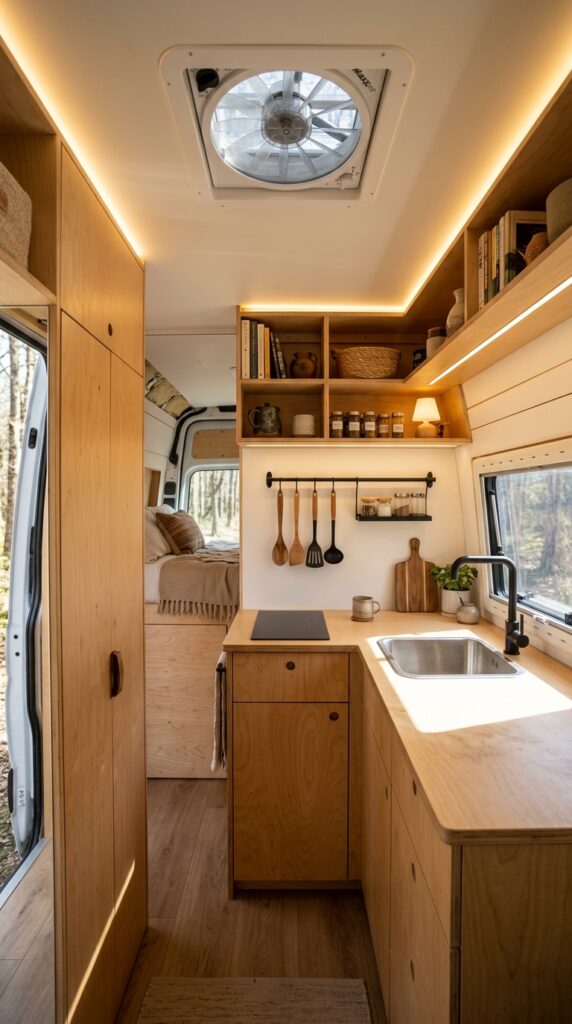
6. Roof Vent with Stargazing Mesh Panel
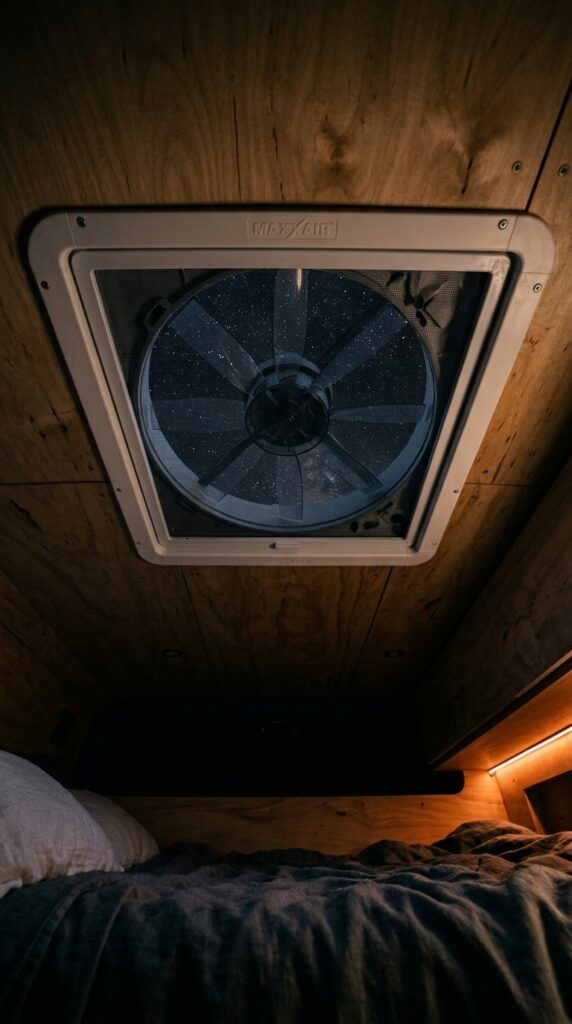
Vibe: Open — the van roof becomes a window to the sky.
Why it works: A roof vent positioned directly above the bed is the single design decision that does the most to dissolve the psychological boundary between van living and outdoor living — lying on the bed with the fan open on a clear night provides a direct, unobstructed view of the sky that no fixed window achieves, because the vent’s vertical orientation provides a true overhead perspective. The Maxxair or Fan-Tastic vent with a fly-screen mesh panel allows this view while preventing insects, and the fan function handles both temperature regulation and moisture extraction — the two most critical comfort variables in van living. One roof vent serving sleeping, ventilation, and night-sky access justifies its cost ($150–$280) comprehensively.
How to get it: Position the roof vent at the midpoint of the bed, not at the foot — overhead placement at sleeping position provides the stargazing orientation. Cut the roof opening with a jigsaw, frame with 18mm birch ply to create an insulated curb, and seal with butyl tape and self-levelling Dicor sealant at the flange perimeter.
Shop the Look
| Product |
| Maxxair roof vent fan campervan 12V |
| Butyl tape self adhesive van roof seal |
| Dicor self levelling sealant roof |
| Fly screen mesh replacement roof vent |
| Roof vent frame birch ply surround kit |
7. Modular Seating with Hidden Storage
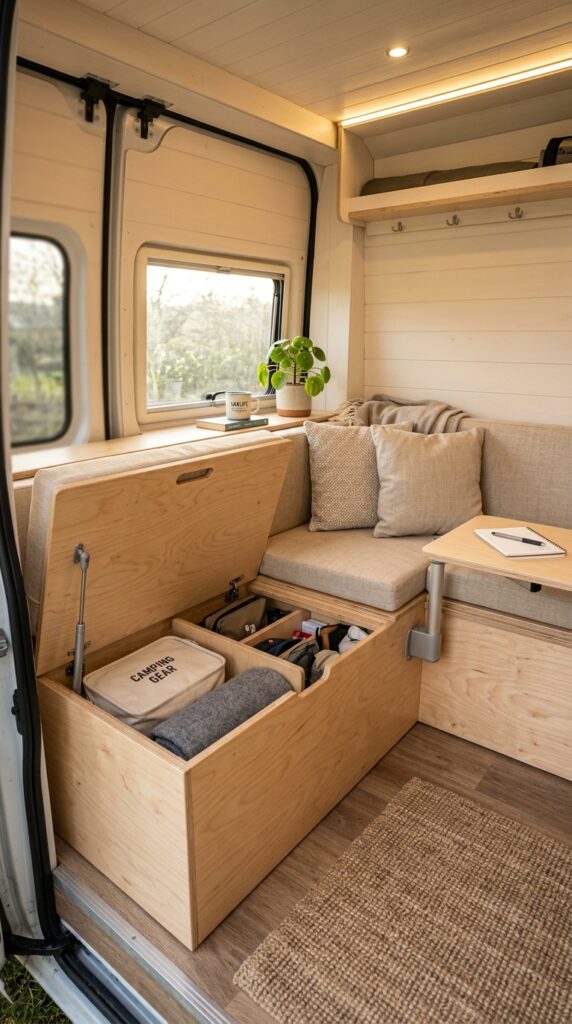
Vibe: Warm — a seating area that holds both comfort and everything you own.
Why it works: An L-shaped rear bench with lift-up storage panels provides a seating area, a social space, and the van’s secondary storage volume simultaneously — this three-function density is what good van design consistently achieves. The 450mm seat height is the ergonomic standard for comfortable seated posture; lower benches (common in basic builds) create an uncomfortable legs-up position that makes the seating area unusable for extended periods. Gas strut supports for the seat panels allow single-handed opening while holding the panel securely at full extension — a detail that seems minor but is used dozens of times per week and directly affects the quality of daily van life.
How to get it: Build bench carcases in 18mm birch ply with a 12mm top panel — the top panel’s reduced thickness keeps the hinge edge thin enough for a clean seat edge reveal. Cut a finger groove 15mm deep and 30mm wide along the front underside of each seat panel for a flush pull detail that requires no hardware.
Shop the Look
| Product |
| Gas strut support lid stay 100N pair |
| Natural linen seat cushion cover indoor outdoor |
| Foam seat cushion medium density 75mm |
| Piano hinge stainless steel lid storage |
| Folding table leg bracket steel pair |
8. Maximising Natural Light — Large Side Windows
Vibe: Airy — the outside comes in through these windows before you open the door.
Why it works: Installing large fixed conversion windows in the cargo body of a panel van is the single most impactful modification for interior light quality — a panel van without additional windows operates at approximately 30% of the natural light level of the same space with two 800×400mm side windows added. Natural light also dramatically reduces the perceived size constraint of the interior: a well-lit 6-square-metre space reads as more spacious than an artificially lit 10-square-metre space. Positioning windows at counter height on the kitchen side and at seat height on the living side ensures that both working and resting orientations benefit from the light source.
How to get it: Source double-glazed van conversion windows with a black rubber seal for thermal performance — single-glazed windows cause significant condensation on cold nights and create cold spots adjacent to the sleeping area. The Carbest or Seitz ranges offer double-glazed options in standard van body cut-out sizes. Cut van body openings with a jigsaw fitted with a metal-cutting blade after drilling a 10mm pilot hole at each corner.
Shop the Look
| Product |
| Double glazed van conversion window 800x400mm |
| Jigsaw blade metal cutting fine tooth |
| Van window rubber seal black frame |
| Curtain rod tension spring van window |
| Linen curtain panel small van window |
9. Sprinter High-Top Conversion — Standing Height
Vibe: Spacious — standing in a van that does not require stooping changes everything.
Why it works: The Sprinter high-roof body provides approximately 195cm of internal standing height after insulation and floor build-up — just sufficient for most adults to stand fully upright — and this single dimension transforms the livability of a van build more than any other variable. The ability to stand, dress, cook, and move through the space without ducking eliminates the primary physical fatigue of van living over extended periods. High-roof conversion also provides an additional 400mm of vertical space for storage: ceiling-height cabinetry, overhead shelving, and hanging storage all become viable, dramatically increasing the total storage volume of the build.
How to get it: When planning a high-roof Sprinter build, account for floor build-up carefully — a standard insulation and ply floor construction adds 60 to 80mm, reducing the ceiling height from the raw 210cm to approximately 195cm. Use thin profile Thinsulate insulation (40mm) in the ceiling ribs rather than standard cut-and-cobble foam insulation to preserve maximum internal height.
💡 Quick Win: Installing a ceiling-height pegboard panel (1700mm tall, 600mm wide) at the van’s mid-point on one wall costs $35–$55 in materials and provides a fully configurable storage wall — hooks, shelves, and brackets can be repositioned without drilling.
Shop the Look
| Product |
| Thinsulate van insulation roll 40mm |
| Ceiling height pegboard panel van storage |
| Pegboard hook set van storage accessories |
| Overhead cabinet hinge soft close |
| Utensil hanging rail kitchen steel |
10. Warm Amber LED Mood Lighting System
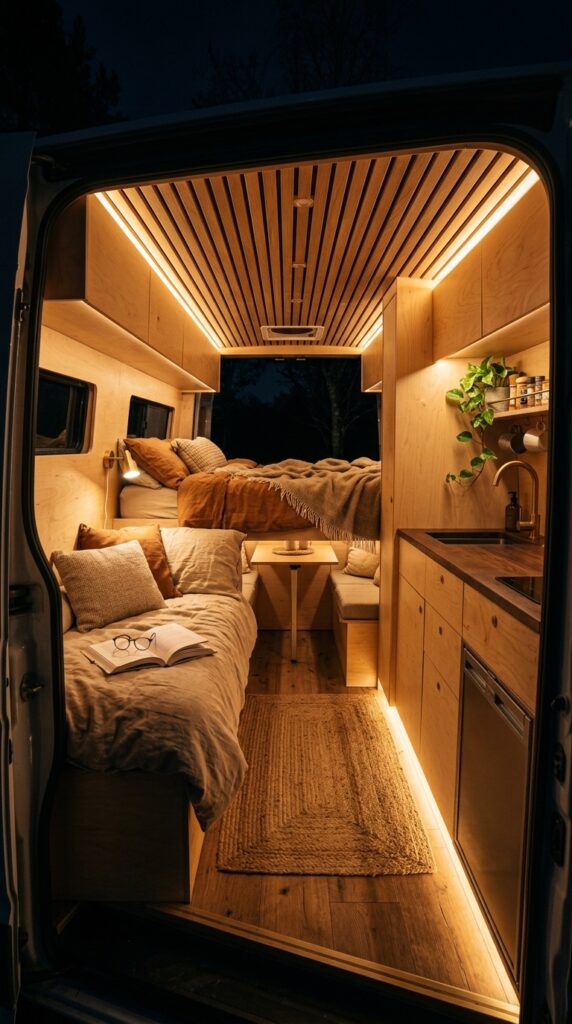
Vibe: Moody — a van at night that holds the quality of a candlelit room.
Why it works: A three-zone LED lighting system — ceiling ambient, under-counter task, and bed reading — creates the layered light quality that makes an evening in a van genuinely comfortable rather than merely functional. The key is zone independence: each circuit should be individually switchable so that the reading light can be used without the full ceiling ambient, and the under-counter lighting can illuminate the kitchen without disturbing a sleeping partner. All LEDs should be 2700K without exception — 4000K cool white, even used sparingly, introduces a harshness that the warm-material palette of the van interior cannot absorb.
How to get it: Wire each lighting zone to its own switch on a central switch panel, powered from the leisure battery via a 5-amp fused circuit. Total power consumption for three LED zones (ceiling strip 10W, under-counter 5W, reading light 3W) is 18W at 12V — 1.5 amps — which is negligible on a 100Ah leisure battery and provides 60+ hours of full lighting from a single charge.
Shop the Look
| Product |
| LED strip light 2700K warm white 12V van |
| Adjustable flex arm reading light 12V |
| LED dimmer switch 12V inline |
| Toggle switch panel van leisure 12V |
| LED under cabinet strip light adhesive |
11. Compact Wet Room Bathroom

Vibe: Compact — a bathroom that justifies every one of its 54 square centimetres.
Why it works: A full wet room bathroom in a van — shower and toilet in one combined 600×900mm cell — is the build choice that most directly affects the independence and livability of long-term van travel. The wet room format (the entire cell waterproofed, no shower tray or door) is the most space-efficient bathroom typology available: the toilet serves as the shower seat, the floor drains from the entire area, and no space is lost to a shower enclosure. A sliding birch door on an aluminium track uses zero swing clearance and seals the bathroom from the living area. The teak slat floor provides a warm, textured, non-slip surface that is naturally water-resistant and lifts out for drying.
How to get it: Waterproof the wet room cell using fibreglass mat and resin applied to a 9mm ply substrate — this is lighter and more flexible than tile adhesive and waterproof membrane systems, and tolerates the vehicle’s constant movement and vibration without cracking. Apply two coats of fibreglass over all seams and corner joints.
Shop the Look
| Product |
| Thetford bench seat cassette toilet compact |
| Teak bath mat slat removable |
| Fibreglass mat and resin kit waterproof |
| Sliding door track aluminium wall mount |
| 12V shower pump campervan water |
12. Vertical Spice and Pantry Wall
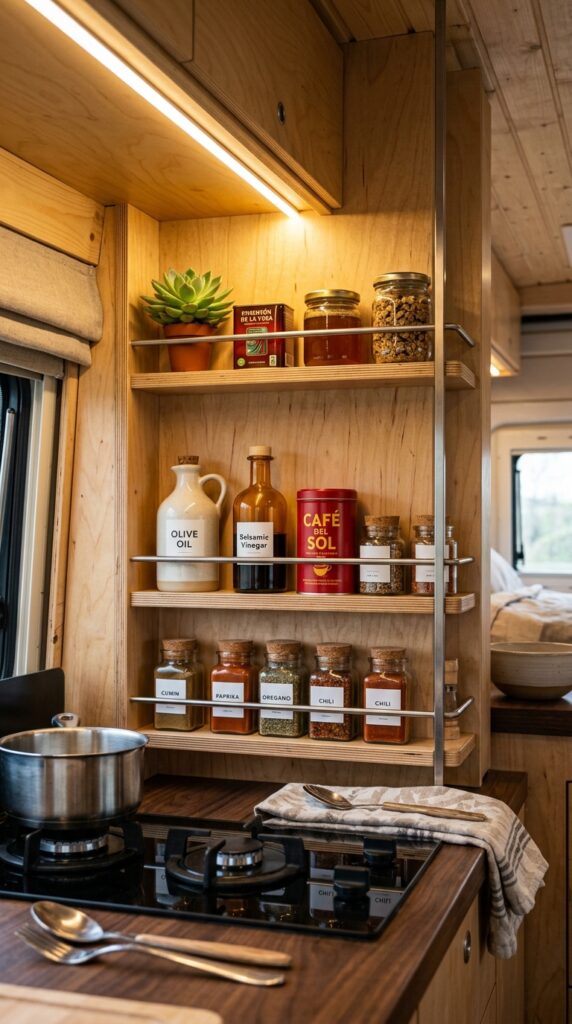
Vibe: Organised — a kitchen wall that holds everything you need in plain sight.
Why it works: A vertical pantry wall adjacent to the hob — utilising the full height from counter to ceiling on a narrow section of wall — provides the most concentrated dry goods storage of any van kitchen solution by using height rather than depth. Shelves at variable spacing (150mm for spices, 250mm for standard tins, 350mm for tall bottles) match the storage containers’ heights exactly, eliminating the wasted space that uniformly spaced shelving produces. The combination of a solid front lip rail (which catches jars in transit) and a secondary thin stainless rod (which prevents larger items from falling at higher speeds or on rough roads) provides dual containment for the road-speed vibration and cornering forces that van pantry storage must withstand.
How to get it: Rout a 10mm wide, 8mm deep groove along the underside of each shelf front at 20mm from the front edge and glue in a 10mm dowel rod — this creates an invisible secondary restraint that holds items against the shelf even in aggressive cornering without the visual clutter of a visible rod at every shelf.
Shop the Look
| Product |
| Glass spice jar set cork lid uniform |
| Stainless steel rod rail thin 8mm |
| Birch plywood shelf lip rail strip |
| Ceramic oil jug small kitchen |
| Small succulent plant compact van shelf |
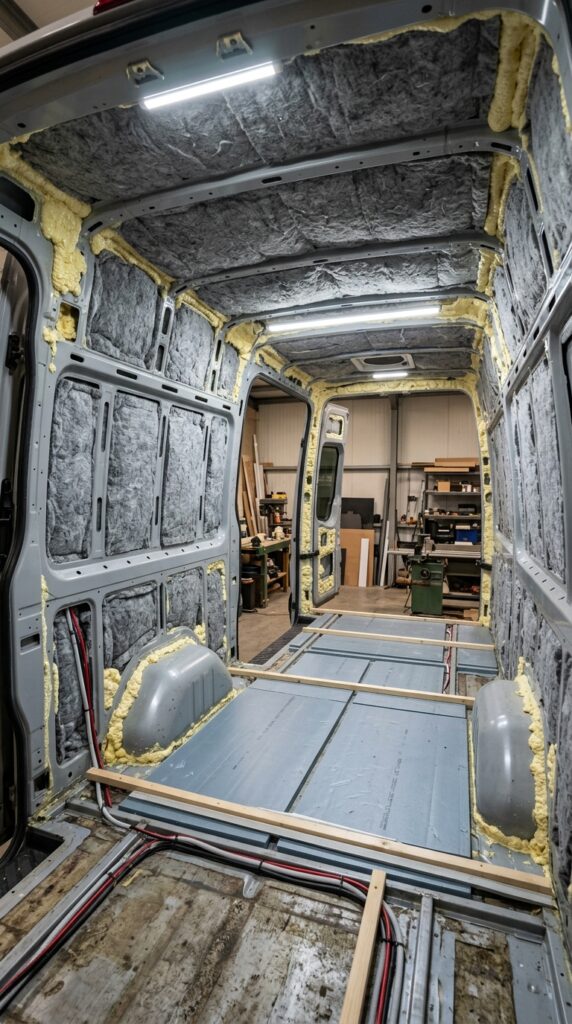
13. Insulation Strategy — Thinsulate and Spray Foam
Vibe: Methodical — insulation done carefully is the difference between a habitable van and a vehicle.
Why it works: Insulation is the single most important determinant of van livability across all seasons — an under-insulated van is cold in winter, hot in summer, and wet with condensation year-round. Thinsulate (3M SM600L) installed in all wall cavity ribs provides an R-value of approximately 5.5 per 40mm thickness while managing moisture vapour better than any foam product — it does not trap moisture against the metal skin, which is the primary cause of van body rust in converted vehicles. Closed-cell spray foam is used specifically in irregularly shaped voids and at the metal-to-wood transitions where thermal bridging would otherwise occur. The combination of both products provides complete thermal coverage without the rigid-foam cutting waste that the cheaper cut-and-cobble approach generates.
How to get it: Install Thinsulate in all flat cavity sections first, then use a low-expansion closed-cell spray foam kit (not high-expansion, which can distort van body panels under pressure) to fill all residual voids. Wear full respiratory protection during spray foam application — the off-gassing during cure is significant.
Shop the Look
| Product |
| 3M Thinsulate SM600L van insulation roll |
| Closed cell spray foam kit low expansion |
| Rigid foam board insulation 50mm floor |
| Vapour barrier tape sealing joints |
| Respirator mask spray foam PPE |
14. Natural Linen and Canvas Soft Furnishings
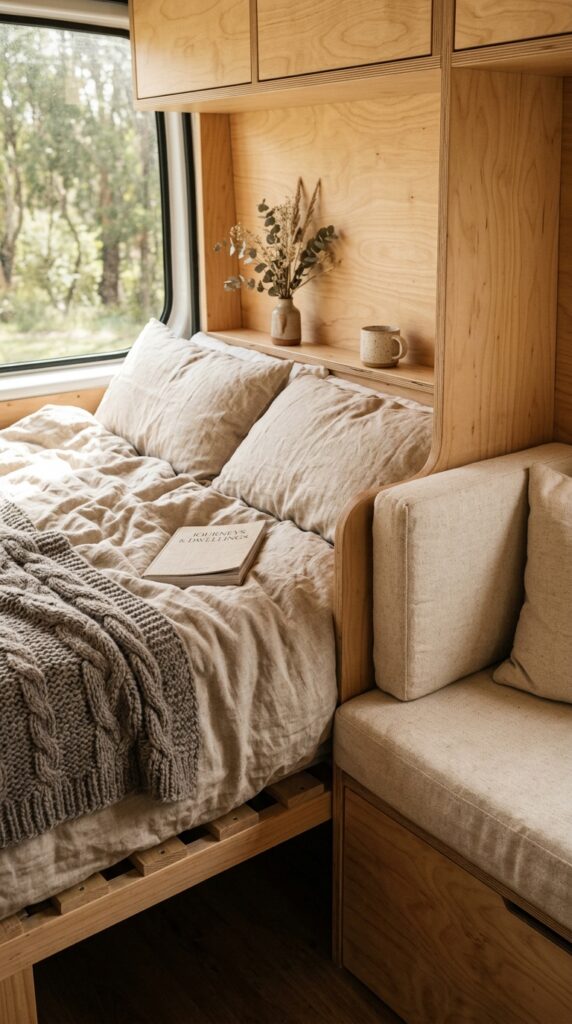
Vibe: Tactile — a sleeping space that earns its warmth through material rather than decoration.
Why it works: Natural linen and canvas soft furnishings in a van interior provide three functional advantages beyond aesthetics: they regulate temperature more effectively than synthetic textiles, absorbing and releasing moisture with the cabin’s humidity changes; they resist the mildew that polyester fabrics develop in the damp conditions of a sealed vehicle over time; and their undyed or naturally dyed tones maintain colour consistency even as they fade over years of UV exposure through van windows. The material palette — natural flax linen, unbleached canvas, undyed wool — also requires no colour coordination with the birch and sage cabinet palette, which simplifies the design decision-making of the build significantly.
How to get it: Source linen fabric from Rough Linen or Libeco at 300g per square metre minimum for a duvet cover — lighter linen in van conditions gets thin quickly from repeated washing. Sew cushion covers in an 8oz or 10oz cotton canvas (the weight used for workwear and boat covers) for durability in a daily-use environment.
Shop the Look
| Product |
| European linen duvet cover natural flax |
| Unbleached cotton canvas fabric 10oz |
| Chunky knit wool throw warm grey |
| Linen cushion cover set oatmeal natural |
| Dried botanical bunch natural neutral |
15. Electrical System — Solar, Leisure Battery, and Inverter
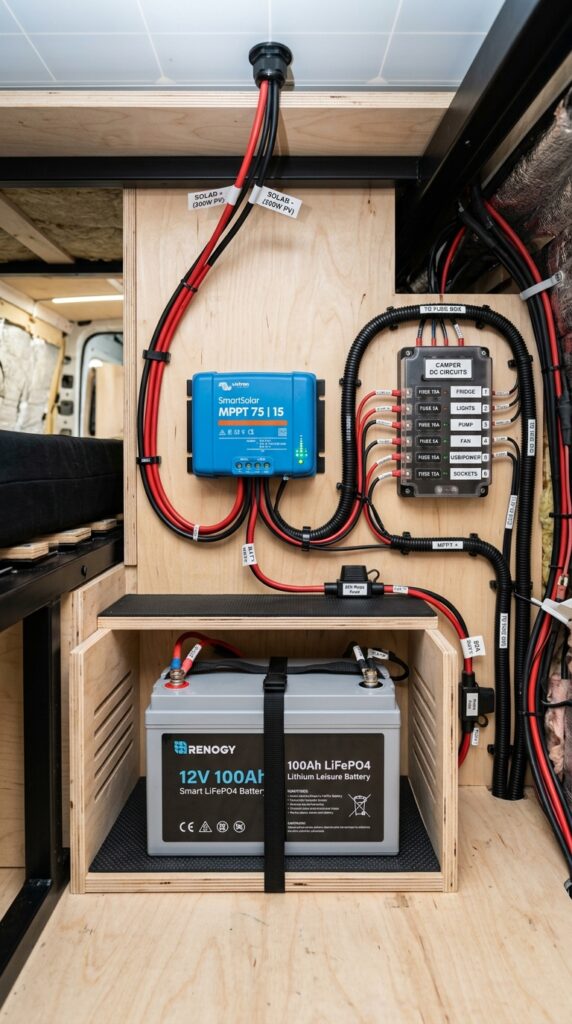
Vibe: Precise — an electrical system built to the standard of a boat.
Why it works: A complete and correctly specified electrical system — solar input, MPPT charge controller, lithium leisure battery, and inverter — is the infrastructure that determines what life in a van actually permits day to day. A 200W solar panel feeding a Victron SmartSolar MPPT into a 100Ah LiFePO4 battery provides approximately 80Wh of daily charging capacity in average European sun, sufficient to power LED lighting, phone charging, a laptop, a USB-C fan, and a water pump for 24 hours with comfortable headroom. Lithium (LiFePO4) over AGM is the build standard in 2025 — the usable capacity is 95% versus 50% for AGM, the charge rate is 4× faster, and the 10-year lifespan at 3,000 cycles amortises to less per year than replacing AGM batteries every 3 years.
How to get it: Use the Victron SmartSolar MPPT 75/15 as the charge controller — its Bluetooth monitoring via the VictronConnect app provides real-time system visibility that identifies any charging or consumption problem before it becomes critical. Specify all cable runs in marine-grade tinned copper wire at the correct ampacity for the circuit length; automotive wire corrodes in van humidity conditions within 3 to 5 years.
Shop the Look
| Product |
| Victron SmartSolar MPPT 75/15 charge controller |
| 100Ah LiFePO4 lithium leisure battery |
| 200W solar panel mono semi-flexible |
| Marine grade tinned copper cable 6mm |
| Consumer unit 12V automotive fuse box |
16. Folding Outdoor Kitchen Extension
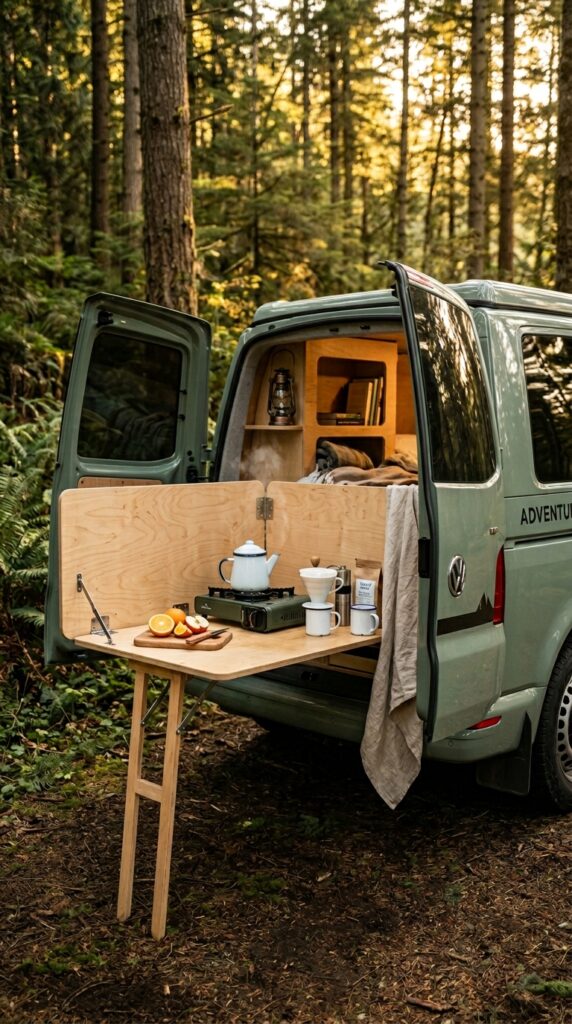
Vibe: Adventurous — cooking outside the van in the last hour of light.
Why it works: A fold-down table hinged from the rear door extends the van’s functional footprint into the outdoor environment in one of the most elegant ways available — the rear door itself becomes the structure, and the table folds flat against the door and disappears completely when driving. This is the van equivalent of the sailboat transom table: using existing structure as the mounting point eliminates the need for a separate outdoor furniture system and keeps the camping setup achievable in under 2 minutes. The outdoor kitchen ritual — coffee on the rear step at dawn, cooking dinner with a view — is one of the primary experiential reasons people choose van life, and designing it properly treats it with the seriousness it deserves.
How to get it: Mount the table hinge at the rear door’s upper horizontal rail — the strongest point of the door structure. Use M8 bolts through the door panel to anchor the hinge, with backing plates on the interior face to distribute load. The folding legs should be 350mm for a standing-height cooking surface at door level; adjust if the van floor-to-door threshold is higher or lower than standard.
💡 Quick Win: A fold-down rear door table in 18mm birch ply on two folding shelf brackets costs $60–$90 in materials, adds zero driving weight (it folds flat to the door), and is the highest-enjoyment-per-dollar modification in any van outdoor living system.
Shop the Look
| Product |
| Folding shelf support bracket heavy duty pair |
| Enamel camping mug set two piece |
| Small butane camping stove compact |
| Pour over coffee dripper camping |
| Small wooden cutting board handle camping |
17. Climbing and Outdoor Gear Storage System
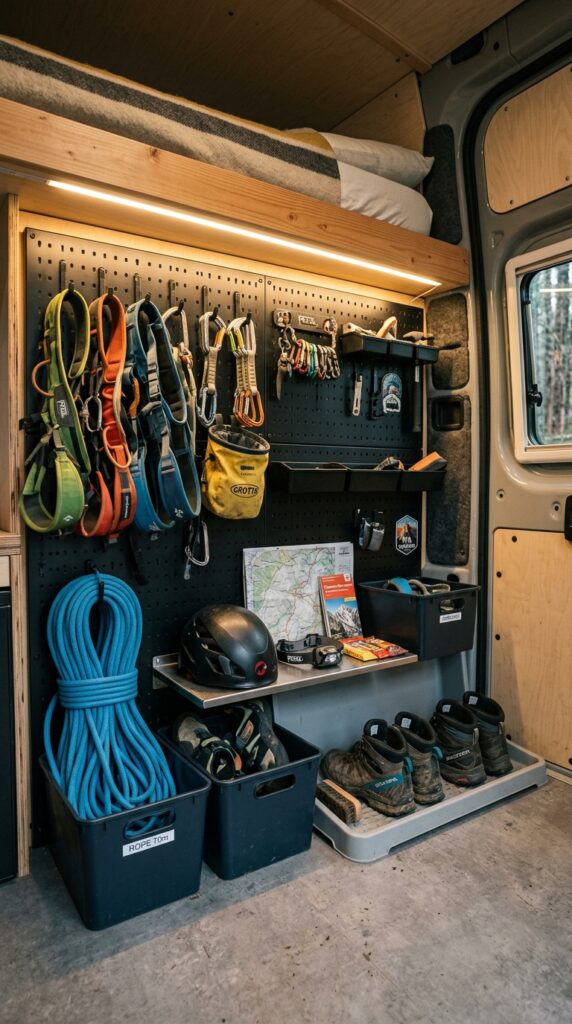
Vibe: Purposeful — a garage organised around going somewhere specific.
Why it works: The under-bed garage zone is the van’s primary gear storage volume, and designing it as a sport-specific modular system — rather than a general-purpose open space — dramatically increases both storage efficiency and gear access speed. A blackened steel pegboard system allows the configuration to be changed as activities or seasons change: the climbing setup reconfigures to a surfboard fin system, to a ski boot rack, to a photography equipment bay without any drilling or permanent modification. Every piece of gear has a specific, deliberate home, which prevents the garage from descending into the undifferentiated pile that is the most common van storage failure mode.
How to get it: Install the pegboard on a plywood backing panel mounted to the interior face of the rear door — this keeps the garage floor entirely clear and uses the door surface area that would otherwise be wasted. Mount the backing panel with four M8 wing nuts so the entire system removes quickly when the van needs to carry oversized cargo.
Shop the Look
| Product |
| Blackened steel pegboard panel 600x900mm |
| Large pegboard hook set modular |
| Boot tray waterproof van floor |
| Rope storage bin divided pegboard |
| Helmet shelf bracket pegboard mount |
18. Condensation Management — Ventilation and Vapour
Vibe: Resolved — the most invisible and important feature in any van build.
Why it works: Condensation is the primary cause of comfort failure, health problems, and structural deterioration in van conversions — two adults sleeping in a sealed van produce approximately 500ml of moisture vapour per night, and without active management this condenses on the coldest surfaces (metal ribs, windows, wheel arches) producing wet walls, mould, and rust. A three-part condensation management system — roof vent fan running on low extraction overnight, Thinsulate insulation eliminating cold surfaces on the van body, and secondary acrylic glazing over windows — reduces condensation to near zero in all but the most extreme cold-and-humid conditions. This is not an aesthetic decision but a structural necessity for any van used year-round.
How to get it: Set the roof fan to run on its lowest extraction setting (approximately 2W) whenever people are sleeping in the van — this continuous slight negative pressure draws humid air up and out before it can condense on colder surfaces. The 2W draw over 8 hours is 16Wh, which is negligible on any leisure battery system.
Shop the Look
| Product |
| Maxxair roof vent fan variable speed 12V |
| Acrylic secondary glazing film window |
| Dehumidifier bag silica gel van reusable |
| Hygrometer humidity monitor compact digital |
| Roof vent rain cover dome exterior |
19. Warm Earthy Tones — Terracotta and Ochre
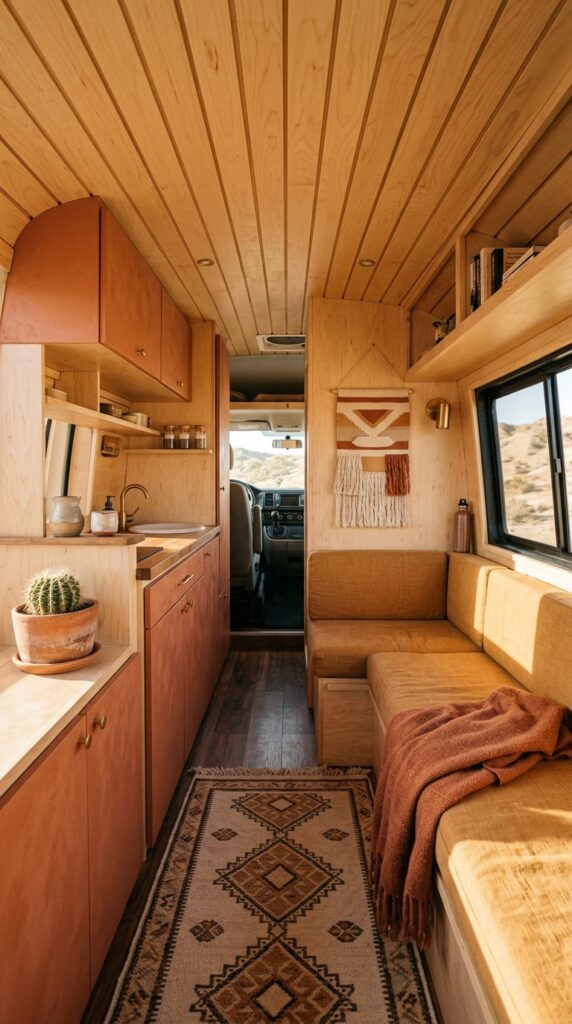
Vibe: Earthy — a van interior that belongs in a desert canyon.
Why it works: A terracotta and ochre palette in a van interior references desert landscapes — the red rock of Utah, the ochre earth of Western Australia, the terracotta walls of Spanish mesa towns — and creates a colour continuity between the van and the environments it most naturally inhabits. These warm earth tones also have a specific functional advantage in van interiors: their warm red-yellow undertones absorb and warm LED light rather than reflecting it, creating a quality of lamplight warmth even under artificial sources. Terracotta (a warm red-orange, similar to Farrow & Ball Perineum or Benjamin Moore Moroccan Spice) on cabinet fronts against birch ply ceilings produces the most sun-warmed interior atmosphere of any van colour palette.
How to get it: Apply terracotta in a breathable mineral paint rather than standard latex — mineral paint (Earthborn or similar) is more vapour-permeable than latex, which is important in the moisture-variable environment of a van interior. The slightly matte, chalky surface of mineral paint also reads as more authentic to the earthy palette’s reference materials than a standard eggshell finish.
Shop the Look
| Product |
| Terracotta interior mineral paint warm |
| Ochre linen cushion cover pair |
| Small terracotta planter cactus indoor |
| Rust tone wool blanket throw |
| Woven wall hanging small textile natural |
20. Magnetic Knife Rail and Kitchen Organisation
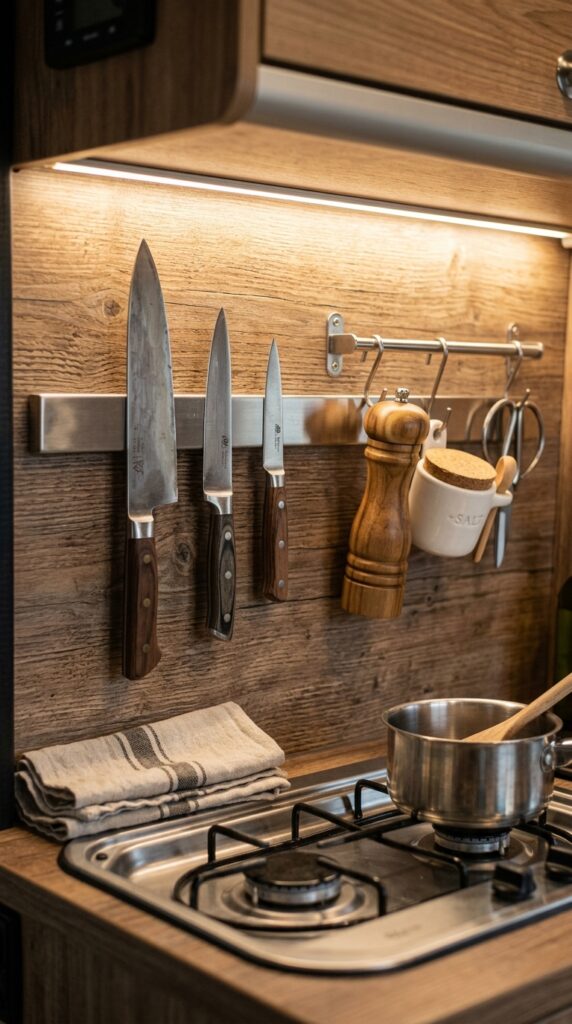
Vibe: Precise — a kitchen wall that treats cooking as a serious activity.
Why it works: A magnetic knife rail is the optimal knife storage solution for van kitchens because it eliminates the drawer space a knife block occupies, keeps blades accessible without a sheath, and — critically — holds knives securely during vehicle movement without rattling. A 400mm stainless magnetic rail with a strong N52 magnet grade holds three full-size knives firmly at speeds up to 100km/h and over road vibration without any additional retention. Mounted at splashback height behind the hob, it positions knives ergonomically for kitchen use — reachable from the hob without stepping. The adjacent small S-hook rail for a pepper grinder and salt cellar extends the principle to all frequently accessed kitchen items.
How to get it: Mount the magnetic rail using the supplied screws through the splashback substrate into a solid ply backing panel — a magnet strip mounted into foam insulation will pull free under road vibration. Always install into solid substrate and use the full complement of mounting holes for security.
Shop the Look
| Product |
| Stainless magnetic knife rail 400mm wall mount |
| Kitchen knife set 3 piece compact chef |
| S-hook rail stainless small accessories |
| Ceramic salt cellar small kitchen |
| Wood pepper grinder compact kitchen |
21. Retractable Privacy Blinds for All Windows
Vibe: Private — the van becomes completely its own world after dark.
Why it works: Custom-fit blackout blinds for all van windows serve two essential functions: privacy for overnight stealth parking in urban and semi-urban environments, and blackout for sleep quality — particularly critical in summer at high latitudes where light persists until 10pm or later. The custom-fit approach (blinds cut to the exact window opening with aluminium channel tracks at top and bottom) eliminates the light gap at window edges that standard curtain approaches produce, achieving full blackout rather than partial light reduction. A blind that retracts completely into a 30mm channel above the window preserves the window’s natural light and view function during the day without any visible hardware intrusion.
How to get it: Use Remis or Horrex aluminium blind cassette systems designed specifically for vehicle windows — these provide the guide channel-and-cassette mechanism in a single extruded aluminium profile that mounts flush to the window frame with self-adhesive tape and two screws. Order to the exact window dimensions; custom cutting is standard for these systems.
💡 Quick Win: Thermal reflective sunshade cut-outs for all cab windows (windscreen, driver’s and passenger’s side) cost $25–$45 for a full set and provide immediate blackout and thermal protection for the cab area — the most thermally vulnerable part of any panel van conversion.
Shop the Look
| Product |
| Remis blind cassette van window custom |
| Blackout fabric material roll dark charcoal |
| Aluminium channel extrusion guide track |
| Reflective thermal cab blind set van |
| Blind fixing tape self adhesive strong |
22. Hanging Plant and Living Greenery
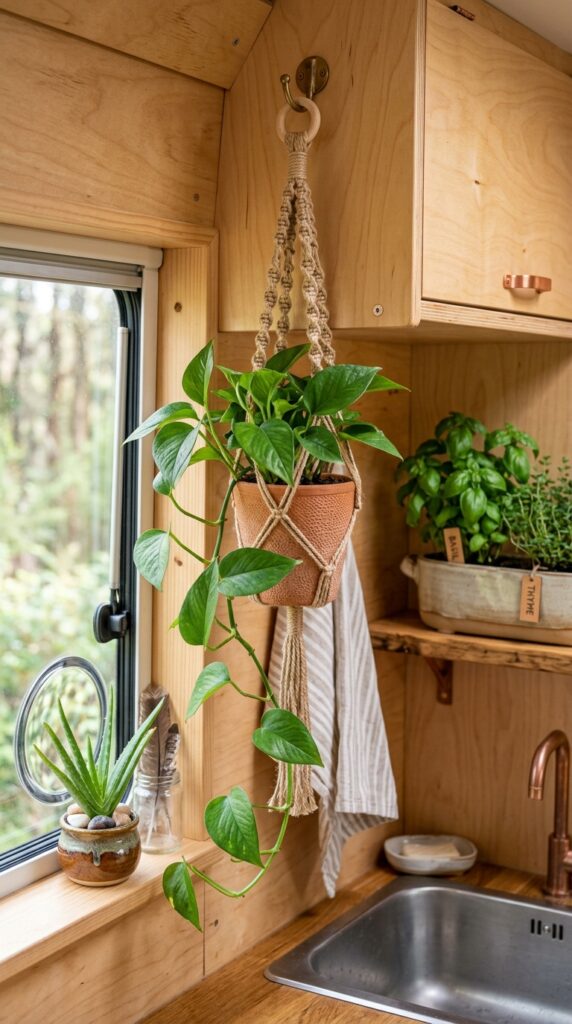
Vibe: Alive — a van that holds living things alongside everything else.
Why it works: A single trailing plant in a van interior does something no material or lighting choice achieves: it introduces a biological, living presence that changes daily, responds to light and temperature, and communicates that the space is genuinely inhabited rather than temporarily occupied. The trailing pothos (Epipremnum aureum) is the optimal van plant — it tolerates low light, irregular watering, temperature variation from 5°C to 35°C, and road vibration without distress, and its trailing habit works with the van’s vertical surfaces rather than requiring horizontal shelf space. A small macramé hanger uses a single cabinet hook and keeps the pot above the working zone, leaving counter and shelf surfaces unoccupied.
How to get it: Water the pothos only when the top 2cm of soil is dry to the touch — in a van’s variable temperature environment this averages every 10 to 14 days. Secure the macramé hanger to a screw hook in the cabinet face above a window so the plant receives adequate light; a pothos with insufficient light loses its variegation and becomes entirely green within 6 to 8 weeks.
Shop the Look
| Product |
| Trailing pothos plant small indoor |
| Hemp macramé plant hanger small |
| Small terracotta pot 12cm indoor |
| Compact herb garden planter van window |
| Aloe vera plant small succulent indoor |
23. White-on-White Minimal Aesthetic

Vibe: Serene — a van that feels twice its size through the discipline of white.
Why it works: An all-white van interior is the palette choice that most dramatically increases perceived space — white reflects up to 80% of incident light back into the room, while natural birch or darker colours absorb a significant proportion. In a 6-square-metre interior, the additional reflected light from white surfaces creates a perceived volume increase of approximately 20 to 30%, which is the difference between a van that feels like a room and one that feels like a vehicle. The single warm material accent — natural birch ply on counter surfaces and shelf edges — prevents the all-white palette from reading as clinical or sterile while maintaining the light-maximising quality of the white field.
How to get it: Use a semi-gloss or gloss finish on cabinet fronts in white van interiors — the increased reflectivity amplifies the light-maximising effect. Clean with a microfibre cloth and diluted white vinegar rather than abrasive cleaners; gloss surfaces show scratches more readily than eggshell and require gentler maintenance in the daily-use van environment.
Shop the Look
| Product |
| White semi gloss cabinet paint interior |
| White foam backed wall panel van lining |
| White ceiling lining board tongue groove |
| Stainless steel cabinet handle set pull |
| White ceramic camping mug minimal |
24. Dual-Purpose Dinette that Converts to Bed
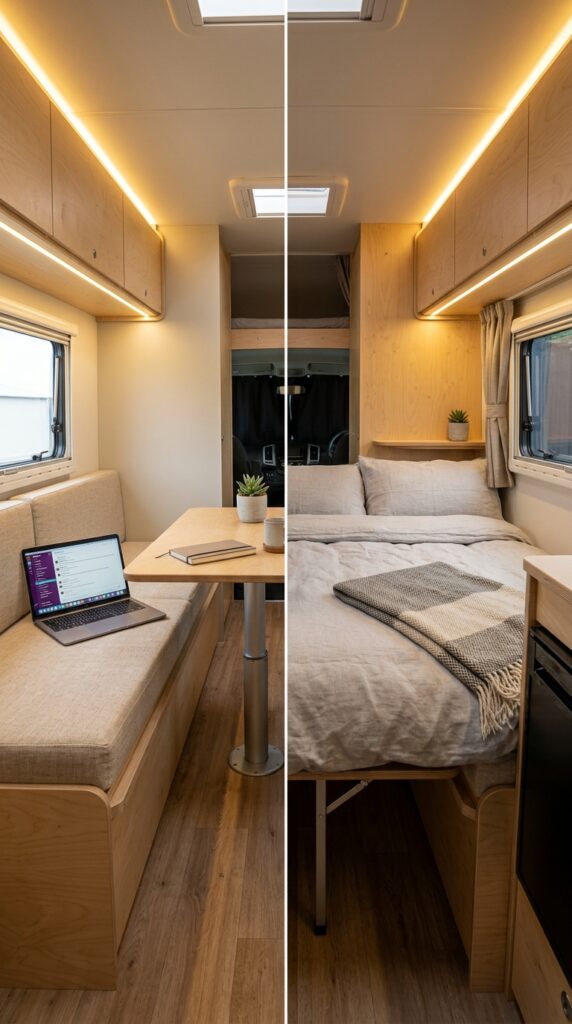
Vibe: Functional — the same 1.8 square metres serving three daily purposes.
Why it works: The dinette-to-bed conversion is the optimal space solution for vans where a fixed bed would consume too much of the total floor area — it provides dining, social, and working surfaces during the day and a full sleeping platform at night, with the conversion taking under 3 minutes. The mechanism is simple and reliable: the central table leg adjusts on a threaded post to lower the table surface to bench height, and the space between the two bench fronts is filled by the table and a gap-filling cushion section to create a flat platform. This configuration provides sleeping for two without the full-length floor space commitment of a fixed rear bed.
How to get it: Build bench seats at exactly the same height to within 2mm — a height discrepancy at the conversion point creates an uncomfortable ridge across the sleeping surface. The table leg post should be a 50mm aluminium tube with a threaded height adjustment at 50mm intervals from floor level to dining height; lock the adjustment with a locking pin rather than a friction clamp for security.
Shop the Look
| Product |
| Adjustable height table leg post aluminium |
| Locking pin clip table height adjustment |
| Bench seat foam cushion cut to size |
| Table top birch ply 600x900mm |
| Gap fill bolster cushion custom size |
25. Roof Rack and Bike Carrier Integration

Vibe: Adventurous — a van that arrives ready to do something.
Why it works: A full-length aluminium roof rack system integrates the van’s storage hierarchy with its adventure purpose — the rack carries the gear that defines the trip (bikes, surfboards, kayaks, solar) while the interior remains organised for living rather than storage. The Forward-mounted solar panel position on the roof rack provides optimal solar exposure in the northern hemisphere (facing south when parked) and protects the panel from the aerodynamic forces that roof-surface-mounted panels experience. Mountain bikes in fork-mount carriers are more aerodynamically efficient than wheel-on frame mounts — the reduced frontal area at highway speed makes a measurable difference to fuel economy on long transits.
How to get it: Specify a roof rack rated to at least 100kg static load and 50kg dynamic load for highway speeds — the Slimline II by Front Runner or equivalent aluminium systems meet this standard. Install on the van’s original roof rails or on gutterless adapters for smooth-roof vans; never mount a loaded rack on self-adhesive roof attachments.
Shop the Look
| Product |
| Aluminium roof rack slimline van full length |
| Fork mount bike carrier roof rack pair |
| Solar panel roof rack mount bracket |
| Roof rack cargo box waterproof large |
| Roof rack loading strap tie down set |
26. Scandinavian Hygge Interior — Wool, Wood, Candles
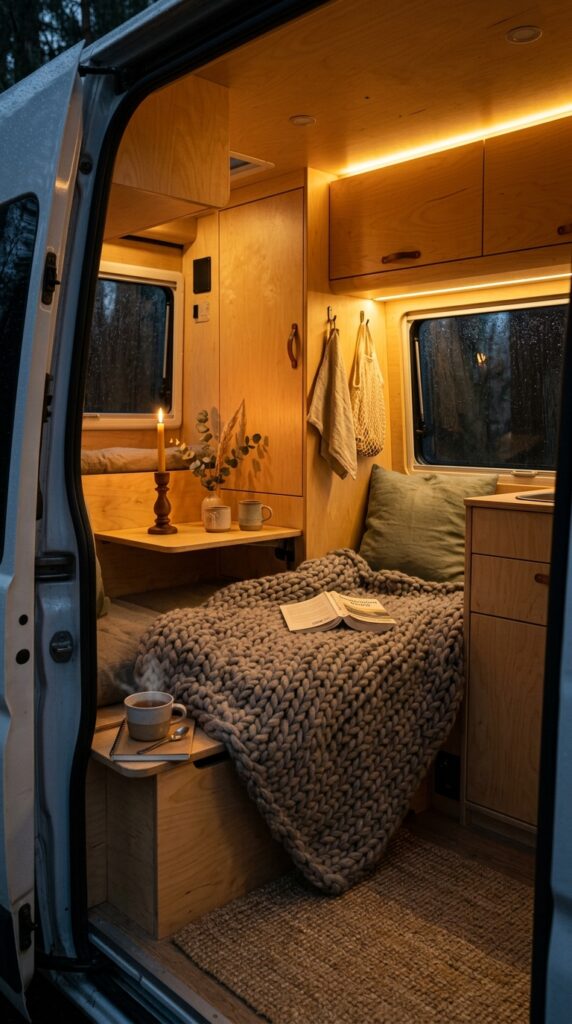
Vibe: Deeply cosy — the specific pleasure of rain on a metal roof when the inside is warm.
Why it works: The Scandinavian hygge approach to van interior styling draws on the same design philosophy that makes Nordic domestic interiors so widely admired — the conviction that warmth, light, and material honesty are sufficient to create a genuinely comfortable domestic space, without decoration or excess. In a van, this philosophy is applied under constraint: birch ply as the primary warm material, a single beeswax candle for supplemental light and scent, a chunky wool throw for tactile warmth, and a sage linen cushion as the single colour accent. The combination of candlelight, amber LED, warm birch, and wool on a rainy evening produces the most intensely comfortable van experience possible — the smallness of the space amplifies rather than diminishes the hygge quality.
How to get it: A beeswax candle in a van is a practical pleasure that requires two safety measures: a heat-resistant ceramic or stone candleholder (never wood alone), and a candle position where it cannot fall — recessed into a shelf with a 20mm lip, or inside a glass hurricane. Never leave a candle burning unattended in a van — the proximity of textiles and the enclosed space make this a genuine fire risk.
Shop the Look
| Product |
| Beeswax pillar candle natural golden |
| Turned wood candle holder tealight |
| Chunky merino wool throw grey natural |
| Sage linen cushion cover pair |
| Hurricane candle glass holder small |
27. Build Journal and Planning System
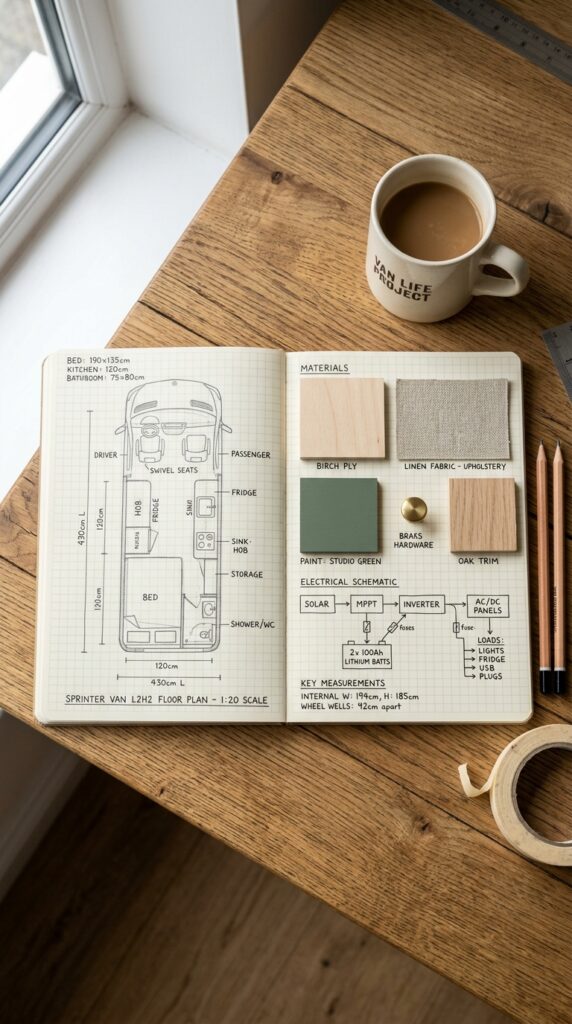
Vibe: Considered — the van starts as a drawing long before it starts as a build.
Why it works: A physical build journal — gridded notebook, floor plans drawn at 1:20 scale, material swatches taped in — externalises the design process in a way that digital planning tools cannot fully replicate. Drawing a floor plan at 1:20 scale forces real engagement with dimensions: a feature that seems viable in an app or sketch becomes clearly impractical or clearly achievable at scale, and mistakes made in pencil cost nothing. The material swatch section — actual samples of plywood, fabric, and paint in the notebook — provides a physical reference point that prevents the colour and material mismatches that derail most builds at the finishing stage, when expensive corrections are required.
How to get it: Start the build journal with three 1:20 floor plans: a top-down layout plan, a driver’s-side elevation, and a passenger-side elevation. Use a 1:20 scale rule ($8–$15) for consistent measurement. Tape material swatches in the colour section of the notebook and mark each swatch with its source, price per unit, and estimated quantity required. Return to the journal at every build stage to record what was changed from the plan and why — this record is invaluable for future builds.
💡 Quick Win: A gridded A4 notebook ($8–$14), a 1:20 scale rule ($10–$15), and an afternoon with the tape measure in your van is the best possible investment before beginning any van build — it reveals the spatial realities of the project before a single cut is made.
Shop the Look
| Product |
| Gridded notebook A4 graph paper thick |
| Architect scale rule 1:20 metric |
| Material swatch book blank samples |
| Fine liner pen set 0.3mm 0.5mm |
| Masking tape roll low tack planning |
How to Start Your Campervan Interior Transformation
Start with one decision before purchasing anything: draw your floor plan at 1:20 scale on graph paper with the actual dimensions of your specific van body. Measure the internal width, length, and height of your van at three points along its length — most panel vans taper significantly at the wheel arches and are narrower at floor level than at shoulder height — and draw the real shape rather than the idealised rectangle. This single act of accurate measurement prevents the most common and most expensive van build mistakes: furniture built to theoretical dimensions that does not fit the real space.
The most common error is beginning the build without completing the insulation and electrical planning simultaneously. Most self-build vans end up with electrical cable runs buried inside cabinetry that was built before the electrical system was fully specified — this means that upgrading or repairing the electrical system requires dismantling finished joinery. The fix is simple: plan all cable routes before building any cabinetry, and install conduit runs through all cabinet cavities before closing them, even if the cables themselves are not yet pulled.
Three specific items under $50 that create immediate van interior impact: a 5-metre roll of 2700K warm white LED strip with controller ($18–$28), which transforms the evening atmosphere of any van interior regardless of the build stage; a set of ten matching black steel recessed cup pulls ($22–$35 for ten), which immediately elevates the quality reading of any plywood cabinetry; and a 1-litre tin of Farrow & Ball or equivalent sample paint in your chosen cabinet colour ($14–$22), which allows you to test the colour in actual van light conditions before committing to full cabinet painting.
A complete basic campervan conversion — insulation, electrical system, fixed bed with storage, and a simple galley kitchen — runs $4,000–$8,000 in materials for a self-build and takes 4 to 8 weeks of full-time work or 3 to 6 months of weekend work. A mid-spec build adding bathroom, solar, and quality joinery finishes runs $8,000–$15,000 self-built. A professional build to a comparable specification runs $25,000–$60,000. The quality gap between self-built and professional is narrowest in the structural and layout decisions — which are planning decisions — and widest in the finish quality of joinery, which improves with practice.
Frequently Asked Questions About Campervan Interior Design
What is the best van for a full interior conversion?
The Mercedes-Benz Sprinter LWB high-roof is the benchmark conversion platform in 2025 — its 195cm internal height after floor build-up provides standing room for most adults, its 3.5-tonne payload rating accommodates a full build without overloading, and the extensive specialist parts ecosystem (windows, roof vents, racks) simplifies sourcing. The Ford Transit LWB high-roof is a strong alternative at a lower purchase price with comparable internal dimensions. The Volkswagen Crafter is mechanically identical to the Sprinter in many markets and offers the same conversion benefits. For a first build on a limited budget, a standard-roof Sprinter or Transit LWB provides the best price-to-space ratio; accept the compromised standing height in exchange for a lower entry cost.
How much does a self-build campervan interior conversion cost?
A complete self-build van interior conversion in 2025 runs $4,000–$8,000 for a basic but functional build (insulation, electrics, fixed bed, simple kitchen), $8,000–$15,000 for a mid-spec build adding a wet room bathroom, quality joinery finishes, and a full solar electrical system, and $15,000–$25,000 for a high-specification self-build with premium materials (solid wood cabinetry, tiled wet room, lithium battery bank, inverter, and professional-grade components throughout). The single largest cost variables are the electrical system (a quality lithium electrical system runs $2,000–$4,000 in components) and the joinery material quality (birch ply is affordable; hardwood face veneers and solid wood trim increase costs significantly).
What insulation is best for a van conversion?
3M Thinsulate SM600L is the consensus best-practice insulation for van walls and ceiling cavities in 2025 — it provides an R-value of approximately 5.5 per 40mm, manages moisture vapour without trapping it against the van body (preventing rust), and is thin enough to fit in standard van rib cavities without reducing internal space. Closed-cell spray foam is used specifically for irregular voids, floor cavities, and thermal bridge points. Rigid XPS or PIR foam board is the standard for floor insulation at 50mm thickness. The critical principle is complete coverage — any uninsulated metal surface, however small, creates a cold bridge that generates condensation and reduces the entire system’s thermal performance.
How do I manage power in a campervan without hookup?
The standard off-grid power system in a 2025 van build consists of 200W to 400W of roof solar feeding a Victron SmartSolar MPPT charge controller, charging a 100Ah to 200Ah LiFePO4 leisure battery bank, supplemented by a B2B (battery-to-battery) charger drawing from the vehicle’s alternator while driving. This system provides sufficient power for LED lighting, phone and laptop charging, a water pump, a diesel heating system, and a 12V compressor fridge in average European summer conditions. In winter at northern latitudes, or for destinations with multiple overcast days, a 2,000W pure sine wave inverter connected to a portable generator provides backup charging. A Victron Cerbo GX with a GX Touch 50 display provides real-time system monitoring and management.
What is the most important thing to get right in a van build?
The insulation and vapour management system, without qualification. Every van builder who has lived in a poorly insulated van for more than one winter reports the same hierarchy of priorities after the fact: insulation first, electrical system second, layout third, aesthetics last. A van with perfect joinery and a compromised insulation system is cold, damp, and eventually mouldy — and the joinery deteriorates as a consequence. A van with simple plywood cabinetry and excellent insulation is comfortable, dry, and warm in all seasons — and the occupants are happy. Spend the first and largest proportion of the build budget and build time on insulation and do it completely; everything built on top of that foundation will perform well.
Ready to Create Your Dream Campervan Interior?
These 27 ideas have moved through every layer of the campervan interior design discipline — from the foundational decisions of insulation strategy and electrical system planning, through the spatial intelligence of fold-down desks and dinette-to-bed conversions, to the atmospheric details of warm amber LED lighting, hygge-inspired textile layering, and the beeswax candle recessed in a turned wood holder on a rainy evening. Real van build transformation begins not with tools but with a scale drawing and an afternoon of honest measurement — knowing exactly what space you are working with before the first sheet of plywood is cut is the decision that separates a build that works from one that almost works. Draw your floor plan this week, insulate it completely before building anything inside, and design every element to serve at least two functions simultaneously. When the build lands correctly, the van becomes the most considered living space you have ever occupied — the constraint of the space, taken seriously, produces a quality of intentionality that rooms of unlimited size rarely achieve. Save the ideas that clarified something you had been trying to work out — in van design, the idea that solves a real problem in your real van is always the one worth building.