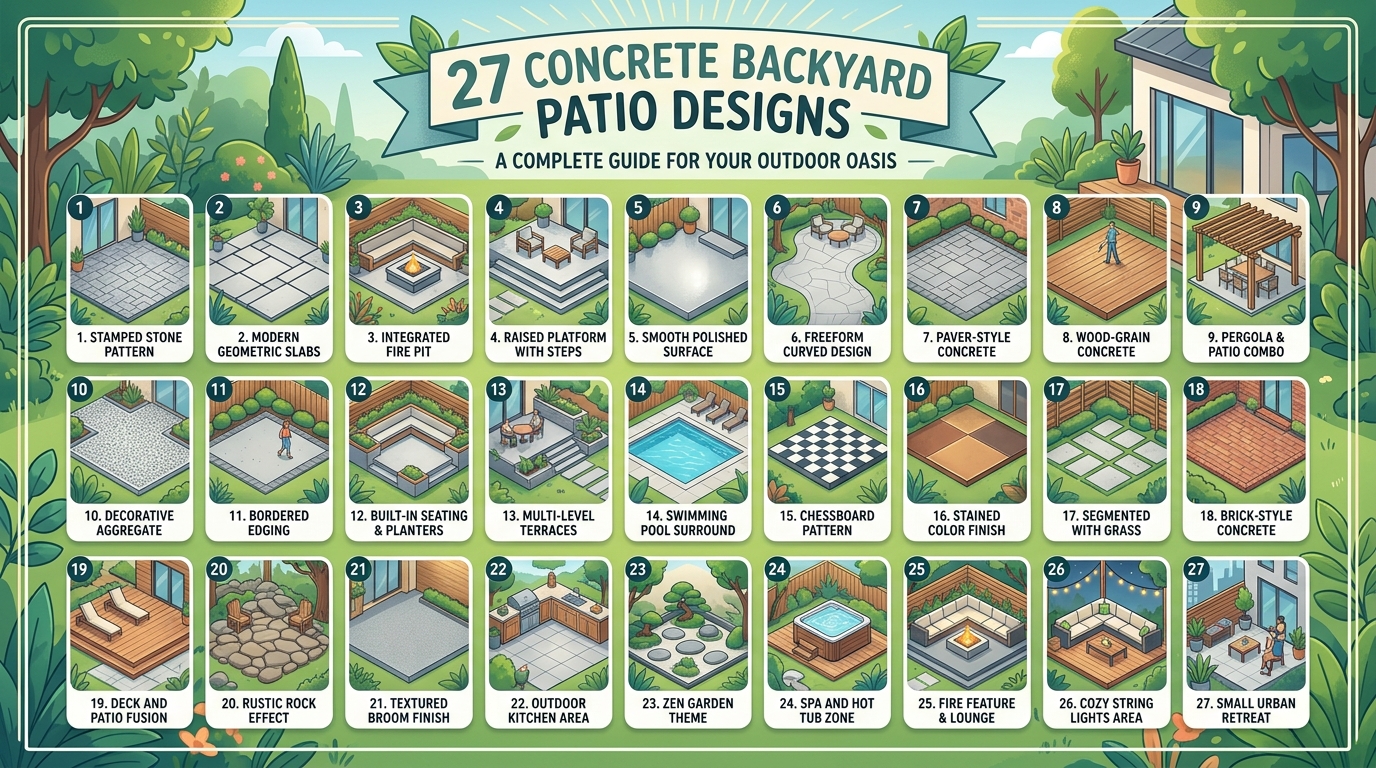
A concrete backyard patio is one of the most durable, design-versatile outdoor surfaces available — capable of being stamped, stained, polished, board-formed, or exposed-aggregate finished to achieve everything from rustic warmth to architectural precision. This article gives you 27 specific, actionable concrete patio ideas covering finish types, layout, color, furniture integration, lighting, planting, drainage, and small-space solutions.
Step onto a well-designed concrete patio and feel the particular satisfaction of a surface that was made for exactly this purpose — this yard, this climate, this life lived mostly outside between May and October. The morning coffee tastes different on concrete that was poured with intention. The evening light does something specific to a board-formed wall. Nothing shifts, nothing splinters, nothing needs to be restained every spring. Here are 27 ideas worth saving — and stealing.
Why Concrete Backyard Patios Work So Well
Concrete as a patio material has a design history that runs parallel to modern architecture itself — from the California Case Study Houses of the 1950s, where architects used poured concrete to dissolve the boundary between interior and exterior living, to the contemporary landscape architecture movement that treats the concrete patio as an extension of the home’s architectural language rather than a separate outdoor afterthought. What distinguishes concrete from pavers, tile, or wood decking is its monolithic quality: a poured concrete surface is one continuous material, and that continuity creates a visual calm and spatial authority that assembled or tiled surfaces cannot replicate.
The material vocabulary of a concrete patio is deceptively wide. Broom-finished concrete — the workhorse surface, slightly textured for slip resistance and honest about its material nature. Stamped concrete — pressed with pattern molds while wet to simulate stone, brick, or wood grain, colored with integral pigment or surface stain. Exposed aggregate — the top layer of cement paste washed away to reveal the stone aggregate within, creating a natural, pebbled surface with excellent grip. Acid-stained concrete — a chemical reaction with the existing concrete producing variegated, translucent color in earth tones, amber, and blue-green. Polished or ground concrete — the surface ground smooth and sealed, producing an almost stone-like finish suitable for covered patio environments. Each finish produces a radically different aesthetic from the same base material.
Concrete patios have never been more design-relevant than they are right now. The outdoor living movement — accelerated dramatically by the pandemic and sustained by the work-from-home culture shift — has elevated the backyard patio from a functional afterthought to the home’s most invested-in room. Pinterest searches for “concrete patio ideas,” “stamped concrete backyard,” and “modern concrete outdoor design” have grown consistently since 2020. At the same time, the architectural aesthetic that prizes honest, raw materials — concrete, corten steel, weathered wood — has moved from high-design homes into mainstream residential preference.
Small backyards benefit enormously from concrete’s design flexibility. A 200-square-foot concrete patio can be designed as a single continuous pour that makes the entire yard feel like one intentional outdoor room — no grout lines dividing it, no gaps suggesting assembly. Integrated planters cast directly into the concrete edge remove the need for separate planter pots. A concrete patio in a small yard should always connect visually to the home’s interior floor — same tone, same material family — so the two spaces read as one expanded living area.
Style at a Glance
| Element | Concrete Advantage | Design Payoff |
| Philosophy | Monolithic continuity, architectural permanence | Spatial authority, visual calm |
| Finishes | Broom, stamped, exposed aggregate, acid stain, polished | One material, infinite expressions |
| Color Palette | Warm grey, charcoal, warm buff, terracotta stain, slate blue | Connects to home, landscape, and sky |
27 Concrete Backyard Patio Designs
1. Broom-Finished Concrete: The Honest Foundation
Vibe: Grounded — a surface that knows exactly what it is.
Why it works: Broom-finished concrete is the most honest and architecturally credible patio surface available because it requires no applied pattern or color to be beautiful — its visual interest comes entirely from the subtle linear texture of the broom drag and the geometric precision of the saw-cut control joints. The design principle is material authenticity: a surface that is visually truthful about its construction process has an inherent design authority that simulated or decorated surfaces lack. The broom texture also serves a precise functional purpose — the fine ridges provide slip resistance on a wet surface, making it safer than smooth-troweled concrete.
How to get it: Specify a medium broom finish (not fine, which nearly disappears, and not coarse, which collects debris). Saw-cut control joints should be planned before the pour — a 10×10-foot grid is the standard spacing, but a deliberate geometric pattern (offset squares, long rectangular strips) turns the control joints into a design element. Apply a penetrating concrete sealer (not a topical film sealer) within 28 days of curing to repel water and staining without changing the surface appearance.
💡 Quick Win: An existing broom-finished patio can be dramatically refreshed by cleaning with a concrete degreaser, filling any cracks with a concrete repair caulk in a matching grey tone, and applying a fresh penetrating sealer — total cost $60–$120 and one weekend, transforming a tired surface without any demolition.
Shop The Look
| Product |
| Penetrating concrete sealer outdoor patio |
| Matte black steel outdoor dining set |
| Concrete crack repair caulk grey |
| Teak outdoor chair set modern |
| Ornamental grass planter outdoor |
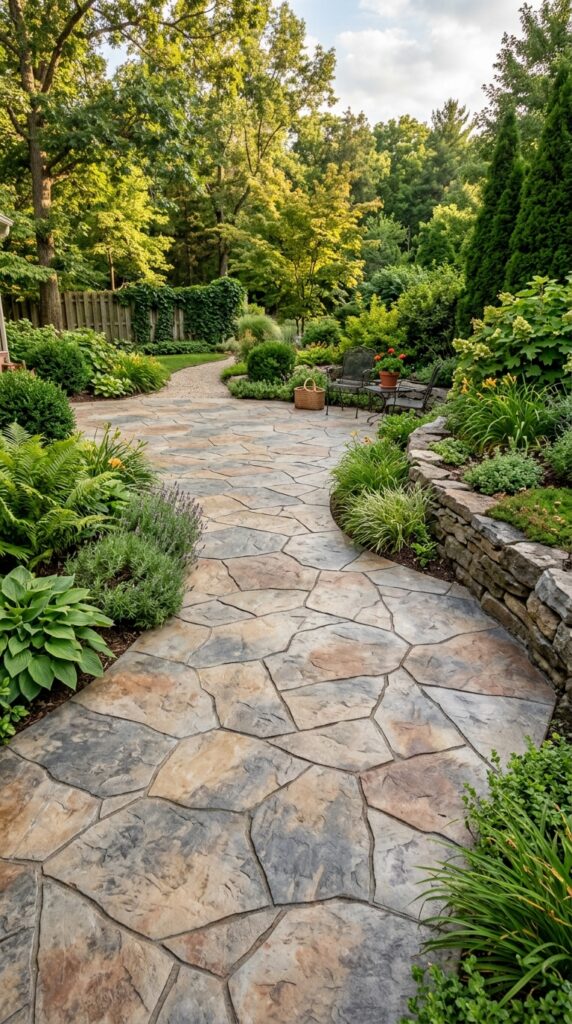
2. Stamped Concrete: Large-Format Stone Pattern

Vibe: Warm — a patio that looks like it was laid stone by hand over a long afternoon.
Why it works: Large-format stamped concrete in a flagstone pattern is the most popular concrete patio finish in North American residential design for a specific reason: it delivers the visual warmth and naturalistic character of genuine irregular stone at approximately one-third the installed cost, with no risk of stone shifting, heaving, or losing grout over time. The design principle is material simulation at scale: larger individual “stones” in the stamp pattern read as more authentic than smaller ones because genuine natural flagstone is typically large and irregular. The release agent (a contrasting color dusted on the surface before stamping) creates the tonal variation that makes each “stone” look individually placed.
How to get it: Integral pigment (mixed into the concrete before pouring) determines the base color; release agent (applied to the stamp tool) adds the accent variation at the joint lines. Choose colors from the warm buff-to-sandy-brown family for the most convincing natural stone appearance — avoid grey-toned concrete with grey release agent, which reads as manufactured rather than natural. The stamp pattern must be planned around the patio’s perimeter — partial stamps at edges should be cut cleanly, not left as awkward partial impressions.
Shop The Look
| Product |
| Concrete integral pigment warm buff |
| Stamped concrete release agent charcoal |
| Concrete stamp tool flagstone pattern |
| Outdoor patio furniture rustic wood set |
| Perennial planting border mix sun |
3. Exposed Aggregate Patio: Natural Pebble Surface
Vibe: Natural — a surface that looks like it grew from the ground rather than being poured onto it.
Why it works: Exposed aggregate concrete is the patio finish that most convincingly references natural landscape materials — the rounded river pebbles or crushed stone visible in the surface connect visually to the garden, pathway, and stream-bed aesthetics that anchor outdoor design. The design principle is material landscape connection: a patio surface that uses the same aggregate tones as the surrounding gravel paths, stone walls, or planted borders creates a visual continuity between the built patio and the naturalistic garden. Exposed aggregate is also the highest-grip concrete finish available — the textured pebble surface provides excellent traction in wet conditions.
How to get it: Exposed aggregate requires a surface retarder sprayed on before the concrete sets — this delays the cement paste curing at the surface while the concrete below hardens normally. After the concrete has set (typically 6–24 hours), the surface is pressure-washed to remove the uncured paste and reveal the aggregate below. The aggregate selection happens at the batch plant — specify the stone type, size, and color mix in advance. River pebble (3/8 inch) in warm brown and grey tones is the most versatile and widely available choice.
Shop The Look
| Product |
| Concrete surface retarder spray aggregate |
| River pebble aggregate mix bag |
| Concrete aggregate sealer wet look |
| Low profile outdoor lounge set modern |
| Perimeter garden edging steel |
4. Acid-Stained Concrete: Variegated Earth Tones
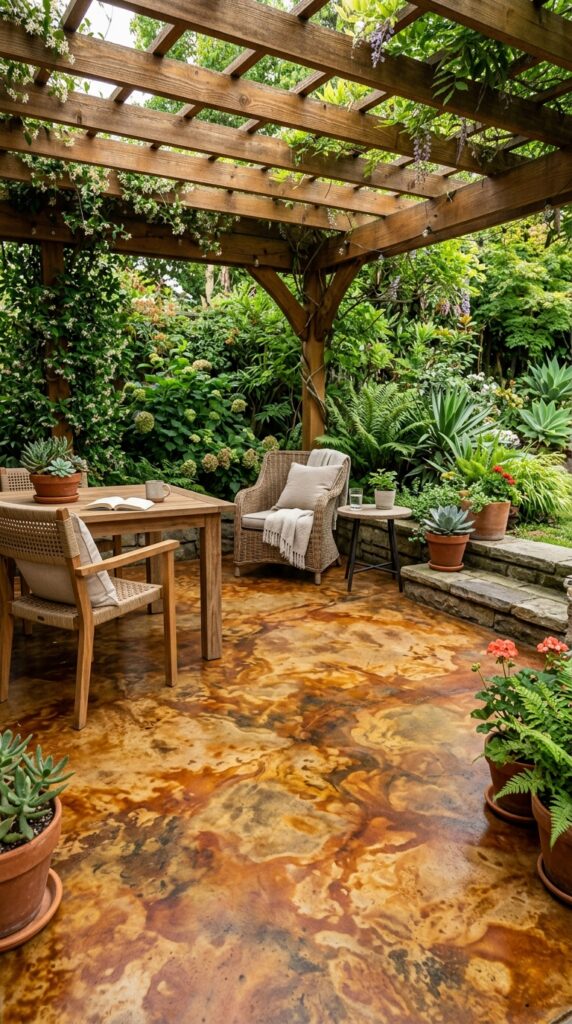
Vibe: Organic — a surface that has been somewhere and shows it.
Why it works: Acid staining is the most visually complex finish available for a concrete patio because the color is not applied to the surface but produced by a chemical reaction between the acid stain and the minerals already present in the concrete — making every result genuinely unique. The design principle is reactive color: because the stain reacts differently across the concrete surface based on variations in mineral content, aggregate distribution, and curing conditions, the finished surface has the organic, non-uniform quality of natural stone. This finish works best under a covered pergola or outdoor room where it is protected from heavy UV exposure, which fades some acid stain colors over time.
How to get it: Acid staining must be applied to clean, previously unsealed concrete — any contamination from oil, paint, or sealer prevents the chemical reaction. The concrete surface must be acid-etched and cleaned before application. Two colors applied in sequence (a base tone followed by an accent tone) create the most complex, natural-looking result. Seal immediately after the reaction has been neutralized and the surface rinsed — a high-quality water-based polyurethane sealer in satin finish protects the stain without creating excessive gloss.
Shop The Look
| Product |
| Acid stain concrete warm amber terra cotta |
| Concrete acid etch cleaner prep |
| Water based concrete sealer satin finish |
| Pergola wood outdoor furniture warm |
| Outdoor rug natural fiber covered patio |
5. Board-Formed Concrete Walls and Patio Combination
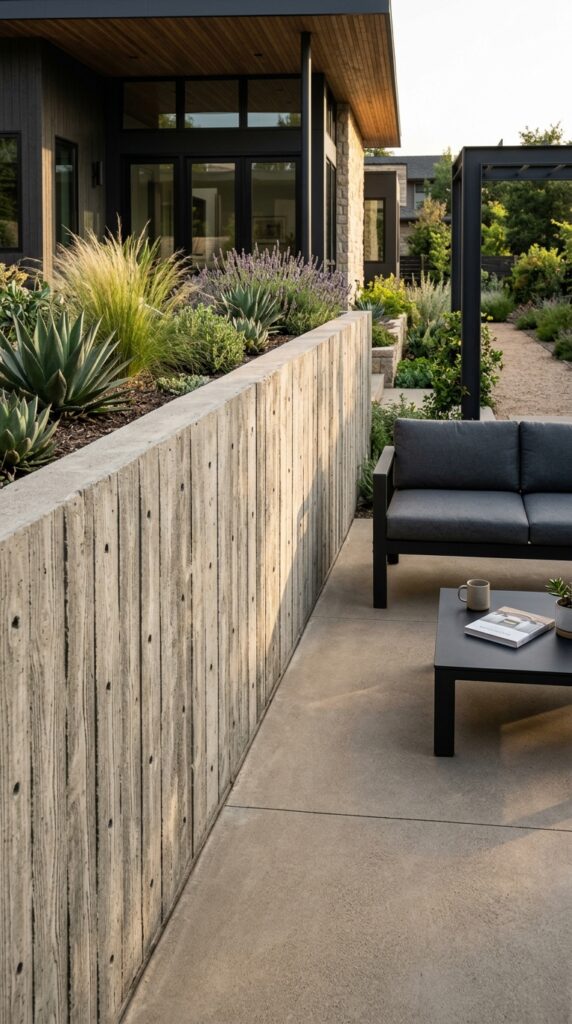
Vibe: Architectural — the wall that remembered how it was made.
Why it works: Board-formed concrete walls beside a broom-finished patio create the most architecturally sophisticated concrete outdoor space available — the board grain texture on the vertical wall surface references the timber formwork used in the pour, making the construction process itself a visible design element. This is the outdoor application of honest construction that defines contemporary residential architecture. The design principle is revealed making: showing how an object was constructed — the board marks, the tie holes, the pour lines — is more interesting and more honest than concealing the construction process behind a smooth rendered finish.
How to get it: Board-formed concrete requires custom formwork built from rough-sawn lumber (1×6 or 1×8 boards) with deliberate gaps between boards to create the shadow-line pattern. The formwork board species and grain determine the wall’s final texture — Douglas fir creates prominent grain; smooth pine creates finer lines. Tie holes should be planned at regular intervals and filled with matching concrete plugs after form removal. The wall should be left unsealed for the first year to allow natural weathering to establish the grey concrete patina.
Shop The Look
| Product |
| Board formed concrete wall planter form lumber |
| Concrete form release agent wood |
| Architectural concrete sealer penetrating |
| Minimalist outdoor dining table concrete |
| Corten steel planter architectural |
6. Integrated Concrete Fire Pit: Cast In Place
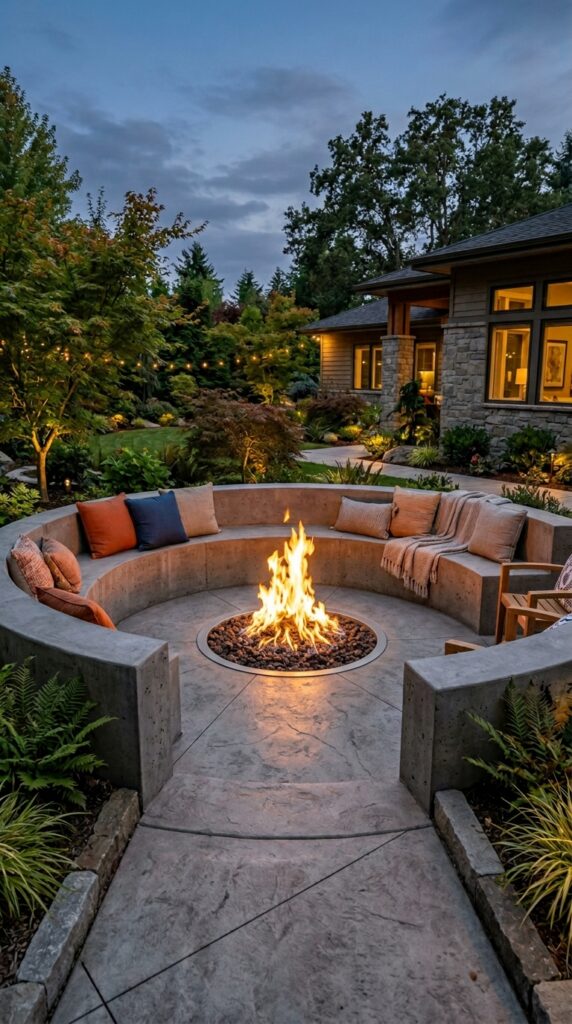
Vibe: Social — a patio that organized itself around fire.
Why it works: An integrated cast-in-place concrete fire pit — poured as part of the patio rather than placed on it afterward — is the most spatially elegant fire feature available because it creates zero visual clutter: no freestanding bowl, no portable unit, no visible gas line above the surface. The design principle is integrated function: when a functional element is designed into the architecture of the patio rather than placed on it afterward, the patio reads as a single intentional composition rather than a platform with equipment on it. The surrounding circular concrete seating wall provides permanent, maintenance-free seating for six to eight people without any furniture required.
How to get it: A gas fire pit integrated into a concrete patio requires a gas line rough-in before the concrete pour — plan the gas supply location during the design phase. The fire bowl insert (stainless steel, typically 12–18 inches diameter) is set into the formwork before the concrete is poured, creating a seamless flush installation. The concrete seating wall should be 17–19 inches high (standard seat height) and 12–15 inches wide — sufficient depth for comfortable sitting.
Shop The Look
| Product |
| Gas fire pit insert stainless steel round |
| Outdoor fire pit ring insert flush mount |
| Outdoor seating cushion set waterproof |
| Gas valve outdoor fire pit key |
| Concrete seating wall cap stone |
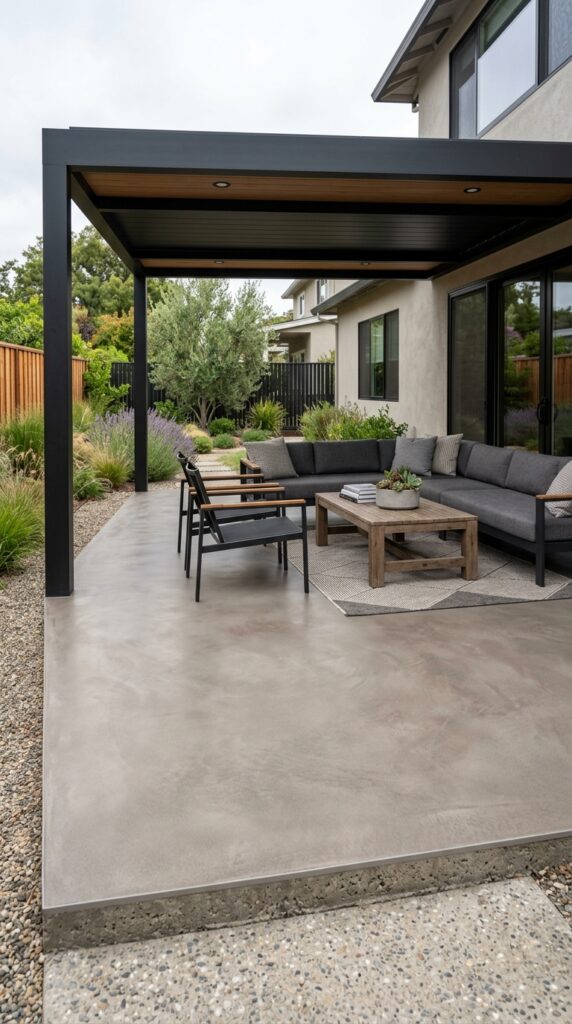
7. Polished Concrete Under Covered Patio
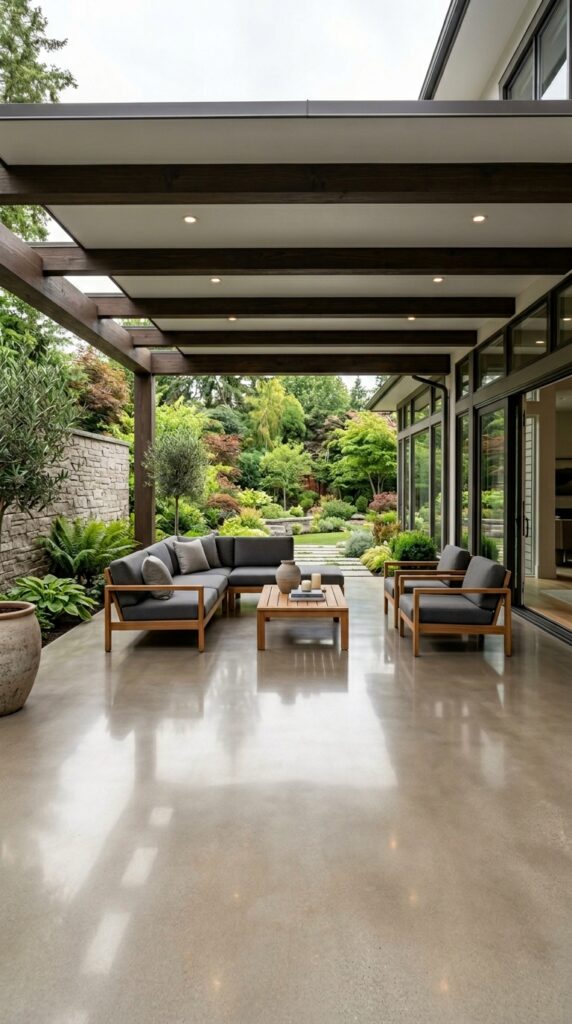
Vibe: Interior — the outdoor room that forgot the roof was the sky.
Why it works: Polished concrete under a covered patio is the finish that most successfully blurs the inside-outside boundary — it brings an interior-quality floor surface into the outdoor space, creating an outdoor room that feels as refined and permanent as an interior one. The design principle is material continuity as boundary dissolution: when the patio floor uses the same finish as the interior floors of the home visible through the glass doors, the eye reads the two spaces as one continuous room. This finish is only appropriate under a fully covered roof — polished concrete exposed to rain becomes slippery and the sealer deteriorates rapidly.
How to get it: Polished concrete requires grinding the surface with progressively finer diamond grinding pads (starting at 30 or 50 grit, finishing at 400–800 grit) followed by a hardener application and final polish. An existing broom-finished patio can be ground and polished — the process removes the broom texture and 1/16–1/8 inch of surface material to expose the aggregate below. Specify a densifier (sodium or lithium silicate) applied after grinding to harden the surface before the final polish passes.
💡 Quick Win: A concrete floor grinder can be rented from equipment rental shops for $80–$150 per day — a single day of grinding and polishing can transform a flat covered patio slab into a dramatically more refined surface without any additional material cost.
Shop The Look
| Product |
| Concrete floor densifier hardener lithium |
| Concrete diamond grinding pad set |
| Outdoor rated concrete polish sealer |
| Low profile outdoor sofa set covered patio |
| Outdoor rug covered patio 8×10 |
8. Two-Level Concrete Patio with Step Integration
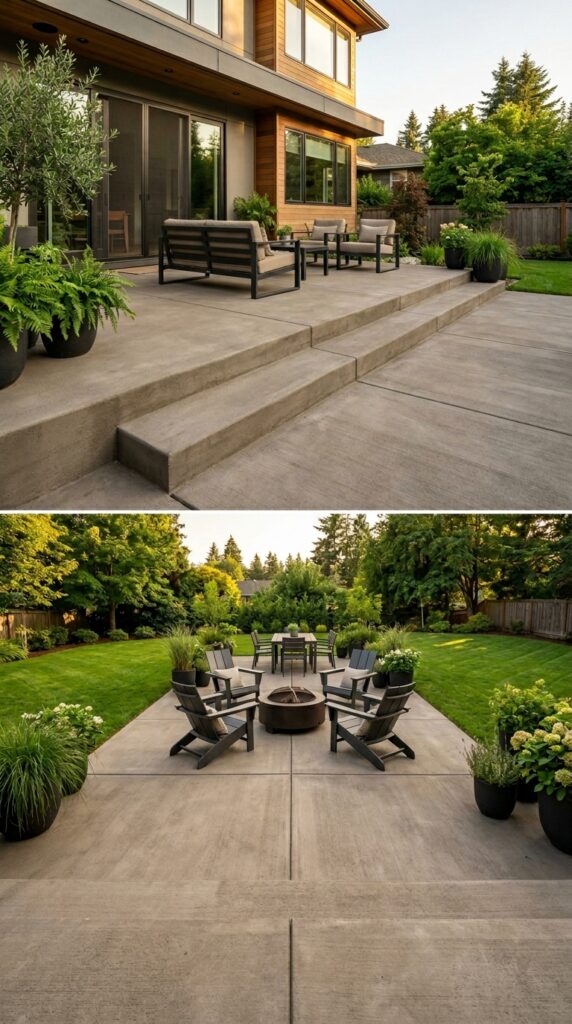
Vibe: Layered — a yard that used its elevation change instead of fighting it.
Why it works: A two-level concrete patio that uses the yard’s natural grade change as a design opportunity — rather than cutting flat and losing the level change — creates spatial variety and a sense of outdoor architecture that a single-plane patio cannot achieve. The design principle is grade integration: designing with the land’s natural topography rather than against it produces a more authentic outdoor space and reduces the excavation and fill required for construction. The full-width step connecting the two levels (rather than a narrow stair at one end) is the key detail — it makes the step feel like a design gesture rather than a code-required transition.
How to get it: The full-width step should be at least 12 inches deep (comfortable stride depth) and 6–8 inches high (a comfortable riser). The step edge detail is critical — a standard square-formed edge chips over time; specify a rounded or chamfered edge using an edge tool while the concrete is still wet. Both levels should use the same mix design and finish to read as one continuous composition.
Shop The Look
| Product |
| Concrete step edge tool rounding |
| Outdoor step light recessed riser LED |
| Two level patio furniture set lower tier |
| Concrete planter raised level edge |
| Step non slip tape clear outdoor |
9. Concrete and Wood Deck Combination
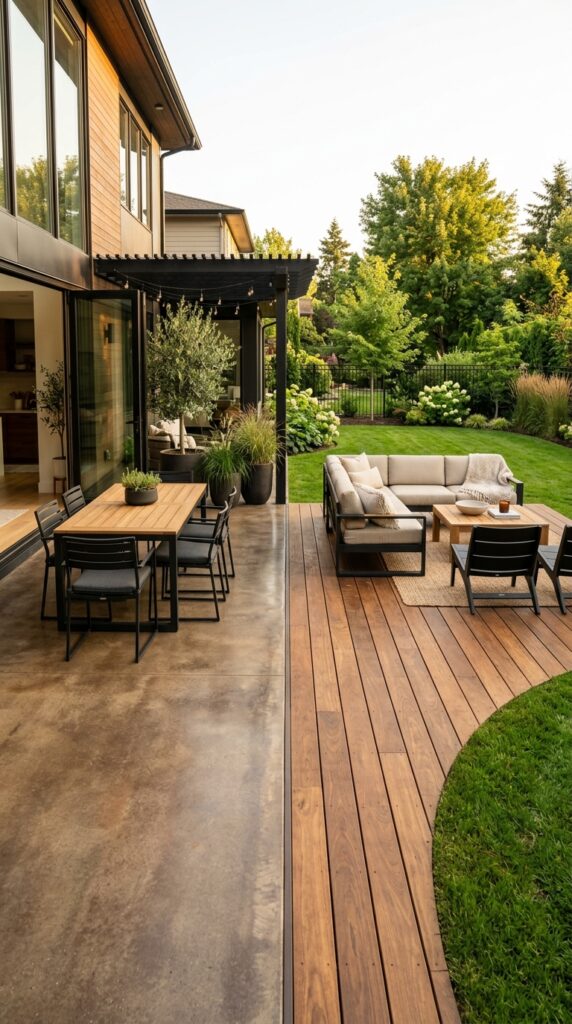
Vibe: Warm — two materials in conversation, each doing what the other cannot.
Why it works: Combining concrete and wood in the same patio design is one of the most effective material strategies in outdoor design because the two materials offer precisely complementary qualities: concrete is permanent, cool to the touch, and architectural; wood is warm, slightly yielding underfoot, and organic. The design principle is material zone definition: using concrete for the dining and cooking zone (where durability, heat resistance, and ease of cleaning matter most) and wood decking for the lounging zone (where barefoot warmth and comfort matter most) assigns each material to the context it naturally excels in.
How to get it: The critical detail is the transition joint between materials — both surfaces must be at exactly the same finished height (within 1/4 inch) to prevent a trip hazard. A 1/2-inch gap filled with a matching flexible caulk or a slim steel transition strip creates a clean joint that accommodates the thermal expansion difference between concrete and wood. Ipe and teak are the most durable hardwood choices for ground-level decking; both resist moisture, insects, and UV far better than cedar or pine.
Shop The Look
| Product |
| Ipe hardwood deck board 5/4 natural |
| Steel deck to concrete transition strip |
| Teak outdoor lounge chair set |
| Outdoor furniture concrete dining table |
| Deck board flexible gap filler caulk |
10. Concrete Patio with Integrated Planter Walls
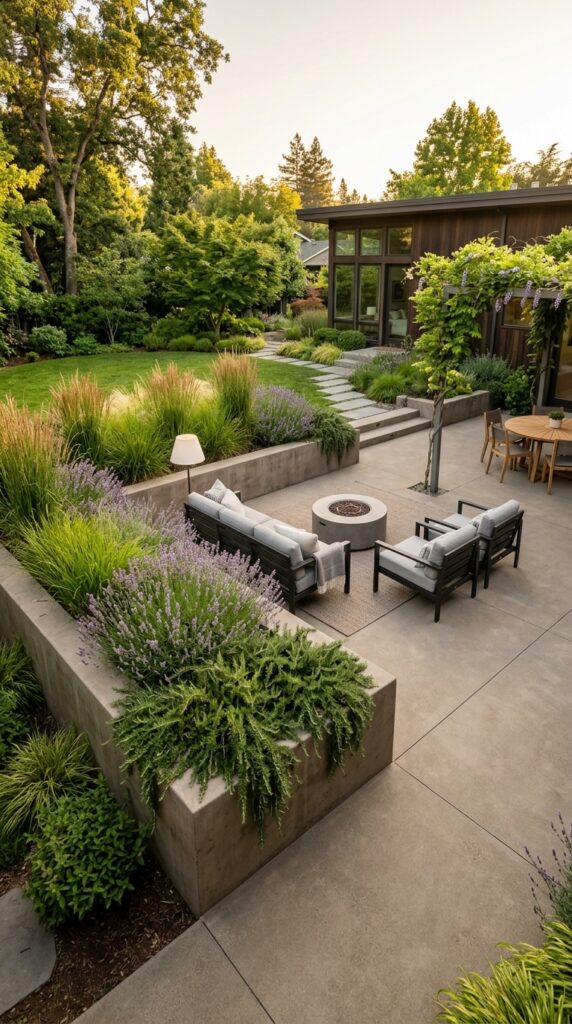
Vibe: Lush — architecture that grew a garden.
Why it works: Integrated concrete planter walls — cast as part of the patio rather than placed on it afterward — serve three simultaneous design functions: they define the patio space as an outdoor room without a fence, they provide raised planting beds that bring plants to a more visible and fragrant height, and they create built-in seating edges when sized at 17–19 inches. The design principle is multifunctional architectural element: a well-designed concrete planter wall does the work of a fence, a planting bed, and a seating bench simultaneously, replacing three separate elements with one.
How to get it: Planter walls must be formed with drainage in mind — specify a 2-inch diameter PVC weep hole at the base of each planter cavity before pouring, and line the interior with a waterproofing membrane to prevent concrete carbonation from plant soil contact. Fill with a well-draining planting mix (60% coarse sand, 30% compost, 10% perlite) rather than standard garden soil, which compacts and prevents drainage in a concrete planter.
Shop The Look
| Product |
| Lavender plant live outdoor perennial |
| Ornamental grass feather reed outdoor |
| Planter waterproofing liner membrane |
| Trailing rosemary plant outdoor perennial |
| Raised planter drainage mat layer |
11. Stamped Concrete in Herringbone Brick Pattern
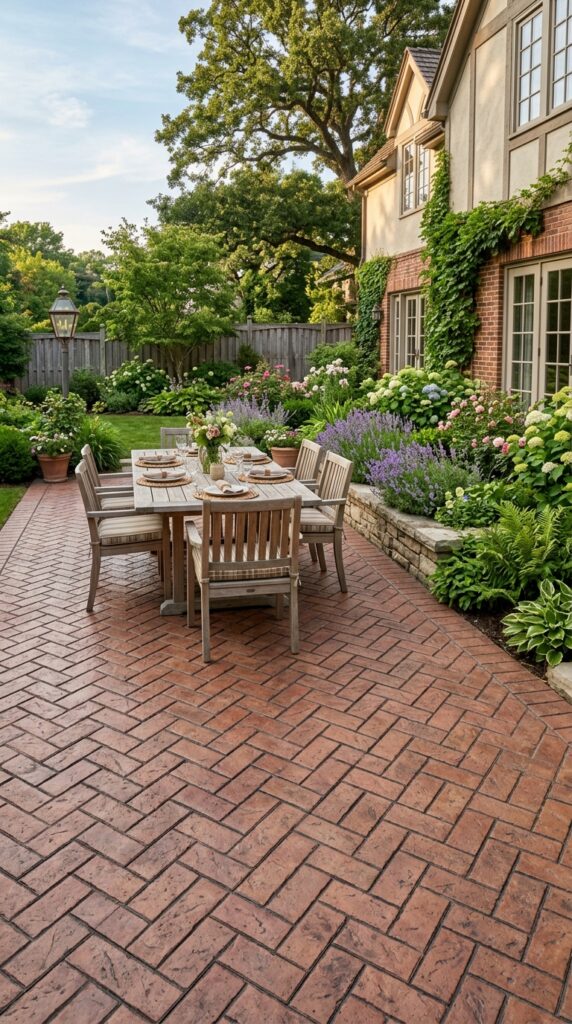
Vibe: Traditional — a pattern that has been correct for several hundred years.
Why it works: Herringbone brick-pattern stamped concrete at 45 degrees to the patio perimeter is the most visually dynamic version of brick simulation because the diagonal orientation creates a strong directional movement that guides the eye toward the garden or focal point at the patio’s terminus. The design principle is diagonal energy: a herringbone pattern running perpendicular to the primary viewing axis is static; the same pattern running at 45 degrees to the viewing axis creates movement and visual interest. The stamped concrete version of this pattern eliminates the primary maintenance challenge of genuine brick — joint repointing — while maintaining the visual warmth of traditional brick.
How to get it: The herringbone stamp pattern must be planned before pouring — the 45-degree orientation requires more careful perimeter planning than a square pattern because all cut edges at the patio perimeter must be cut, not stamped. Specify a warm red-brown integral pigment (iron oxide red) and a grey or charcoal release agent to simulate aged brick mortar joints. The release agent color is what sells the “mortar joint” illusion — choose it carefully.
Shop The Look
| Product |
| Concrete integral pigment iron oxide red brick |
| Herringbone brick stamp tool concrete |
| Grey concrete release agent mortar joint |
| Traditional outdoor dining set wood |
| Perennial border mix sun cottage garden |
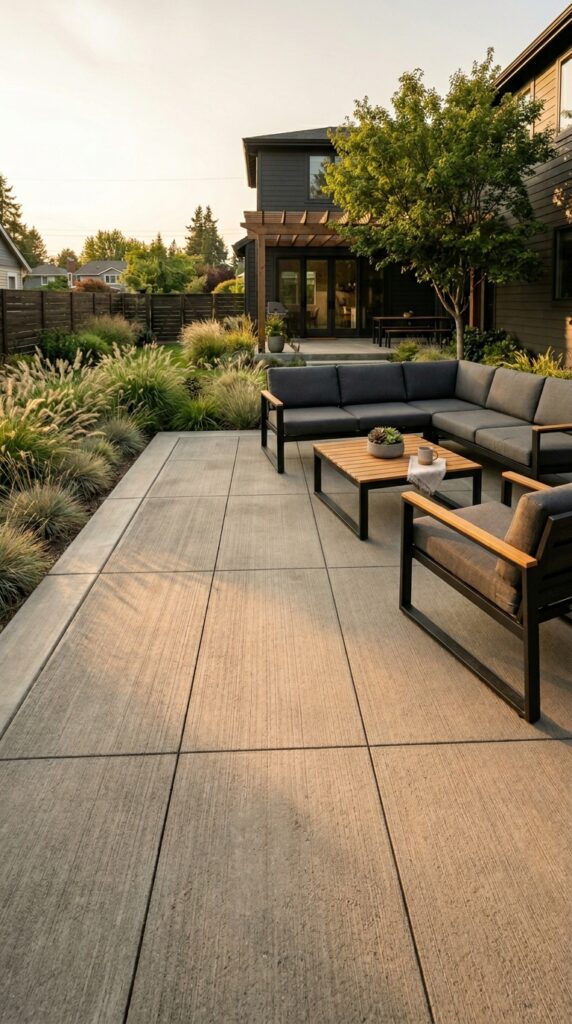
12. Modern Grey Concrete with Black Steel Accents
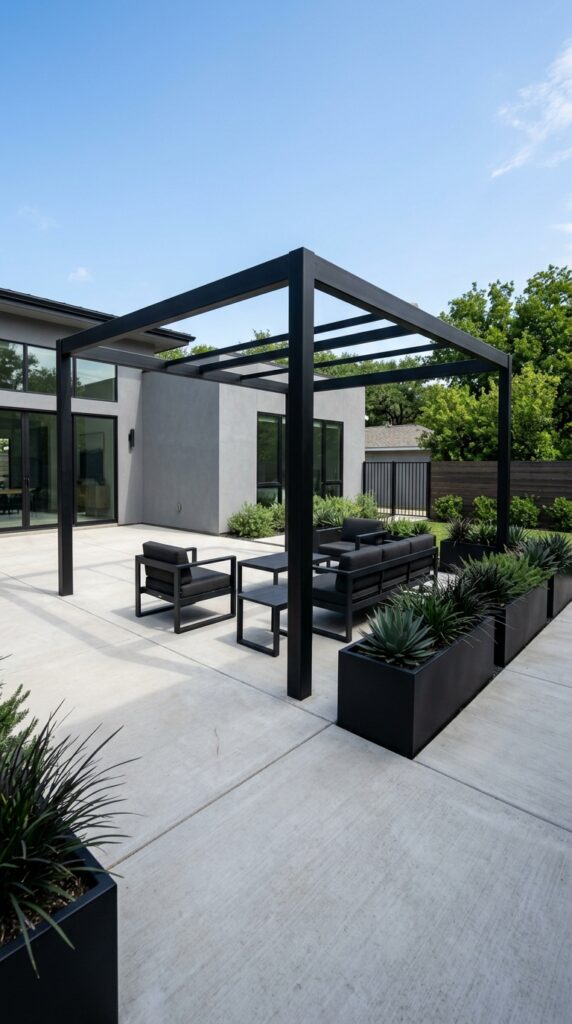
Vibe: Precise — the backyard where every line was decided before anything was built.
Why it works: A warm grey concrete patio paired with matte black steel elements is the outdoor equivalent of a modern interior’s warm white walls and matte black hardware — a maximally controlled palette that lets the material quality and spatial composition do all the design work. The design principle is two-material discipline: limiting the patio palette to two materials (concrete and black steel) forces every design decision to be expressed through form, proportion, and placement rather than color variety. The result is a space that reads as architecturally confident rather than decoratively busy.
How to get it: Achieve material consistency by specifying all steel elements — furniture, planters, pergola structure, lighting poles — from the same powder-coat batch or manufacturer. Even slight variation in black tone (matte black versus semi-gloss black versus blackened steel) will register as inconsistency in a palette this controlled. Use the same saw-cut grid spacing as the pergola’s structural bay spacing to create a geometric harmony between the floor grid and the overhead structure.
Shop The Look
| Product |
| Matte black steel outdoor planter box |
| Matte black steel outdoor dining set |
| Black steel pergola kit freestanding |
| Low ornamental grass black mondo grass |
| Black steel outdoor floor lamp |
13. Flagstone-Pattern Concrete with Natural Color Stain
Vibe: Naturalistic — the patio that convinced the garden it was stone.
Why it works: Combining a large-format flagstone stamp pattern with a natural color stain (rather than a solid integral pigment) produces the most convincing natural stone simulation available in concrete because the stain’s organic application creates color variation between individual “stones” — lighter in the centers, darker at the edges and joints — that mirrors the genuine tonal variation of natural flagstone. The design principle is simulated natural variation: the less uniform and more organic the color application, the more convincingly it reads as genuine natural material.
How to get it: Apply a natural concrete stain (water-based, not acid-based) in two complementary earth tones within 24 hours of stamp removal — while the concrete is still slightly green and the stamp impression is crisp. Use a large sea sponge to apply the secondary stain color over the base coat with dabbing motions that concentrate the color at the stamp edges and thin it toward the center of each “stone.” This single technique is responsible for 80% of the natural stone simulation effect.
Shop The Look
| Product |
| Natural concrete stain water based earth tones |
| Large format flagstone stamp tool |
| Concrete stain applicator sponge tools |
| Outdoor natural stone look sealer |
| Garden border edging natural stone |
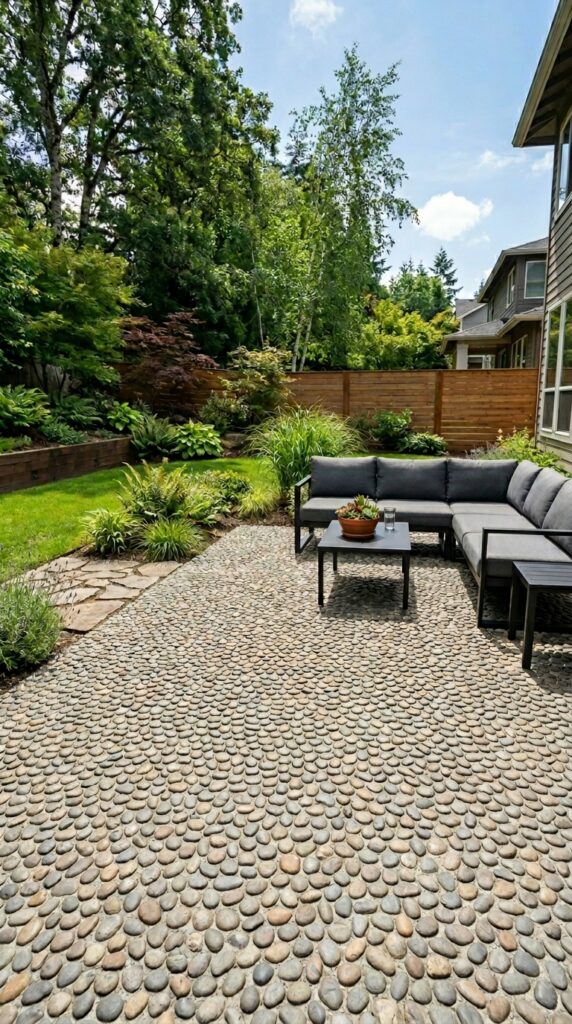
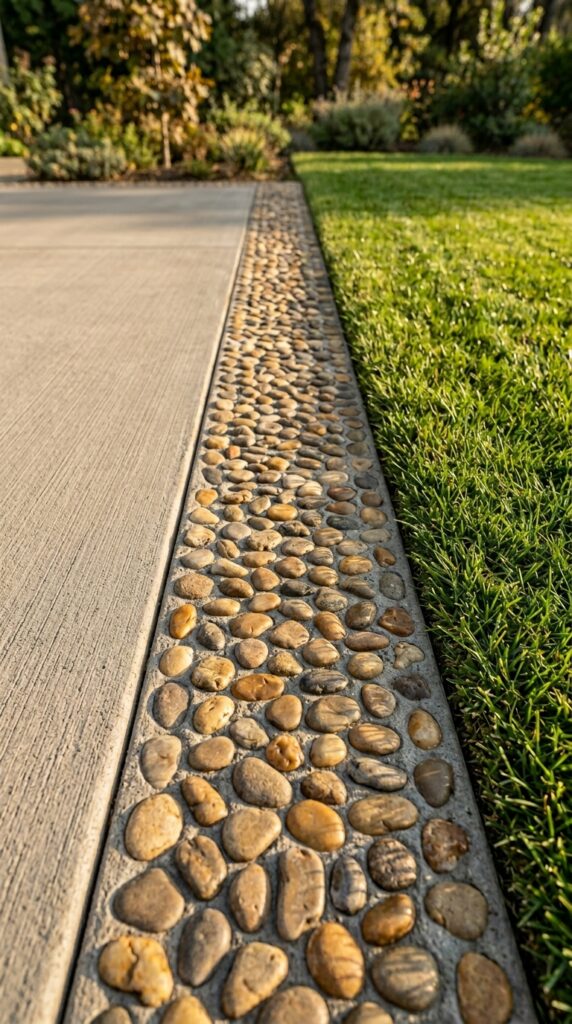
14. Concrete Patio with Embedded Pebble Border
Vibe: Detailed — a patio that spent time on its edges.
Why it works: An embedded pebble border band creates a decorative transition zone between the main patio surface and the lawn or planting edge — it solves the abrupt concrete-to-lawn edge problem that makes many patios look like industrial slabs dropped into a garden. The design principle is transitional material gradient: a border zone that bridges two different materials (concrete and landscape) creates a visual transition that makes the patio read as part of the garden rather than imposed on it. The pebbles’ natural rounded forms also reference the landscape materials — gravel paths, stream beds, planting mulch — that surround the patio.
How to get it: The pebble border is installed immediately after screeding the concrete — before it begins to set. Place the pebble section 6–12 inches from the formwork edge, press pebbles individually into the fresh concrete surface to approximately half their diameter, then float the surrounding concrete flush with the pebble tops. The pebbles must be pressed to a consistent depth — if they protrude above the concrete surface, they create a trip hazard and accumulate dirt.
Shop The Look
| Product |
| River pebble decorative stone small bag |
| Concrete pebble border divider |
| Patio edge landscape border steel |
| Outdoor concrete pebble sealer |
| River rock garden decorative large |
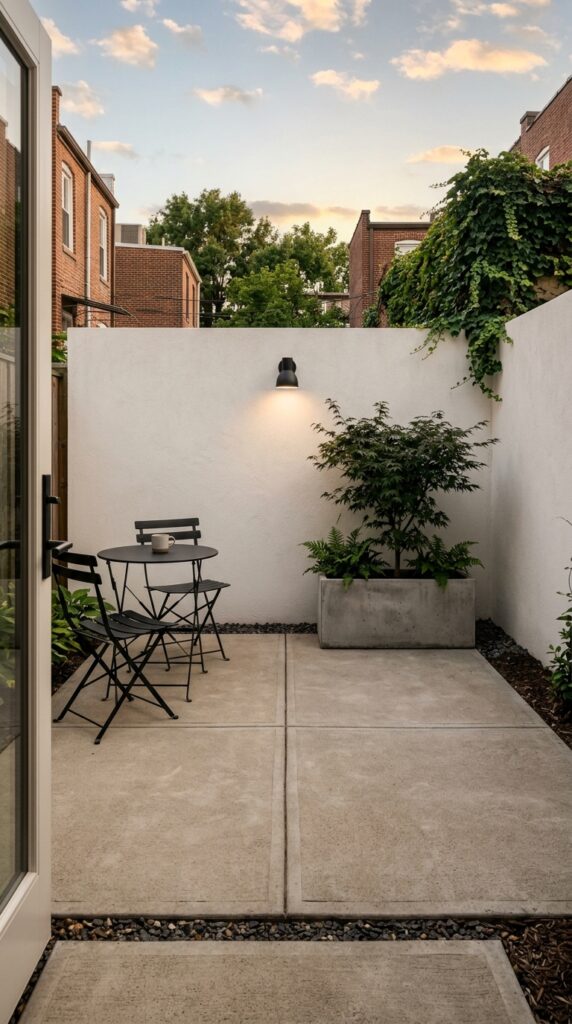
15. Small Concrete Patio: 200 Square Feet, Maximum Impact
Vibe: Complete — everything a small outdoor space needs and nothing it doesn’t.
Why it works: A small concrete patio succeeds when it operates on the same principle as a minimalist interior: fewer, better-chosen elements rather than multiple small elements competing for space. The design principle is small space discipline: in a 200-square-foot patio, one dining set and one planter have more visual impact than the same patio crowded with multiple seating zones, multiple planters, and multiple lighting fixtures. The concrete’s monolithic surface makes the small patio read as a single complete outdoor room rather than a collection of furniture on a slab.
How to get it: Size the concrete pour to include a 24-inch extension beyond the furniture arrangement on all sides — this provides the visual “breathing room” that prevents a small patio from feeling like a furniture showroom floor. The saw-cut joint pattern should divide the slab into no more than four panels — any more joints and the patio’s small size starts to feel measured and fragmented. Use large-format furniture scaled correctly to the slab — a standard 60-inch diameter dining table is too large for a 200-square-foot patio; a 36–42-inch bistro table is correct.
Shop The Look
| Product |
| Bistro table and chairs set outdoor small |
| Compact concrete planter box |
| Wall mount outdoor sconce matte black |
| Small patio bistro set foldable |
| Compact outdoor furniture 2 chair set |
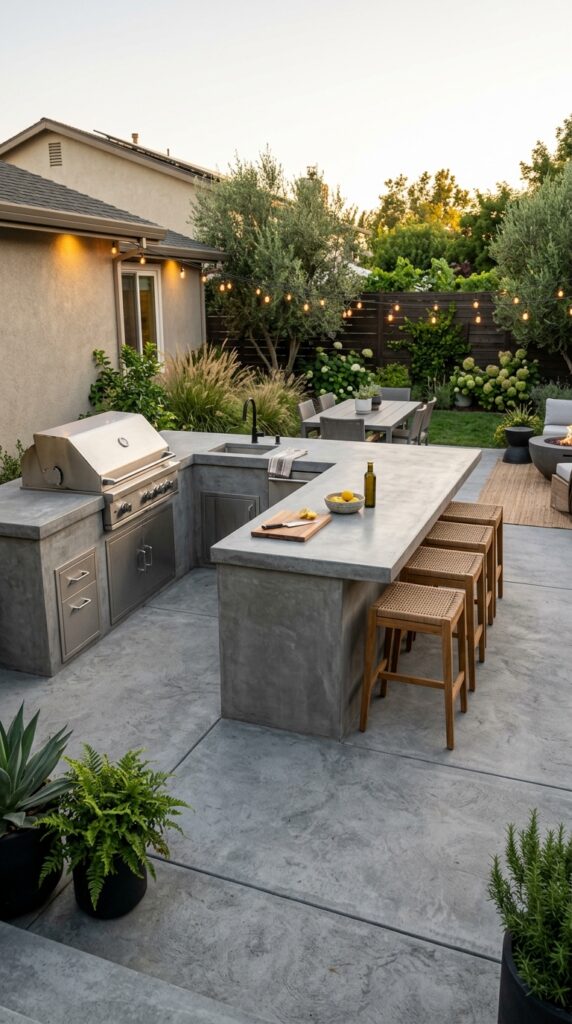
16. Concrete Patio with Outdoor Kitchen Integration
Vibe: Social — the backyard organized around the activity of feeding people.
Why it works: Integrating an outdoor kitchen structure into the concrete patio — building it from the same poured concrete material as the patio surface itself — creates the most cohesive and architecturally resolved outdoor kitchen available. The design principle is material unity: when the kitchen base, countertops, and patio floor are all concrete, the outdoor kitchen reads as a structural extension of the outdoor room rather than a prefabricated unit placed on the patio. The concrete countertops also provide the most heat-resistant, durable outdoor cooking surface available.
How to get it: Concrete outdoor kitchen countertops are typically cast-in-place over a concrete block or steel stud frame, with a minimum 2-inch thickness for structural integrity. Seal with a two-part epoxy concrete sealer rated for outdoor food preparation surfaces — standard concrete sealers are not food-safe. The countertop concrete mix should include a fiber additive (polypropylene microfibers) to control cracking in the cantilever overhang area.
Shop The Look
| Product |
| Outdoor kitchen concrete countertop sealer |
| Stainless steel outdoor grill built in |
| Concrete fiber additive outdoor mix |
| Outdoor bar stool teak matte black set |
| Outdoor kitchen stainless appliance set |
17. Concrete Patio with String Light Overhead Grid
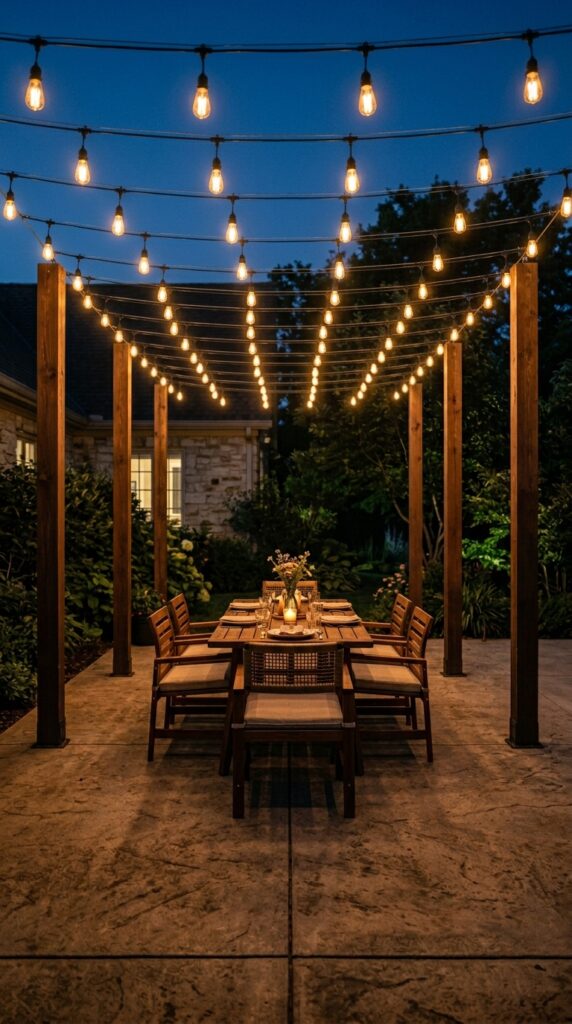
Vibe: Festive — a patio that becomes its best version of itself after dark.
Why it works: An overhead string light grid is the most cost-effective outdoor lighting strategy that transforms a concrete patio from a daytime surface into a defined outdoor room at night. The design principle is overhead plane definition: string lights suspended above a patio at 9–11 feet create a luminous horizontal plane that visually “ceilings” the outdoor space, making the area beneath feel enclosed and intimate without any physical ceiling structure. The warm 2200K color temperature of Edison-style bulbs mimics firelight and creates the most flattering, atmosphere-rich outdoor illumination available.
How to get it: String light posts should be set in concrete footings (post spikes are not reliable for tall, light-load poles in most soil conditions) at the patio perimeter with the post top at 10–11 feet. Run the string lights in a parallel grid pattern rather than a random crisscross — a regular grid reads as intentional architecture; a random crisscross reads as decoration. Use commercial-grade string lights (not residential) for outdoor permanence — commercial-grade strands have weatherproof sockets and UV-resistant cord.
Shop The Look
| Product |
| Commercial grade outdoor string lights 100 ft |
| Edison bulb outdoor string light replacement |
| String light post kit wood outdoor |
| Outdoor string light pole anchor kit |
| String light dimmer outdoor plug in |
18. Curved Concrete Patio Edge: Organic Form
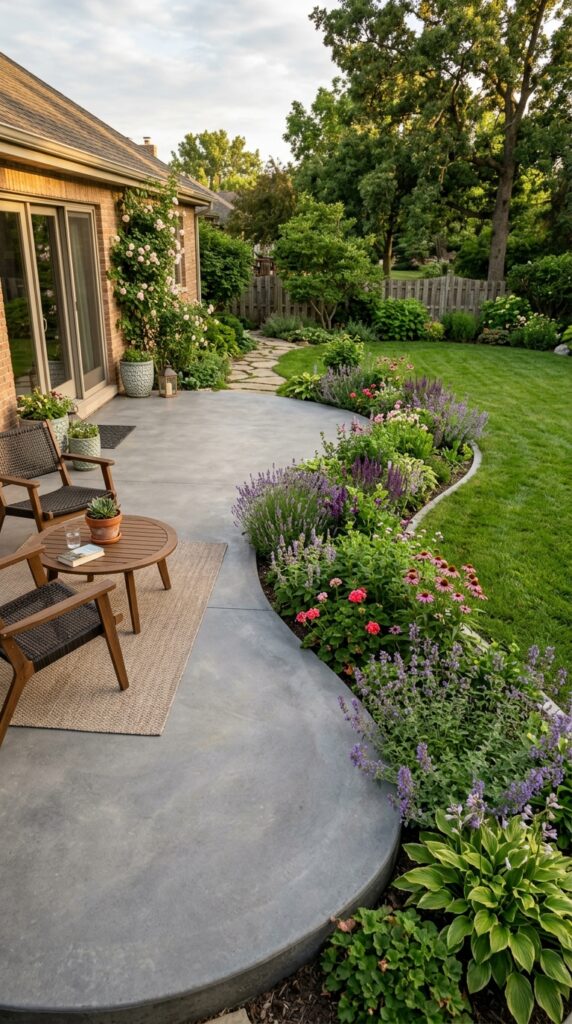
Vibe: Organic — a patio that negotiated its edge with the garden rather than imposing it.
Why it works: A curved concrete patio edge — on the garden-facing side while the house-facing side remains straight — creates a visual softening that connects the architectural character of the concrete to the naturalistic character of the surrounding landscape. The design principle is geometric transition: maintaining straight lines adjacent to the house (where the architecture demands it) and introducing curves adjacent to the garden (where the landscape calls for it) creates a patio form that belongs to both worlds simultaneously. Curved edges also eliminate the corner points that typically make a rectangular patio look like it was cut from a sheet of concrete.
How to get it: Curved concrete edges are formed using flexible plastic lawn edging bent into the desired curve and staked in place before the pour. The curve radius should be generous — a minimum 8-foot radius for a standard patio — tighter curves look forced rather than organic. Plant immediately against the curved concrete edge (no mulch gap) so the planting appears to grow from the patio’s edge, reinforcing the organic quality of the form.
Shop The Look
| Product |
| Flexible lawn edging black plastic curved |
| Perennial border plant mix curved edge |
| Concrete edge form flexible stakes |
| Curved garden border patio edging kit |
| Garden border perennial ground cover |
19. Concrete Patio with Recessed LED Strip Lighting
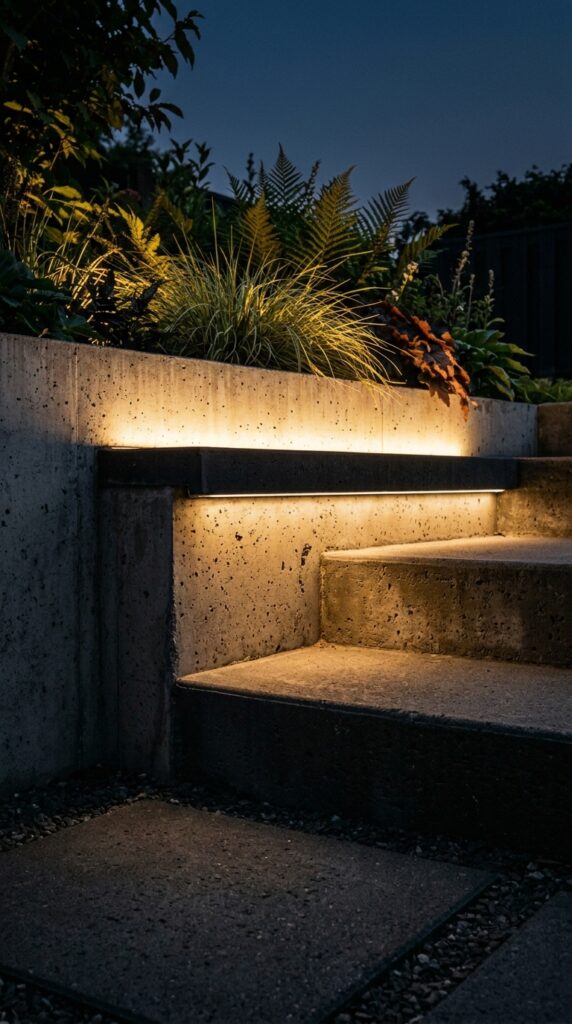
Vibe: Moody — the patio after dark is a completely different room.
Why it works: Recessed LED strip lighting integrated into concrete step risers and planter wall bases provides both safety illumination (clearly lit step edges prevent trips) and architectural drama — the warm LED light washing upward across the concrete surface creates dramatic shadow and material texture that is invisible during the day. The design principle is concealed source lighting: light whose source is hidden creates a more sophisticated atmosphere than light from visible fixtures because the illumination appears to emanate from the surface itself rather than from a hardware object.
How to get it: LED strip channels must be cast into the concrete formwork before the pour — a 1-inch by 1-inch aluminum channel set into the concrete creates a recessed slot that holds the LED strip and conceals the source behind a 3/4-inch concrete lip. Use IP67-rated LED strips (fully waterproof) for outdoor embedded applications. Connect to a low-voltage transformer rated for the total strip length and run 12V wiring through conduit cast into the concrete during the pour.
Shop The Look
| Product |
| IP67 waterproof LED strip warm white outdoor |
| Low voltage transformer outdoor LED |
| Aluminum LED channel extrusion 1 inch |
| Outdoor LED step light recessed |
| LED strip connector waterproof outdoor |
20. Japanese-Inspired Concrete and Gravel Patio
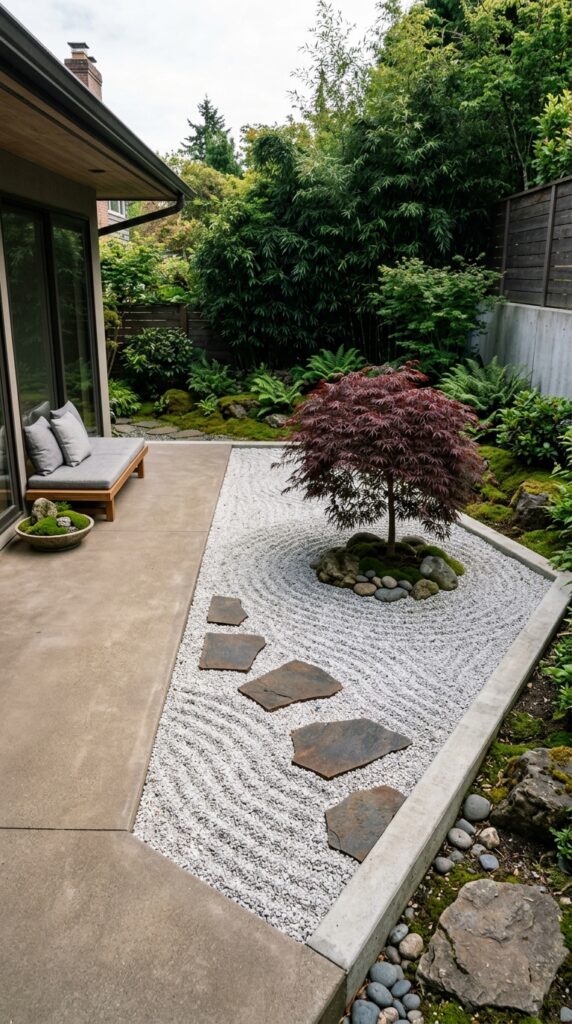
Vibe: Meditative — a backyard that learned stillness from a garden in Kyoto.
Why it works: Combining a concrete patio with an integrated dry gravel garden section draws from the Japanese karesansui tradition — the raked gravel garden that represents water and landscape through abstracted material. The design principle is material contrast for contemplation: the juxtaposition of the permanent, solid concrete plane with the impermanent, rake-able gravel creates a visual and philosophical contrast that gives the outdoor space a contemplative quality that purely hard-surfaced patios cannot achieve. The raked patterns in the gravel change with the seasons and the mood of the gardener.
How to get it: The gravel section requires a concrete curb (formed and poured simultaneously with the main patio) to contain the gravel and prevent migration into the concrete or lawn areas. Lay a weed membrane beneath the gravel before filling. Use white or pale grey pea gravel (3/8 inch) in a 3–4-inch depth — deep enough to rake patterns without disturbing the membrane beneath. A traditional bamboo rake creates the finest parallel lines; a wider wooden rake creates more graphic wave patterns.
Shop The Look
| Product |
| White pea gravel bag landscape 50lb |
| Japanese bamboo rake garden small |
| Japanese maple live tree container |
| Weed barrier landscape fabric roll |
| Steel stepping stone flat outdoor |
21. Concrete Patio with Pergola Column Integration
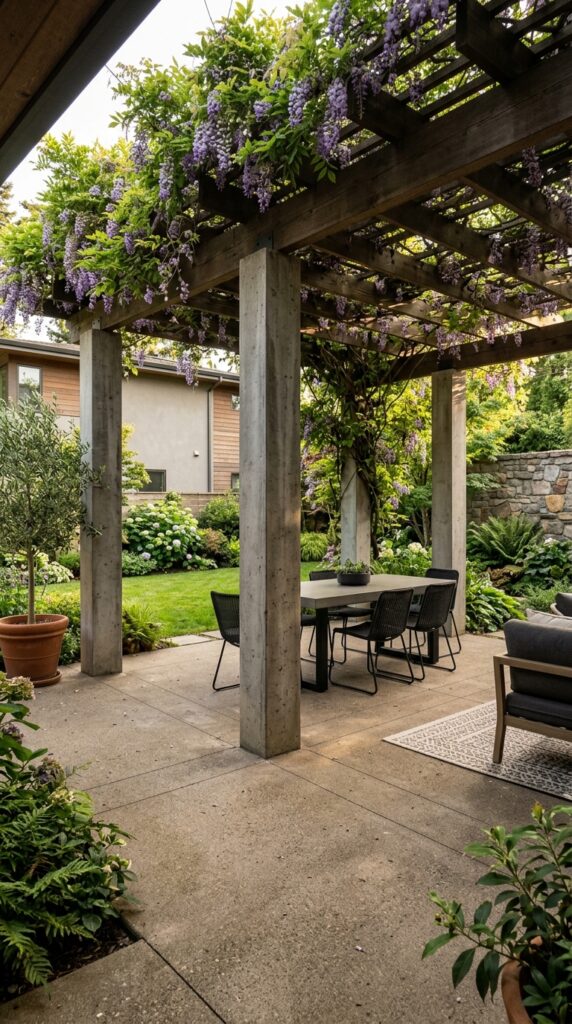
Vibe: Architectural — a pergola that grew from the ground it stands on.
Why it works: Concrete pergola columns cast integrally with the concrete patio surface create the most architecturally unified outdoor structure available — the columns read as vertical extensions of the patio plane, making the entire outdoor room feel like a single poured object rather than a slab with a structure sitting on it. The design principle is structural continuity: when the vertical and horizontal elements of an outdoor structure share the same material and are connected at the foundation, the structure reads as architecturally resolved rather than assembled. The concrete columns also require zero maintenance compared to wood pergola posts.
How to get it: Concrete pergola columns are most efficiently formed using square Sonotube-style column forms or custom-built rectangular wood forms. The column rebar must be tied into the patio slab reinforcement below before the pour, creating a monolithic connection. Column base dimensions of 8×8 inches are sufficient for pergola spans up to 16 feet; wider spans require structural engineering input for appropriate column sizing.
Shop The Look
| Product |
| Pergola column form square concrete tube |
| Wisteria climbing plant live |
| Concrete column rebar tie wire |
| Outdoor pendant light pergola mount |
| Climbing plant trellis wire system |
22. Concrete Patio with Water Feature Integration
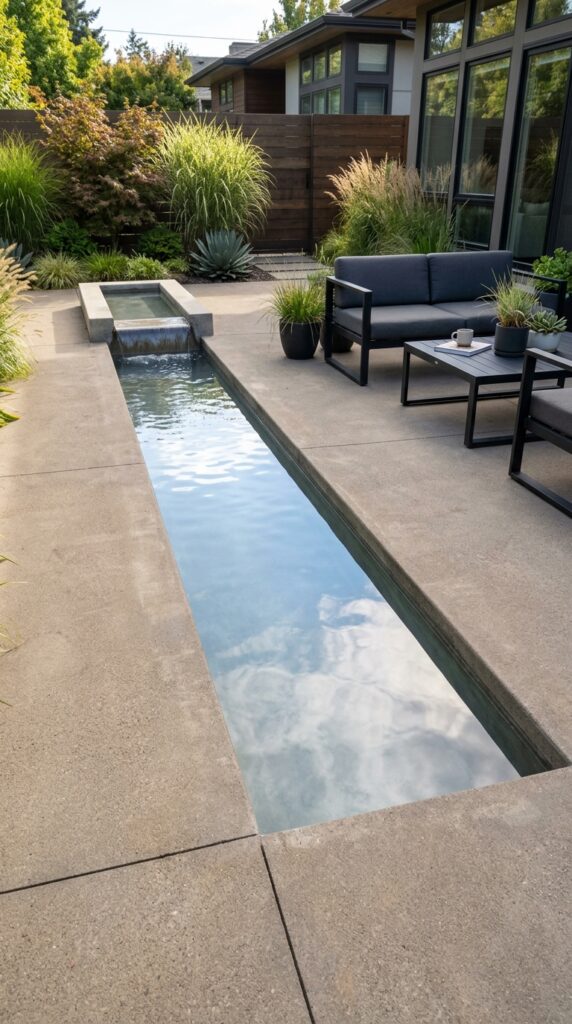
Vibe: Serene — the sound of water that was put exactly where it was needed.
Why it works: A linear water feature integrated flush into the concrete patio surface is the most architecturally precise water element available for a residential backyard — the water channel reads as a slot cut into the concrete plane, creating a reflective surface that brings the sky down to ground level. The design principle is horizontal water plane: a still or near-still water surface at patio level creates a mirror effect that doubles the perceived depth of the sky above and introduces a calming, meditative quality. The sound of a thin water sheet falling over a concrete weir adds the acoustic dimension that outdoor spaces consistently undervalue.
How to get it: The water channel requires a waterproofed concrete or stainless steel liner, a recirculating pump in the weir chamber, and a skimmer or overflow drain at the opposite end. The pump should be sized for the sheet width of the weir — a 12-inch-wide weir requires a pump with at least 400 gallons per hour flow rate. Cast the channel into the patio formwork before the pour, with the channel liner set at the correct elevation relative to the finished patio surface.
Shop The Look
| Product |
| Water feature pump recirculating 400 GPH |
| Linear water channel weir stainless |
| Outdoor water feature basin waterproof |
| Submersible pump fountain feature |
| Concrete water feature liner membrane |
23. Coloured Concrete Patio: Warm Terracotta Tone
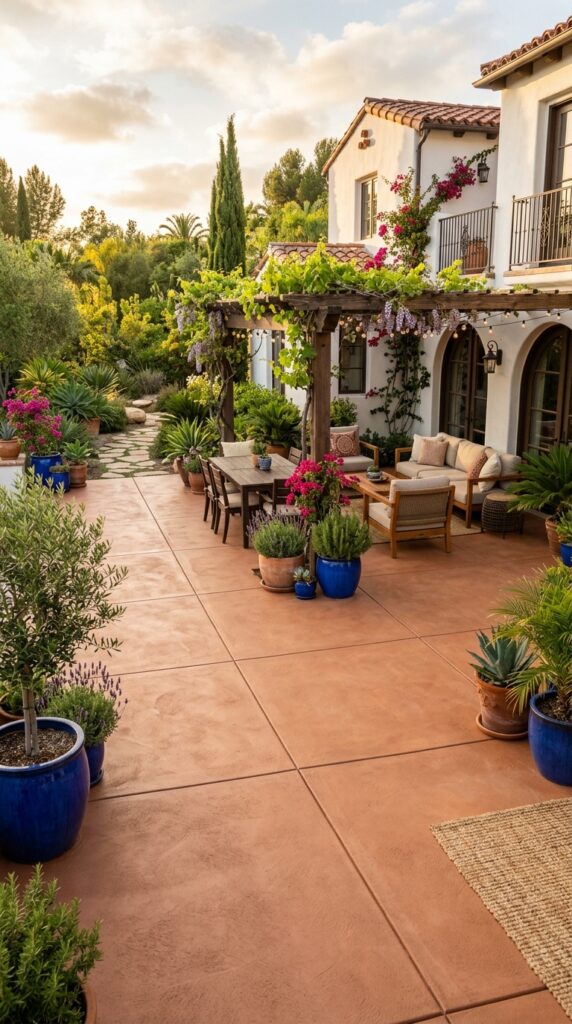
Vibe: Sun-drenched — a patio that absorbed twenty years of Mediterranean light.
Why it works: Integrally pigmented terracotta-tone concrete is one of the most warm and inviting color choices for a backyard patio because the warm clay-earth tone connects visually to both the natural landscape (soil, clay, stone) and the architectural tradition of warm-climate outdoor living (Spanish tile, Italian terracotta, Moroccan tadelakt). The design principle is climate color connection: a warm-toned patio surface reflects warm-spectrum light back into the outdoor space, making the entire area feel warmer and more inviting even on cool days. Integral pigment (mixed into the concrete before pouring) produces a consistent color throughout the slab depth — chips and cracks remain the same color, unlike surface-applied color.
How to get it: Iron oxide pigment in red-brown tones is added to the concrete mix at the batch plant at a rate of 1–5% of cement weight — higher percentages produce deeper, more saturated color. Test the color with a small sample pour before the full pour — pigment color shifts significantly as concrete cures and dries, typically lightening by 20–30% from the wet mix color. Seal with a penetrating sealer in a matte or satin finish that does not alter the warm terracotta tone.
Shop The Look
| Product |
| Iron oxide pigment terracotta red concrete |
| Integral concrete pigment warm earth tone |
| Mediterranean outdoor dining set |
| Terracotta planter large outdoor |
| Cobalt blue ceramic garden pot outdoor |
24. Concrete Patio with Built-In Bench Seating
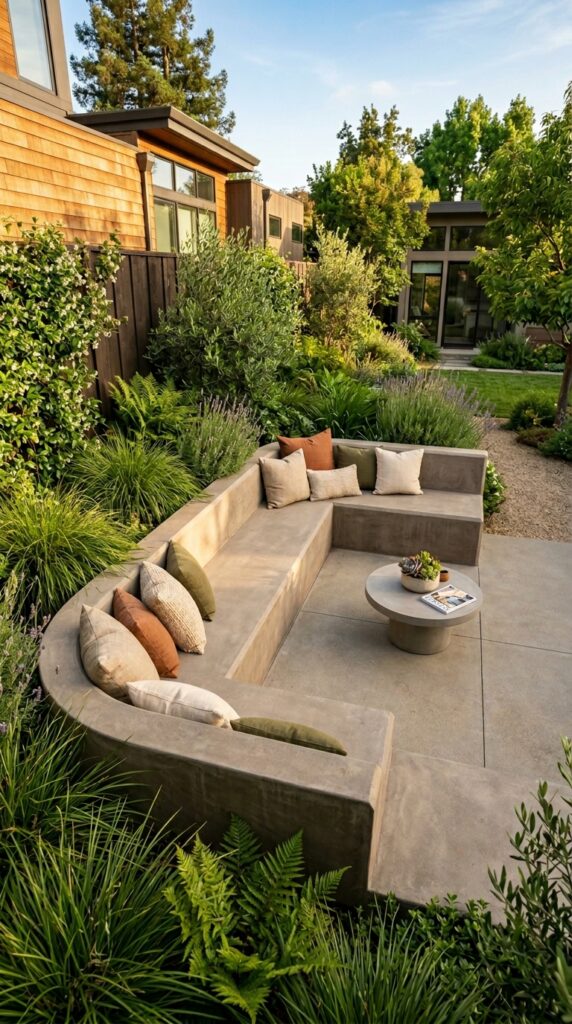
Vibe: Social — the seating that was never going to blow away.
Why it works: Built-in concrete bench seating along the patio perimeter eliminates the need for movable outdoor chairs entirely — providing permanent, maintenance-free seating for eight to twelve people in the footprint of the perimeter bench alone, freeing the center of the patio for a dining table, a fire feature, or open space. The design principle is perimeter seating: placing permanent seating at the edges of an outdoor space preserves the center as dynamic, multifunctional area. Concrete benches are also the most durable outdoor seating surface available — no rust, no rot, no repainting.
How to get it: Bench height of 17 inches (standard seat height) and seat depth of 14–16 inches ensures comfortable seating for most adults. The chamfered or rounded top edge is critical — a square concrete edge is uncomfortable for extended sitting and chips easily. Add 2 inches of waterproof foam topped with weatherproof linen cushions; the cushions can be brought inside in winter while the concrete bench weathers in place without issue.
Shop The Look
| Product |
| Outdoor bench cushion waterproof linen |
| Outdoor foam cushion waterproof 2 inch |
| Concrete bench edge chamfer tool |
| Outdoor bench cushion cover linen |
| Built in bench outdoor waterproof cushion |
25. Decorative Saw-Cut Pattern: Geometric Design
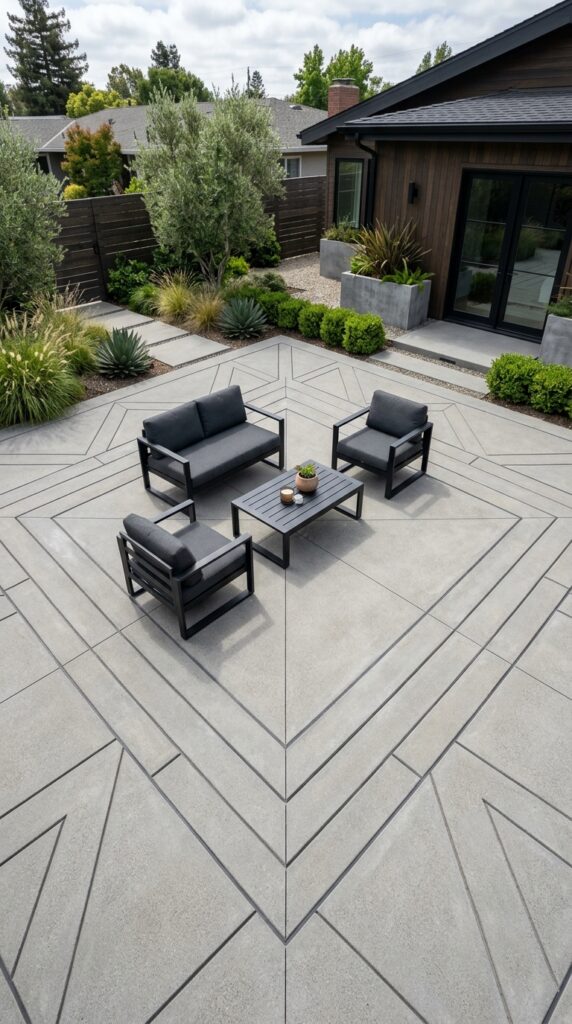
Vibe: Precise — a patio designed from above before it was built from below.
Why it works: Using decorative saw cuts to create a geometric pattern in a concrete patio transforms the standard functional control joint into a deliberate design element — the pattern becomes the patio’s primary visual feature, requiring no additional applied color or texture to be interesting. The design principle is surface inscription: a geometric pattern cut into the concrete surface uses the material’s own color and the shadow depth of the cut line to create design, rather than applying a pattern from the outside. The diamond-within-border composition also has the practical advantage of directing cracking (which follows the weakened saw-cut line) along the pattern’s lines, making any future cracks visually consistent with the design intent.
How to get it: Decorative saw cuts are made with a standard concrete saw within 24–48 hours of the pour (early entry cutting prevents cracking while providing the control joint function). The pattern must be precisely laid out with chalk lines before cutting — even 1/4-inch deviation from plumb is visible in a geometric pattern. Fill saw cuts with a matching grey polyurea joint filler for a flush, clean finish that prevents debris accumulation in the cuts.
Shop The Look
| Product |
| Polyurea concrete joint filler grey |
| Concrete saw cut pattern template |
| Chalk line reel concrete layout |
| Geometric concrete design guide |
| Concrete saw blade diamond 4 inch |
26. Concrete Patio with Outdoor Shower Integration

Vibe: Spa-like — the outdoor shower that made staying inside feel unnecessary.
Why it works: An outdoor shower integrated into a concrete patio corner — defined by a concrete privacy wall and a sloped drain rather than an enclosure — is both the most functional outdoor shower design and the most architecturally minimal. The design principle is element definition by surface rather than enclosure: instead of building a shower enclosure, the shower zone is defined by the drain location (where the floor slopes to) and the privacy wall (where the fixtures mount), creating a clear shower area with no additional structure required. The linear drain at the shower zone also serves as the patio’s area drain during rain events.
How to get it: The shower area requires a 2% slope to the linear drain minimum. The privacy wall should be positioned to block the sightline from any neighboring windows or public view — a wall height of 6 feet provides standing privacy. Specify a thermostatic outdoor shower valve rated for exterior use (look for weatherproof or exterior-rated valve designations) — standard indoor shower valves corrode rapidly in outdoor conditions.
Shop The Look
| Product |
| Outdoor shower fixture matte black wall mount |
| Outdoor shower valve thermostatic exterior |
| Linear drain outdoor patio 24 inch |
| Tropical planting outdoor screen tall |
| Outdoor shower privacy screen wall panel |
27. Resurfaced Concrete Patio: Microtopping Transformation
Vibe: Refined — the patio that became something better without being replaced.
Why it works: Microtopping — a thin, polymer-modified cementitious overlay applied at 1/8-inch thickness over an existing concrete surface — is the most cost-effective transformation available for an existing patio that is structurally sound but aesthetically dated. The design principle is surface transformation without substrate replacement: instead of demolishing and replacing an existing concrete slab (typically $8–$15 per square foot for removal and replacement), a microtopping overlay achieves a completely new surface aesthetic at $3–$6 per square foot in materials. The result is a smooth, modern surface with the organic tonal variation characteristic of thin cement coatings.
How to get it: Microtopping requires thorough surface preparation — the existing concrete must be ground or shot-blasted to open the surface porosity and remove any sealer or contamination. Apply a primer coat followed by two trowel-applied microtopping coats, sanding lightly between coats. Seal with a penetrating sealer rated for outdoor use — a film-forming sealer on a microtopping surface will peel under freeze-thaw cycling in cold climates. Ardex Feather Finish and Skimstone are the most widely available microtopping products for DIY application.
💡 Quick Win: A microtopping overlay is the only concrete patio transformation that can be completed without demolition — for an existing patio in good structural condition, this is always the first option to evaluate before considering full replacement.
Shop The Look
| Product |
| Concrete microtopping overlay skim coat |
| Ardex feather finish concrete overlay |
| Concrete primer bonding agent overlay |
| Penetrating sealer microtopping outdoor |
| Concrete overlay trowel finishing set |
How to Start Your Concrete Backyard Patio Transformation
The single most important first move is not a material choice — it is a layout decision: draw the patio’s exact shape and dimensions on the ground using spray paint or string lines, then live with those lines for one full week before calling a contractor. Walk through them morning and evening. Eat dinner beside them. Watch where the afternoon shadow falls across them. Most patio projects that disappoint their owners fail at the layout stage — the patio is too small for comfortable furniture arrangement, positioned to collect the hottest afternoon sun, or located where it blocks the best garden view. One week of living with the painted outline costs nothing and prevents the most expensive mistake in outdoor design.
The most common mistake in concrete patio design is choosing the finish based on photos rather than lifestyle. Stamped concrete in a stone pattern looks compelling in a magazine but requires annual resealing and can fade and chip over time in freeze-thaw climates. Polished concrete is architectural and refined but becomes dangerously slippery when wet if the wrong sealer is applied. Exposed aggregate is extremely durable and slip-resistant but is difficult to clean and can be uncomfortable barefoot. Match the finish to how the patio will actually be used — a patio that hosts barefoot summer parties needs a textured slip-resistant surface; a covered outdoor room used for dining needs a smooth, easy-to-clean finish.
Three specific items under $50 for immediate concrete patio impact: a bag of concrete stain in warm amber or terracotta ($18–$35) applied to an existing grey patio that transforms the color without any construction; a set of six weatherproof matte black solar stake lights ($20–$40) placed at the patio perimeter that define the space at night; and a 50-pound bag of white pea gravel ($8–$15) spread in a narrow border strip along the patio edge that immediately creates the landscape-to-concrete transition detail that most installed patios lack.
A basic broom-finished concrete patio (200–300 square feet) runs $1,500–$3,500 installed, depending on site access and excavation requirements. A stamped and colored patio of the same size runs $3,000–$7,000. A full outdoor room with integrated fire pit, seating walls, outdoor kitchen, and lighting runs $15,000–$45,000 for a well-specified project. Concrete’s durability advantage compounds over time — a well-poured, properly sealed concrete patio requires no maintenance beyond resealing every 3–5 years and outlasts wood decking, pavers, and tile by decades.
Frequently Asked Questions About Concrete Backyard Patios
What is the best concrete finish for a backyard patio?
The best finish depends entirely on three site-specific factors: climate, use, and aesthetic preference. In freeze-thaw climates (USDA zones 1–6), broom-finished or exposed aggregate concrete is the most durable choice — both finishes are non-slip, tolerate freeze-thaw cycling well, and can be resealed easily. In warm climates, stamped concrete and acid-stained concrete both perform well and offer the widest aesthetic range. For covered outdoor rooms, polished or microtopping-finished concrete provides an interior-quality surface. The universal recommendation is to avoid any finish with a high-gloss sealer — gloss sealers become slippery when wet and show every footprint, leaf stain, and furniture scuff.
How much does a concrete patio cost per square foot?
Installed cost varies significantly by finish type and region. Plain broom-finished concrete: $8–$15 per square foot installed. Stamped and colored concrete: $15–$25 per square foot installed. Exposed aggregate: $12–$18 per square foot installed. Acid-stained concrete: $10–$20 per square foot installed (including prep and sealing). Polished concrete: $15–$30 per square foot installed. These prices include excavation, base preparation, reinforcing, forming, placing, finishing, and sealing but exclude any integrated features such as fire pits, water features, outdoor kitchens, or built-in seating walls, which each add $2,000–$10,000 depending on complexity.
How long does a concrete patio last?
A properly poured, reinforced, and sealed concrete patio has a functional lifespan of 30–50 years in most residential applications — significantly longer than wood decking (15–25 years), pavers (20–30 years), or composite decking (25–30 years). The primary failure modes are cracking (controlled by proper reinforcement, control joints, and base preparation), surface deterioration (controlled by appropriate sealing and resealing every 3–5 years), and freeze-thaw spalling in northern climates (controlled by specifying air-entrained concrete in freeze-thaw zones). A patio that cracks within the first five years almost always reflects a base preparation failure — inadequate compaction or insufficient gravel base — rather than a concrete quality issue.
Can I pour a concrete patio myself?
A DIY concrete patio pour is technically possible for a homeowner with physical fitness, access to a concrete mixer or ready-mix delivery, and experience with tools — but it has a genuinely narrow window for success. Concrete must be placed, leveled, and finished before it begins to set (typically 45–90 minutes in normal temperatures, faster in hot weather), which requires a team of three to four people working efficiently and in coordination. Mistakes made in the placement and finishing stage cannot be undone after the concrete begins to set. For a patio under 200 square feet, a competent homeowner team can succeed with thorough preparation. For larger patios, any stamped or decorative finish, or any integrated feature such as a fire pit or drainage channel, professional installation is consistently the better investment.
How do I stop my concrete patio from cracking?
Cracking in concrete is normal and expected — the question is whether cracks are controlled (occurring at planned saw-cut locations, invisible or minimal) or uncontrolled (random cracks across the slab). Controlled cracking requires four things: a properly compacted granular base (minimum 4 inches of compacted gravel), adequate reinforcement (fiber mesh or #3 rebar at 18-inch centers), correct control joint spacing (no more than 2.5 times the slab thickness in feet — a 4-inch slab needs joints every 10 feet), and a consistent concrete mix design with a water-to-cement ratio below 0.50. The single most common cause of uncontrolled patio cracking in residential projects is a poorly compacted or inadequate base — the concrete has no stable substrate and flexes under load, cracking unpredictably.
Ready to Create Your Dream Concrete Backyard Patio?
These 27 designs have covered the complete range of what concrete can do outdoors — from the honest simplicity of a broom-finished slab to the architectural complexity of board-formed walls, integrated water features, and outdoor kitchens — along with the finish details, layout strategies, lighting approaches, and small-space techniques that transform a poured slab into a considered outdoor room. The most important thing to understand about a concrete patio is that the material rewards the investment of design thinking before the pour more than any other outdoor surface — decisions about layout, finish, control joints, and integrated elements cannot be revisited after the concrete sets. Start today by drawing your patio’s ideal shape on paper, then painting it on the ground with marking spray, and spending a week learning what the afternoon light does to it. Save the ideas from this list that match your site, your climate, and your actual outdoor life — and build the version that was designed for you rather than the version that looked best in a photograph.